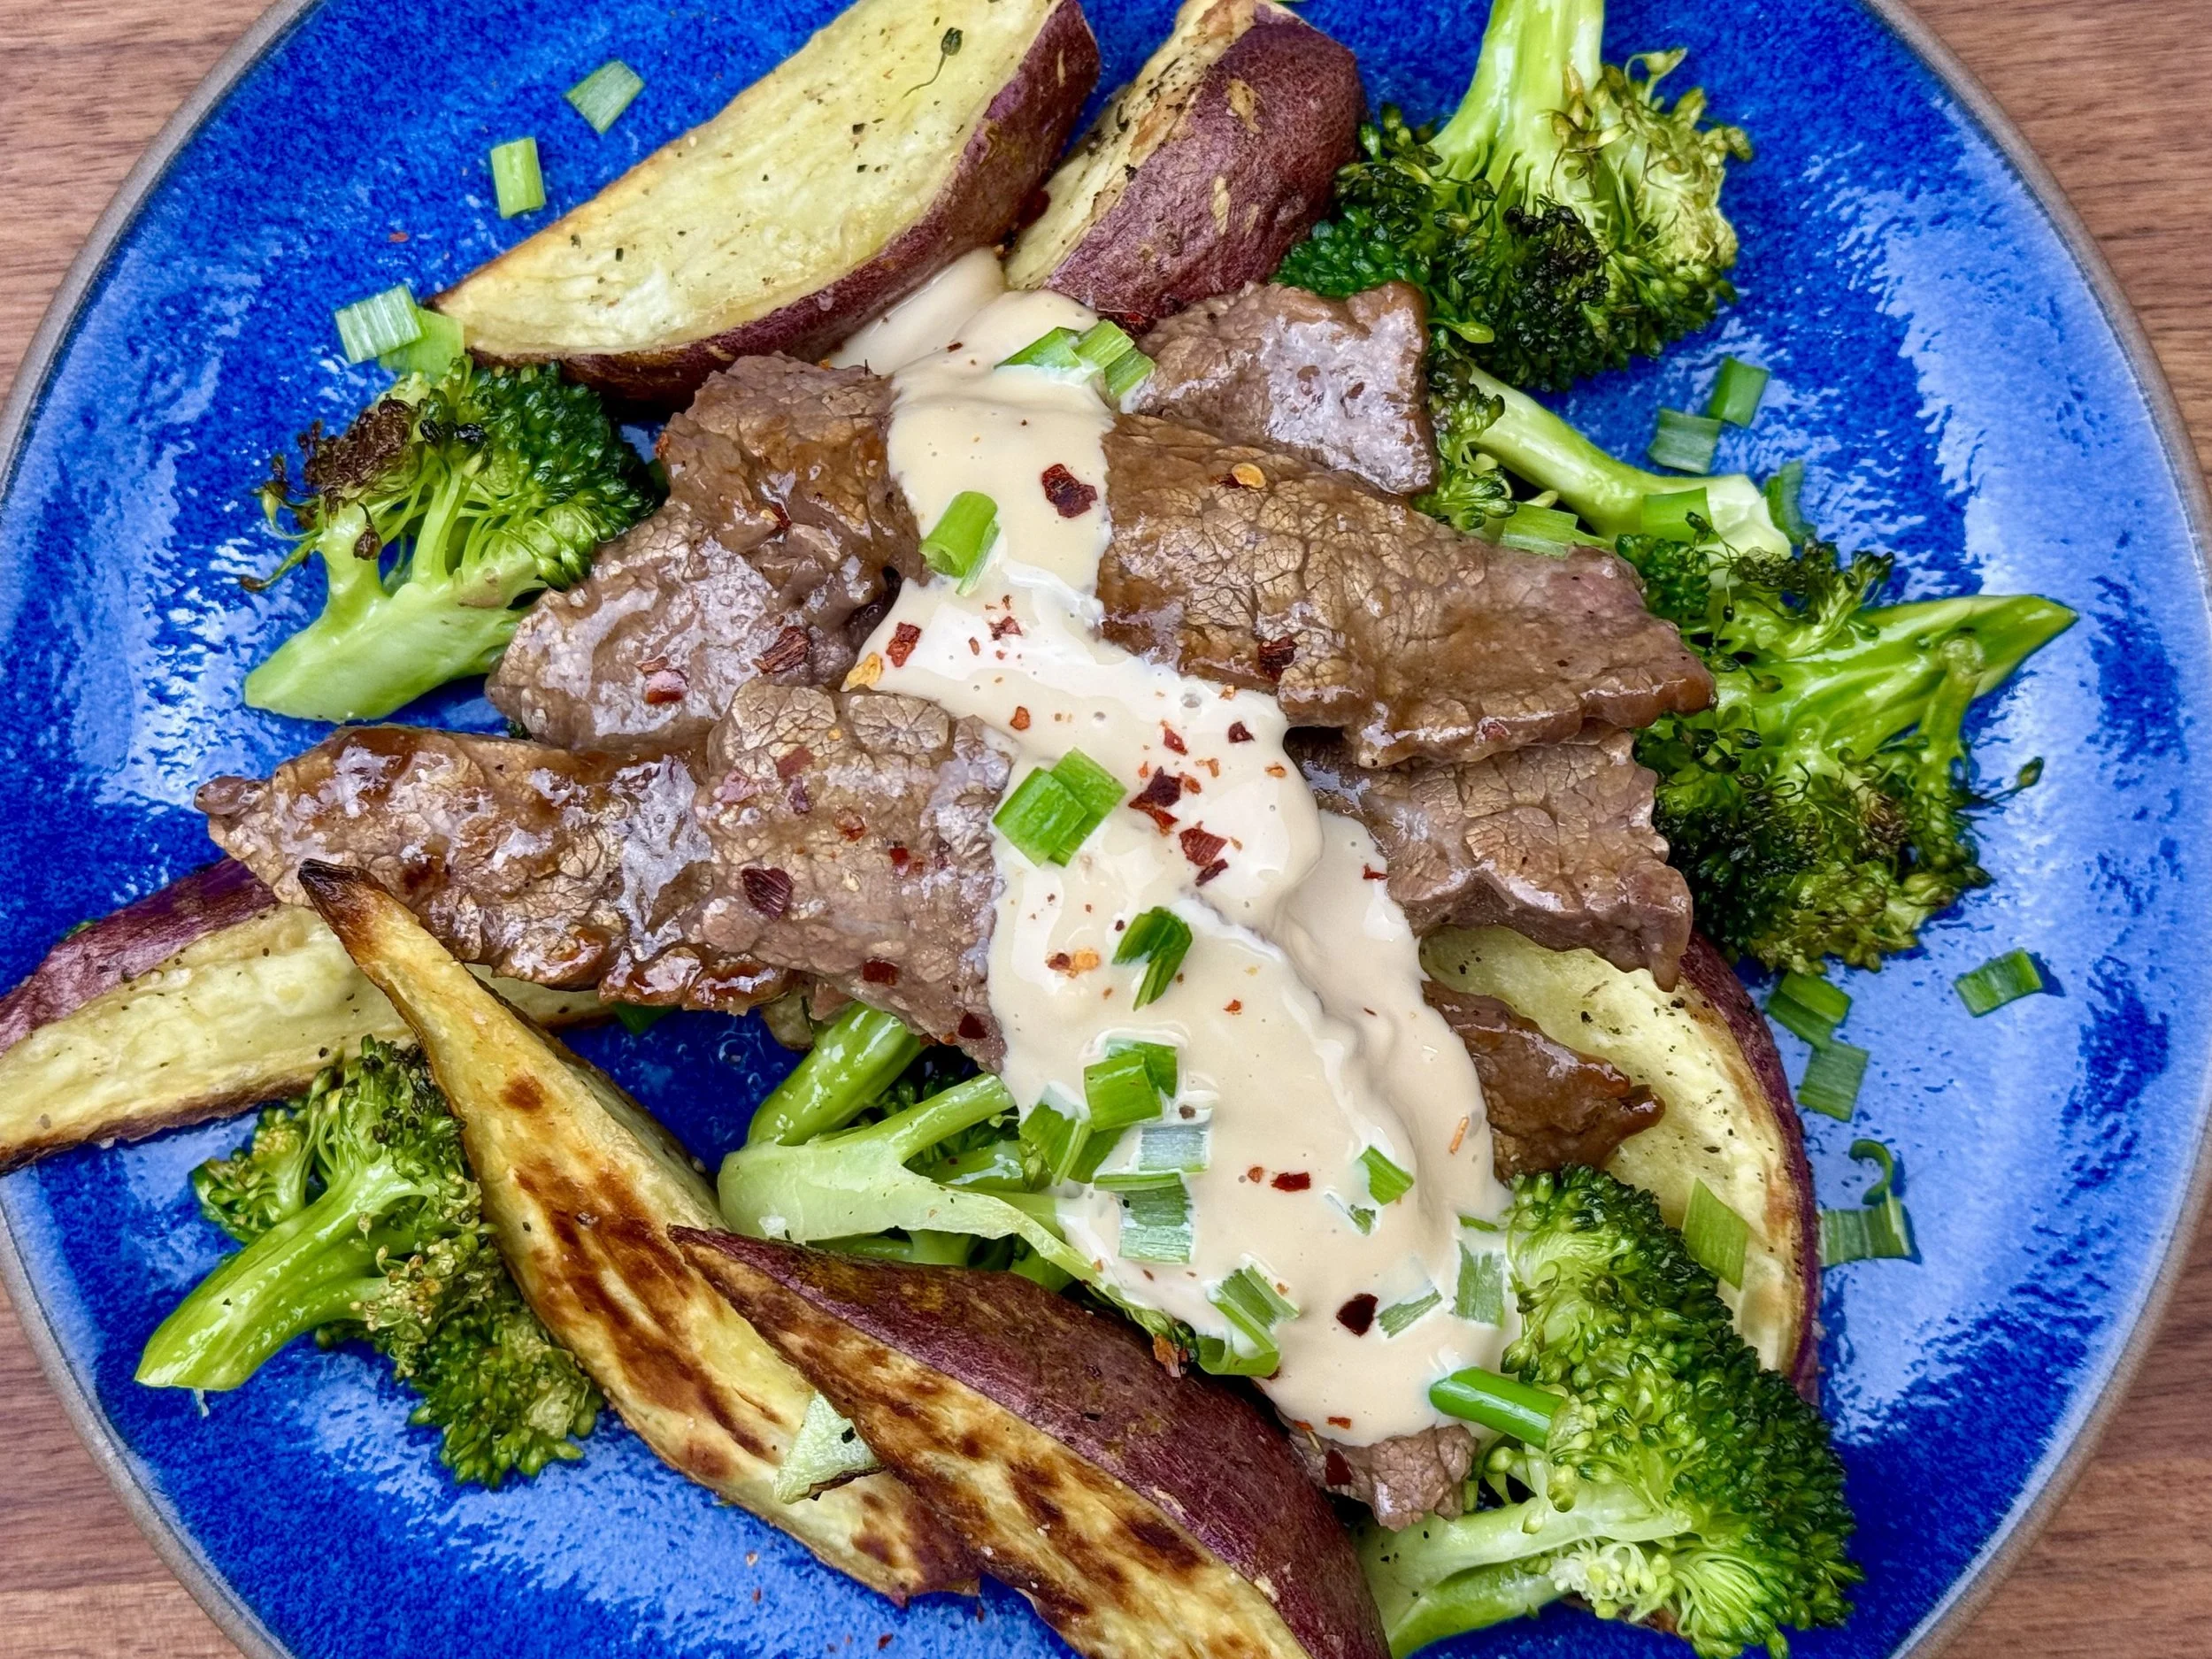
Deliciously Low FODMAP

Inspire yourself with hundreds of delicious low FODMAP recipes, tips, and tools, and enjoy the abundance that is yours even when you have IBS.
Use the buttons and filters to find something specific or browse the complete collection for inspiration.
Discover a treasure trove of recipes with my FREE recipe club! Get new ideas delivered straight to your inbox every week.
Deliciously Low FODMAP is a trademark of IBS Game Changer, LLC
Filter to find Recipes and Tools
More Filtering Options
- All 827
- Appetizer 56
- BBQ 49
- Bowl 32
- Breakfast 69
- Cocktails 13
- Collection 1 58
- Collection 10 27
- Collection 11 30
- Collection 12 27
- Collection 13 31
- Collection 14 29
- Collection 15 31
- Collection 16 34
- Collection 17 31
- Collection 18 33
- Collection 19 36
- Collection 2 32
- Collection 20 33
- Collection 21 33
- Collection 22 40
- Collection 23 63
- Collection 24 46
- Collection 3 28
- Collection 4 29
- Collection 5 30
- Collection 6 32
- Collection 7 31
- Collection 8 31
- Collection 9 32
- Condiments 6
- Crock Pot 4
- Dessert 119
- Diabetes Game Changer Exception Protocol Contains Alcohol 11
- Diabetes Game Changer Exception Protocol Contains Flour 113
- Diabetes Game Changer Exception Protocol Contains Flour AND Sugar 79
- Diabetes Game Changer Exception Protocol Contains Sugar 52
- Diabetes Game Changer First Four Weeks 405
- Dinner 371
- Drink 8
- Easter 1
- Free Guide 17
- Gluten-free 686
- Gut Microbiome 2
- Guthealth 3
- Holidays 73
- IBS Triggers 4
- Keto Friendly 178
- Lactose-Free 184
- Low Carb 22
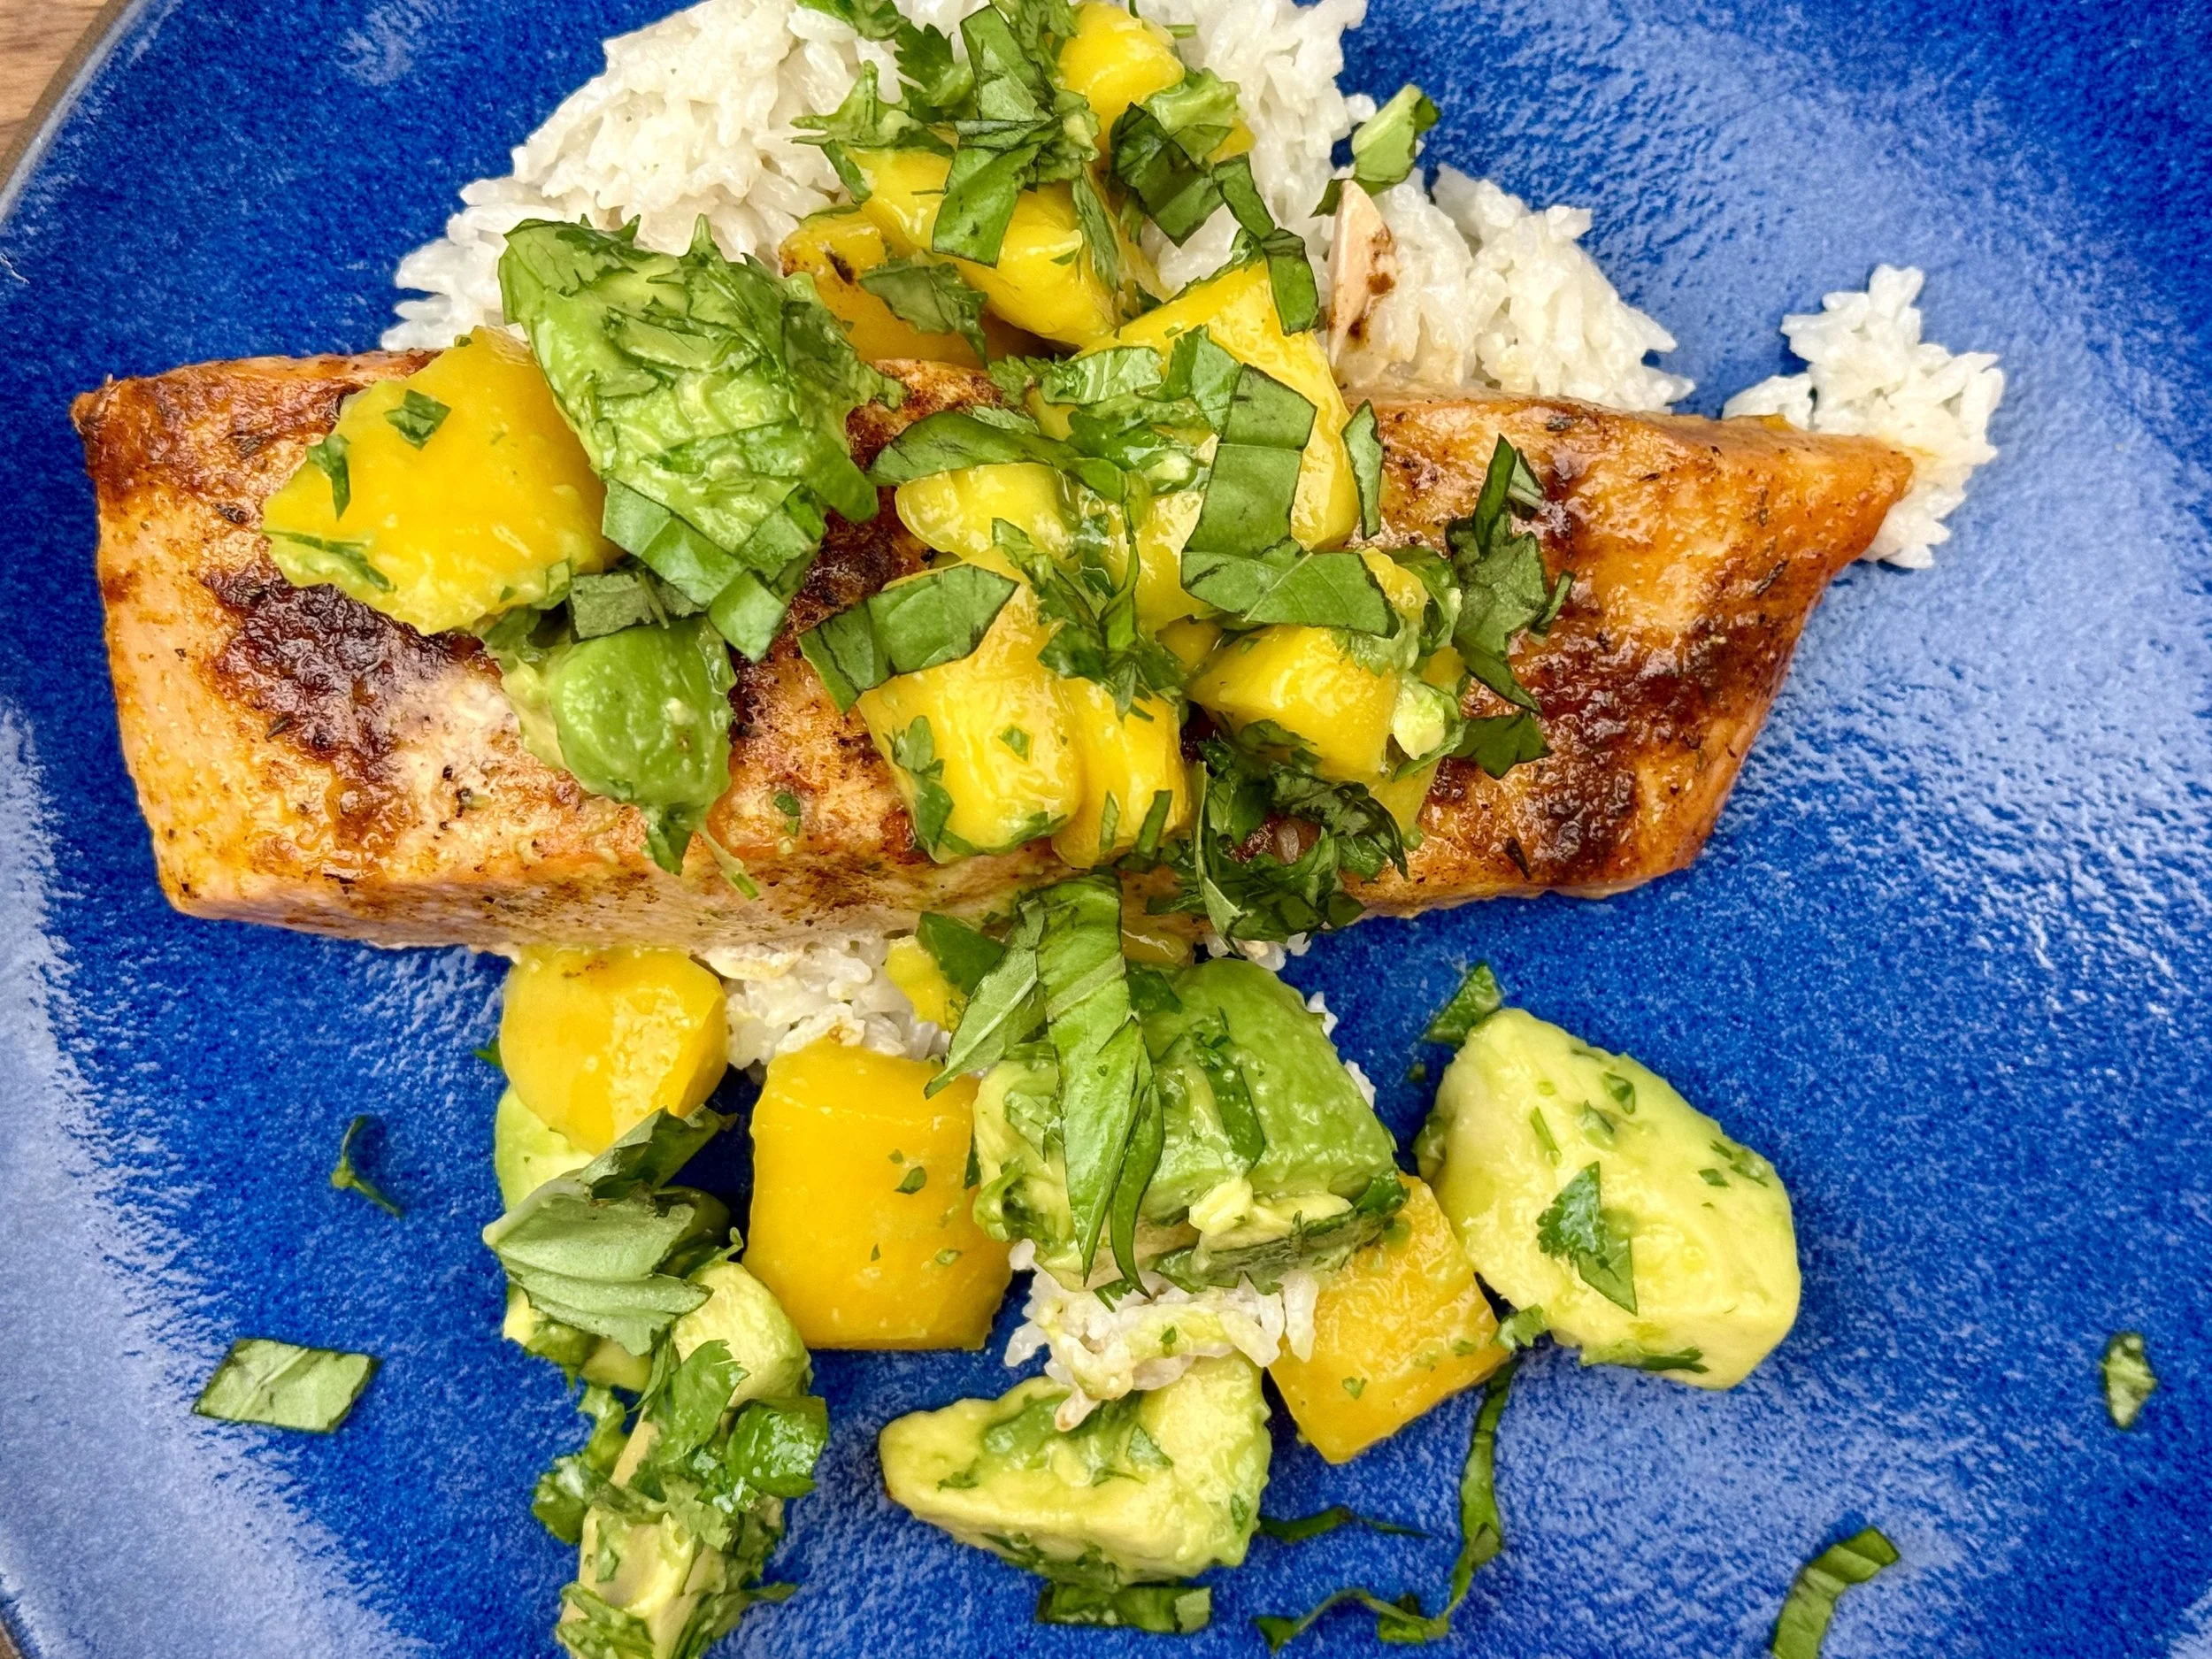
One Pan Coconut Butter Salmon (Low FODMAP)
15 Minutes prep • 15 Minutes cook • Low FODMAP • Gluten-Free • Serves 5
15 Minutes prep • 15 Minutes cook • Low FODMAP • Gluten-Free • Serves 5
This salmon is the weeknight dinner you didn't know you needed. A rich coconut milk sauce spiked with warming ginger, cumin, and paprika wraps around perfectly seared filets, while a hit of lime and fresh basil keeps everything feeling light and fresh. And that avocado mango salsa on top? It's the kind of colorful, fruity finish that makes this dish look like it came from a restaurant — not your stovetop. One pan, five salmon filets, zero gut regrets.
See this new recipe in my FREE recipe club.
To streamline your search through hundreds of existing recipes, I'm moving the release of my new weekly creations to the Recipe Club on Patreon. In the club, you’ll get access to a treasure trove of low-FODMAP goodness, complete with collections and filters to use as your virtual cookbook!
Here's what awaits you in the club:
Exclusive weekly recipes: Be the first to try my latest delicious low-FODMAP creations!
Simple & Easy: My recipes continue to focus on readily available ingredients and effortless preparation, perfect for family-friendly meals (no more separate low-FODMAP meal prep!).
Hundreds of existing recipes: Gain access to my entire library of low-FODMAP recipes, all conveniently organized.
You can join for free or sign up for only $5/month. Your support fuels my passion for creating new, delicious, and easy-to-make low-FODMAP recipes just for you.
Let's go on this delicious low-FODMAP journey together.
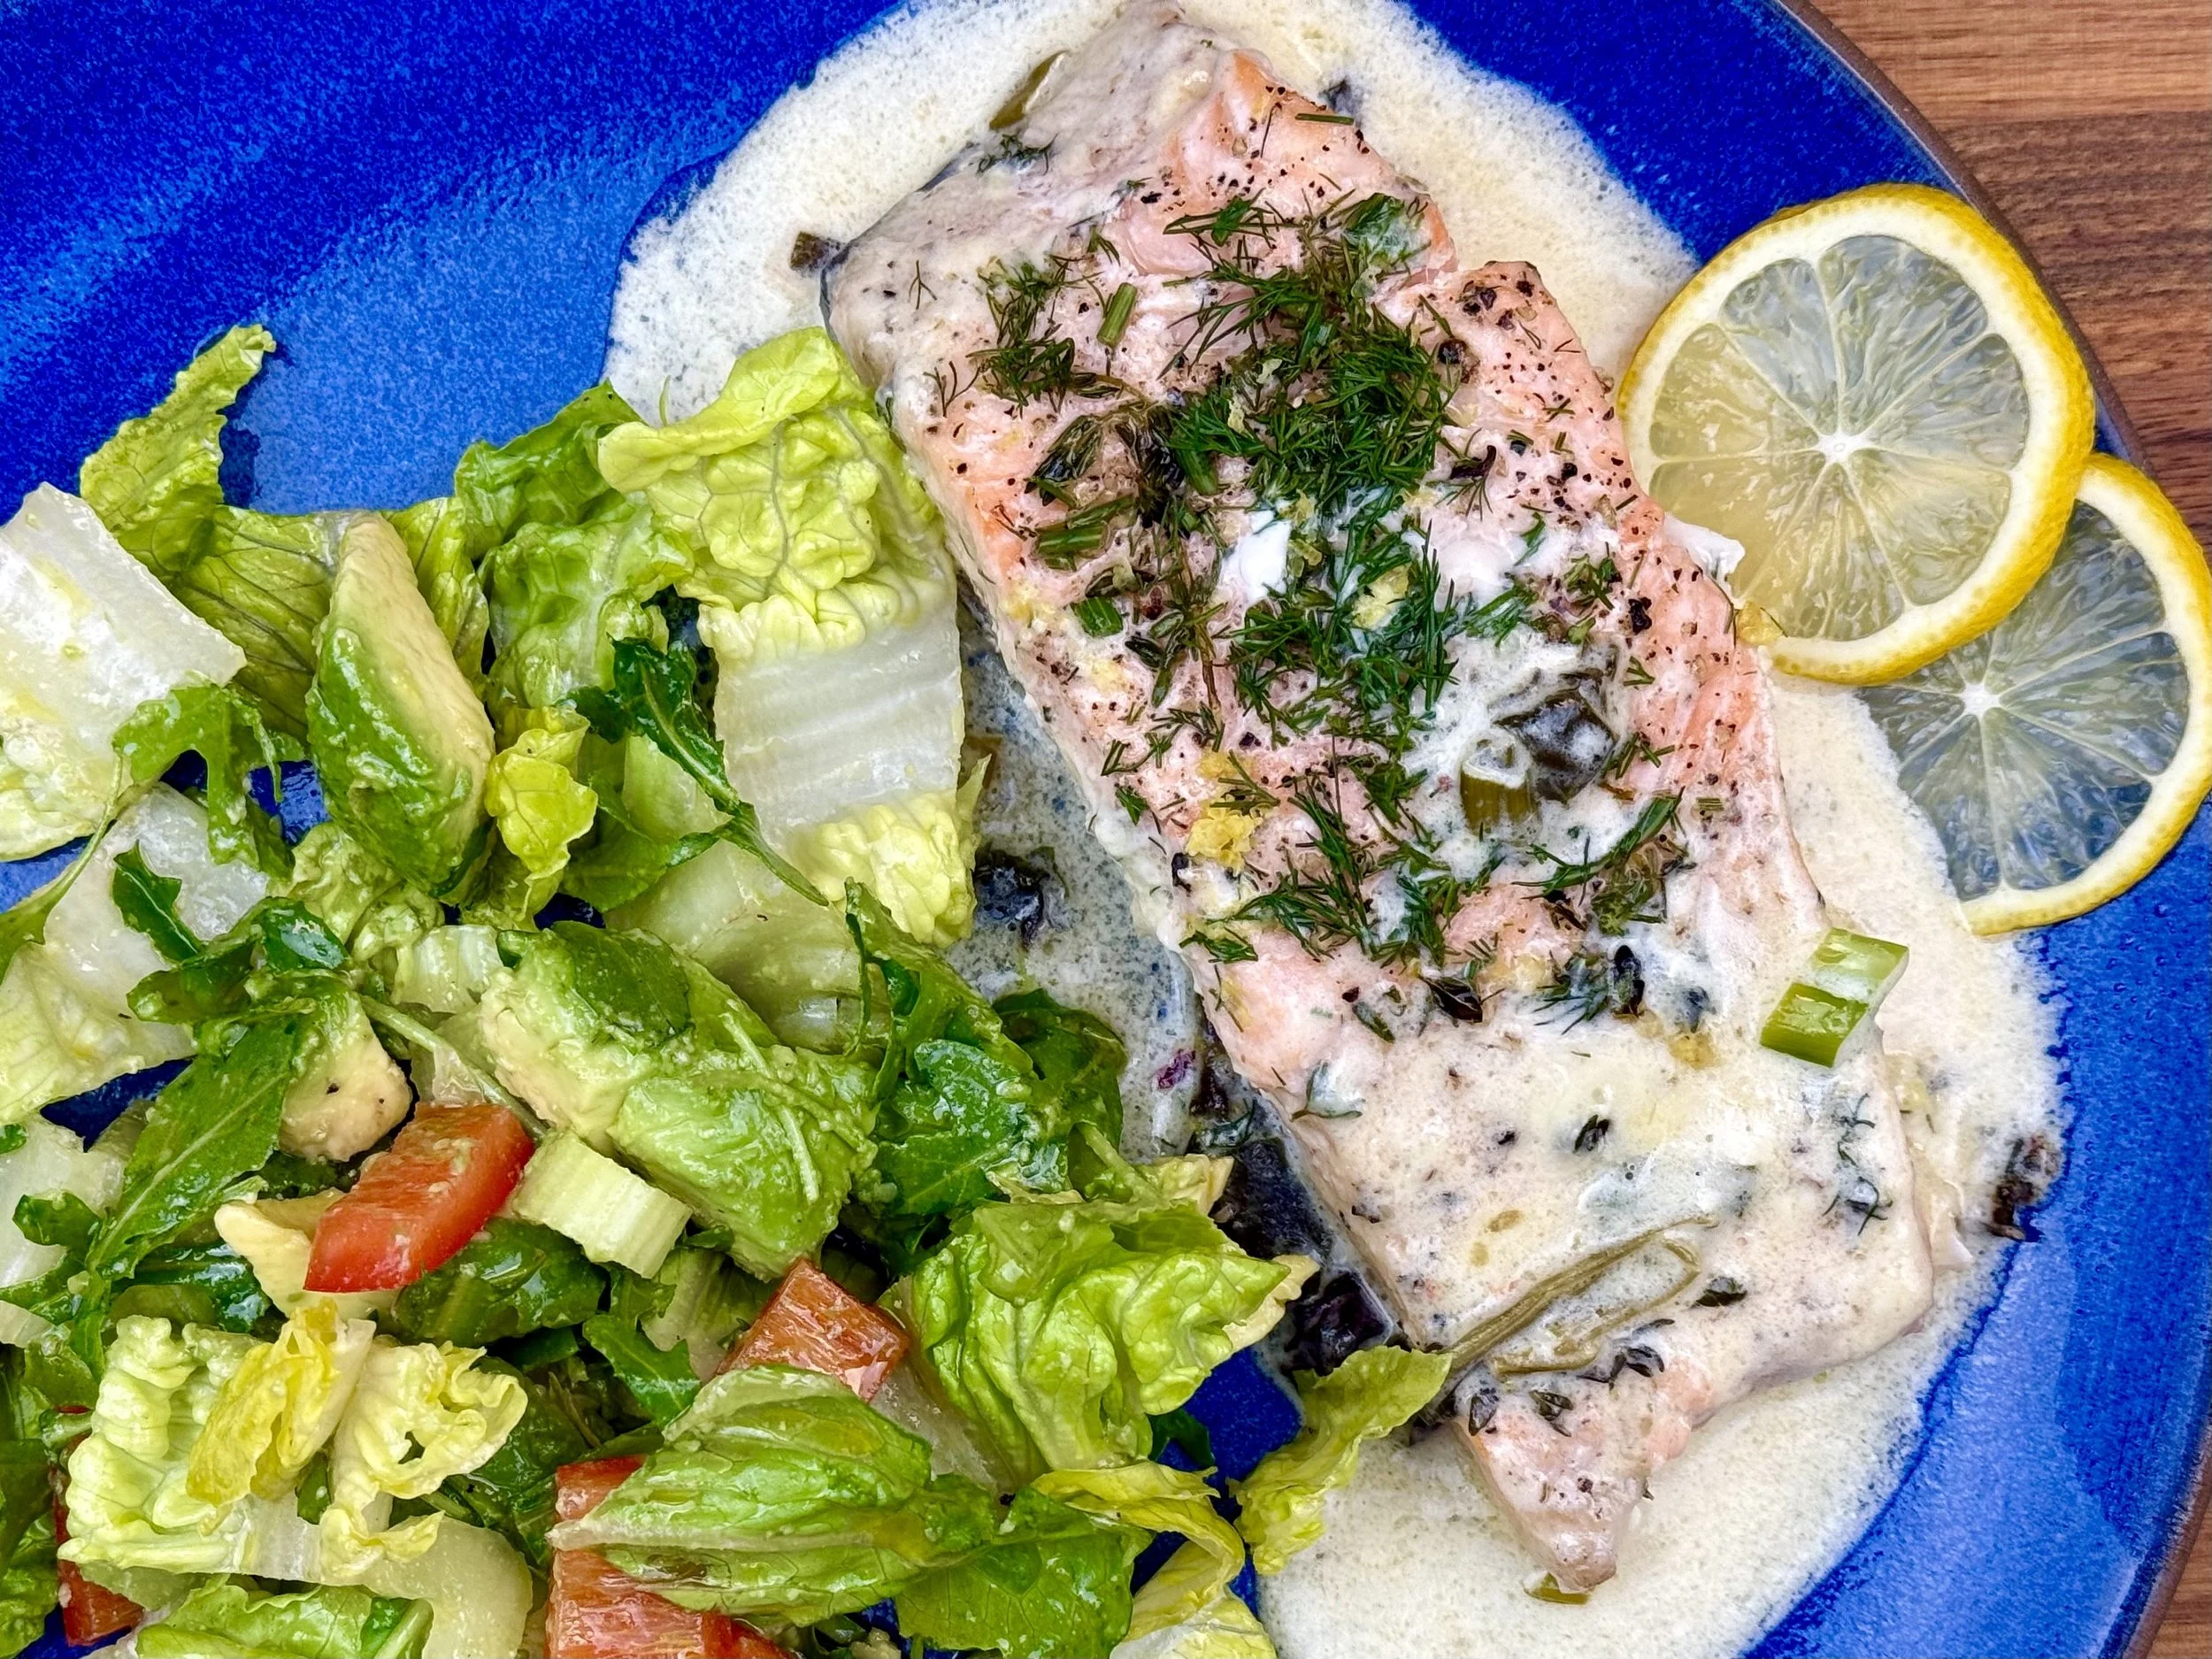
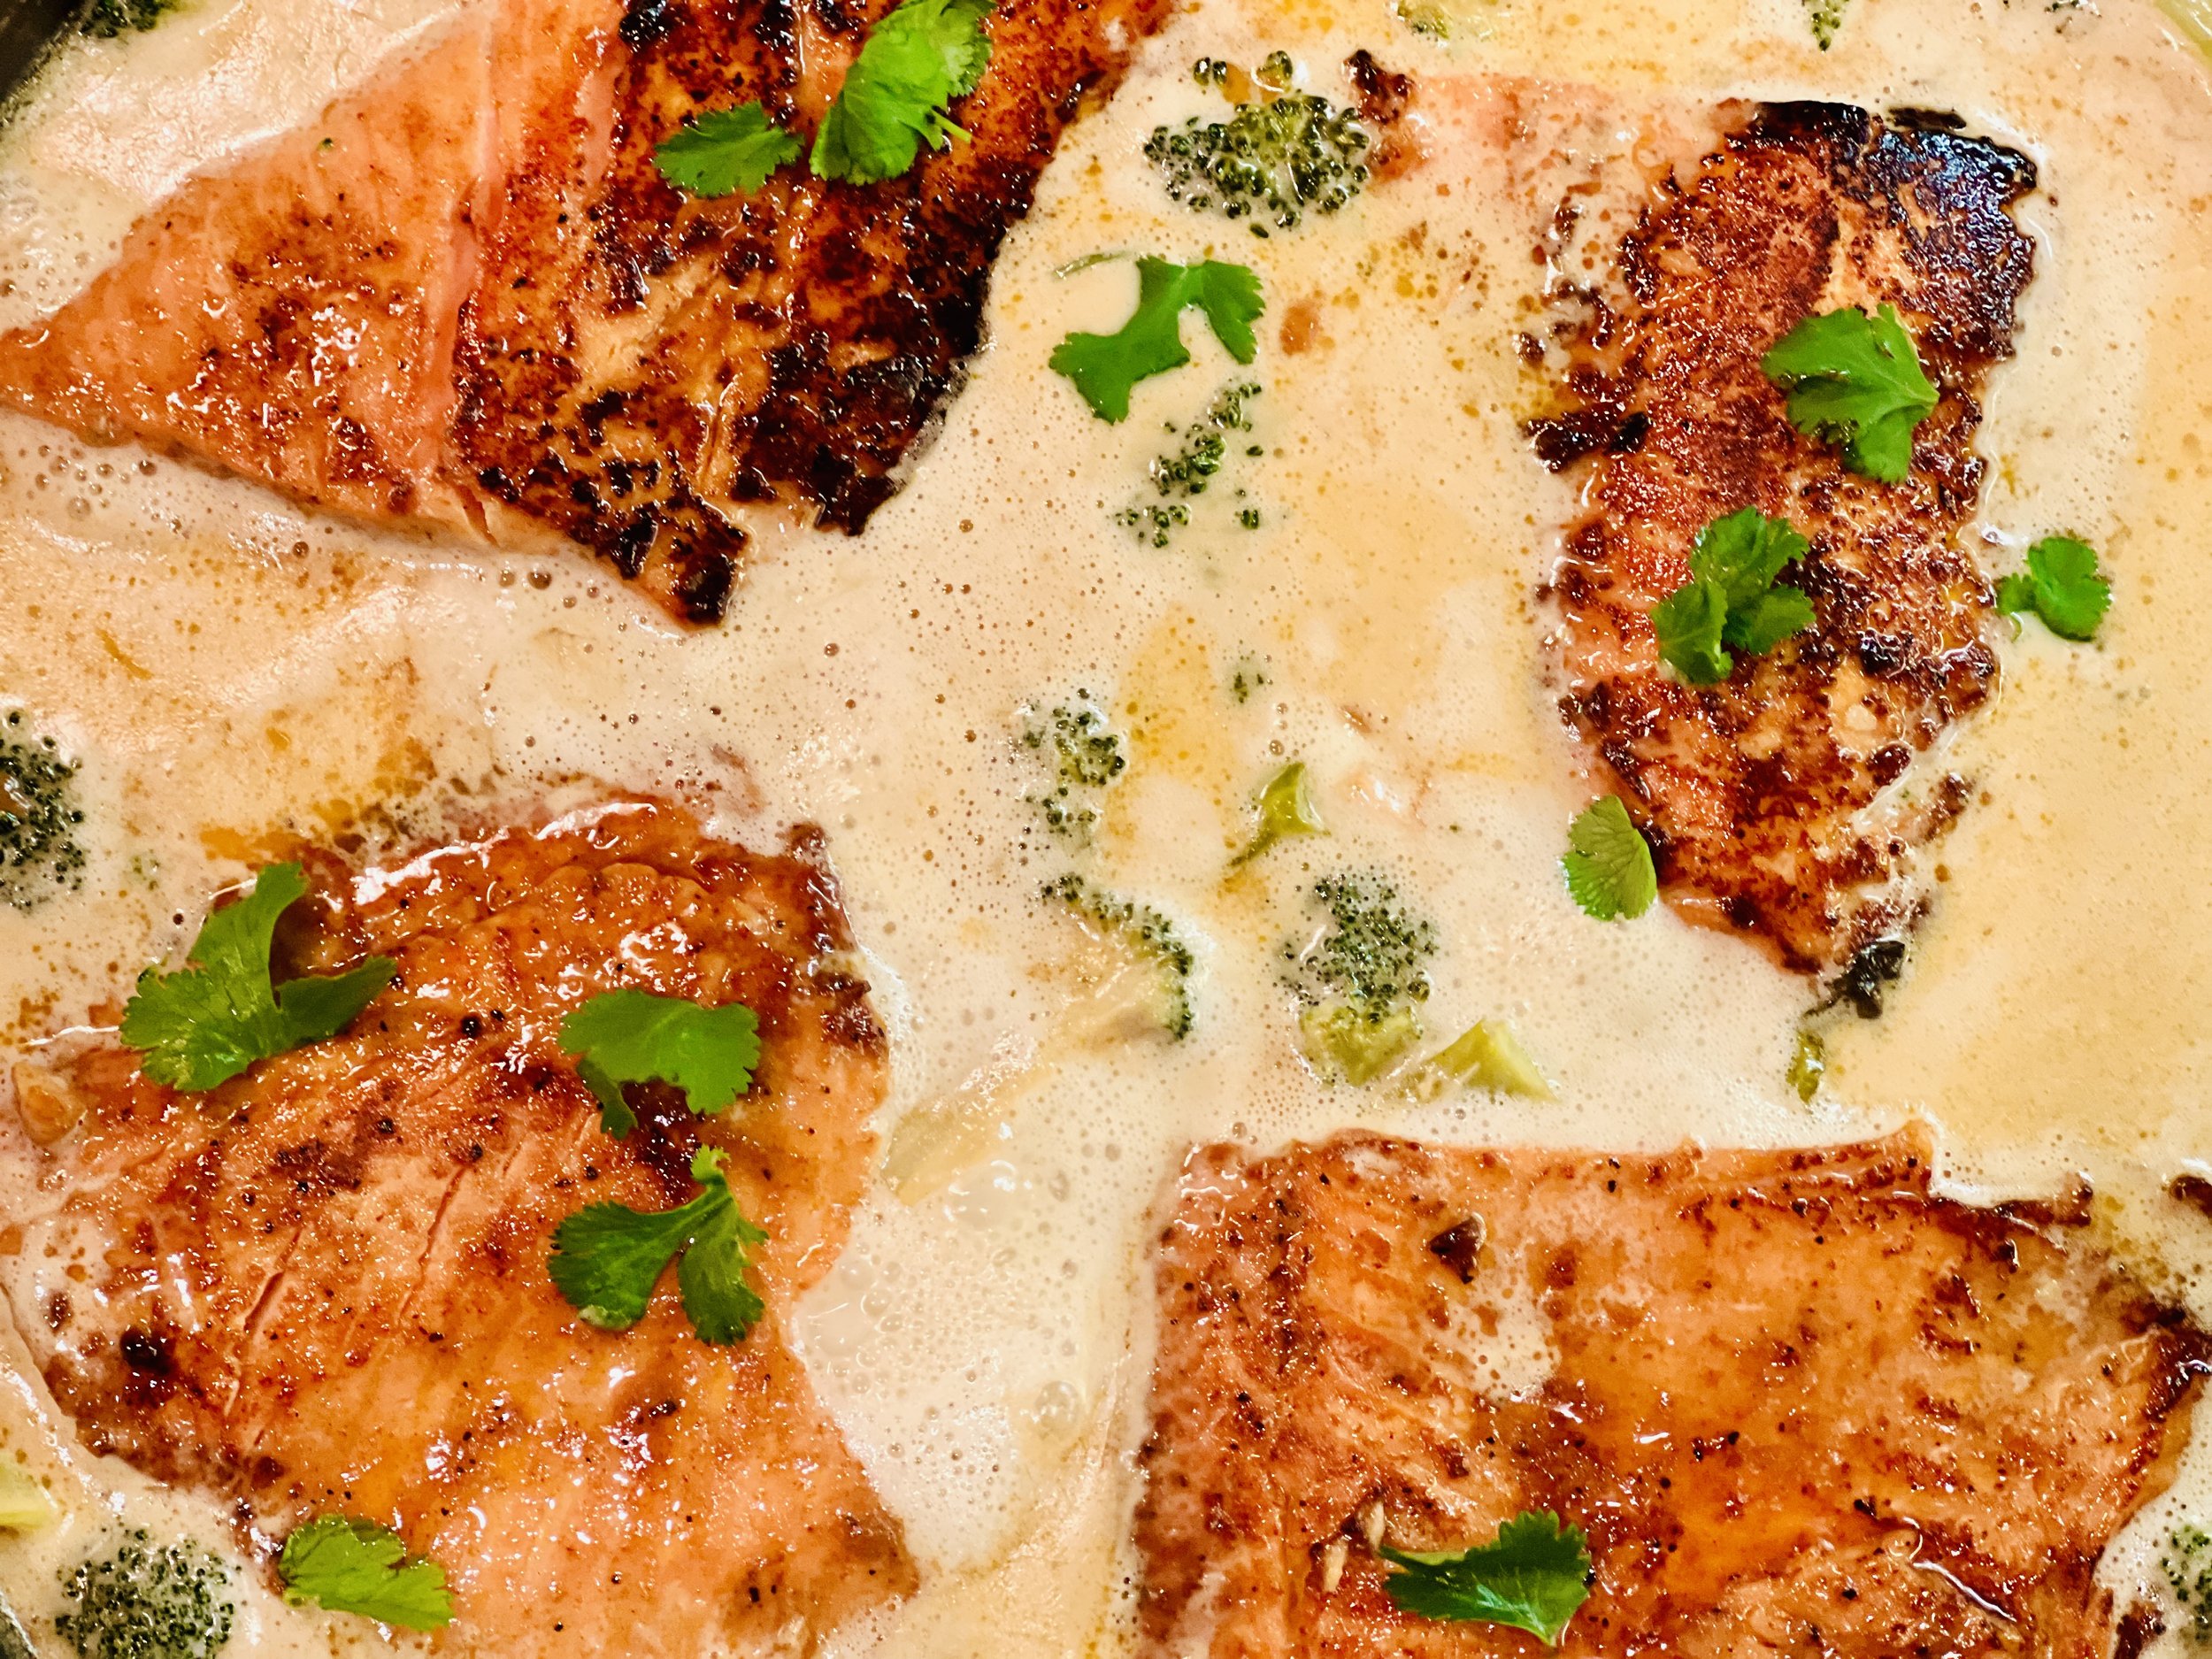
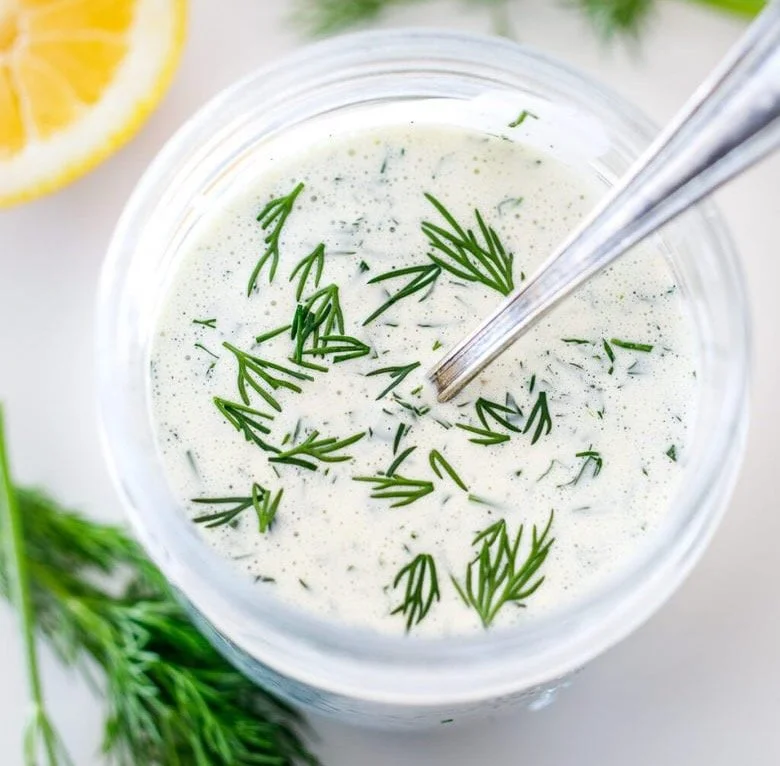
One Pan Creamy Baked Salmon with Dill (Low FODMAP)
15 Minutes prep • 20 Minutes cook • Low FODMAP • Gluten-Free • Serves 4
15 Minutes prep • 20 Minutes cook • Low FODMAP • Gluten-Free • Serves 4 • Ok to make-ahead: Steps 1 - 4
Some nights you want something that feels a little fancy without the fuss. This is that recipe. The secret is broiling the salmon first with butter and thyme until the edges are perfectly crisp, then finishing it in a silky Parmesan cream sauce with spinach, lemon, and fresh dill. Rich, bright, and deeply satisfying — and it all comes together in one skillet in about thirty minutes. Elegant enough for company. Easy enough for a Tuesday.
See this new recipe in my FREE recipe club.
To streamline your search through hundreds of existing recipes, I'm moving the release of my new weekly creations to the Recipe Club on Patreon. In the club, you’ll get access to a treasure trove of low-FODMAP goodness, complete with collections and filters to use as your virtual cookbook!
Here's what awaits you in the club:
Exclusive weekly recipes: Be the first to try my latest delicious low-FODMAP creations!
Simple & Easy: My recipes continue to focus on readily available ingredients and effortless preparation, perfect for family-friendly meals (no more separate low-FODMAP meal prep!).
Hundreds of existing recipes: Gain access to my entire library of low-FODMAP recipes, all conveniently organized.
You can join for free or sign up for only $5/month. Your support fuels my passion for creating new, delicious, and easy-to-make low-FODMAP recipes just for you.
Let's go on this delicious low-FODMAP journey together.
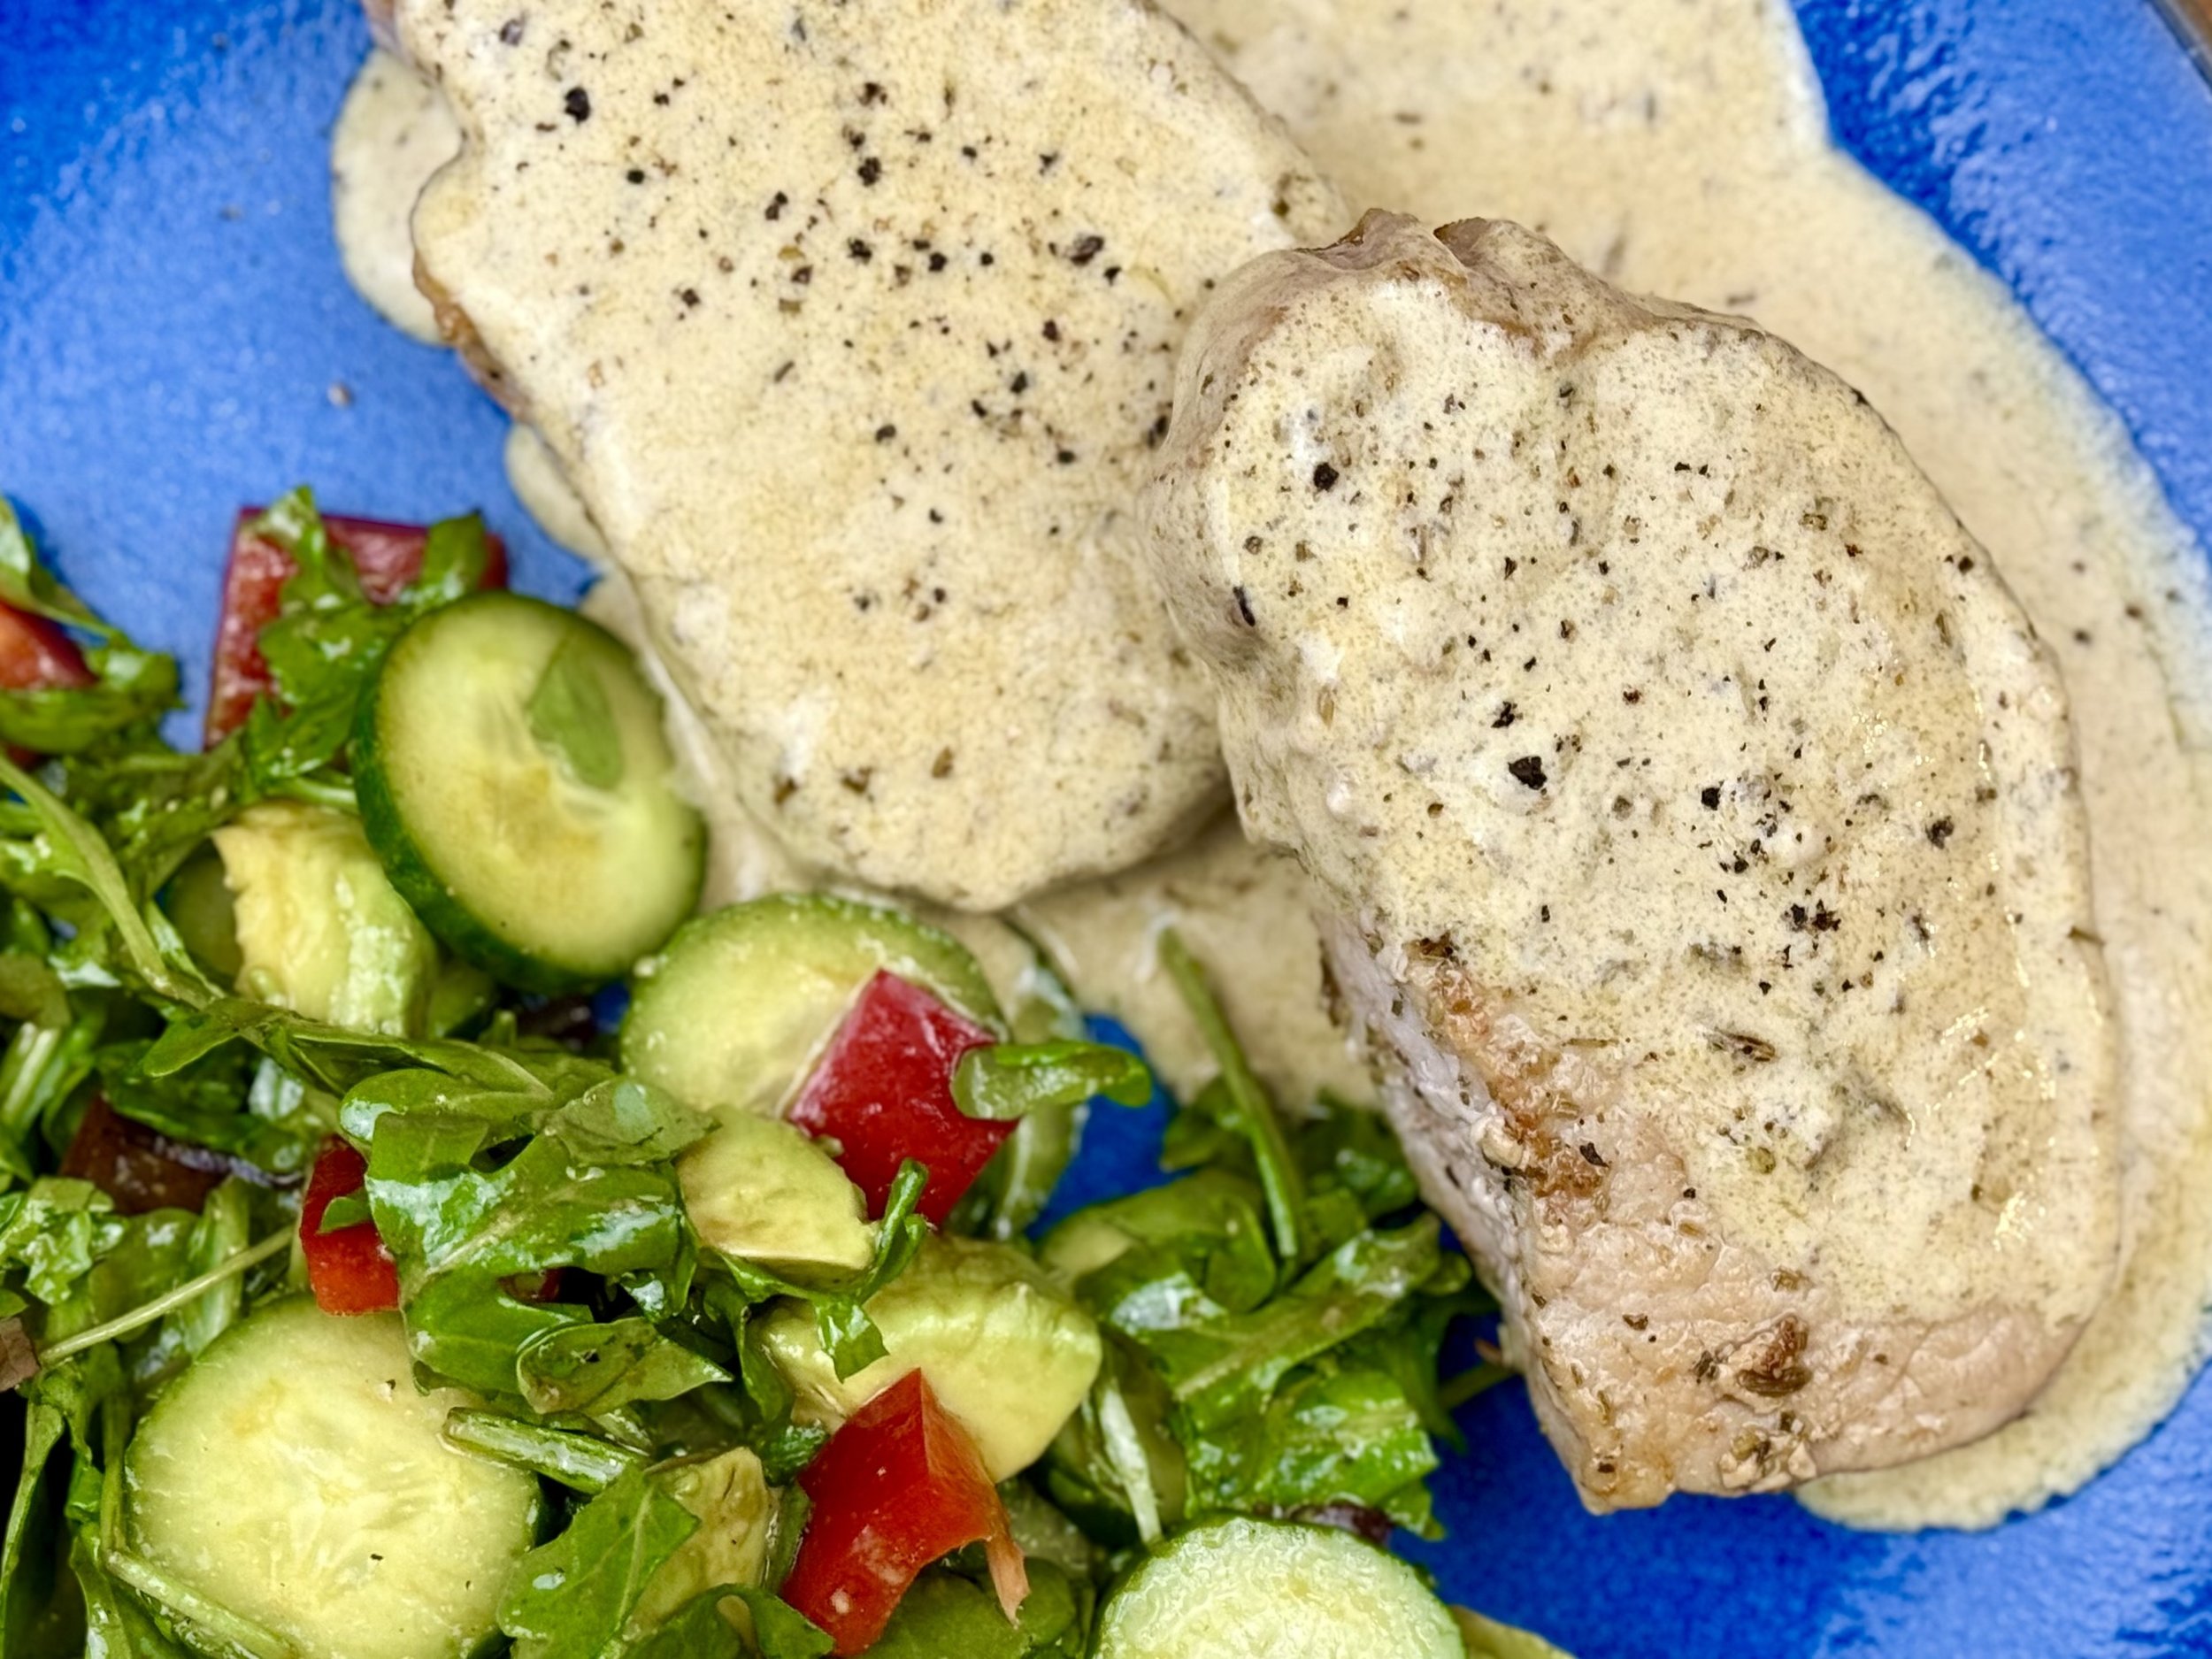
Easy Porchetta Style Pork Chops with Rosemary Cream (Low FODMAP)
5 Minutes prep • 20 Minutes cook • Low FODMAP • Gluten-Free • Serves 4
5 Minutes prep • 20 Minutes cook • Low FODMAP • Gluten-Free • Serves 4 • Ok to make-ahead: Step 1
Missing the flavors of Italian porchetta but can't handle all that garlic and onion? These pork chops deliver all those gorgeous herb-forward, fennel-kissed flavors without any of the FODMAP drama. Thick, juicy bone-in pork chops get rubbed with classic porchetta seasonings - rosemary, fennel, and red pepper flakes - then finished with a luxurious cream sauce that tastes like you've been simmering it for hours.This is the kind of dinner that makes you forget you're following any dietary restrictions at all.
See this new recipe in my FREE recipe club.
To streamline your search through hundreds of existing recipes, I'm moving the release of my new weekly creations to the Recipe Club on Patreon. In the club, you’ll get access to a treasure trove of low-FODMAP goodness, complete with collections and filters to use as your virtual cookbook!
Here's what awaits you in the club:
Exclusive weekly recipes: Be the first to try my latest delicious low-FODMAP creations!
Simple & Easy: My recipes continue to focus on readily available ingredients and effortless preparation, perfect for family-friendly meals (no more separate low-FODMAP meal prep!).
Hundreds of existing recipes: Gain access to my entire library of low-FODMAP recipes, all conveniently organized.
You can join for free or sign up for only $5/month. Your support fuels my passion for creating new, delicious, and easy-to-make low-FODMAP recipes just for you.
Let's go on this delicious low-FODMAP journey together.
Roasted Salmon with Lemony Horseradish Cream (Low FODMAP)
5 Minutes prep • 20 Minutes cook • Low FODMAP • Gluten-Free • Serves 2 - 4
5 Minutes prep • 20 Minutes cook • Low FODMAP • Gluten-Free • Serves 2 - 4 • Ok to make-ahead: Steps 1 - 4
When you need a weeknight dinner that feels restaurant-quality, but won't leave you standing over the stove for hours, this sheet pan salmon is your answer. The secret to perfectly moist, flavorful salmon is roasting it at high heat for just a short time - no complicated techniques required. The horseradish mayo adds a tangy, creamy kick that cuts through the richness of the salmon beautifully, while fresh lemon brightens everything up. This is the kind of meal that looks impressive enough for guests but is actually easier than ordering takeout. Plus, cleanup is a breeze with everything cooking in one pan on foil.
See this new recipe in my FREE recipe club.
To streamline your search through hundreds of existing recipes, I'm moving the release of my new weekly creations to the Recipe Club on Patreon. In the club, you’ll get access to a treasure trove of low-FODMAP goodness, complete with collections and filters to use as your virtual cookbook!
Here's what awaits you in the club:
Exclusive weekly recipes: Be the first to try my latest delicious low-FODMAP creations!
Simple & Easy: My recipes continue to focus on readily available ingredients and effortless preparation, perfect for family-friendly meals (no more separate low-FODMAP meal prep!).
Hundreds of existing recipes: Gain access to my entire library of low-FODMAP recipes, all conveniently organized.
You can join for free or sign up for only $5/month. Your support fuels my passion for creating new, delicious, and easy-to-make low-FODMAP recipes just for you.
Let's go on this delicious low-FODMAP journey together.
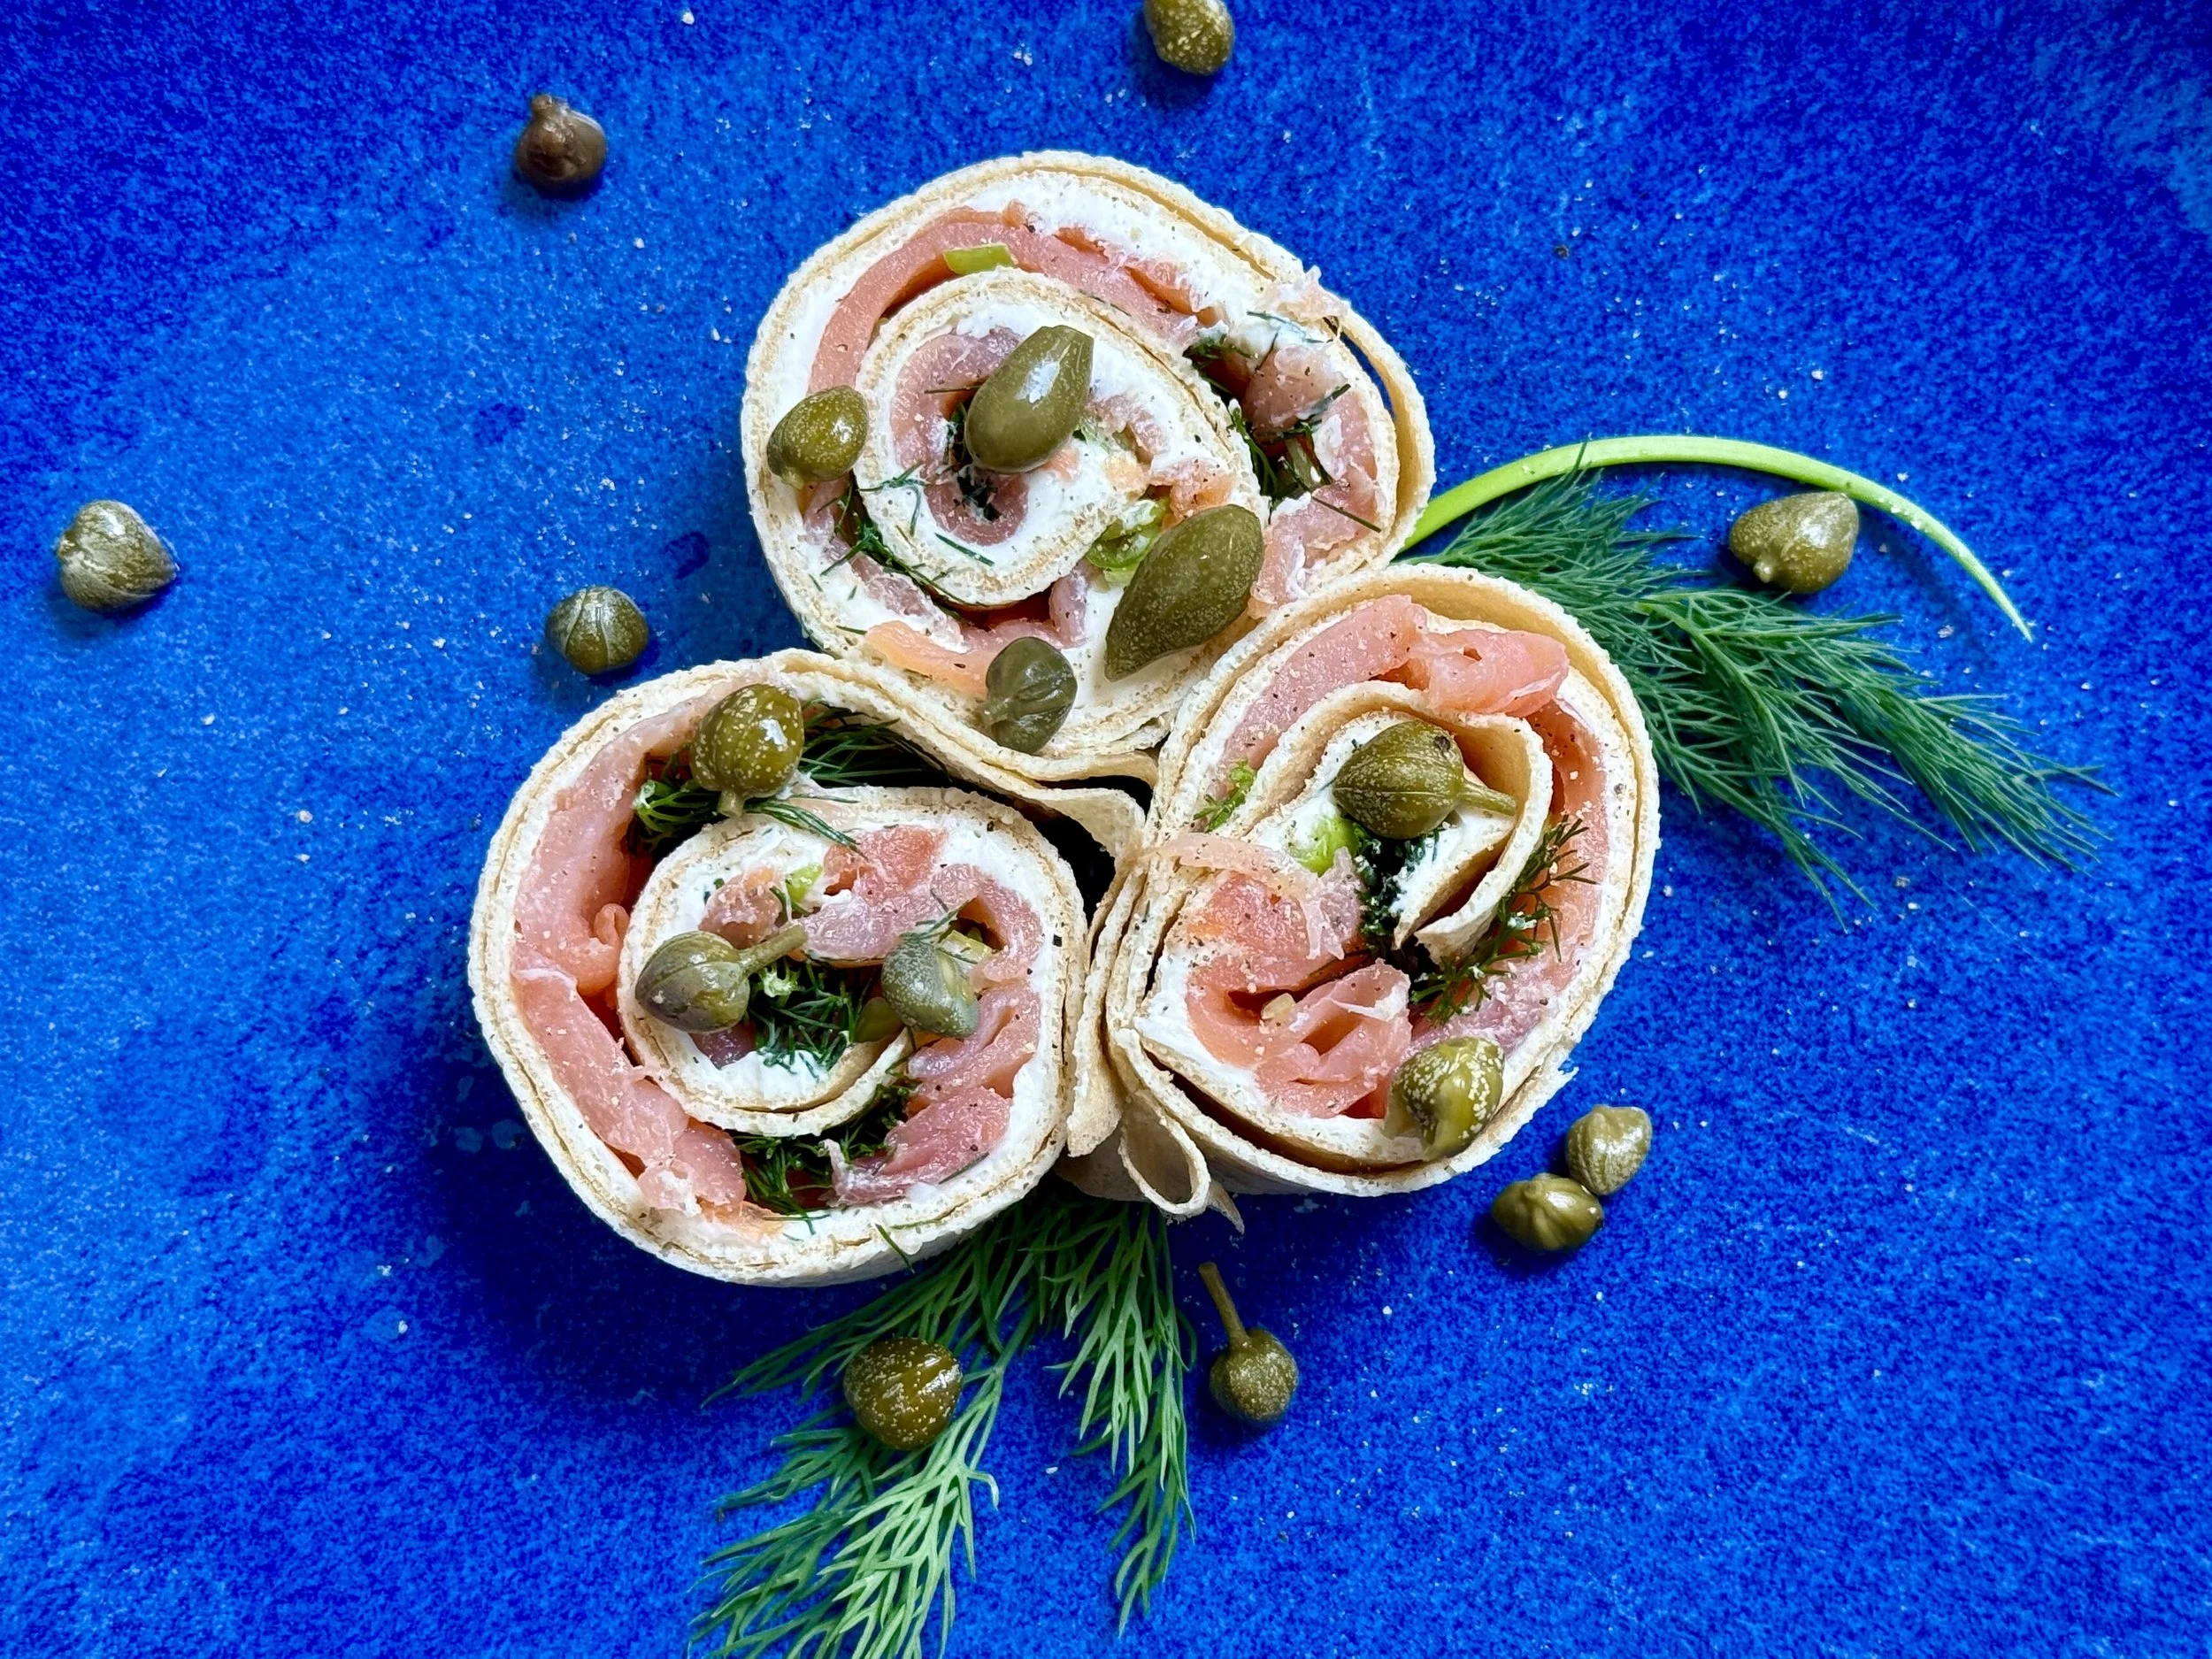
Cream Cheese and Lox - Everything but the Bagel! (Low FODMAP)
10 Minutes prep • Makes 2 • Low FODMAP • Gluten-Free • Serves 1 - 2
10 Minutes prep • Makes 2 • Low FODMAP • Gluten-Free • Serves 1 - 2
Missing your favorite Sunday bagel and lox situation? This brilliant low FODMAP workaround gives you all those classic flavors - silky smoked salmon, tangy cream cheese, briny capers, fresh dill, and the green parts of green onions - wrapped up in a protein-packed egg wrap instead of a bagel. It's everything but the bagel, literally!
The egg wrap is surprisingly sturdy and adds its own subtle richness without competing with those bold, classic flavors we all crave. Roll it up, slice it into pinwheels if you're feeling fancy, or just fold it in half and devour it whole. Either way, you're getting that satisfying brunch experience without the gluten or the digestive aftermath.
IBS-friendly brunch win: All the flavor, none of the FODMAP load. Plus, it's naturally gluten-free and keeps you full for hours thanks to all that protein.
Time to bring back brunch...
See this new recipe in my FREE recipe club.
To streamline your search through hundreds of existing recipes, I'm moving the release of my new weekly creations to the Recipe Club on Patreon. In the club, you’ll get access to a treasure trove of low-FODMAP goodness, complete with collections and filters to use as your virtual cookbook!
Here's what awaits you in the club:
Exclusive weekly recipes: Be the first to try my latest delicious low-FODMAP creations!
Simple & Easy: My recipes continue to focus on readily available ingredients and effortless preparation, perfect for family-friendly meals (no more separate low-FODMAP meal prep!).
Hundreds of existing recipes: Gain access to my entire library of low-FODMAP recipes, all conveniently organized.
You can join for free or sign up for only $5/month. Your support fuels my passion for creating new, delicious, and easy-to-make low-FODMAP recipes just for you.
Let's go on this delicious low-FODMAP journey together.
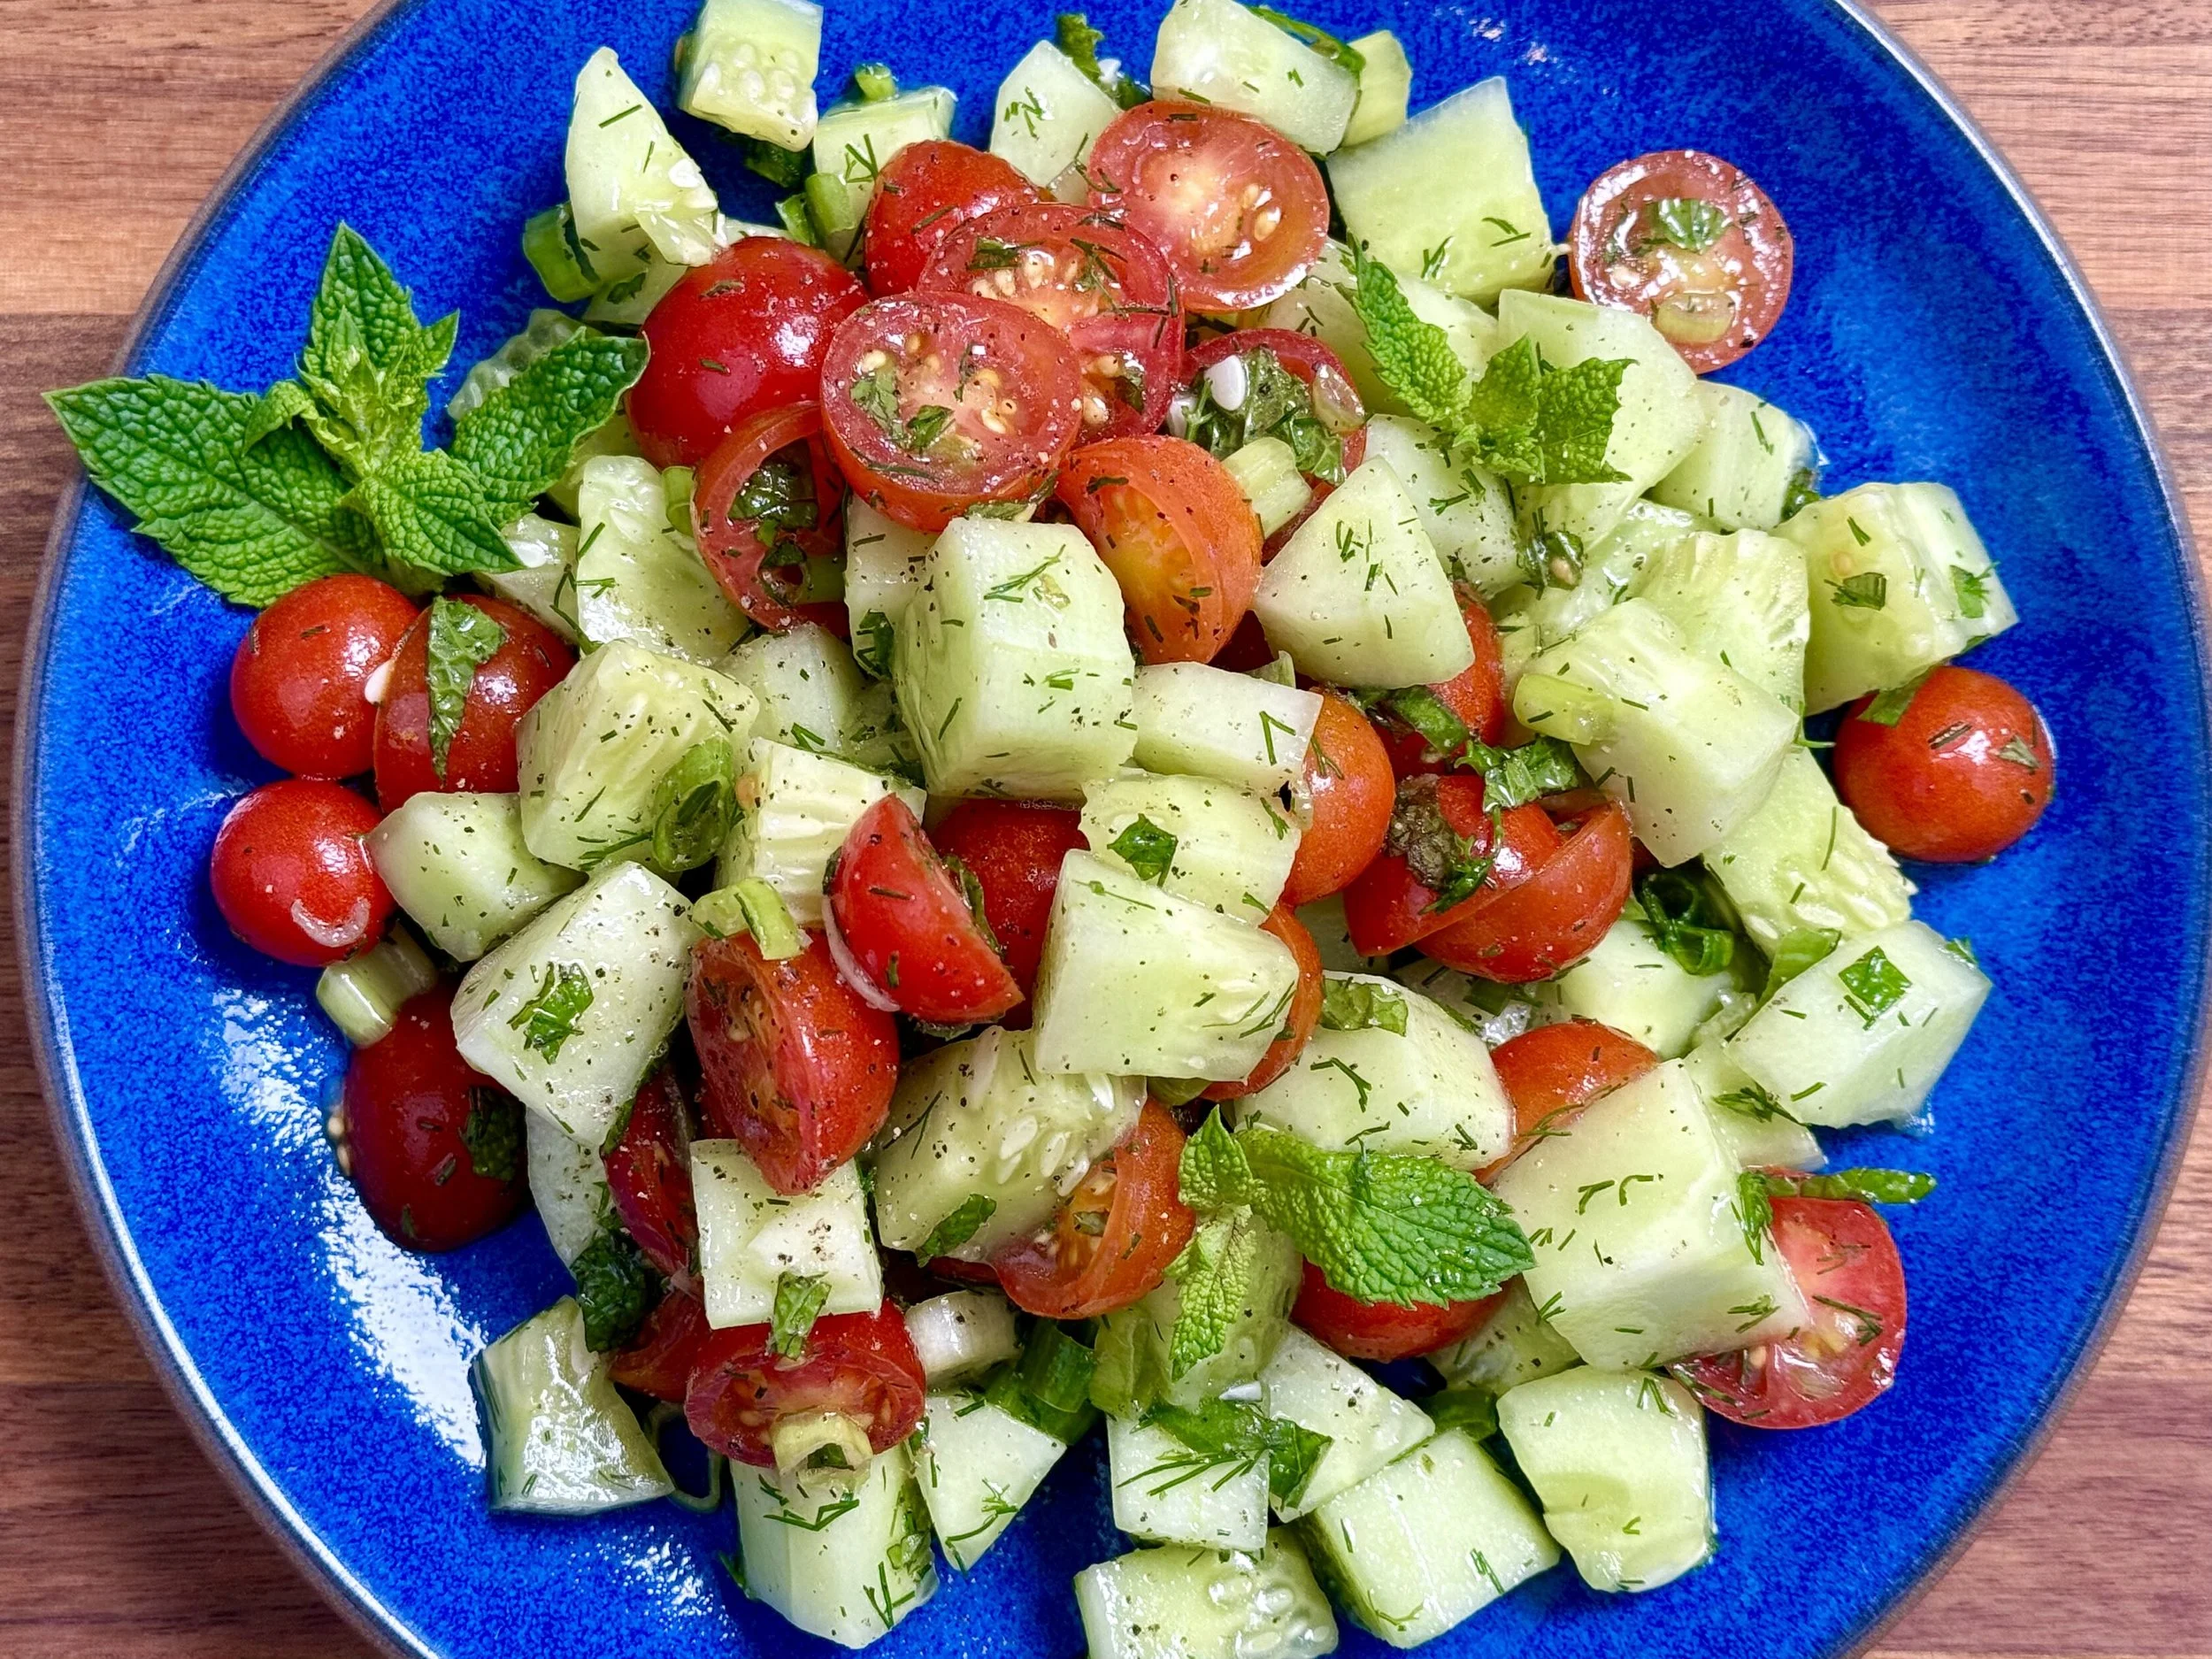
Baked Salmon on Cherry Tomatoes (Low FODMAP)
15 Minutes prep • 20 Minutes - 4 hours marinate • 25 Minuste cook time • Low FODMAP • Gluten-Free • Serves 4
15 Minutes prep • 20 Minutes - 4 hours marinate • 25 Minutes cook time • Low FODMAP • Gluten-Free • Serves 4 • Ok to make-ahead: Steps 1 - 2
Delight in the vibrant flavors of tender baked salmon nestled atop a bed of juicy cherry tomatoes, bursting with summery goodness. This dish combines the richness of salmon with the sweet tang of roasted tomatoes, creating a harmony of flavors that is both comforting and refreshing. Perfect for a weeknight dinner or a weekend gathering, it's easy to prepare and impressive to serve.
See this new recipe in my FREE recipe club.
To streamline your search through hundreds of existing recipes, I'm moving the release of my new weekly creations to the Recipe Club on Patreon. In the club, you’ll get access to a treasure trove of low-FODMAP goodness, complete with collections and filters to use as your virtual cookbook!
Here's what awaits you in the club:
Exclusive weekly recipes: Be the first to try my latest delicious low-FODMAP creations!
Simple & Easy: My recipes continue to focus on readily available ingredients and effortless preparation, perfect for family-friendly meals (no more separate low-FODMAP meal prep!).
Hundreds of existing recipes: Gain access to my entire library of low-FODMAP recipes, all conveniently organized.
You can join for free or sign up for only $5/month. Your support fuels my passion for creating new, delicious, and easy-to-make low-FODMAP recipes just for you.
Let's go on this delicious low-FODMAP journey together.
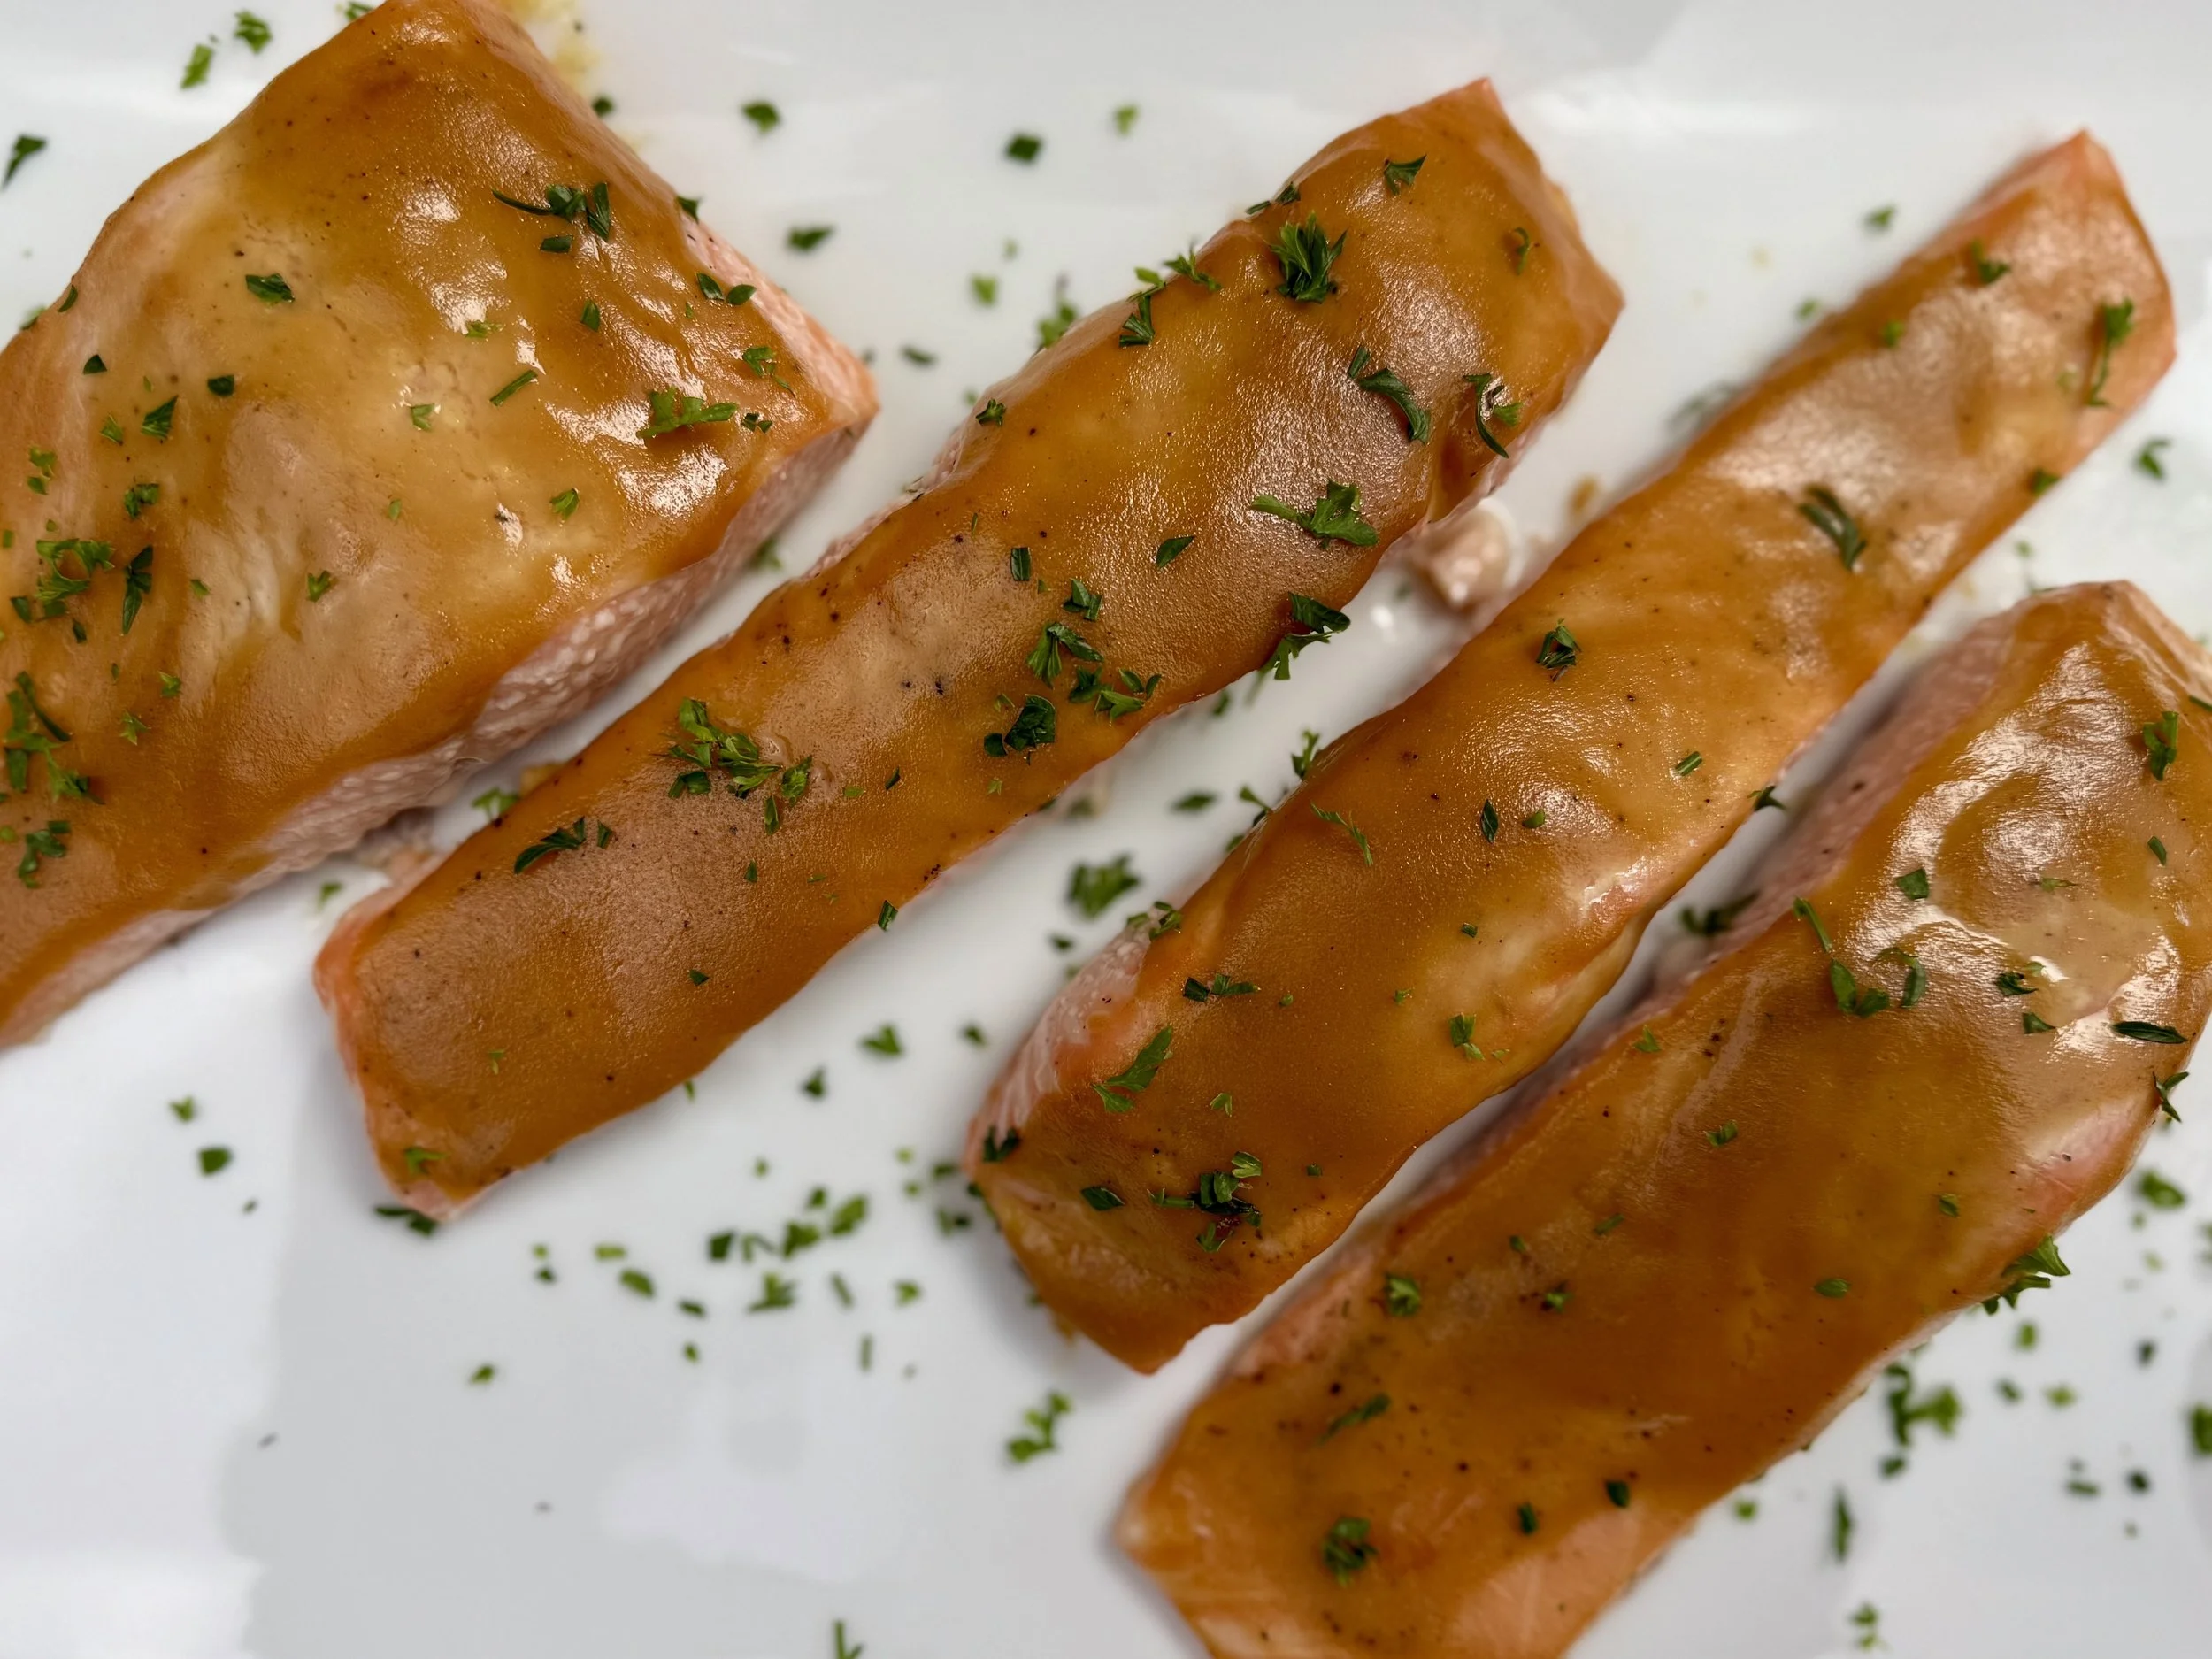
Quick Sheet Pan Dijon Salmon (Low FODMAP)
5 Minutes prep • 10 Minutes cook • Low FODMAP • Gluten-Free • Lactose-Free • Serves 4
5 Minutes prep • 10 Minutes cook • Low FODMAP • Gluten-Free • Lactose-Free • Serves 4 • Ok to make-ahead: Steps 1 - 2
Craving a healthy, delicious, and incredibly easy weeknight meal? Look no further than this Quick Sheet Pan Dijon Salmon! Sheet pan dinners are a busy cook's dream come true, offering minimal cleanup and a hands-off approach to cooking. This recipe leverages that convenience by pairing juicy salmon fillets with a sweet and savory Dijon glaze. Salmon is not only packed with omega-3s, but it's also very versatile and cooks quickly, making it an ideal choice for a speedy supper. With just a few simple ingredients and one pan, you'll have a flavorful and satisfying meal on the table in no time!
See this new recipe in my FREE recipe club.
To streamline your search through hundreds of existing recipes, I'm moving the release of my new weekly creations to the Recipe Club on Patreon. In the club, you’ll get access to a treasure trove of low-FODMAP goodness, complete with collections and filters to use as your virtual cookbook!
Here's what awaits you in the club:
Exclusive weekly recipes: Be the first to try my latest delicious low-FODMAP creations!
Simple & Easy: My recipes continue to focus on readily available ingredients and effortless preparation, perfect for family-friendly meals (no more separate low-FODMAP meal prep!).
Hundreds of existing recipes: Gain access to my entire library of low-FODMAP recipes, all conveniently organized.
You can join for free or sign up for only $5/month. Your support fuels my passion for creating new, delicious, and easy-to-make low-FODMAP recipes just for you.
Let's go on this delicious low-FODMAP journey together.
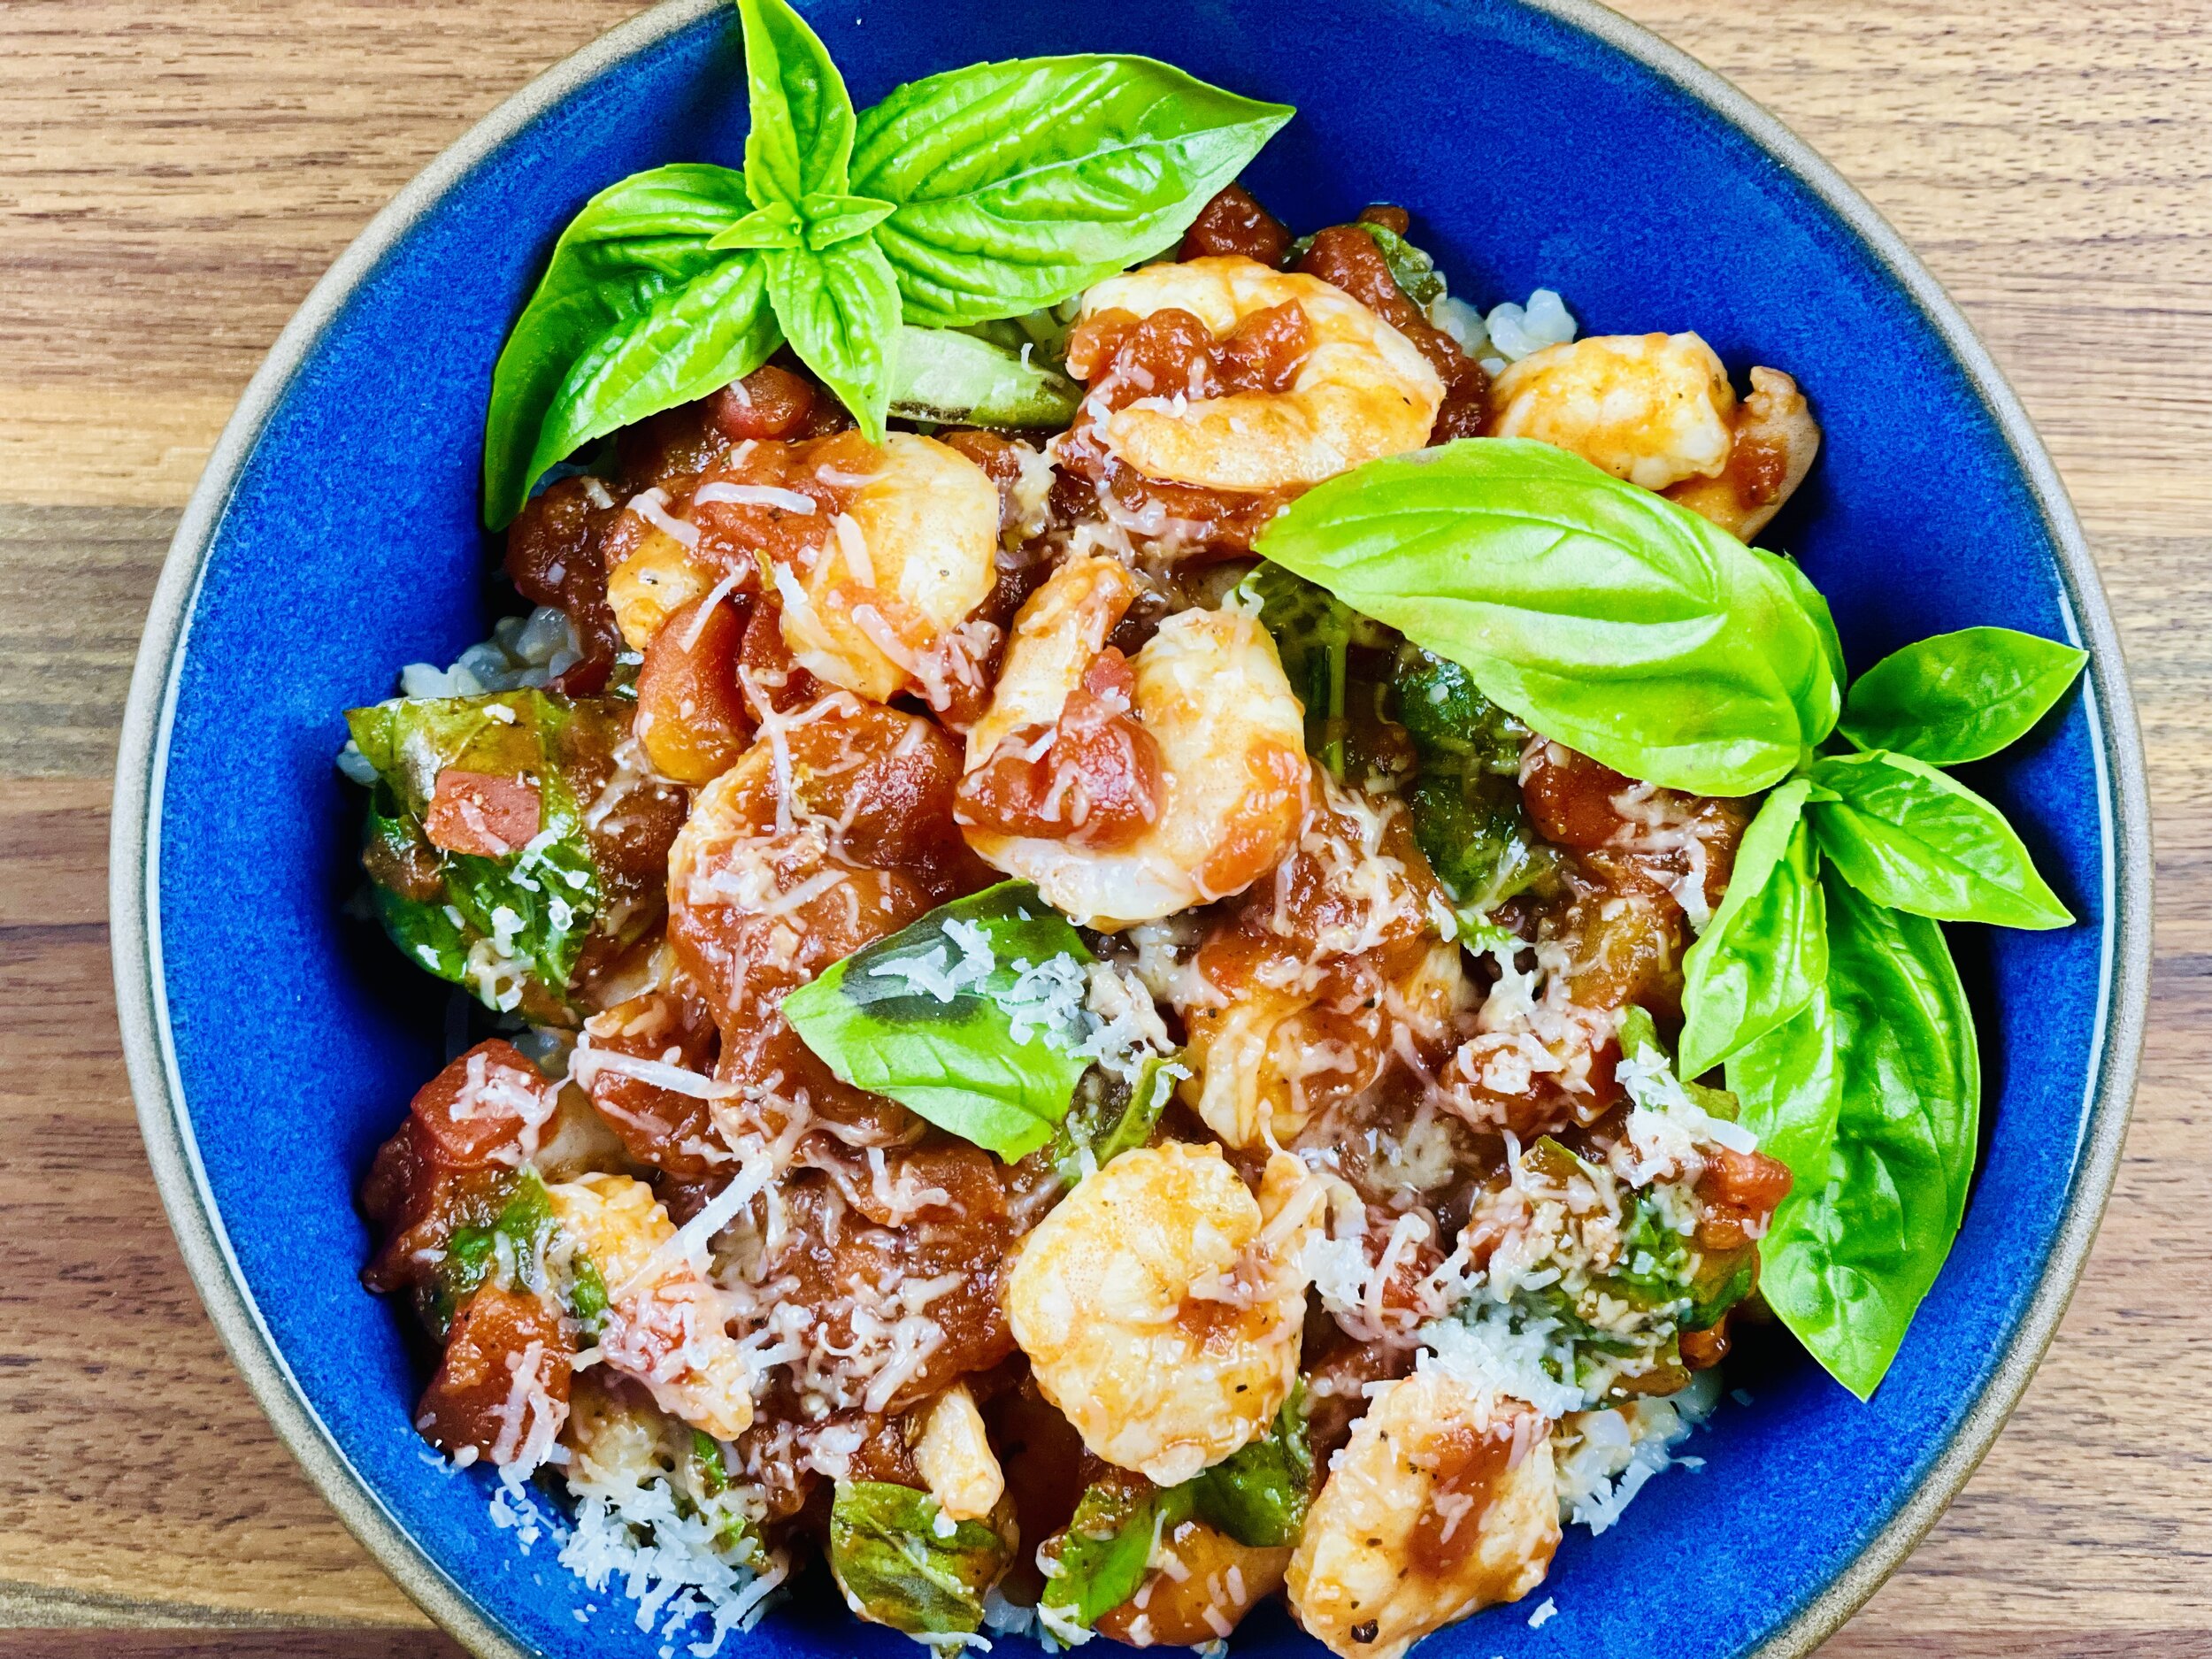
Simple One Pan Seafood Stew (Low FODMAP)
15 Minutes prep • 20 Minutes cook • Low FODMAP • Gluten-Free • Serves 4
15 Minutes prep • 20 Minutes cook • Low FODMAP • Gluten-Free • Serves 4 • Ok to make-ahead: Steps 1 - 2
This simple seafood stew is a comforting and flavorful dish perfect for a cozy night in. Packed with tender halibut, and a medley of fresh vegetables, this easy-to-make one-pan meal is a great way to enjoy some seafood.
See this new recipe in my FREE recipe club.
To streamline your search through hundreds of existing recipes, I'm moving the release of my new weekly creations to the Recipe Club on Patreon. In the club, you’ll get access to a treasure trove of low-FODMAP goodness, complete with collections and filters to use as your virtual cookbook!
Here's what awaits you in the club:
Exclusive weekly recipes: Be the first to try my latest delicious low-FODMAP creations!
Simple & Easy: My recipes continue to focus on readily available ingredients and effortless preparation, perfect for family-friendly meals (no more separate low-FODMAP meal prep!).
Hundreds of existing recipes: Gain access to my entire library of low-FODMAP recipes, all conveniently organized.
You can join for free or sign up for only $5/month. Your support fuels my passion for creating new, delicious, and easy-to-make low-FODMAP recipes just for you.
Let's go on this delicious low-FODMAP journey together.
3-Ingredient Grilled Cajun Salmon (Low FODMAP)
5 Minutes prep • 14 - 18 Minutes cook • Low FODMAP • Gluten-Free • Serves 2
5 Minutes prep • 14 - 18 Minutes cook • Low FODMAP • Gluten-Free • Serves 2 • Ok to make-ahead: Steps 1 - 2
Craving a delicious, yet simple dinner? Look no further than this 3-ingredient, Cajun Salmon that you can whip up in no time. With its bold Cajun seasoning, flaky salmon, and buttery juices, this dish is sure to impress your pickiest guests. Perfect for a weeknight meal or a family gathering, this recipe is so easy to make and delivers big on flavor.
See this new recipe in my FREE recipe club.
To streamline your search through hundreds of existing recipes, I'm moving the release of my new weekly creations to the Recipe Club on Patreon. In the club, you’ll get access to a treasure trove of low-FODMAP goodness, complete with collections and filters to use as your virtual cookbook!
Here's what awaits you in the club:
Exclusive weekly recipes: Be the first to try my latest delicious low-FODMAP creations!
Simple & Easy: My recipes continue to focus on readily available ingredients and effortless preparation, perfect for family-friendly meals (no more separate low-FODMAP meal prep!).
Hundreds of existing recipes: Gain access to my entire library of low-FODMAP recipes, all conveniently organized.
You can join for free or sign up for only $5/month. Your support fuels my passion for creating new, delicious, and easy-to-make low-FODMAP recipes just for you.
Let's go on this delicious low-FODMAP journey together.
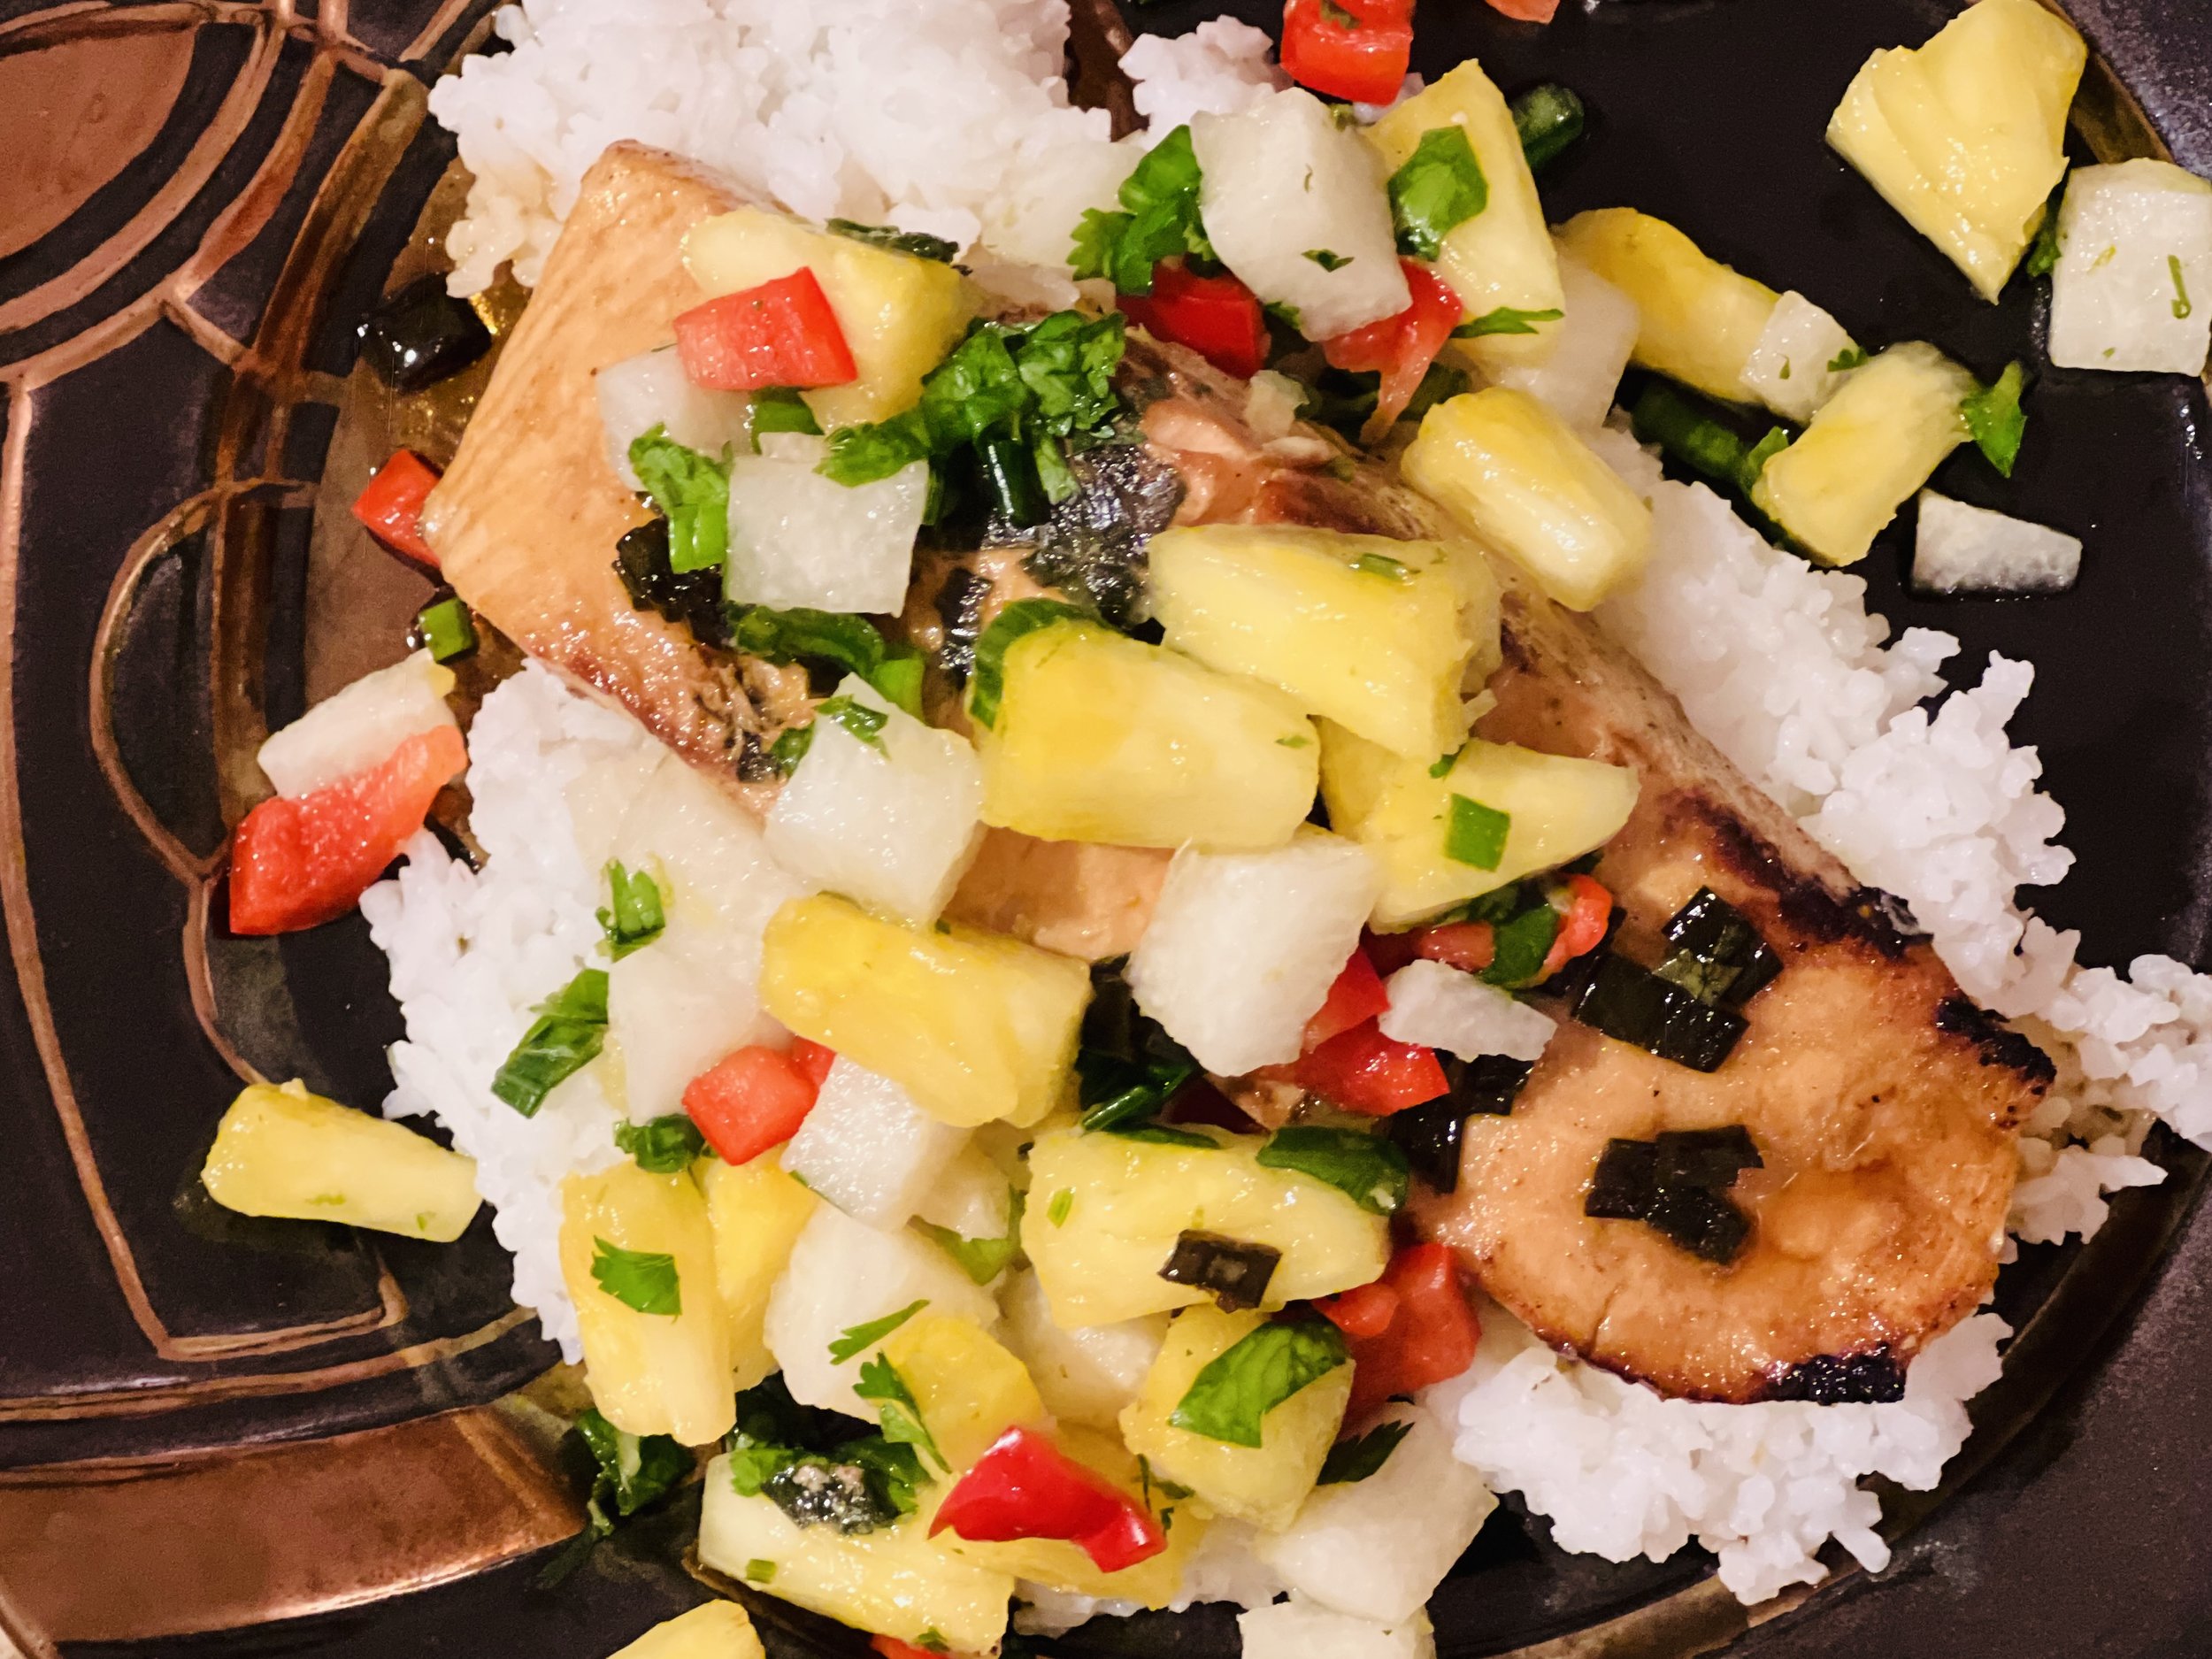
Tropical BBQ Salmon with Mango Salsa and Coconut Rice (Low FODMAP)
20 Minutes prep • 10 Minutes cook • Low FODMAP • Gluten-Free • Serves 2
20 Minutes prep • 10 Minutes cook • Low FODMAP • Gluten-Free • Serves 2 • Ok to make-ahead: Steps 1 - 3
Get ready to elevate your summer dining with this simple BBQ salmon recipe! This dish brings together the fresh flavors of the tropics, featuring a delicious mango salsa and fragrant coconut rice, all complemented by a creamy sauce and perfectly seasoned salmon. Whether you're hosting a backyard BBQ or looking for a fresh weeknight dinner, this recipe is sure to become a favorite.
See this new recipe in my FREE recipe club.
To streamline your search through hundreds of existing recipes, I'm moving the release of my new weekly creations to the Recipe Club on Patreon. In the club, you’ll get access to a treasure trove of low-FODMAP goodness, complete with collections and filters to use as your virtual cookbook!
Here's what awaits you in the club:
Exclusive weekly recipes: Be the first to try my latest delicious low-FODMAP creations!
Simple & Easy: My recipes continue to focus on readily available ingredients and effortless preparation, perfect for family-friendly meals (no more separate low-FODMAP meal prep!).
Hundreds of existing recipes: Gain access to my entire library of low-FODMAP recipes, all conveniently organized.
You can join for free or sign up for only $5/month. Your support fuels my passion for creating new, delicious, and easy-to-make low-FODMAP recipes just for you.
Let's go on this delicious low-FODMAP journey together.
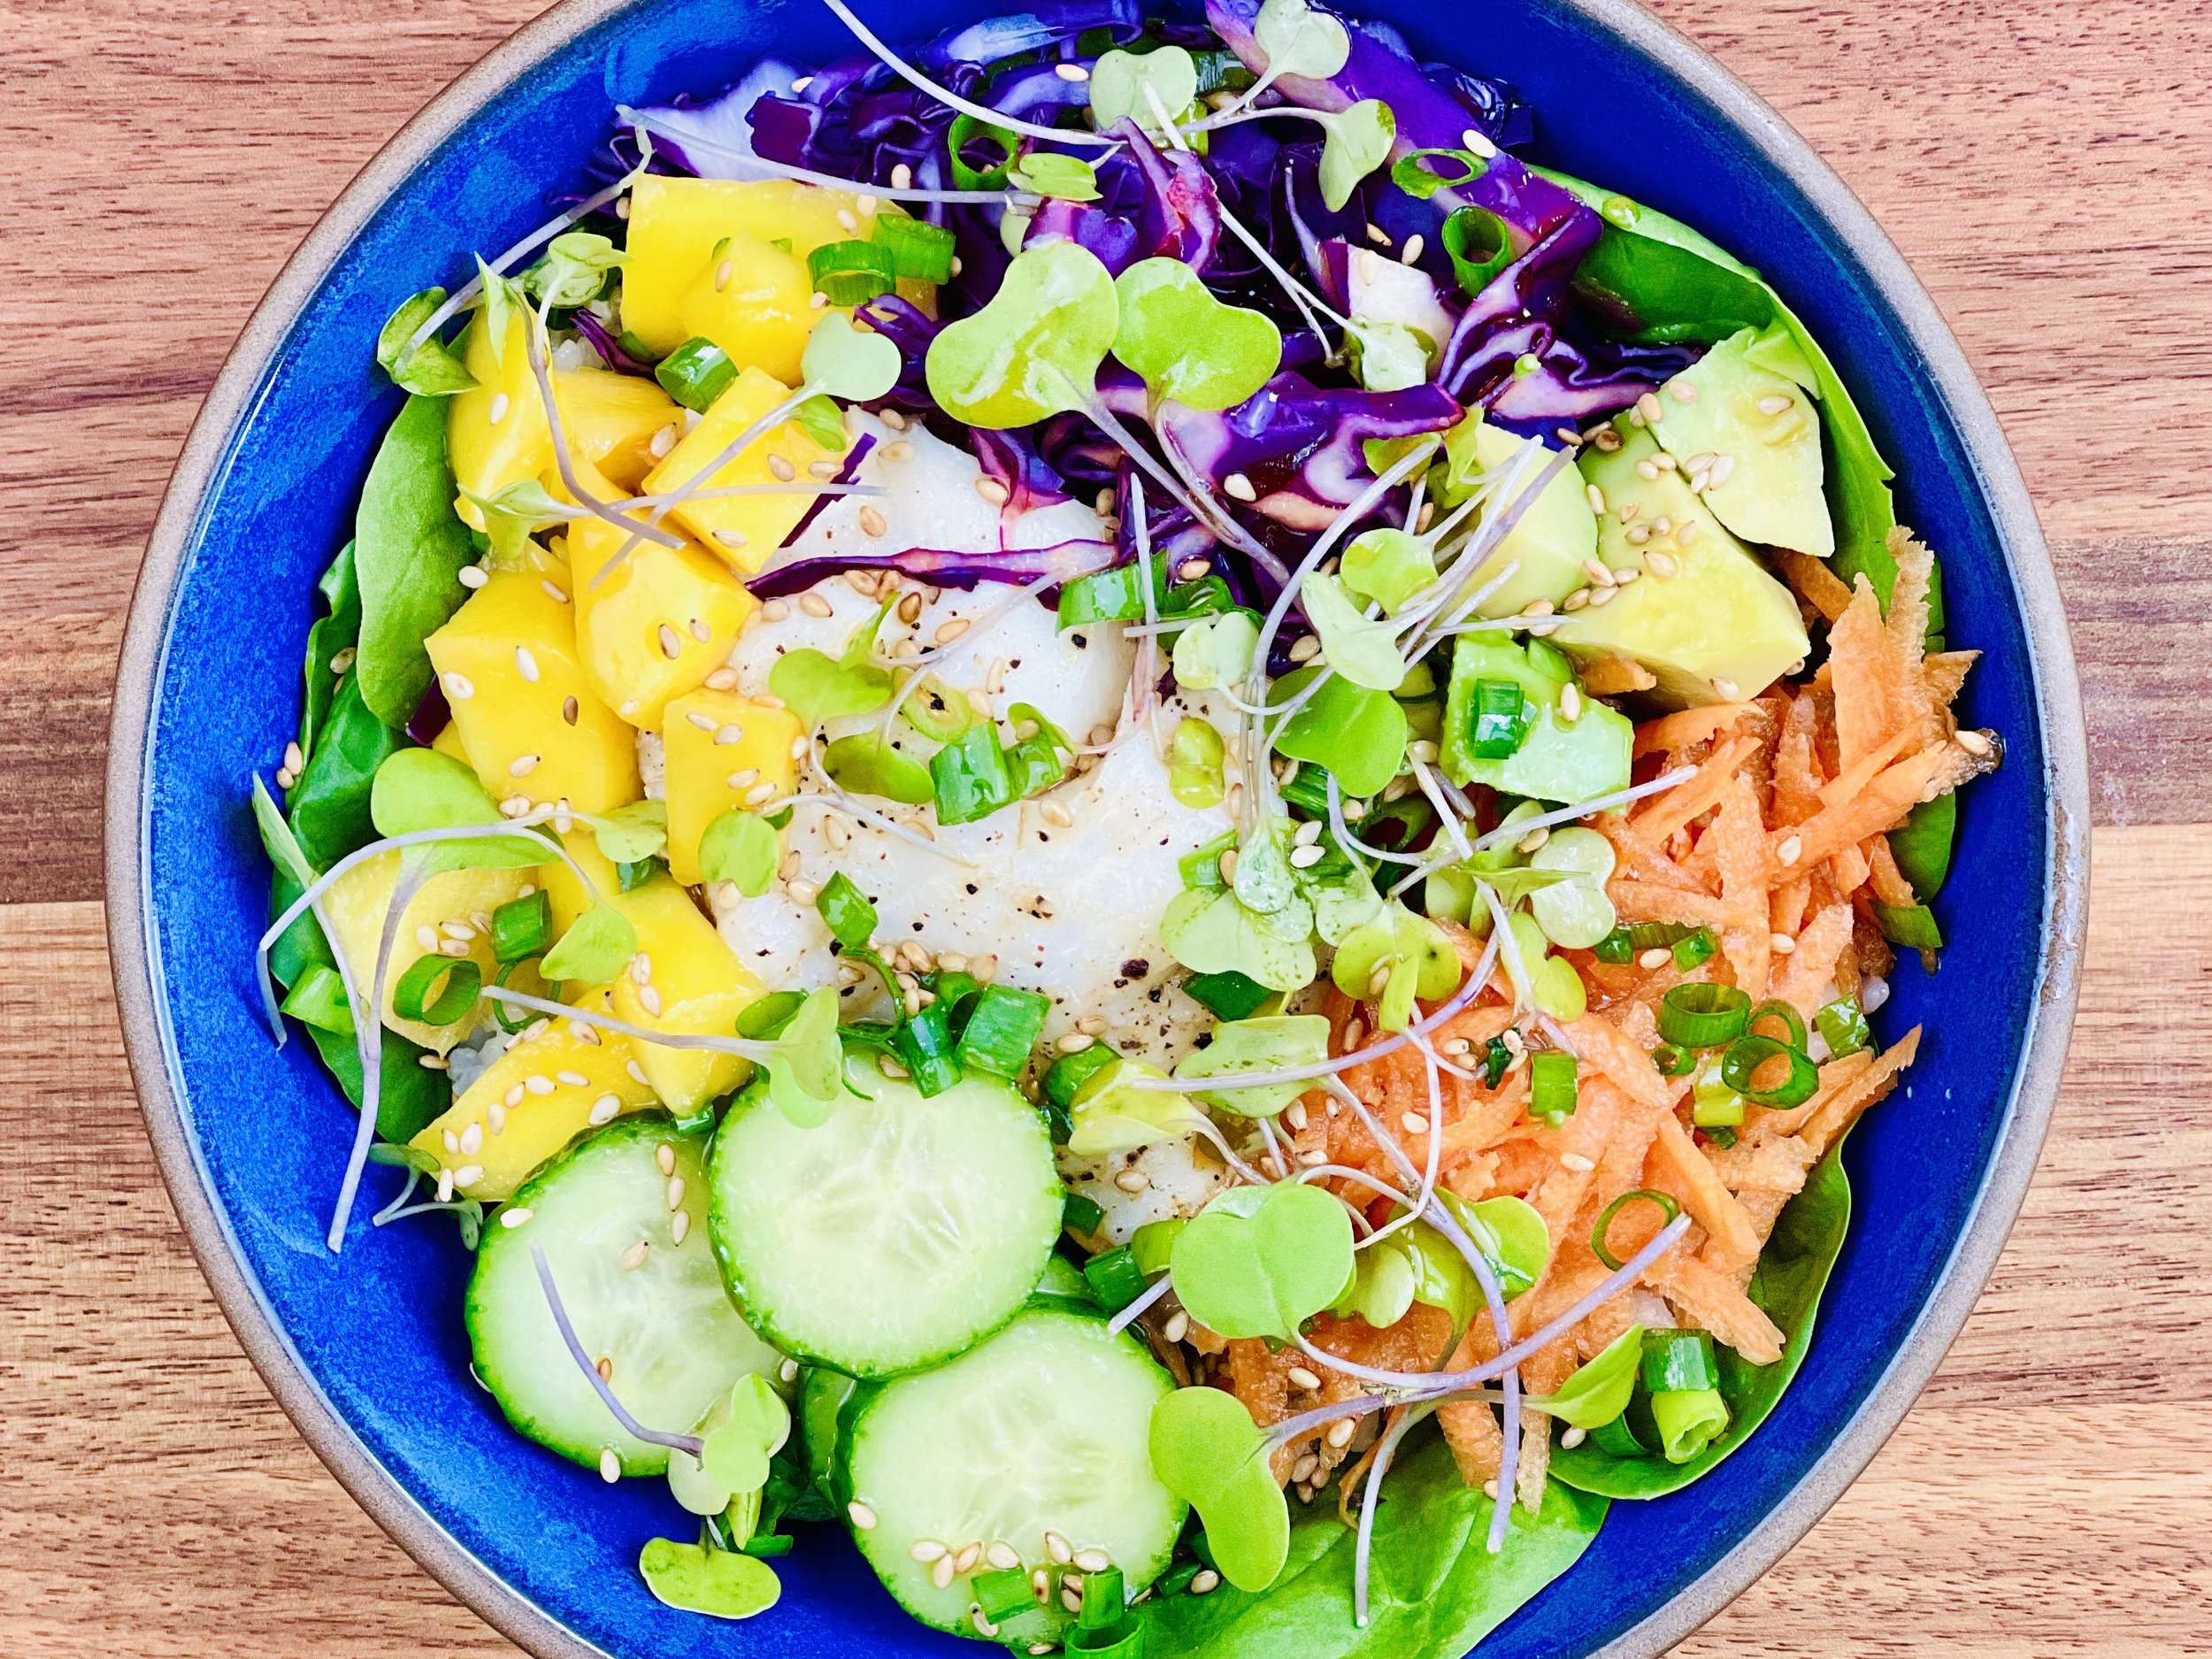
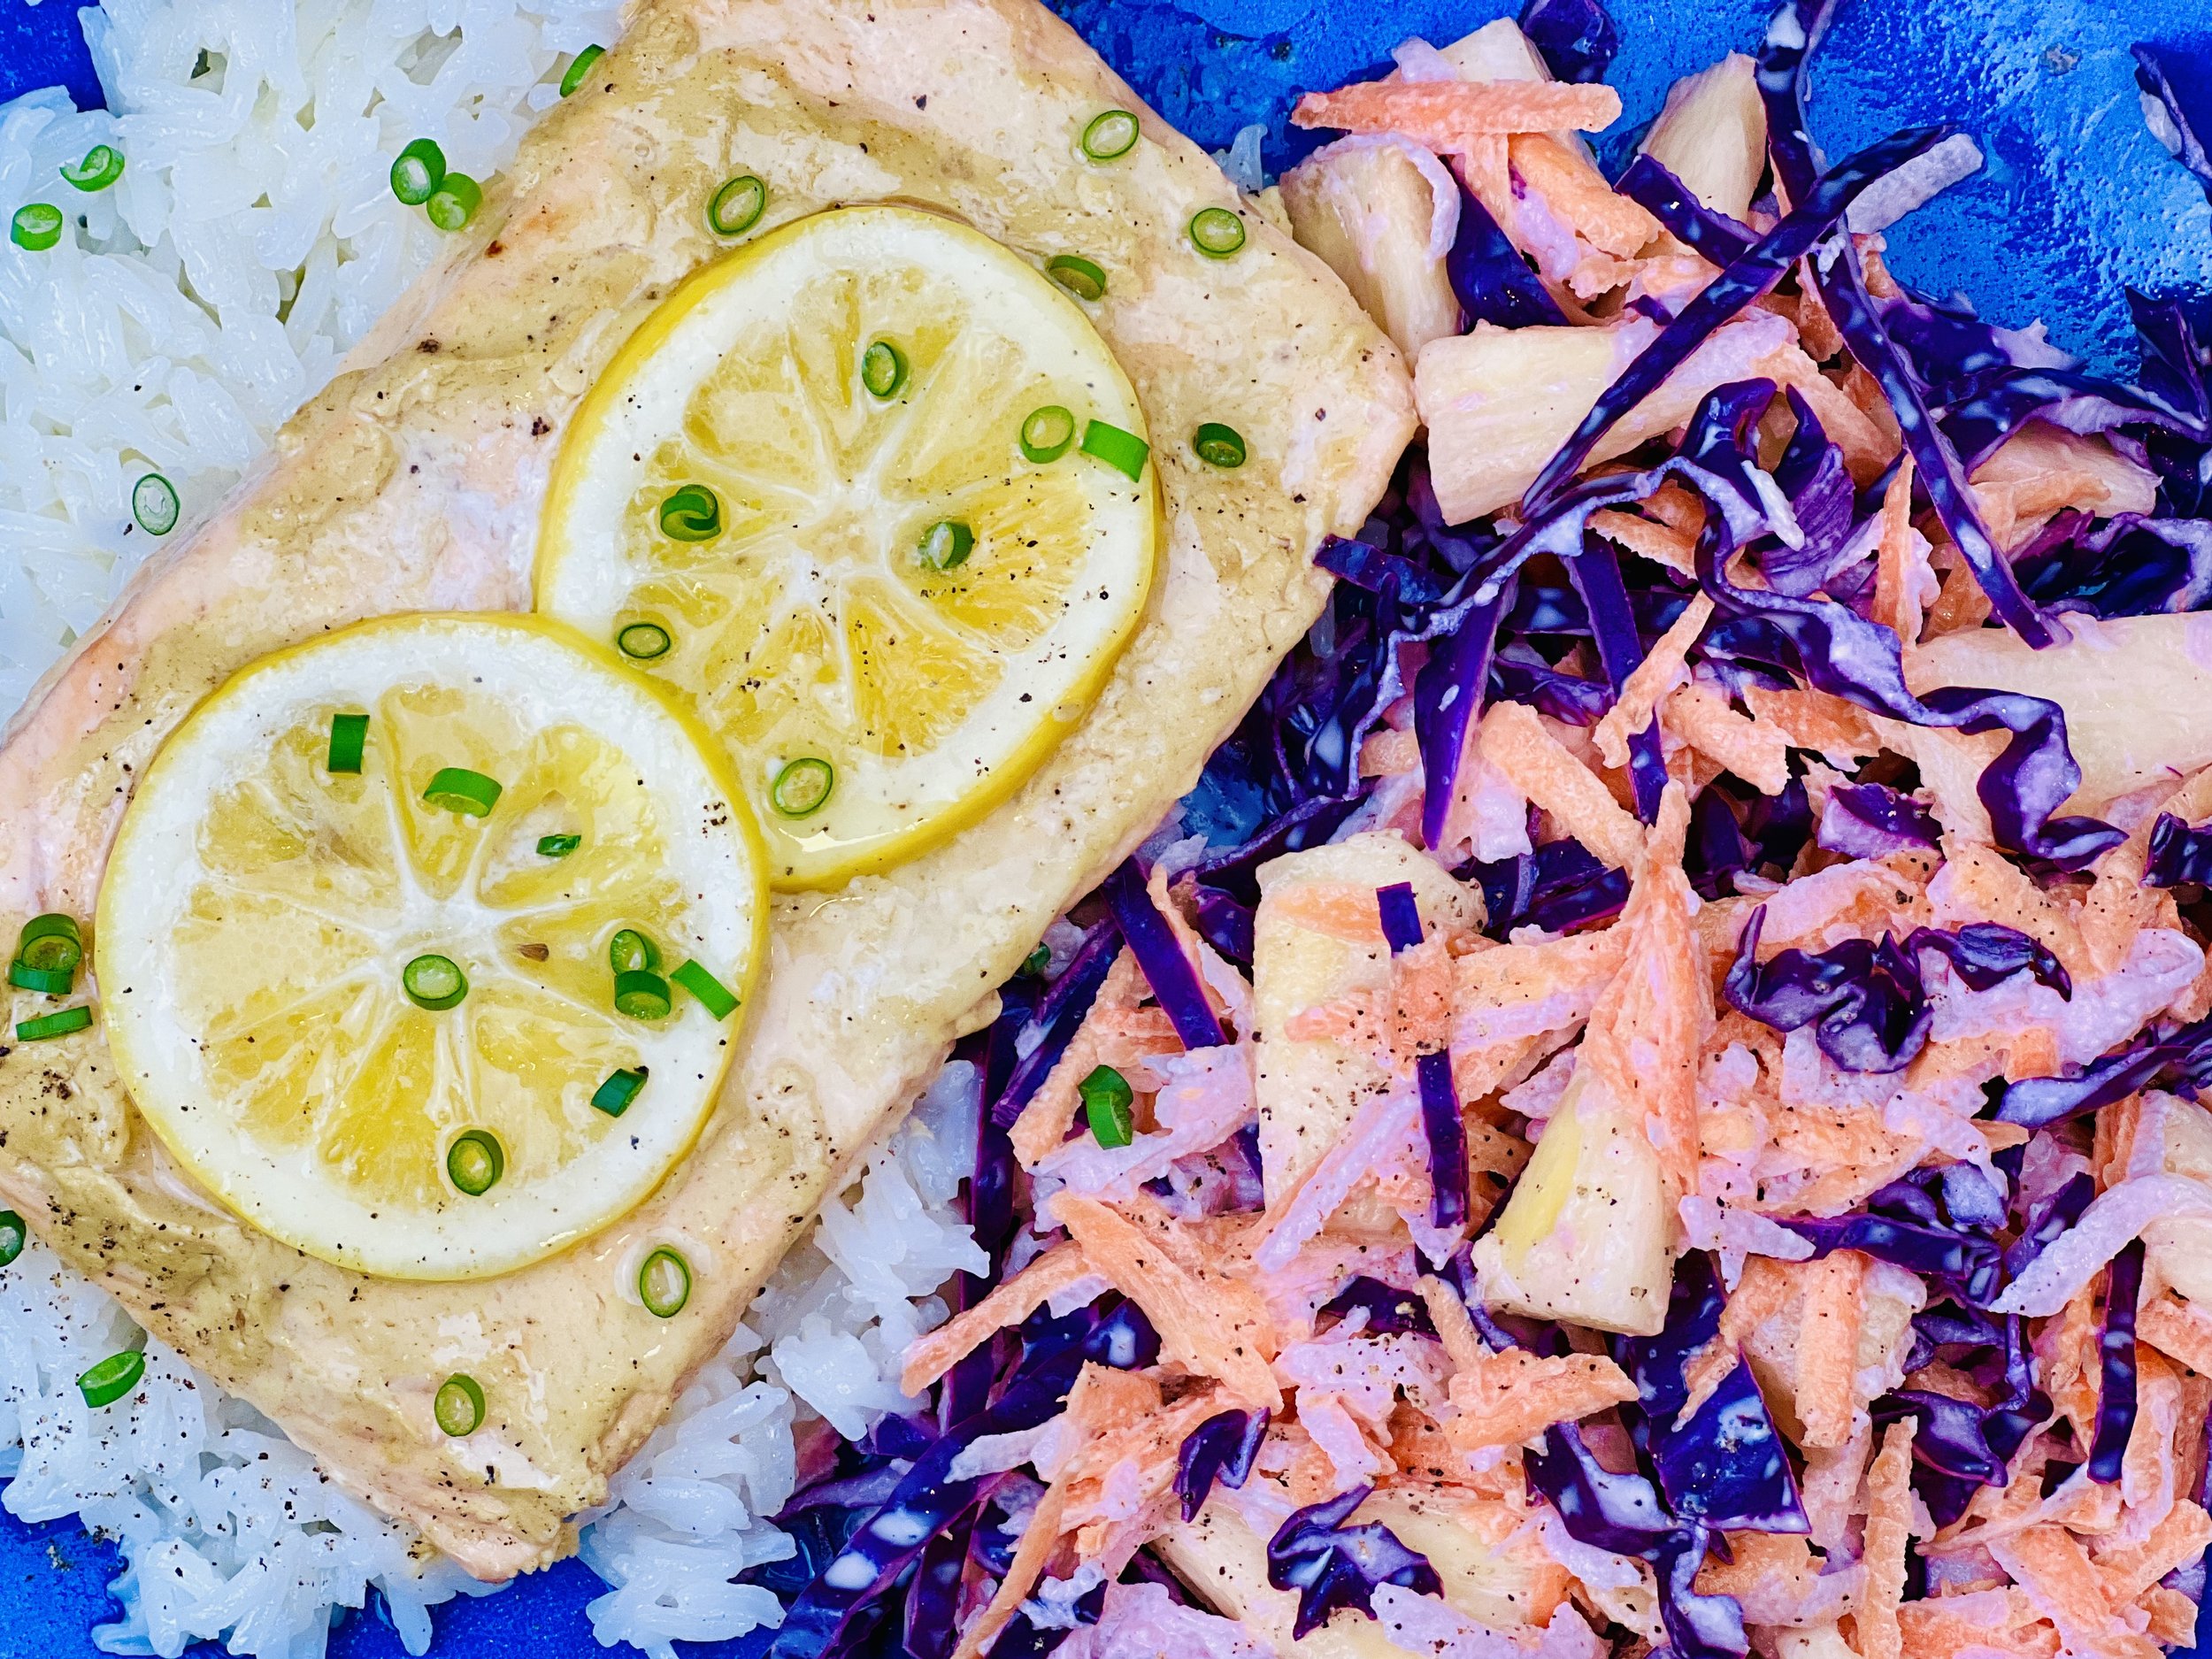
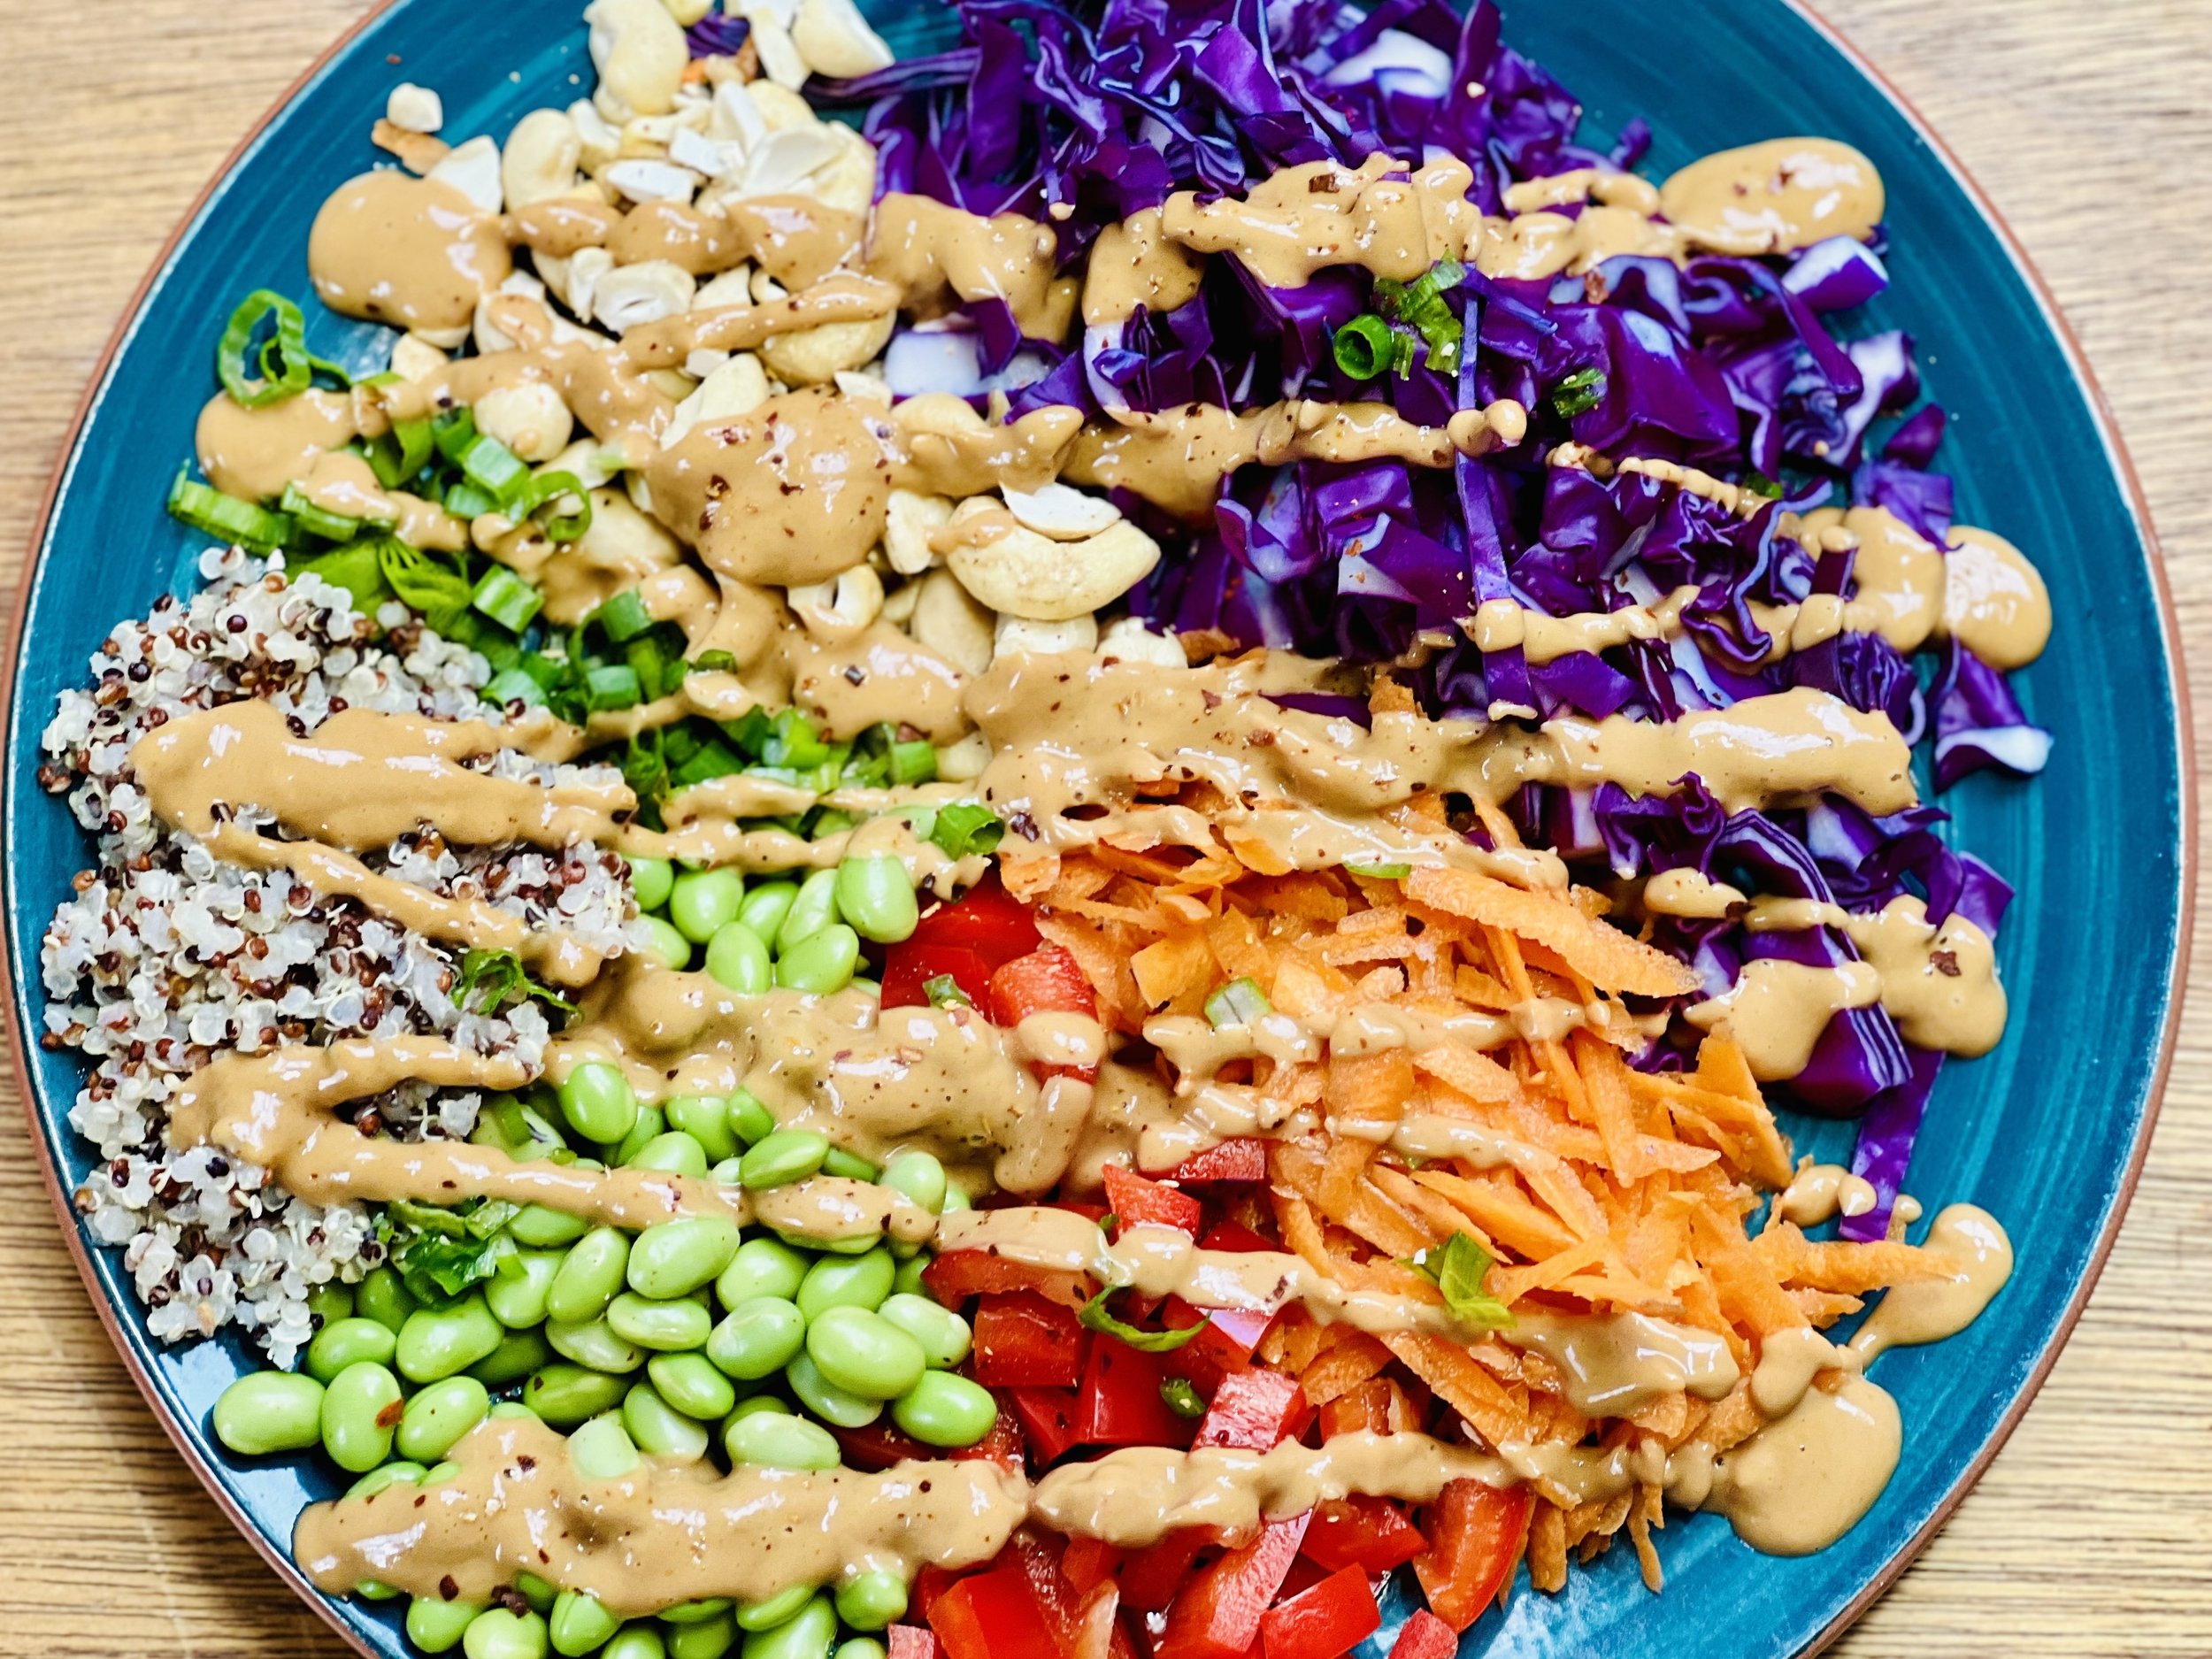
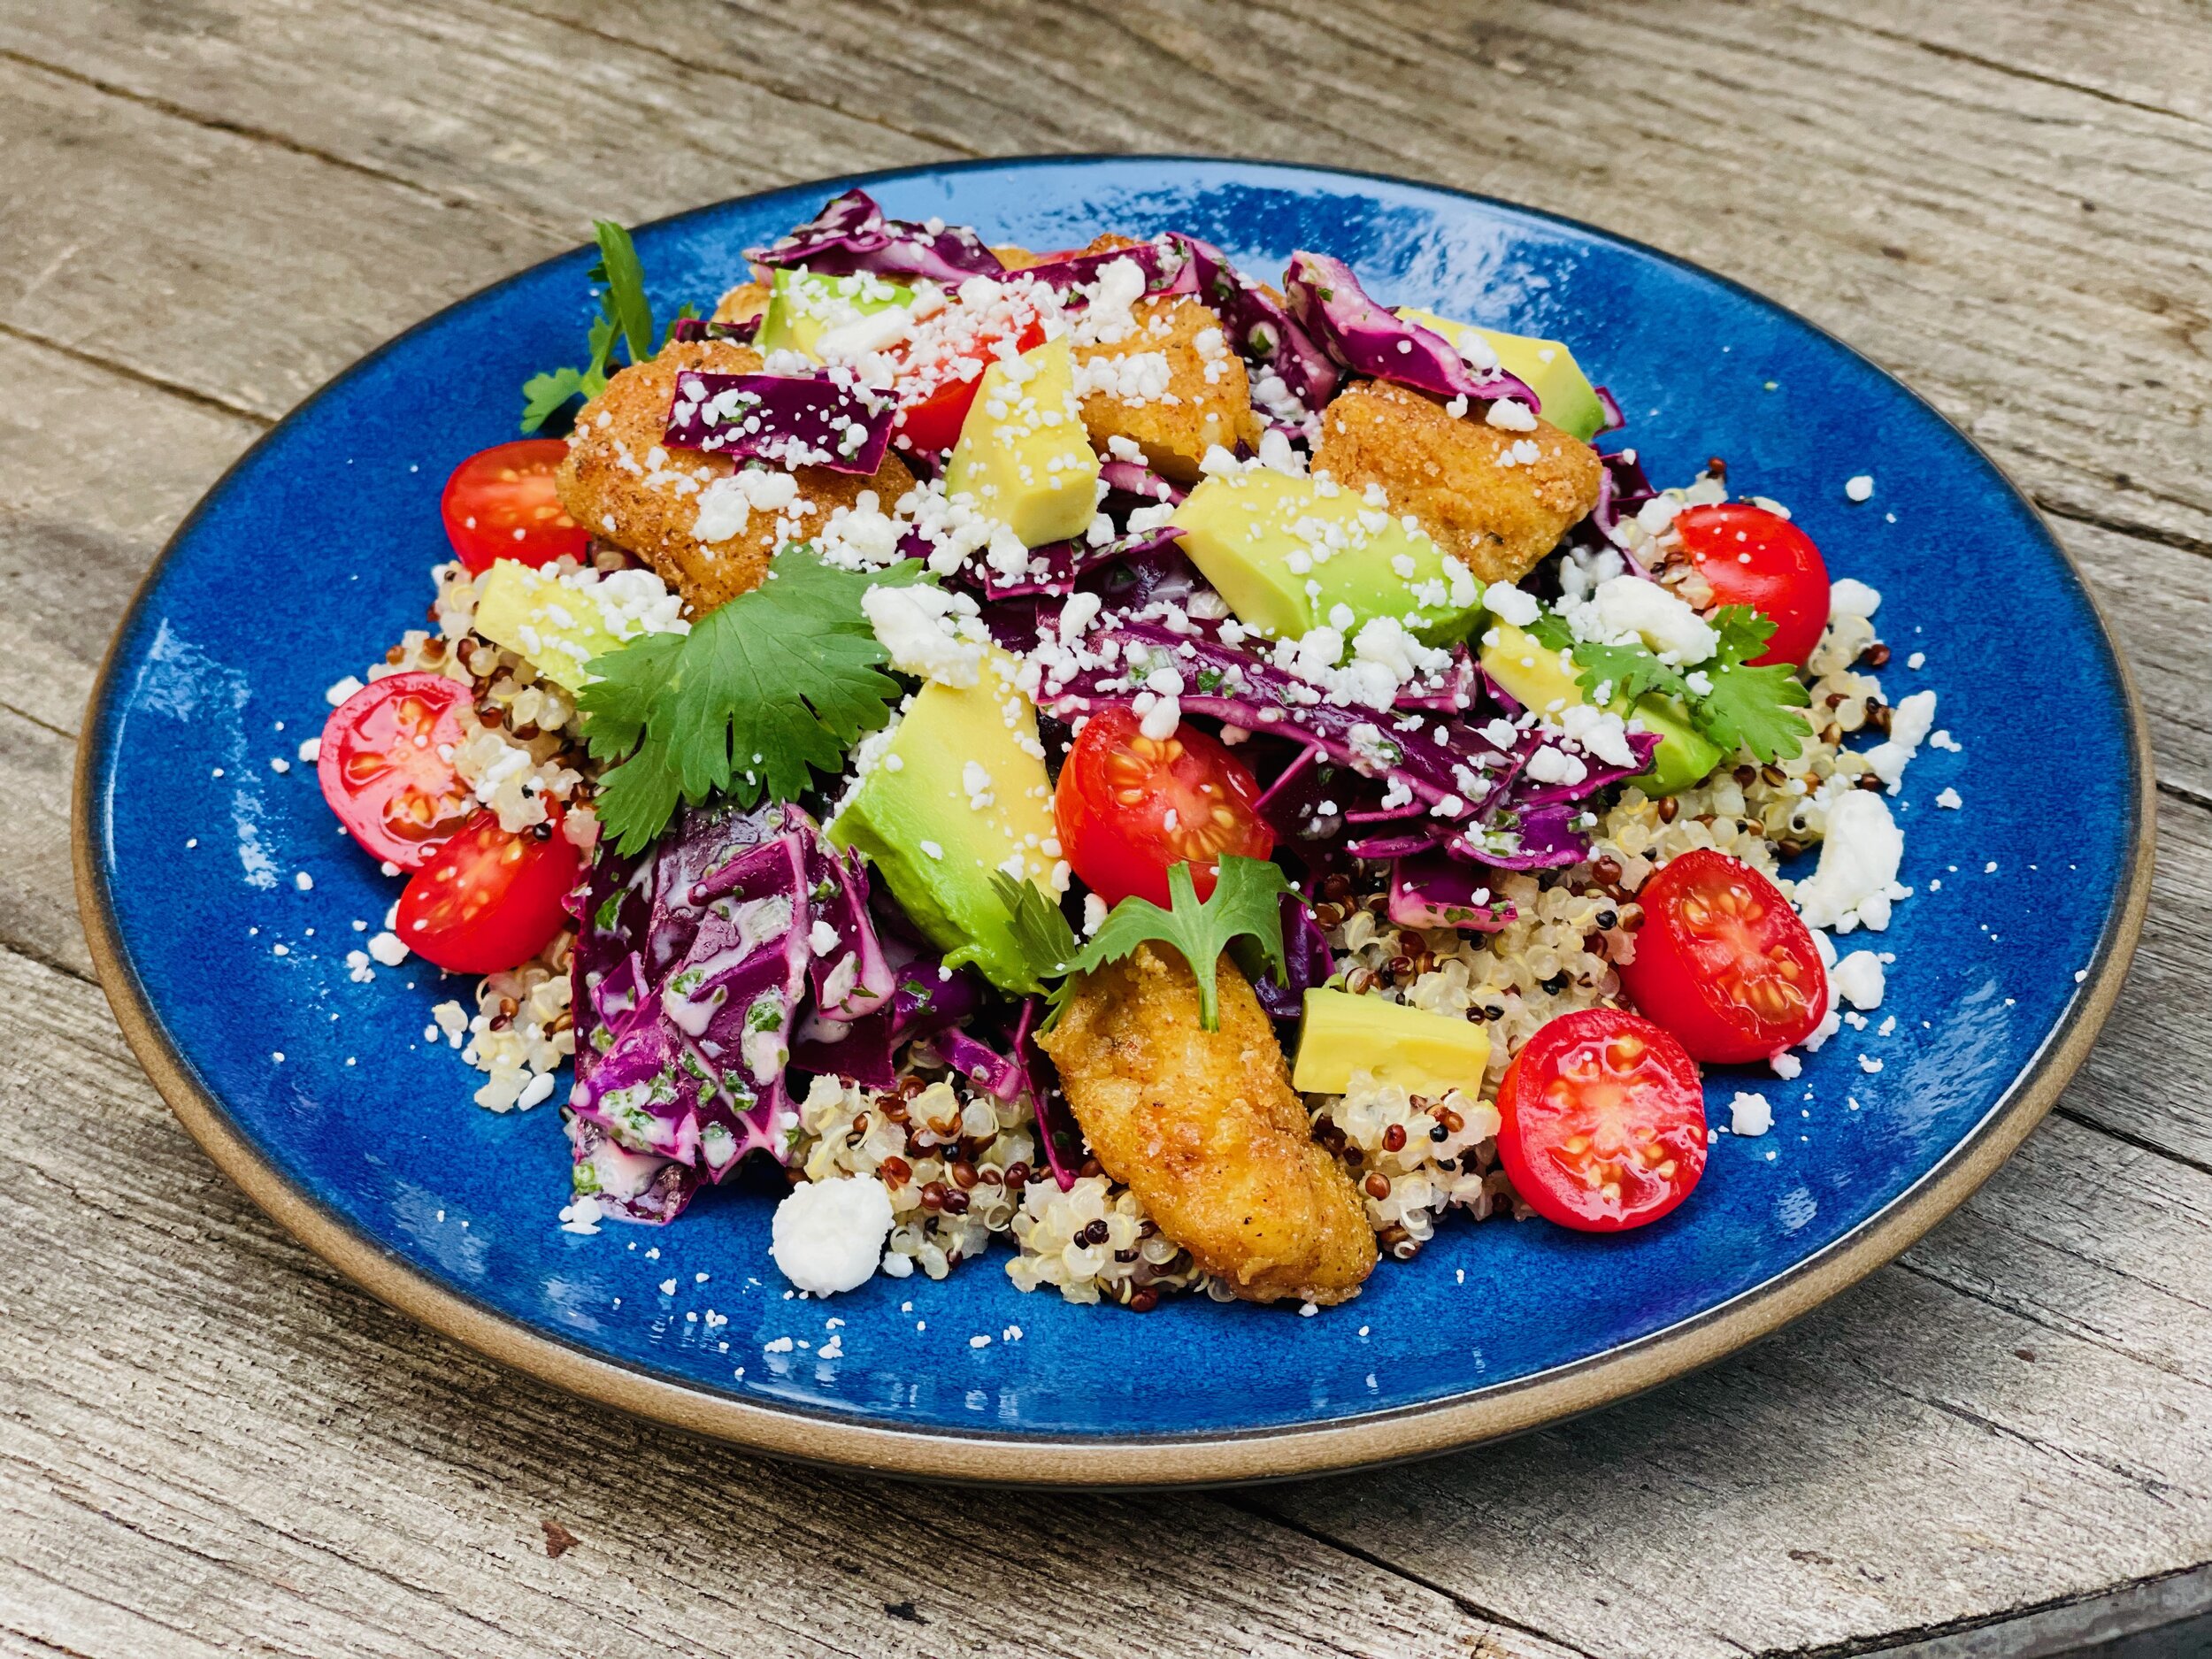
Coconut Mango Halibut Rice Bowl (Low FODMAP)
20 Minutes prep • 10 Minutes cook • Low FODMAP • Gluten-free • Serves 4
20 Minutes prep • 10 Minutes cook • Low FODMAP • Gluten-free • Serves 4 • Ok to make ahead: Steps 1-3
My daughter is AMAZING in the kitchen and she can whip recipes up out of thin air. This one was particularly delicious and also perfectly low FODMAP so I had to share! Halibut is firm, flaky, and mild and it pairs beautifully with the coconut rice, sweet mango, creamy avocado, and all the veggie toppings. Mango has a lot of fructose but one ounce is considered low FODMAP and a little goes a long way. It makes a beautiful addition and you don’t need much to add a delightful tropical flavor to this recipe. Make this tonight and transport yourself to the tropics.
Ingredients
12 ounces Halibut
1 tablespoon toasted toasted sesame oil
1 tablespoon salted butter, melted
1/2 teaspoon Kosher salt
1/2 teaspoon black pepper
Ingredients: Coconut rice
1 cup jasmine rice, or sushi rice
1 1/2 cups unsweetened coconut milk
1/2 teaspoon kosher salt
Ingredients: Toppings
4 ounces Mango, diced
1/2 cup purple cabbage, chopped
2 medium carrots, grated
2 green onions, green part only, chopped
8 ounces avocado, cubed
3 Persian cucumbers, sliced
1/2 cup microgreens
2 cups baby spinach, long stems removed
Pickled ginger (like you get with sushi)
Ingredients: Sauce
2 tablespoons gluten-free soy sauce or tamari
1 tablespoon fresh lime juice
1 tablespoon toasted sesame oil
2 teaspoons maple syrup
1 teaspoon rice vinegar
1 teaspoon toasted sesame seeds
Directions
(1) Prepare: Wash, chop, grate, and slice the veggies as indicated. Preheat the oven or grill to 425 degrees F.
(2) Make the coconut rice: Put the rice in a fine strainer and rinse under cold water until the water runs clear. Set aside and let drain. In a medium saucepan over medium heat add the coconut milk, rice, and salt and bring to a boil. Reduce heat to a simmer, cover, and cook 18-20 minutes, until the liquid has been absorbed. Remove from the heat. Stir and let sit for a few minutes before serving.
(3) Make the sauce: Combine all ingredients in a small jar or bowl and shake or whisk to combine.
(4) Cook the fish: Melt the butter and mix with the sesame oil. Put the fish in the middle of a square of foil large enough to make into a loose pouch around the fish. Add salt and pepper to the fish, then fold the foil across the top and sides to seal. Grill on medium-high or cook in a 425 degree F oven for 8 - 10 minutes—or until the fish is opaque and flakes when you cut into it.
(5) Plate and serve: Make a bed of spinach in the bottom of the bowl. Cover with warm coconut rice. Add the fish, then all of the other toppings around the fish. Drizzle with sauce and serve with a sprinkle of toasted sesame seeds and pickled ginger on the side.
Eat and enjoy every bite because you can!
Recipe note: I use Diamond Crystal Kosher salt in all my recipes because it has a wonderful flat and crisp flake that tastes delicious. It is also the least salty salt available so you can use it more liberally as a seasoning than you can table salt or sea salt. If you use another type of salt, you may need to reduce the amount so it is not over-salted.
Have a question you’d like to have answered? Email me at hello@ibsgamechanger.com
Link note: This post may contain affiliate links for you to easily purchase items that are linked. I may earn a small commission from qualifying purchases but none of this costs you a thing so feel free to use the links! In addition, for some items, I have provided a special discount code for IBS Game Changers so be sure to use the code when you purchase an item to get the discount that has been arranged just for you.
More Deliciously Low FODMAP™ seafood recipes


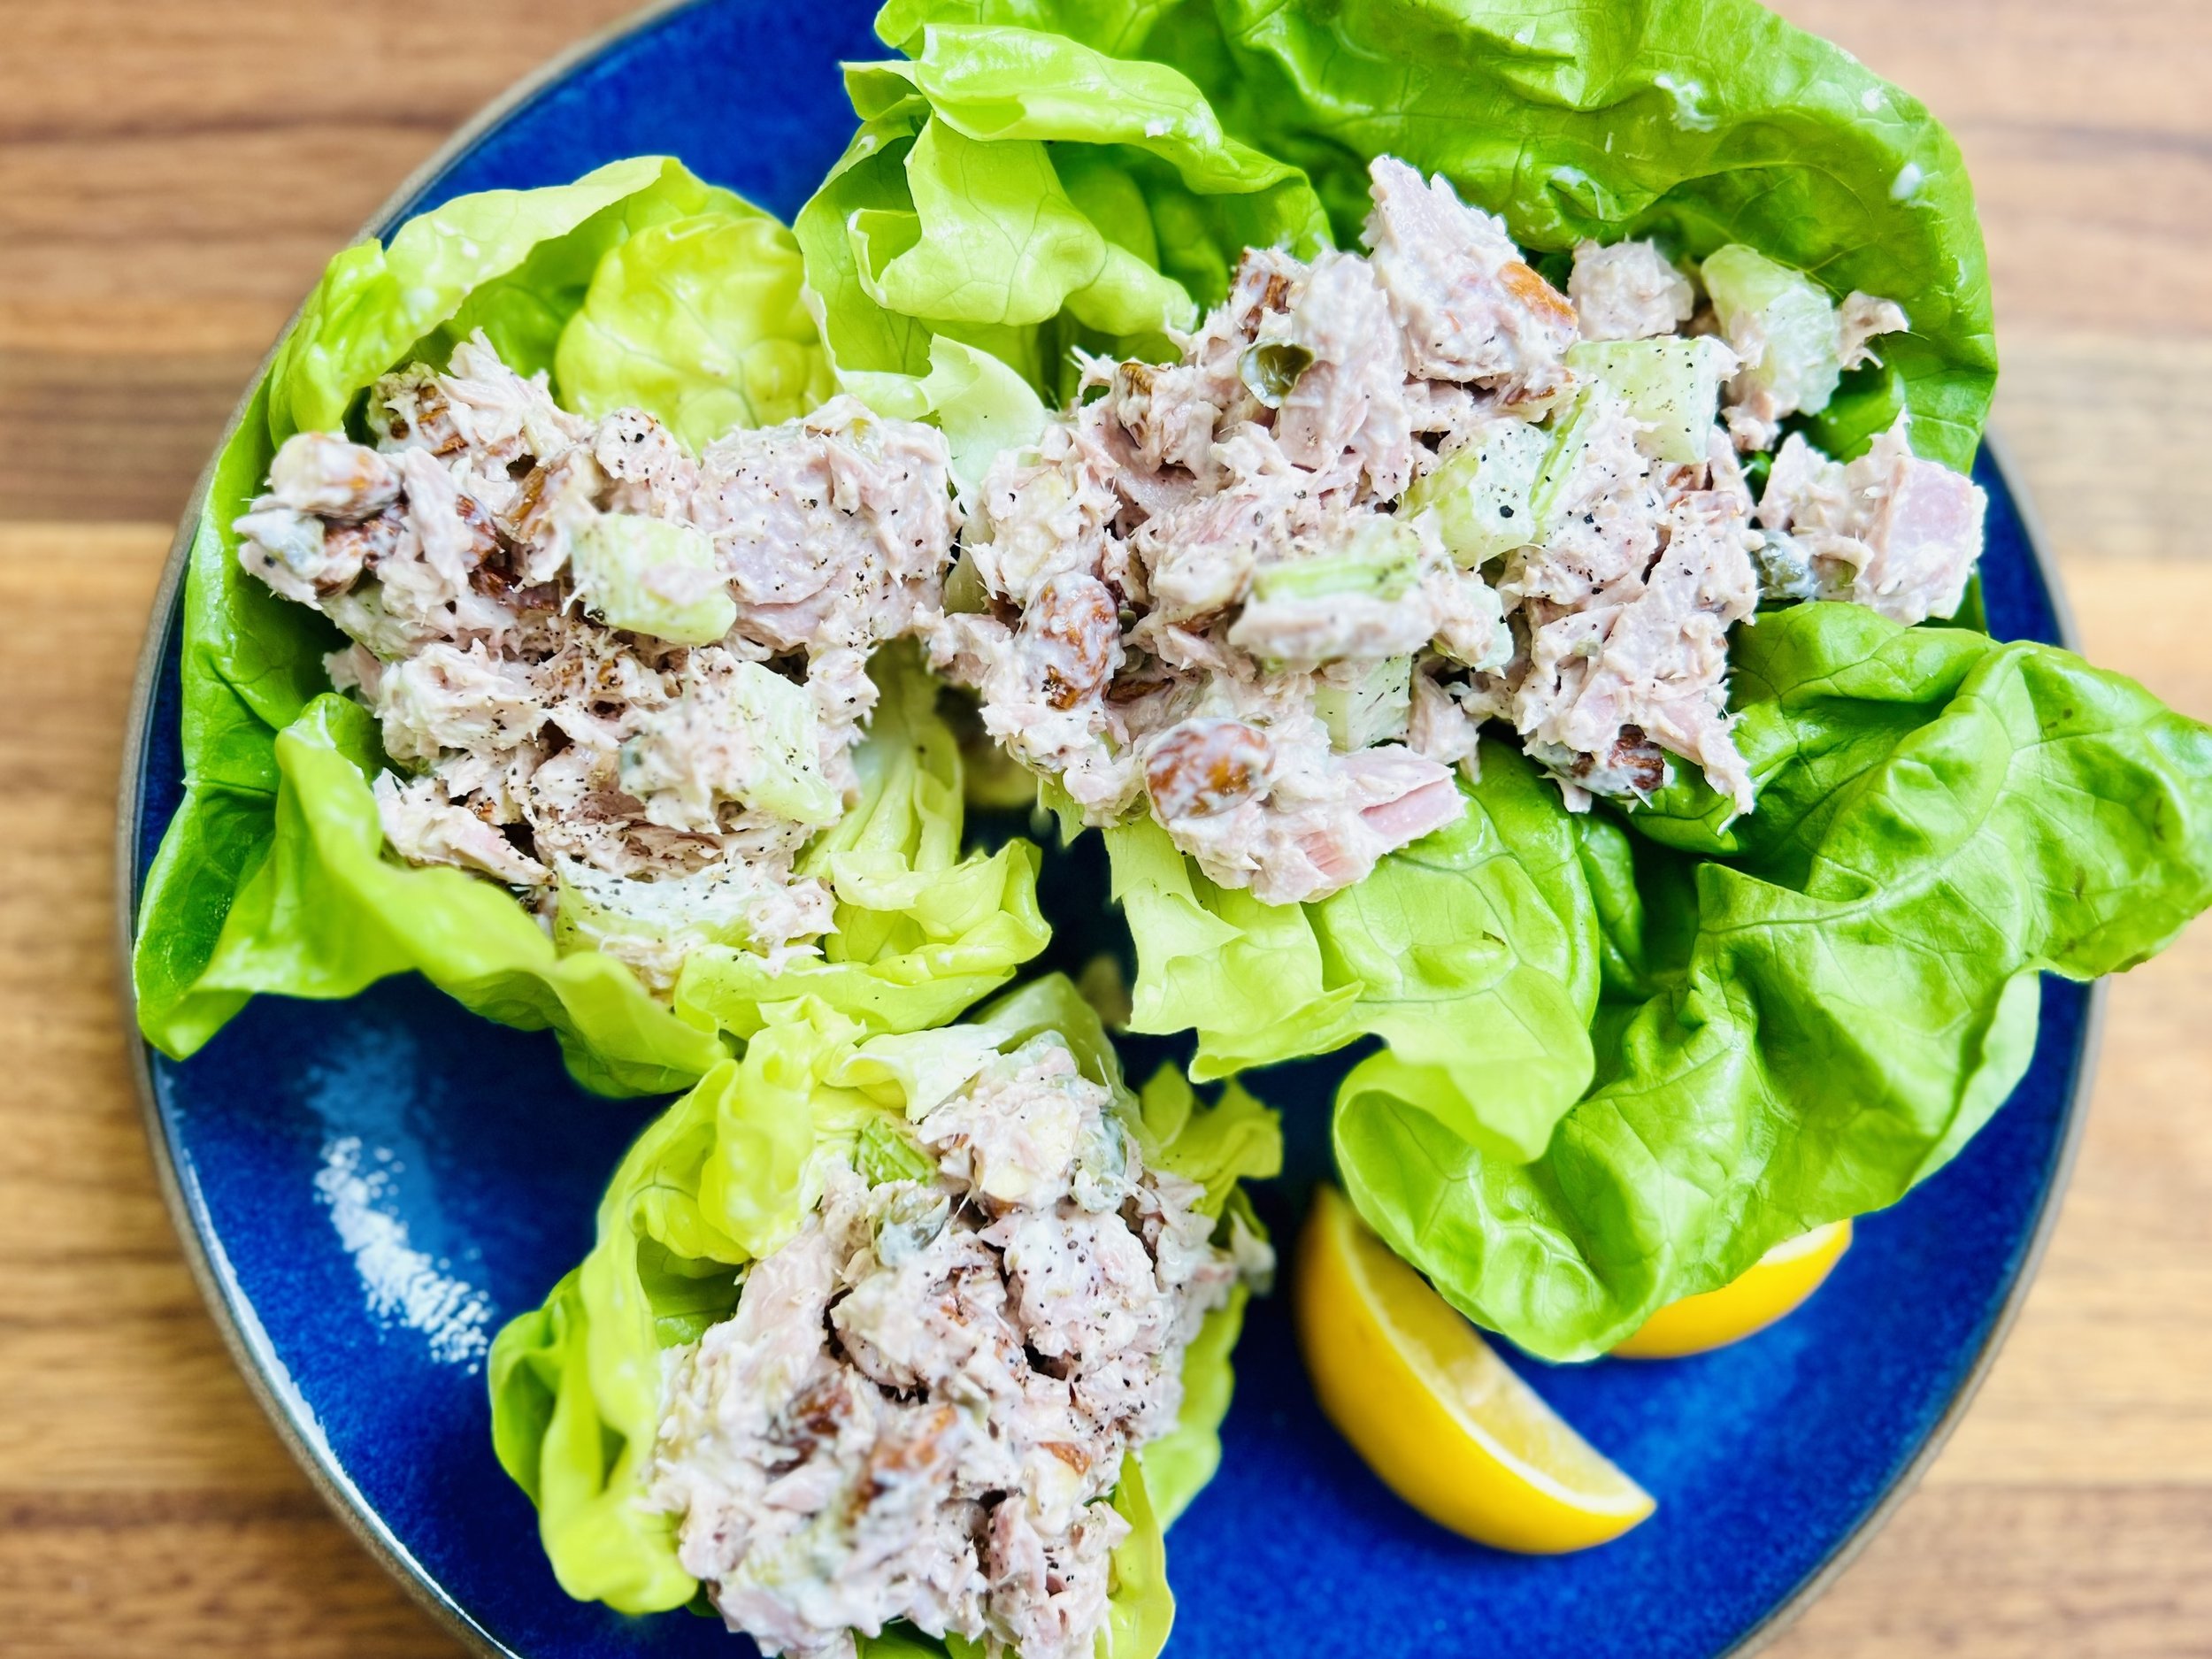


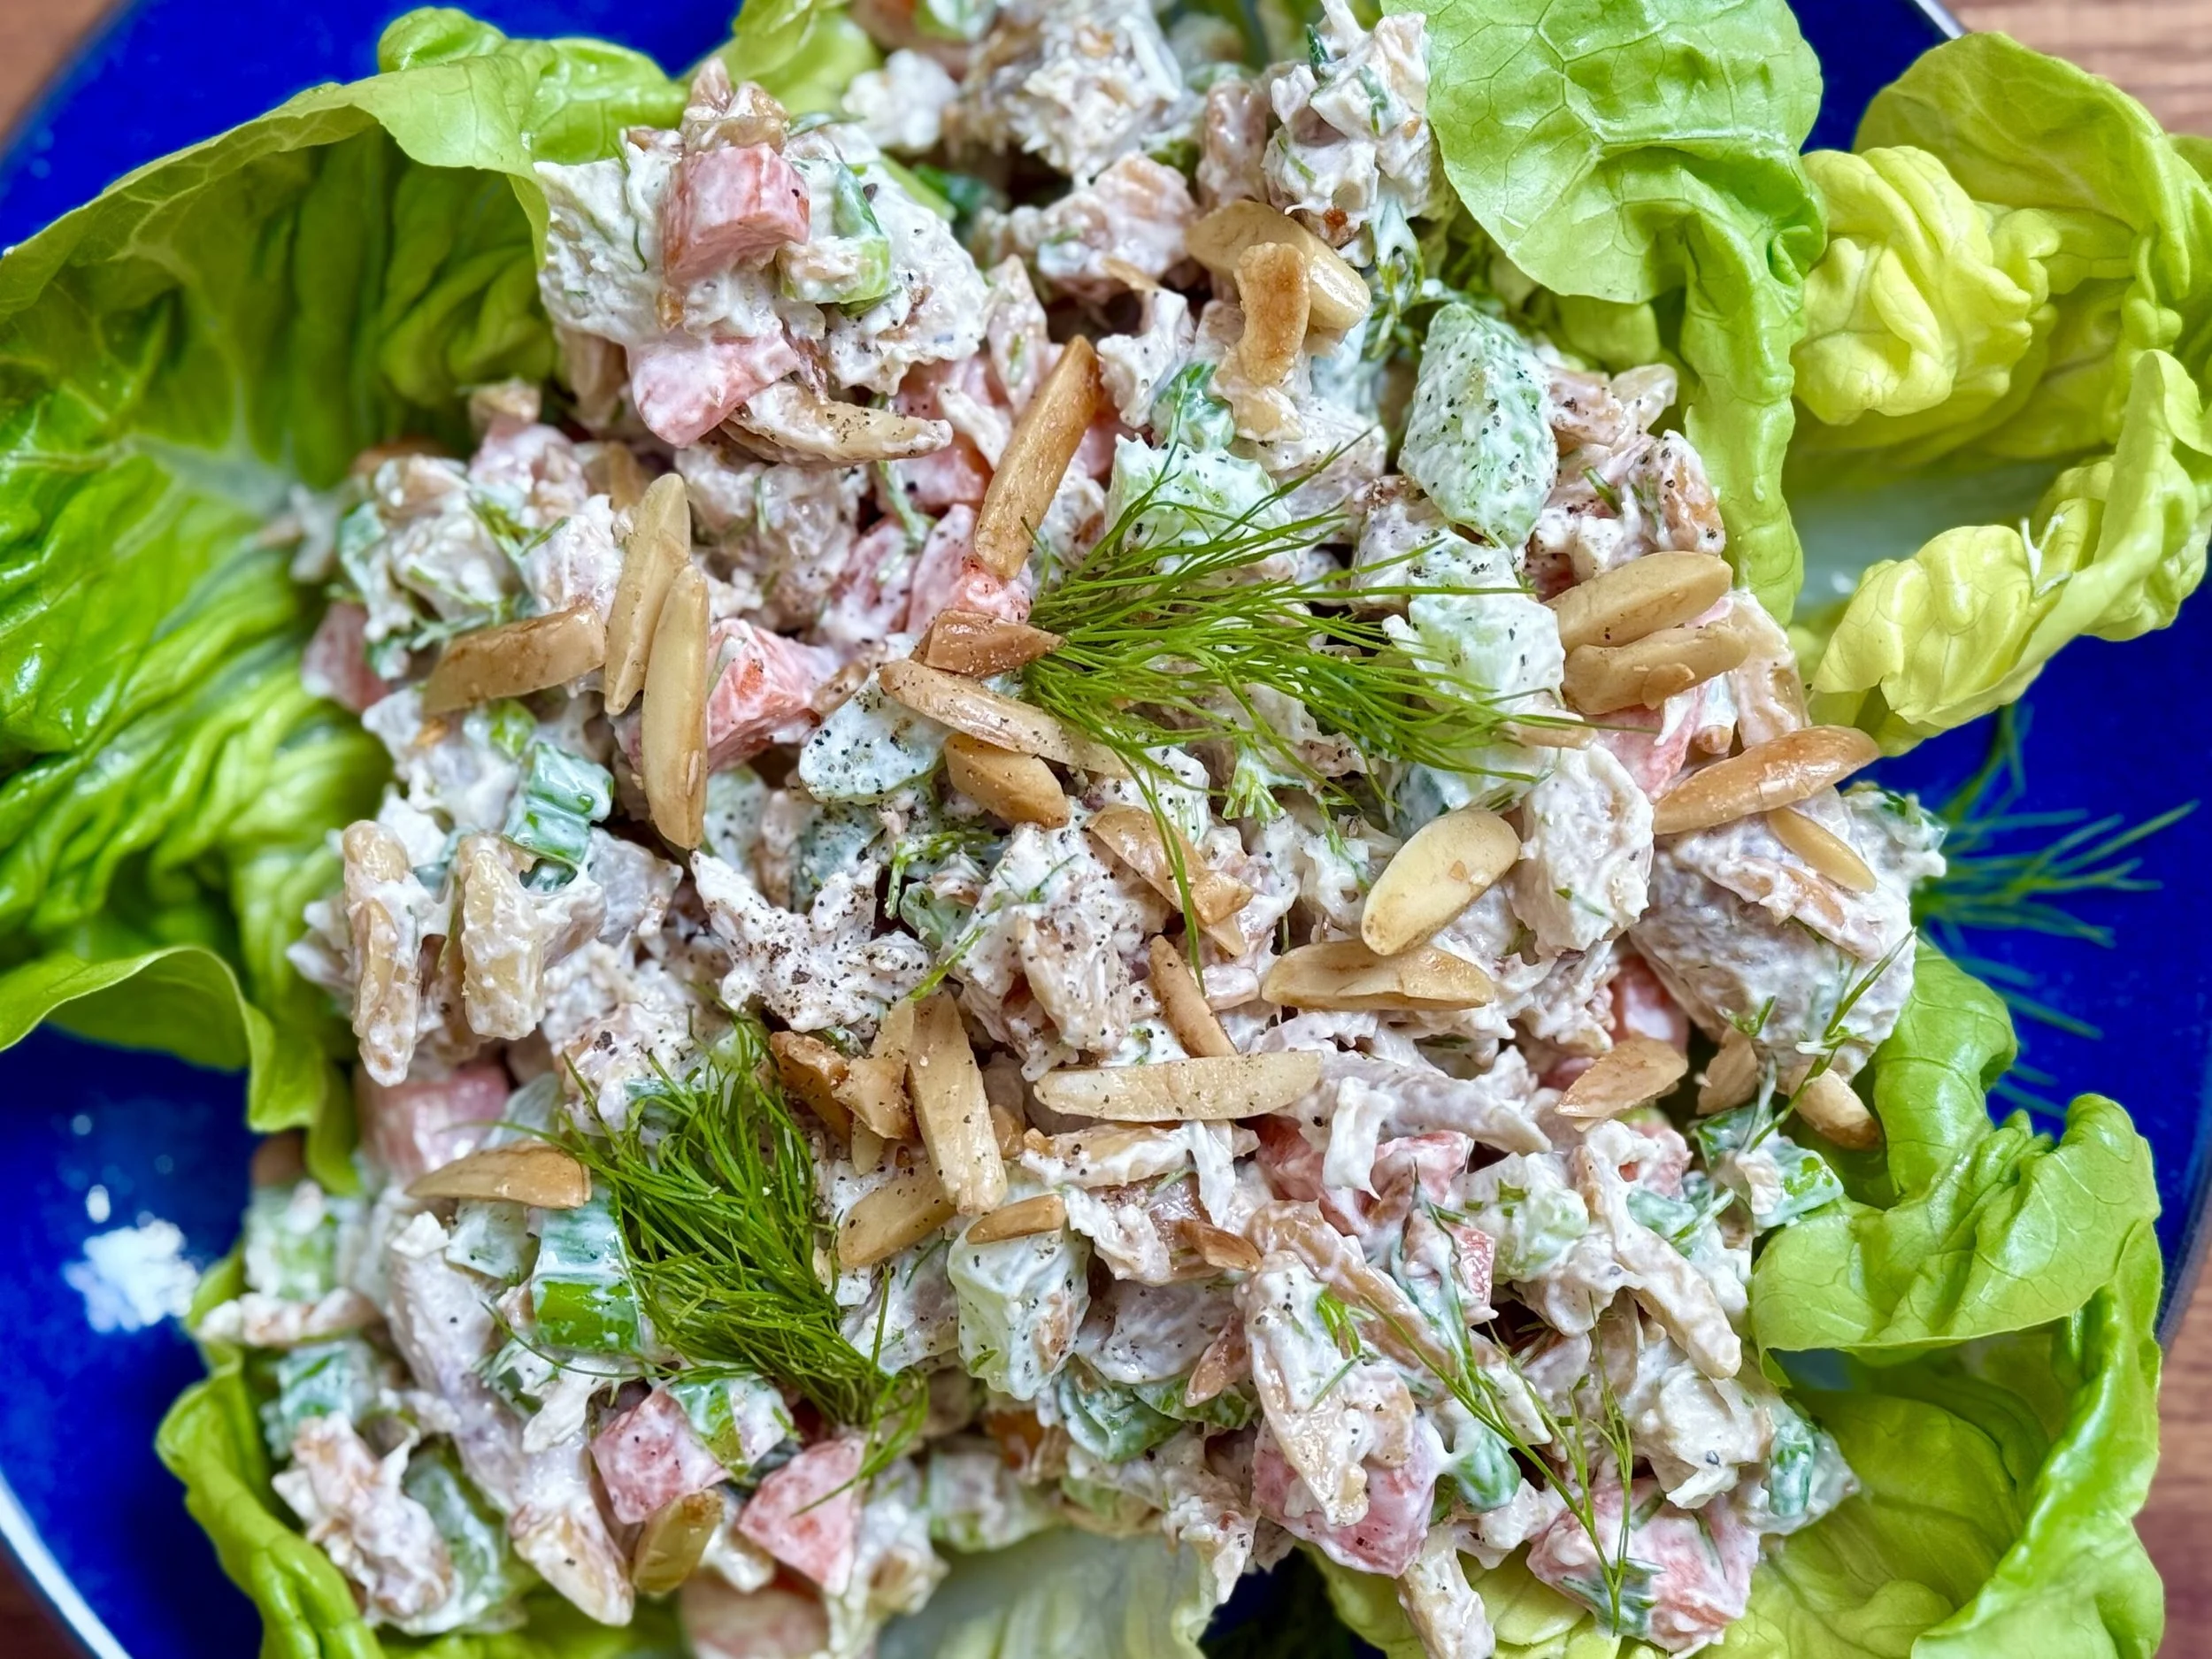
Tuna Salad Lettuce Wraps (Low FODMAP)
10 Minutes prep • Low FODMAP • Gluten-free • Serves 2
10 Minutes prep • Low FODMAP • Gluten-free • Serves 2 • Ok to make ahead: Steps 1-2
This is the perfect energizing lunch. Protein, fiber, plants, and delicious flavor. It’s light and hearty at the same time. The almonds and celery give it a wonderful crunch while the capers provide a depth of flavor that isn’t always common in a tuna salad. And, capers are an especially good source of antioxidants like quercetin and rutin both of which have been well-studied for their ability to alleviate inflammation, enhance wound healing, and promote healthy blood sugar levels.
Ingredients
1 can skipjack tuna or yellowfin tuna in water or olive oil (these iare lowest in mercury but you can use any variety you like)
1/2 cup raw almonds, chopped
1/2 stalk celery, chopped
2 - 3 tablespoons avocado mayonnaise (or regular mayo is OK too)
1 teaspoon lemon juice
1 tablespoon (or more) capers, rinsed thoroughly and roughly chopped
1/4 teaspoon Kosher salt
1/4 teaspoon black pepper
6 whole leaves butter lettuce, washed and spun dry
Directions
(1) Prepare: Wash and spin dry the lettuce. Chop the almonds and celery. Rinse and chop the capers. Drain the water or oil out of the tuna.
(2) Make the salad: Combine all ingredients in a bowl using a fork to break up the tuna and blend the ingredients together. Taste and adjust seasoning with additional lemon juice, salt, or pepper if needed.
(3) Plate and serve: Spoon the tuna salad into the lettuce leaves and serve.
Eat and enjoy every bite because you can!
Recipe note: I use Diamond Crystal Kosher salt in all my recipes because it has a wonderful flat and crisp flake that tastes delicious. It is also the least salty salt available so you can use it more liberally as a seasoning than you can table salt or sea salt. If you use another type of salt, you may need to reduce the amount so it is not over-salted.
Have a question you’d like to have answered? Email me at hello@ibsgamechanger.com
Link note: This post may contain affiliate links for you to easily purchase items that are linked. I may earn a small commission from qualifying purchases but none of this costs you a thing so feel free to use the links! In addition, for some items, I have provided a special discount code for IBS Game Changers so be sure to use the code when you purchase an item to get the discount that has been arranged just for you.
More Deliciously Low FODMAP™ salad recipes


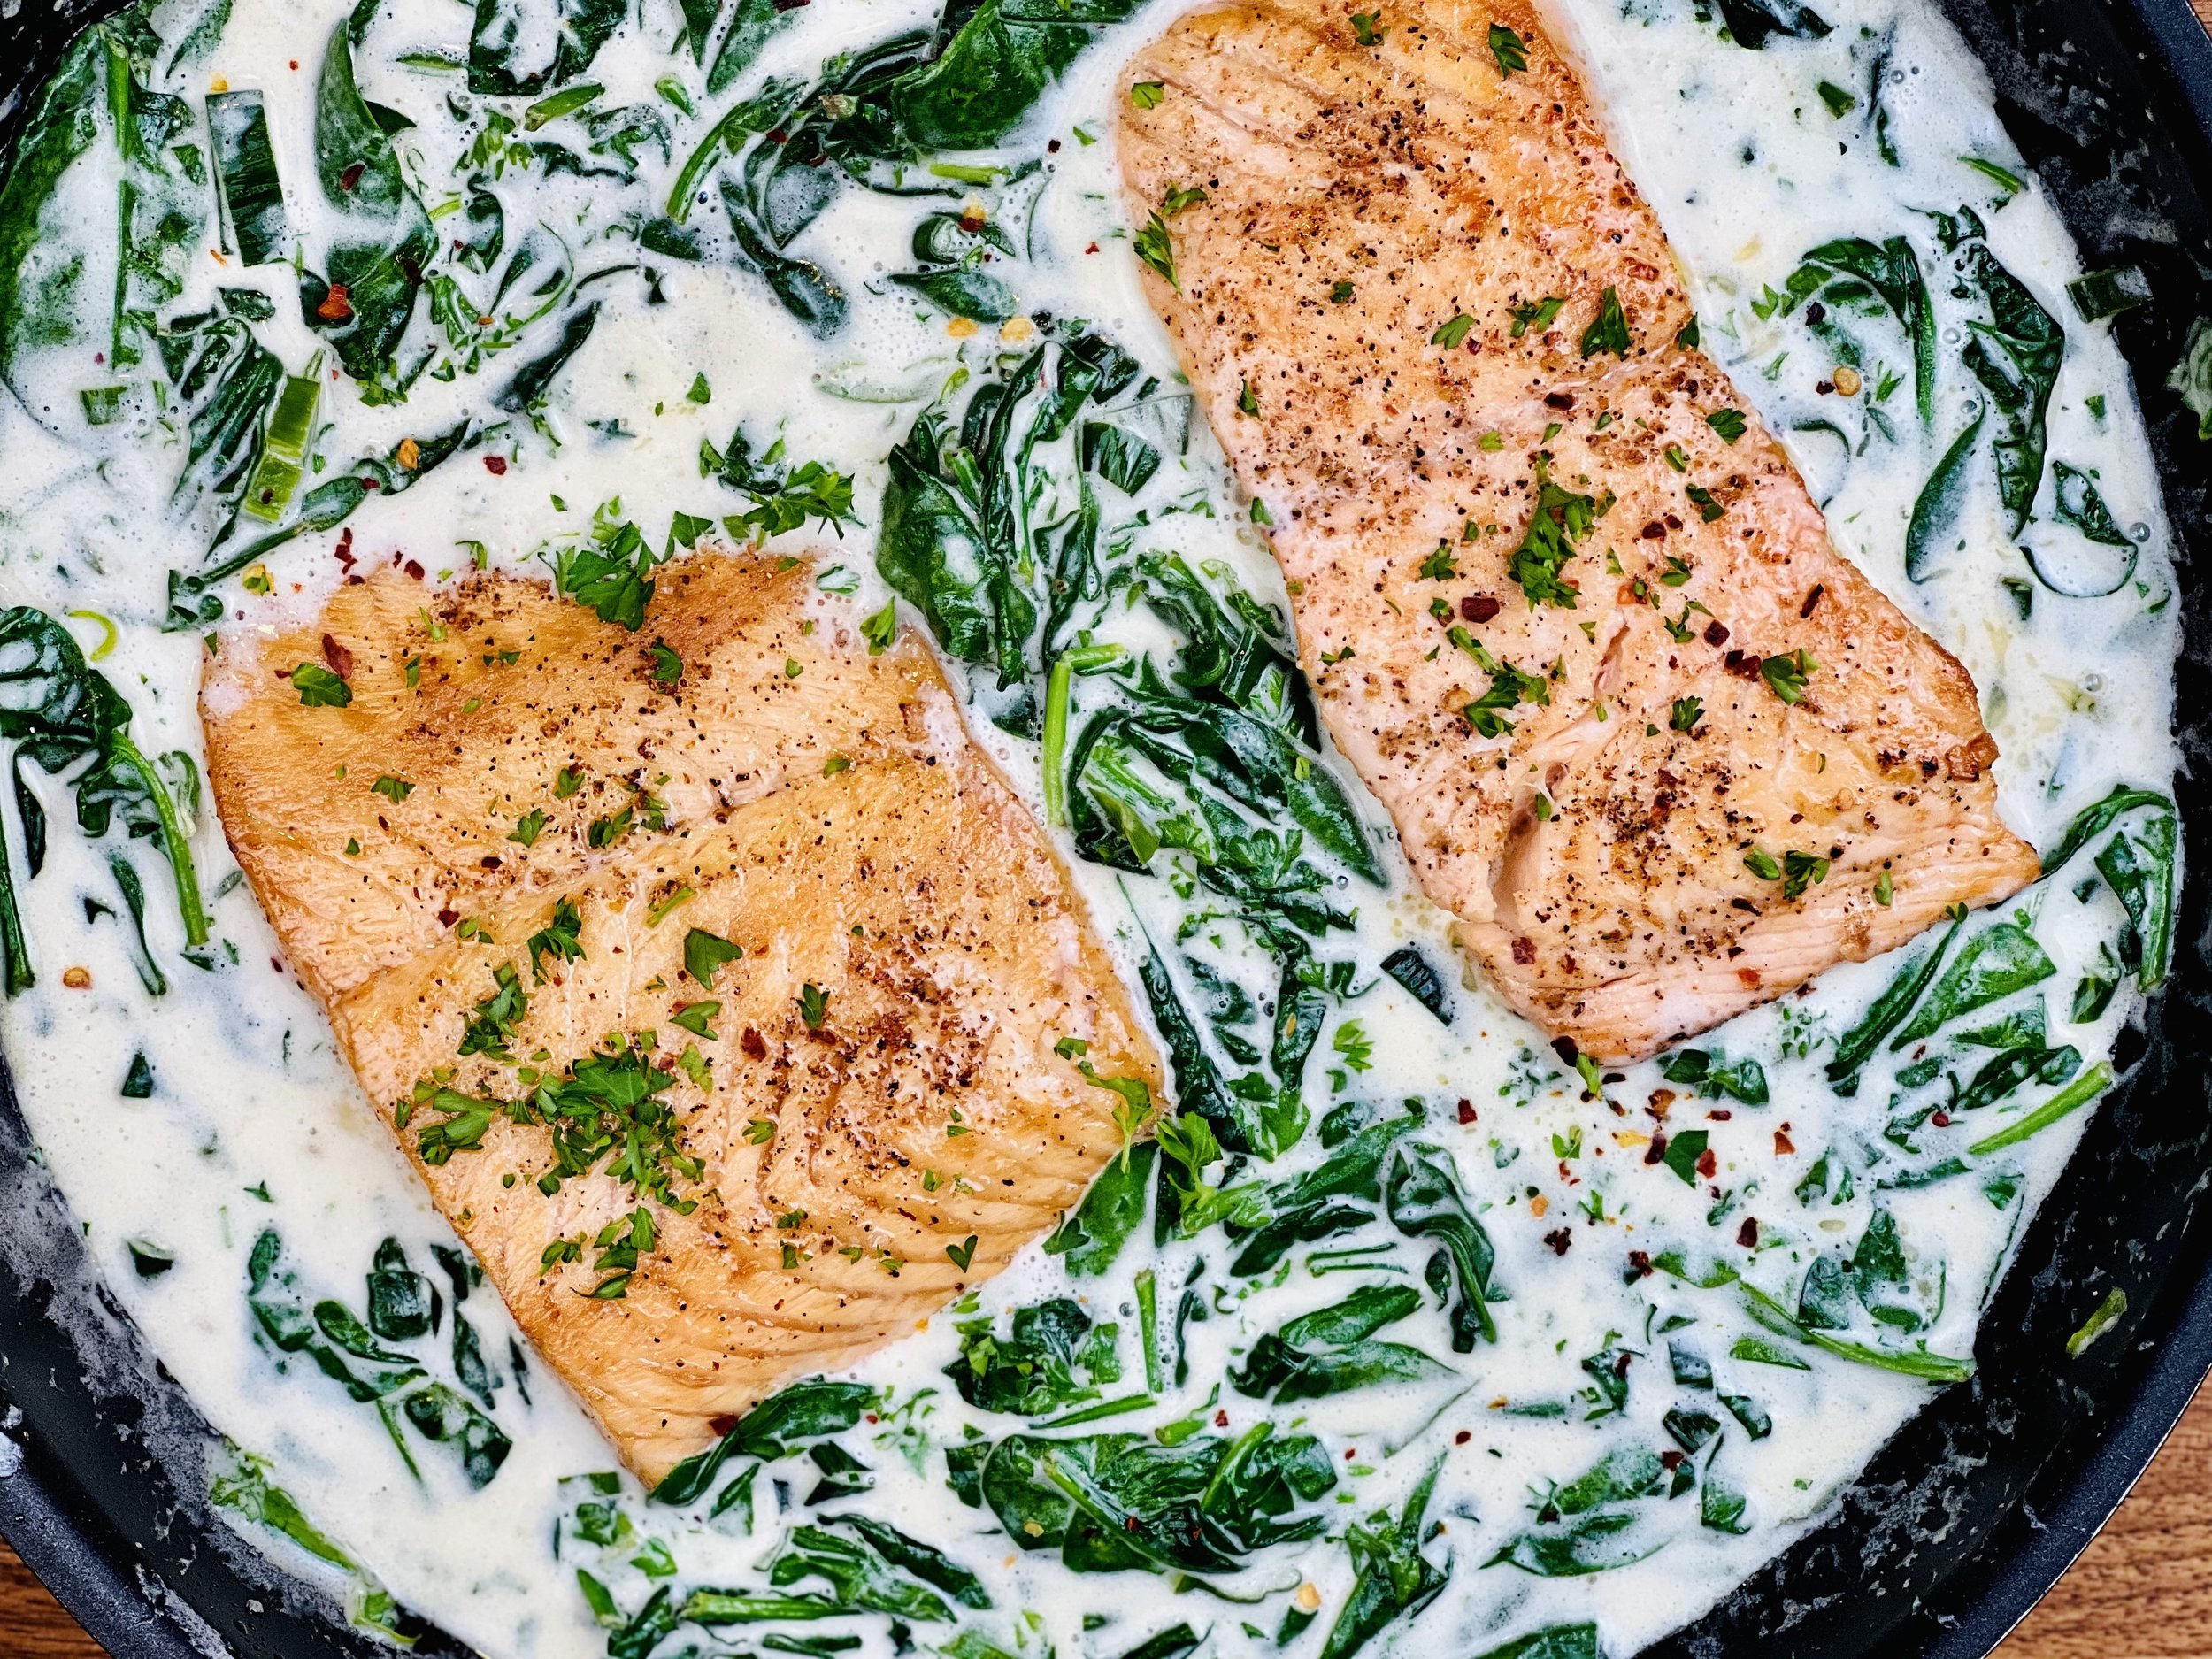
Creamy Spinach and Salmon (Low FODMAP)
10 Minutes prep • 15 Minutes cook • Low FODMAP • Gluten-free • Serves 4
10 Minutes prep • 15 Minutes cook • Low FODMAP • Gluten-free • Serves 4
Five-star flavor on a weeknight? This is it. Super creamy and delicious, this one-pan meal is quick and easy enough to make on a weeknight and fancy enough to serve for company. And, because you make it all in one pan, clean-up is a snap too. Tons of fresh spinach turns silky in the lemony cream sauce and makes a perfect companion for delicious salmon filets. Use fresh salmon for the best flavor and texture, but frozen salmon works great too!
Ingredients
4 salmon filets, with or without skin
2 tablespoons garlic-infused olive oil
2 tablespoons salted butter
1 leek (green part only), thinly sliced
1/2 teaspoon crushed red pepper flakes
1 cup canned full-fat coconut milk, or heavy cream (or a combination)
1/2 cup lactose-free milk (if needed to thin the sauce)
2 ounces lactose-free cream cheese, at room temperature
1/2 teaspoon Kosher salt and 1/4 teaspoon black pepper
1/2 cup grated parmesan cheese
4 cups fresh baby spinach
Juice of 1 lemon
2 tablespoons chopped fresh parsley, plus more for serving
Directions
(1) Prepare: Season the salmon with a sprinkle of salt and pepper on each side.
(2) Cook the salmon: Heat the olive oil in a large skillet over medium heat. When the oil shimmers, add the salmon, skin side down (if using salmon with skin), and cook for 2-3 minutes until the salmon is crisp on the bottom. Carefully flip each filet, and continue cooking for another 2-3 minutes, or until the salmon is cooked to your preference. Remove to a plate and set aside. If desired, remove the salmon skin and discard.
(3) Make the sauce: To the same skillet, add the butter and leek greens and cook for about a minute. Add the crushed red pepper flakes, coconut milk, cream, and cream cheese. Season the sauce with salt and pepper. Bring to a simmer over medium heat, stirring until smooth and creamy. Add the parmesan, and spinach and cook until the spinach is wilted, about 3-5 minutes. Stir in the lemon juice and parsley. Taste and add more salt or pepper if needed.
(4) Finish: Put the salmon back into the pan and cook for a minute or two to warm the salmon if it has cooled.
(5) Plate and serve: To serve, put a scoop of spinach and cream on each plate then add a piece of salmon atop the spinach, then spoon the sauce over the top. Serve with a sprinkle of chopped parsley and red pepper flakes.
Eat and enjoy every bite because you can!
Recipe note: I use Diamond Crystal Kosher salt in all my recipes because it has a wonderful flat and crisp flake that tastes delicious. It is also the least salty salt available so you can use it more liberally as a seasoning than you can table salt or sea salt. If you use another type of salt, you may need to reduce the amount so it is not over-salted.
Have a question you’d like to have answered? Email me at hello@ibsgamechanger.com
Link note: This post may contain affiliate links for you to easily purchase items that are linked. I may earn a small commission from qualifying purchases but none of this costs you a thing so feel free to use the links! In addition, for some items, I have provided a special discount code for IBS Game Changers so be sure to use the code when you purchase an item to get the discount that has been arranged just for you.
More Deliciously Low FODMAP™ seafood recipes
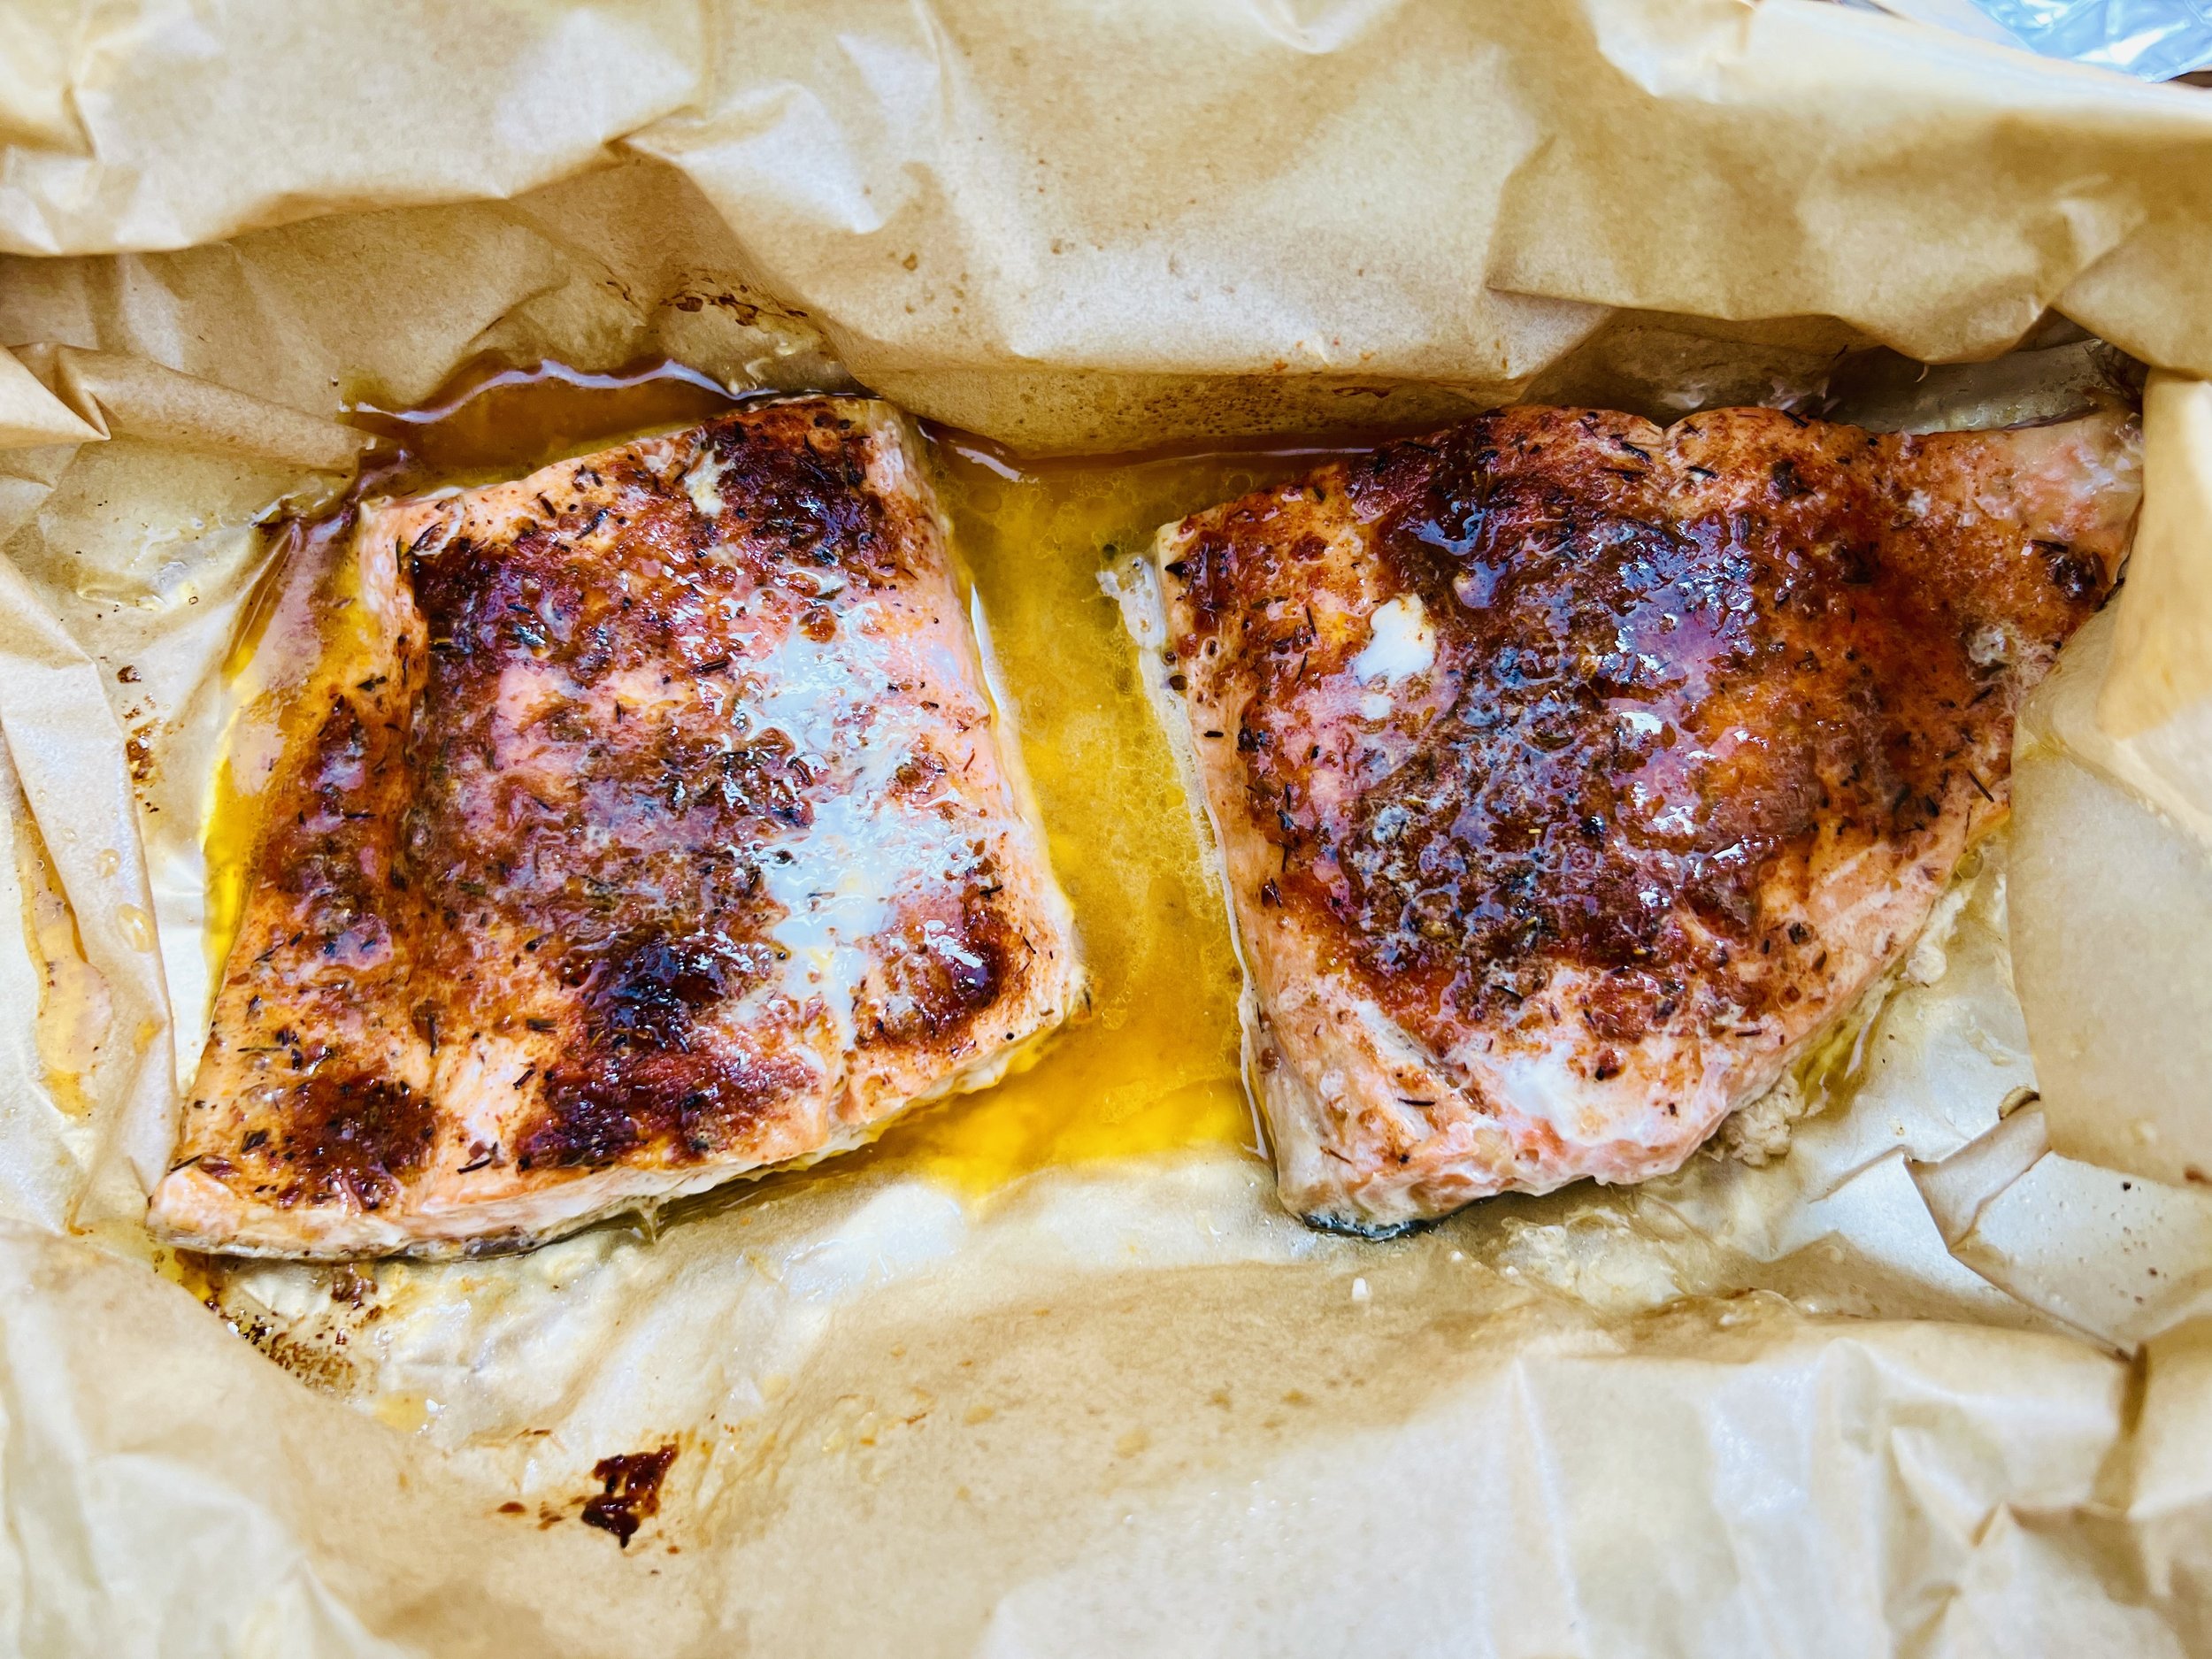
Lemon Dijon Salmon Filets En Papillote (Low FODMAP)
10 Minutes prep • 20 Minutes cook • Low FODMAP • Glutne-free • Serves 4
10 Minutes prep • 20 Minutes cook • Low FODMAP • Glutne-free • Serves 4 • Ok to make ahead: Steps 1-3
Dijon mustard and salmon pair very nicely as the bold flavor of the fish is enhanced by the bold flavor of the mustard. Whether you cook the fish on the grill or in the oven, this method of cooking, called “En Papillote” or “in paper,” is a great way to maintain flavor and moisture. Simple to make for one or two people, this recipe and method can be doubled (or tripled or more!) to serve many people, so it’s a great main course for a big family gathering or party.
Ingredients
4 salmon filets (skin on or off)
1 teaspoon Kosher salt
1/4 teaspoon black pepper
4 tablespoons Dijon mustard
3 tablespoons salted butter
1 lemon, sliced (and seeds removed)
Chives or green onions
Ingredients: Sauce
1/4 cup salted butter
Juice of 1/2 lemon
Directions
(1) Prepare: Preheat the oven or grill to about 400 degrees F. Lay a large piece of foil on a cookie sheet and then lay a large piece of parchment paper on top of the foil. Set the salmon filets close together but not touching on the parchment. Lightly salt and pepper the filets.
(2) Prepare the salmon: Put about 1 tablespoon of Dijon on each salmon filet and use the back of a spoon or your fingers to spread it evenly over the top and sides of the filet. Add a pat of butter and then top with two lemon slices for each filet.
(3) Wrap the salmon: Pull the foil up around the salmon and roll it together at the top to make a seal. Then fold the ends of the foil package to completely seal the salmon inside. This method is called “En Papillote” or “in paper” and it’s a great way to maintain flavor and moisture when you cook.
Make-ahead note: At this point, you may keep the salmon in the refrigerator until you’re ready to cook it.
(4) Cook the salmon: Slide the entire foil packet directly on the grill grate (if grilling). If cooking in the oven, you can keep the foil package on a cookie sheet. Bake for 15-20 minutes, until the salmon is cooked to your liking (when the fish is opaque all the way through it is fully cooked.) Remove from the heat. When ready to serve, open the foil packet. If you used salmon with the skin on, you may use a sharp metal spatula to pick up the meat of the salmon and leave the skin behind if you wish.
(5) Make the sauce: Melt the butter with the lemon juice in the microwave or on the stove.
(6) Plate and serve: Serve the salmon on a bed of rice, pasta, or vegetables. Drizzle generously with the sauce. Sprinkle with chives or green onion greens and a grind or two of black pepper. Serve alongside one of my crisp green salads.
Eat and enjoy every bite because you can!
Recipe note: I use Diamond Crystal Kosher salt in all my recipes because it has a wonderful flat and crisp flake that tastes delicious. It is also the least salty salt available so you can use it more liberally as a seasoning than you can table salt or sea salt. If you use another type of salt, you may need to reduce the amount so it is not over-salted.
Have a question you’d like to have answered? Email me at hello@ibsgamechanger.com
Link note: This post may contain affiliate links for you to easily purchase items that are linked. I may earn a small commission from qualifying purchases but none of this costs you a thing so feel free to use the links! In addition, for some items, I have provided a special discount code for IBS Game Changers so be sure to use the code when you purchase an item to get the discount that has been arranged just for you.
More Deliciously Low FODMAP™ seafood recipes
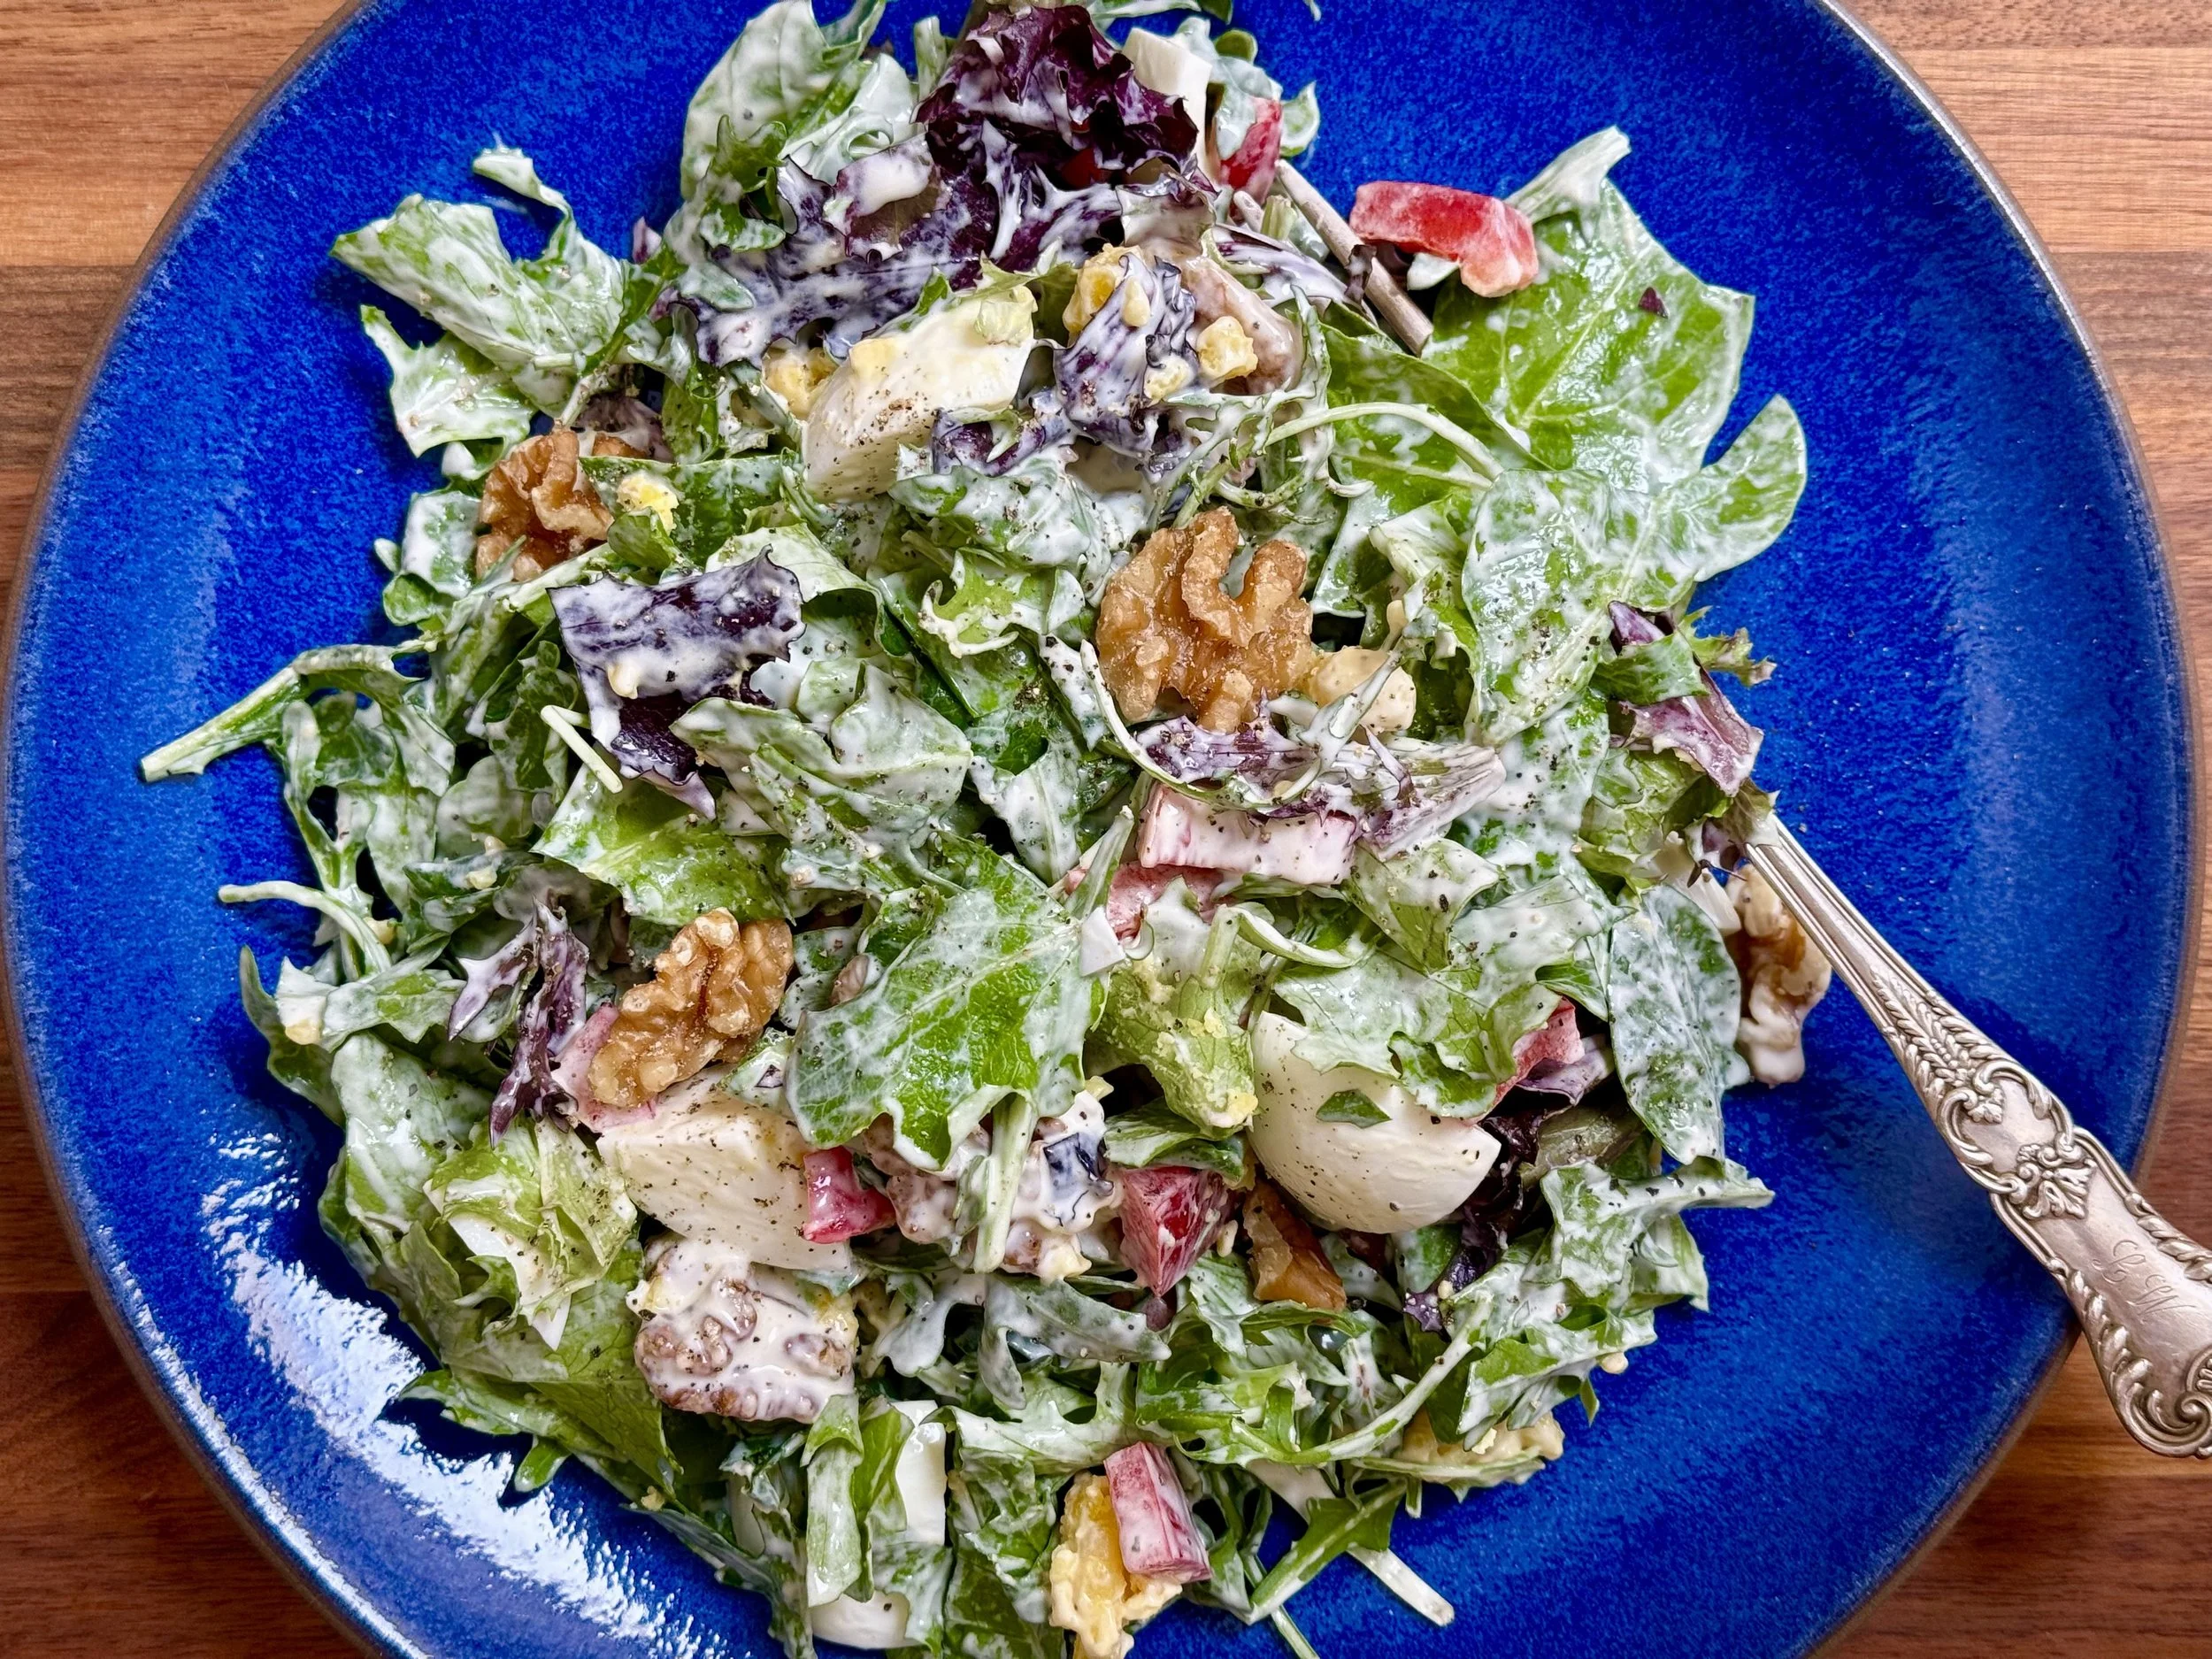
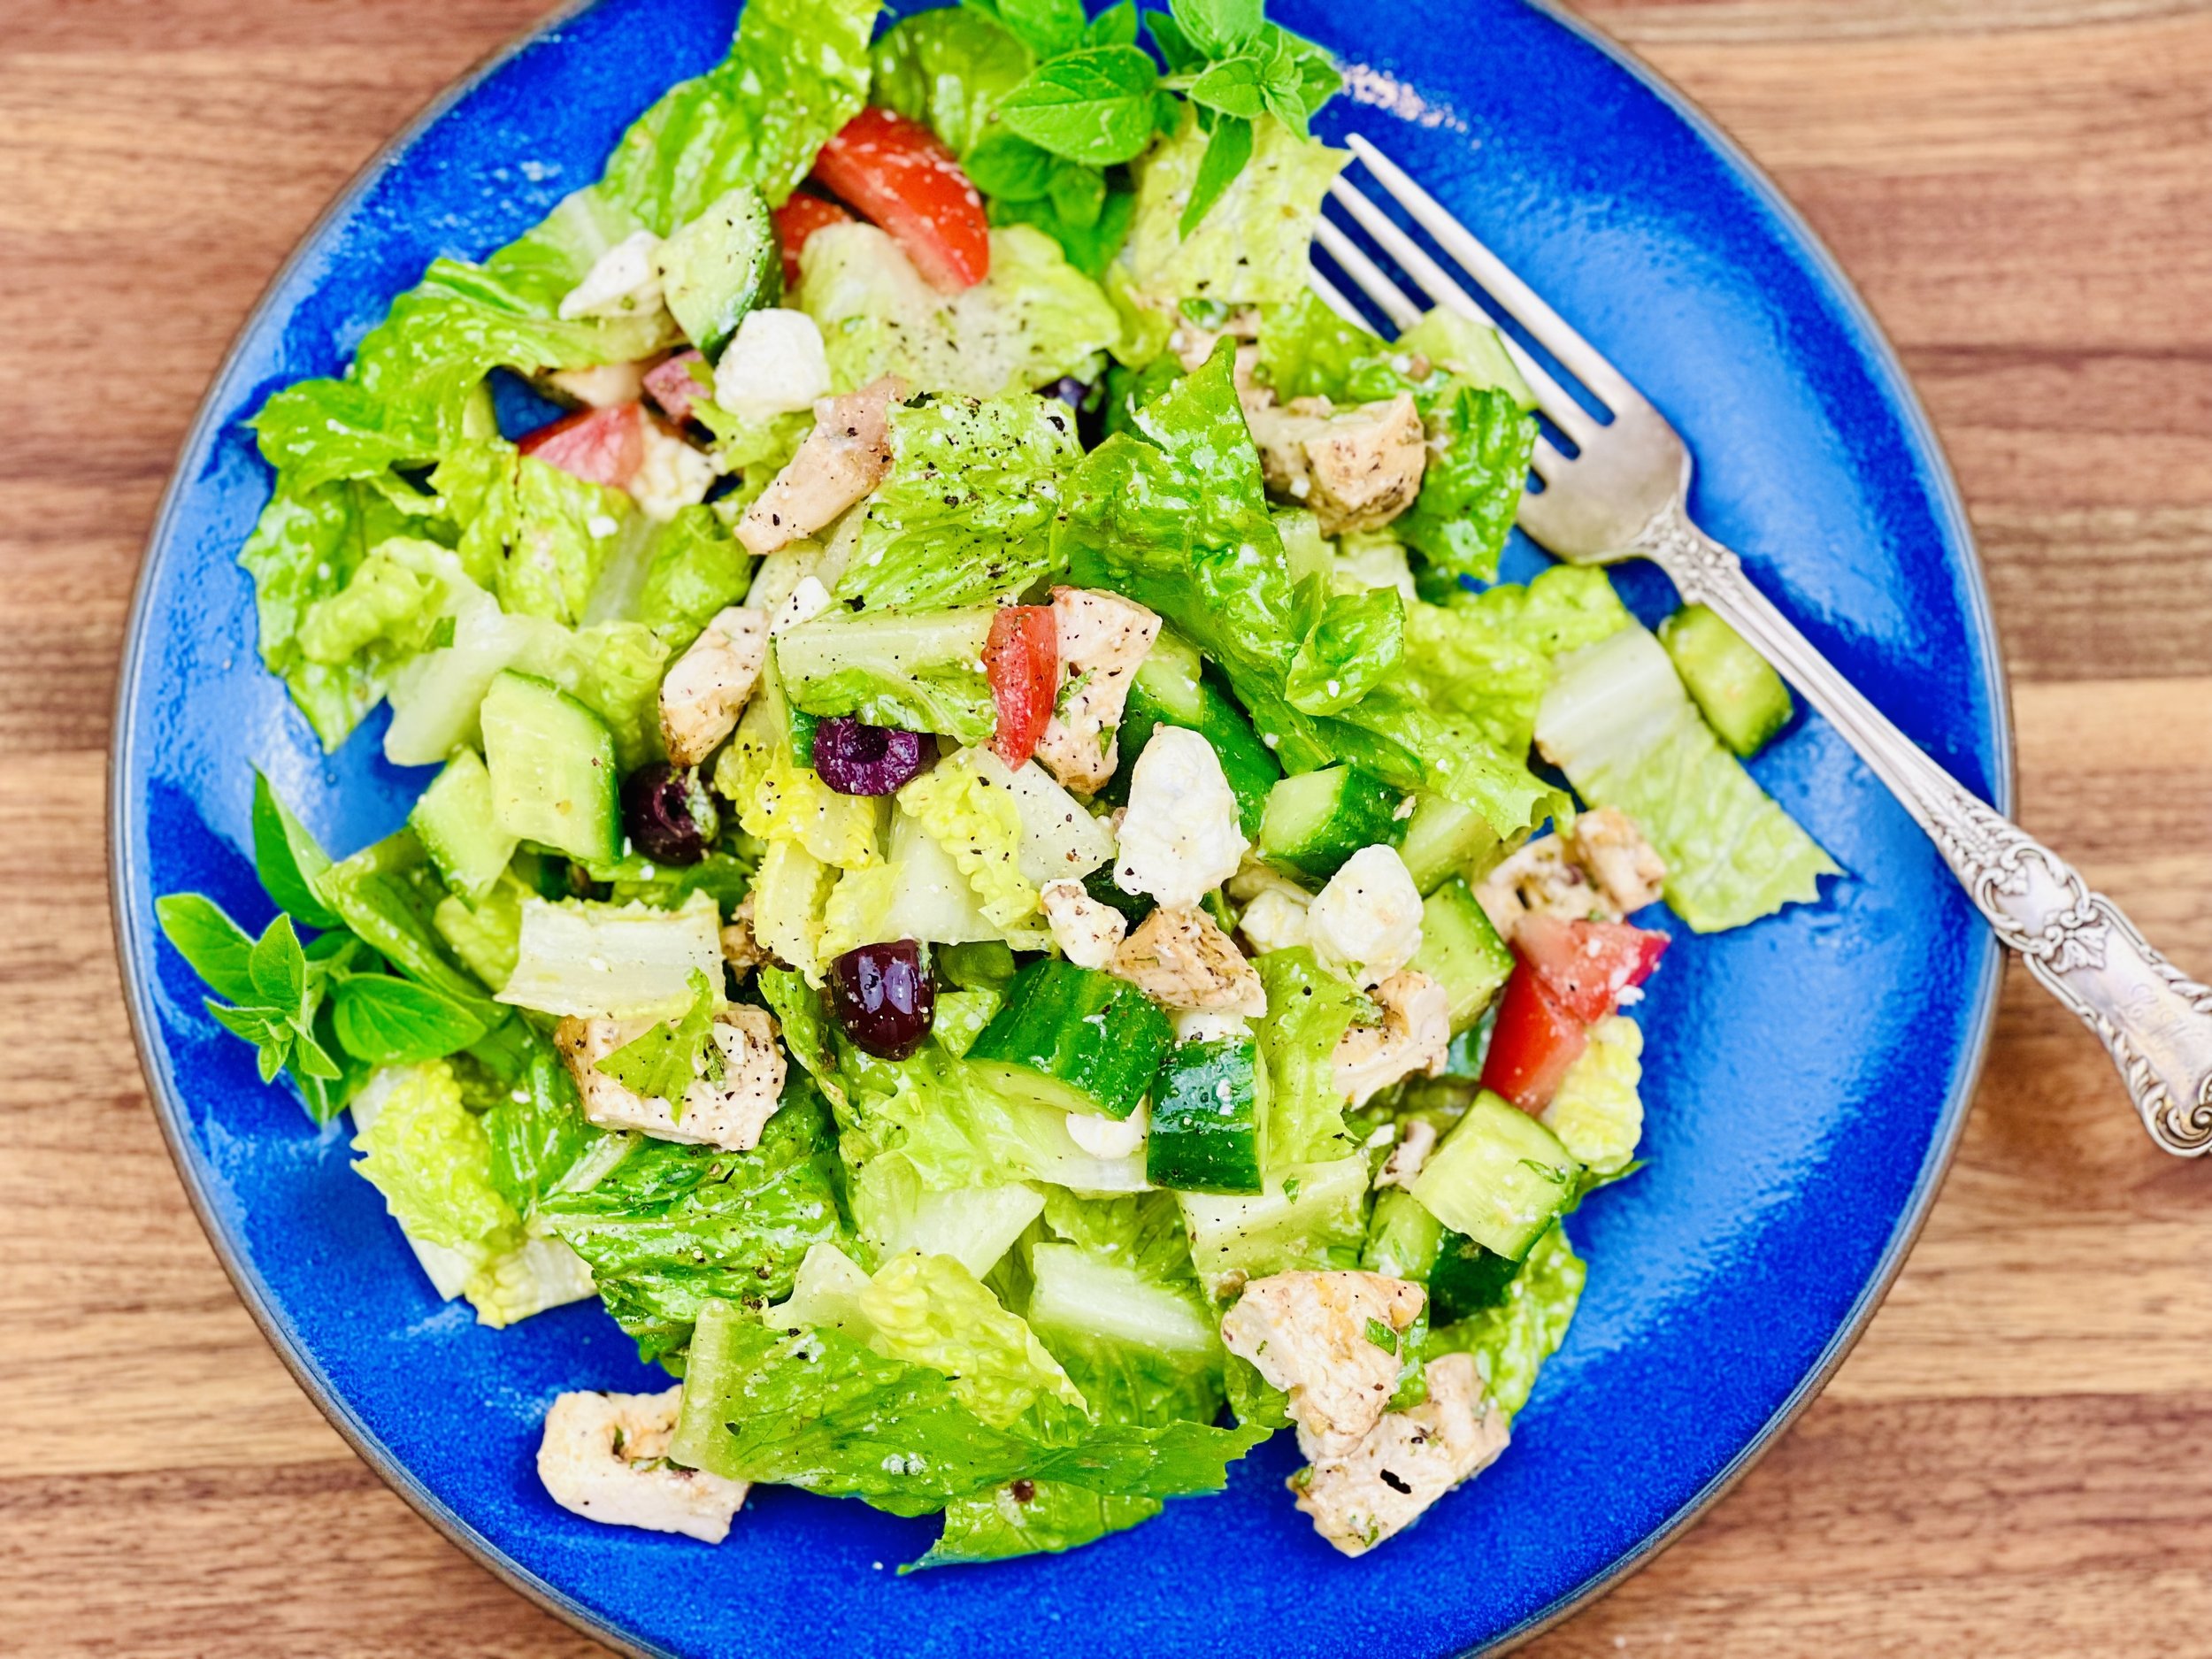
Easy Smoked Salmon Salad (Low FODMAP)
20 Minutes prep • 3-4 Hours cook • Low FODMAP • Gluten-free • Serves 6
20 Minutes prep • 3-4 Hours cook • Low FODMAP • Gluten-free • Serves 6 • Ok to make ahead: Steps 1-3
Creamy avocado, perfect eggs, tangy feta, crisp lettuce, and cool cucumbers are the perfect bed for this delicious smoked salmon. Drizzle on the lemon dijon dressing and you have a perfectly delicious and quite hearty salad. I cooked the salmon on my backyard smoker, but you could cook it in the oven and it would still be delicious.
Ingredients: Salmon
1 1/2 pounds salmon or steelhead salmon
1 - 2 tablespoons Smoke N Sanity Sweet Maple Dust (Use code IBSGC15 for 15% off)
1 teaspoon Kosher salt
1/2 teaspoon Red pepper flakes (and here’s a nifty red pepper flake grinder!)
1 tablespoon olive oil
1/2 - 1 lemon sliced
Ingredients: Salad
1 head butter lettuce, washed and dried
2 - 3 Persian cucumbers, washed and sliced
Handful of cherry tomatoes, halved
1/3 cup feta cheese, crumbled
Fresh chives and/or dill for serving
Ingredients: Dressing
1/4 cup lemon juice
1/4 cup olive oil
1 1/2 teaspoons Dijon mustard
Kosher salt and pepper
Directions: Salmon
(1) Prepare: Preheat the smoker or grill to 180 degrees F. Lay fish out, skin side down, on a piece of heavy aluminum foil. Sprinkle the sweet maple dust, salt, and red pepper flakes evenly over the fish. Drizzle with olive oil.
(2) Cook the fish: Put the fish on the foil directly on the grill grates. Do not wrap the fish in the foil—leave it flat. Cook with the smoker or grill lid closed for about 3 - 4 hours until the fish is cooked through.
(3) Finish: Remove fish from the grill and add lemon slices and chopped chives.
Make-ahead note: At this point, you may keep the fish in the refrigerator for 2 - 3 days until you’re ready to serve it.
Directions: Salad
(4) Prepare: Wash all produce. Slice cucumbers, break lettuce into bite-sized pieces, and cut cherry tomatoes in half.
(5) Make the dressing: Combine ingredients in a jar or small bowl and shake or whisk to blend.
(6) Make the salad: Put all ingredients except salmon in a large bowl. Toss to combine. Drizzle with dressing and toss once more.
(7) Plate and serve: Put the salad on each plate. Cut the salmon into portions size pieces and lay one on top of each salad. Sprinkle with fresh herbs and a grind of black pepper.
Eat and enjoy every bite because you can!
Recipe note: I use Diamond Crystal Kosher salt in all my recipes because it has a wonderful flat and crisp flake that tastes delicious. It is also the least salty salt available so you can use it more liberally as a seasoning than you can table salt or sea salt. If you use another type of salt, you may need to reduce the amount so it is not over-salted.
Have a question you’d like to have answered? Email me at hello@ibsgamechanger.com
Link note: This post contains links for you to easily purchase items listed on the page. In some cases, we have provided a special discount code for IBS Game Changers so be sure to use it when you purchase an item to get the discount that has been arranged just for you! As an Amazon Associate, I earn a commission from qualifying Amazon purchases.
More Deliciously Low FODMAP™ main course recipes


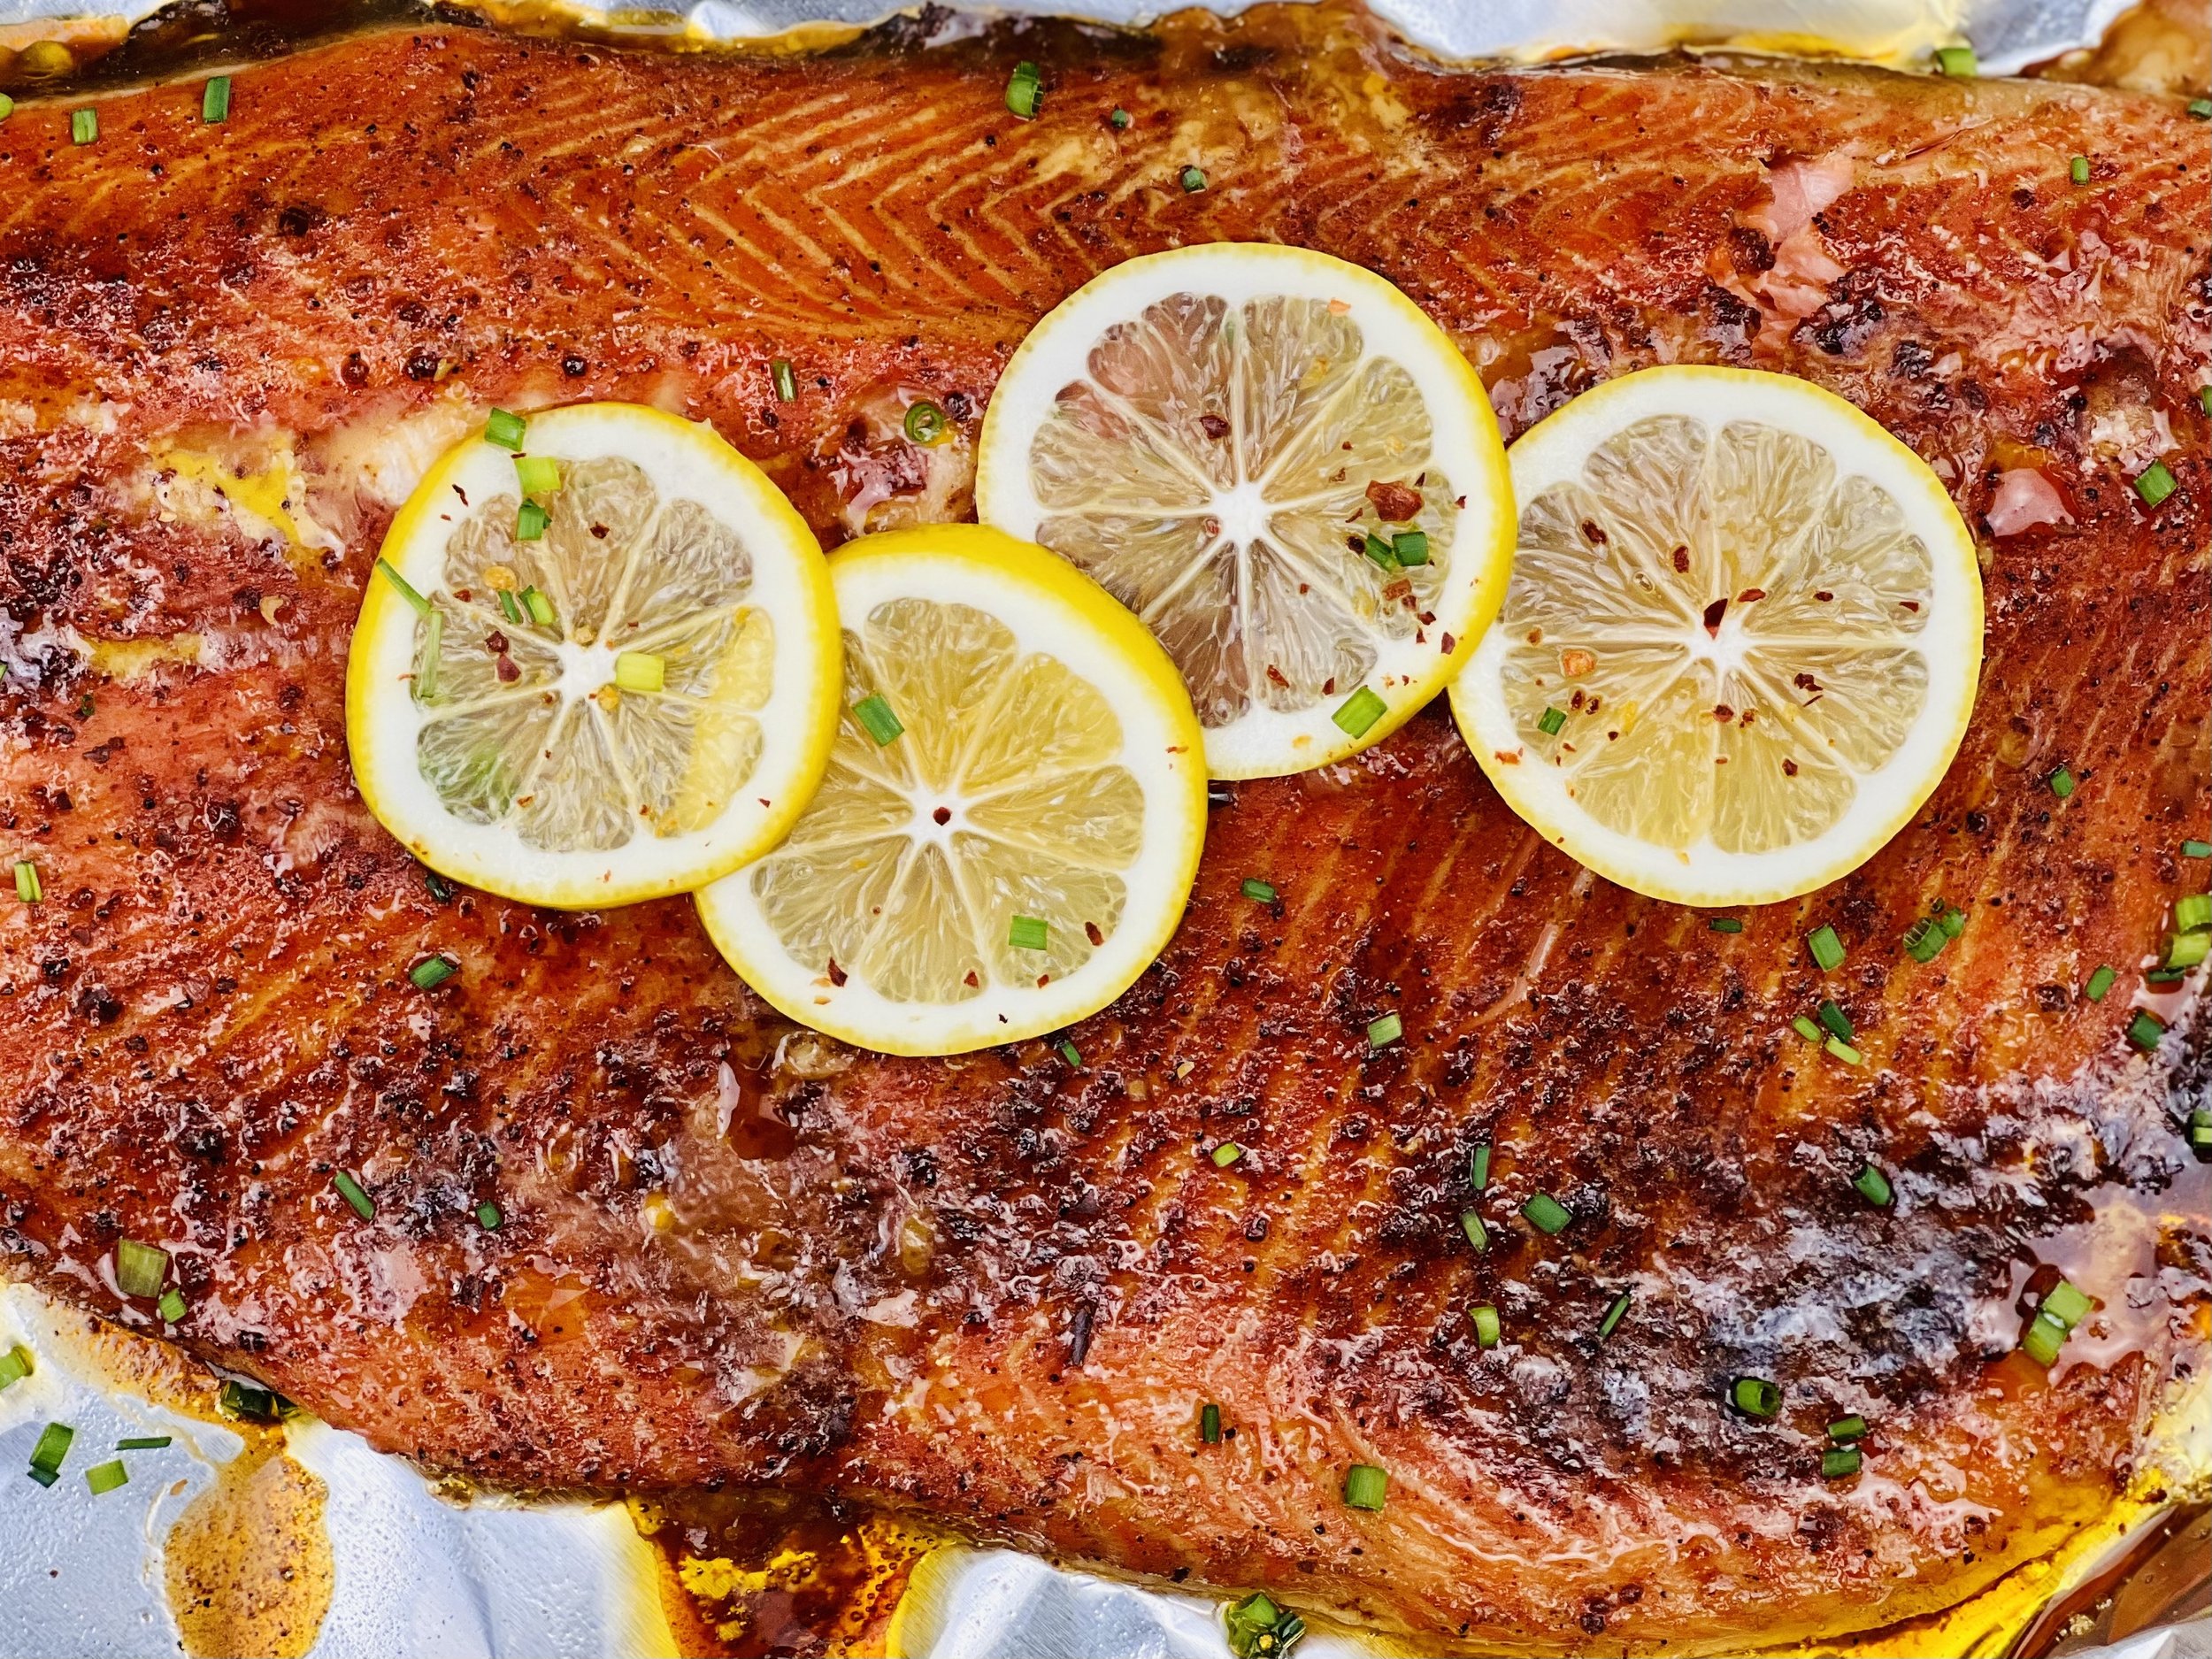
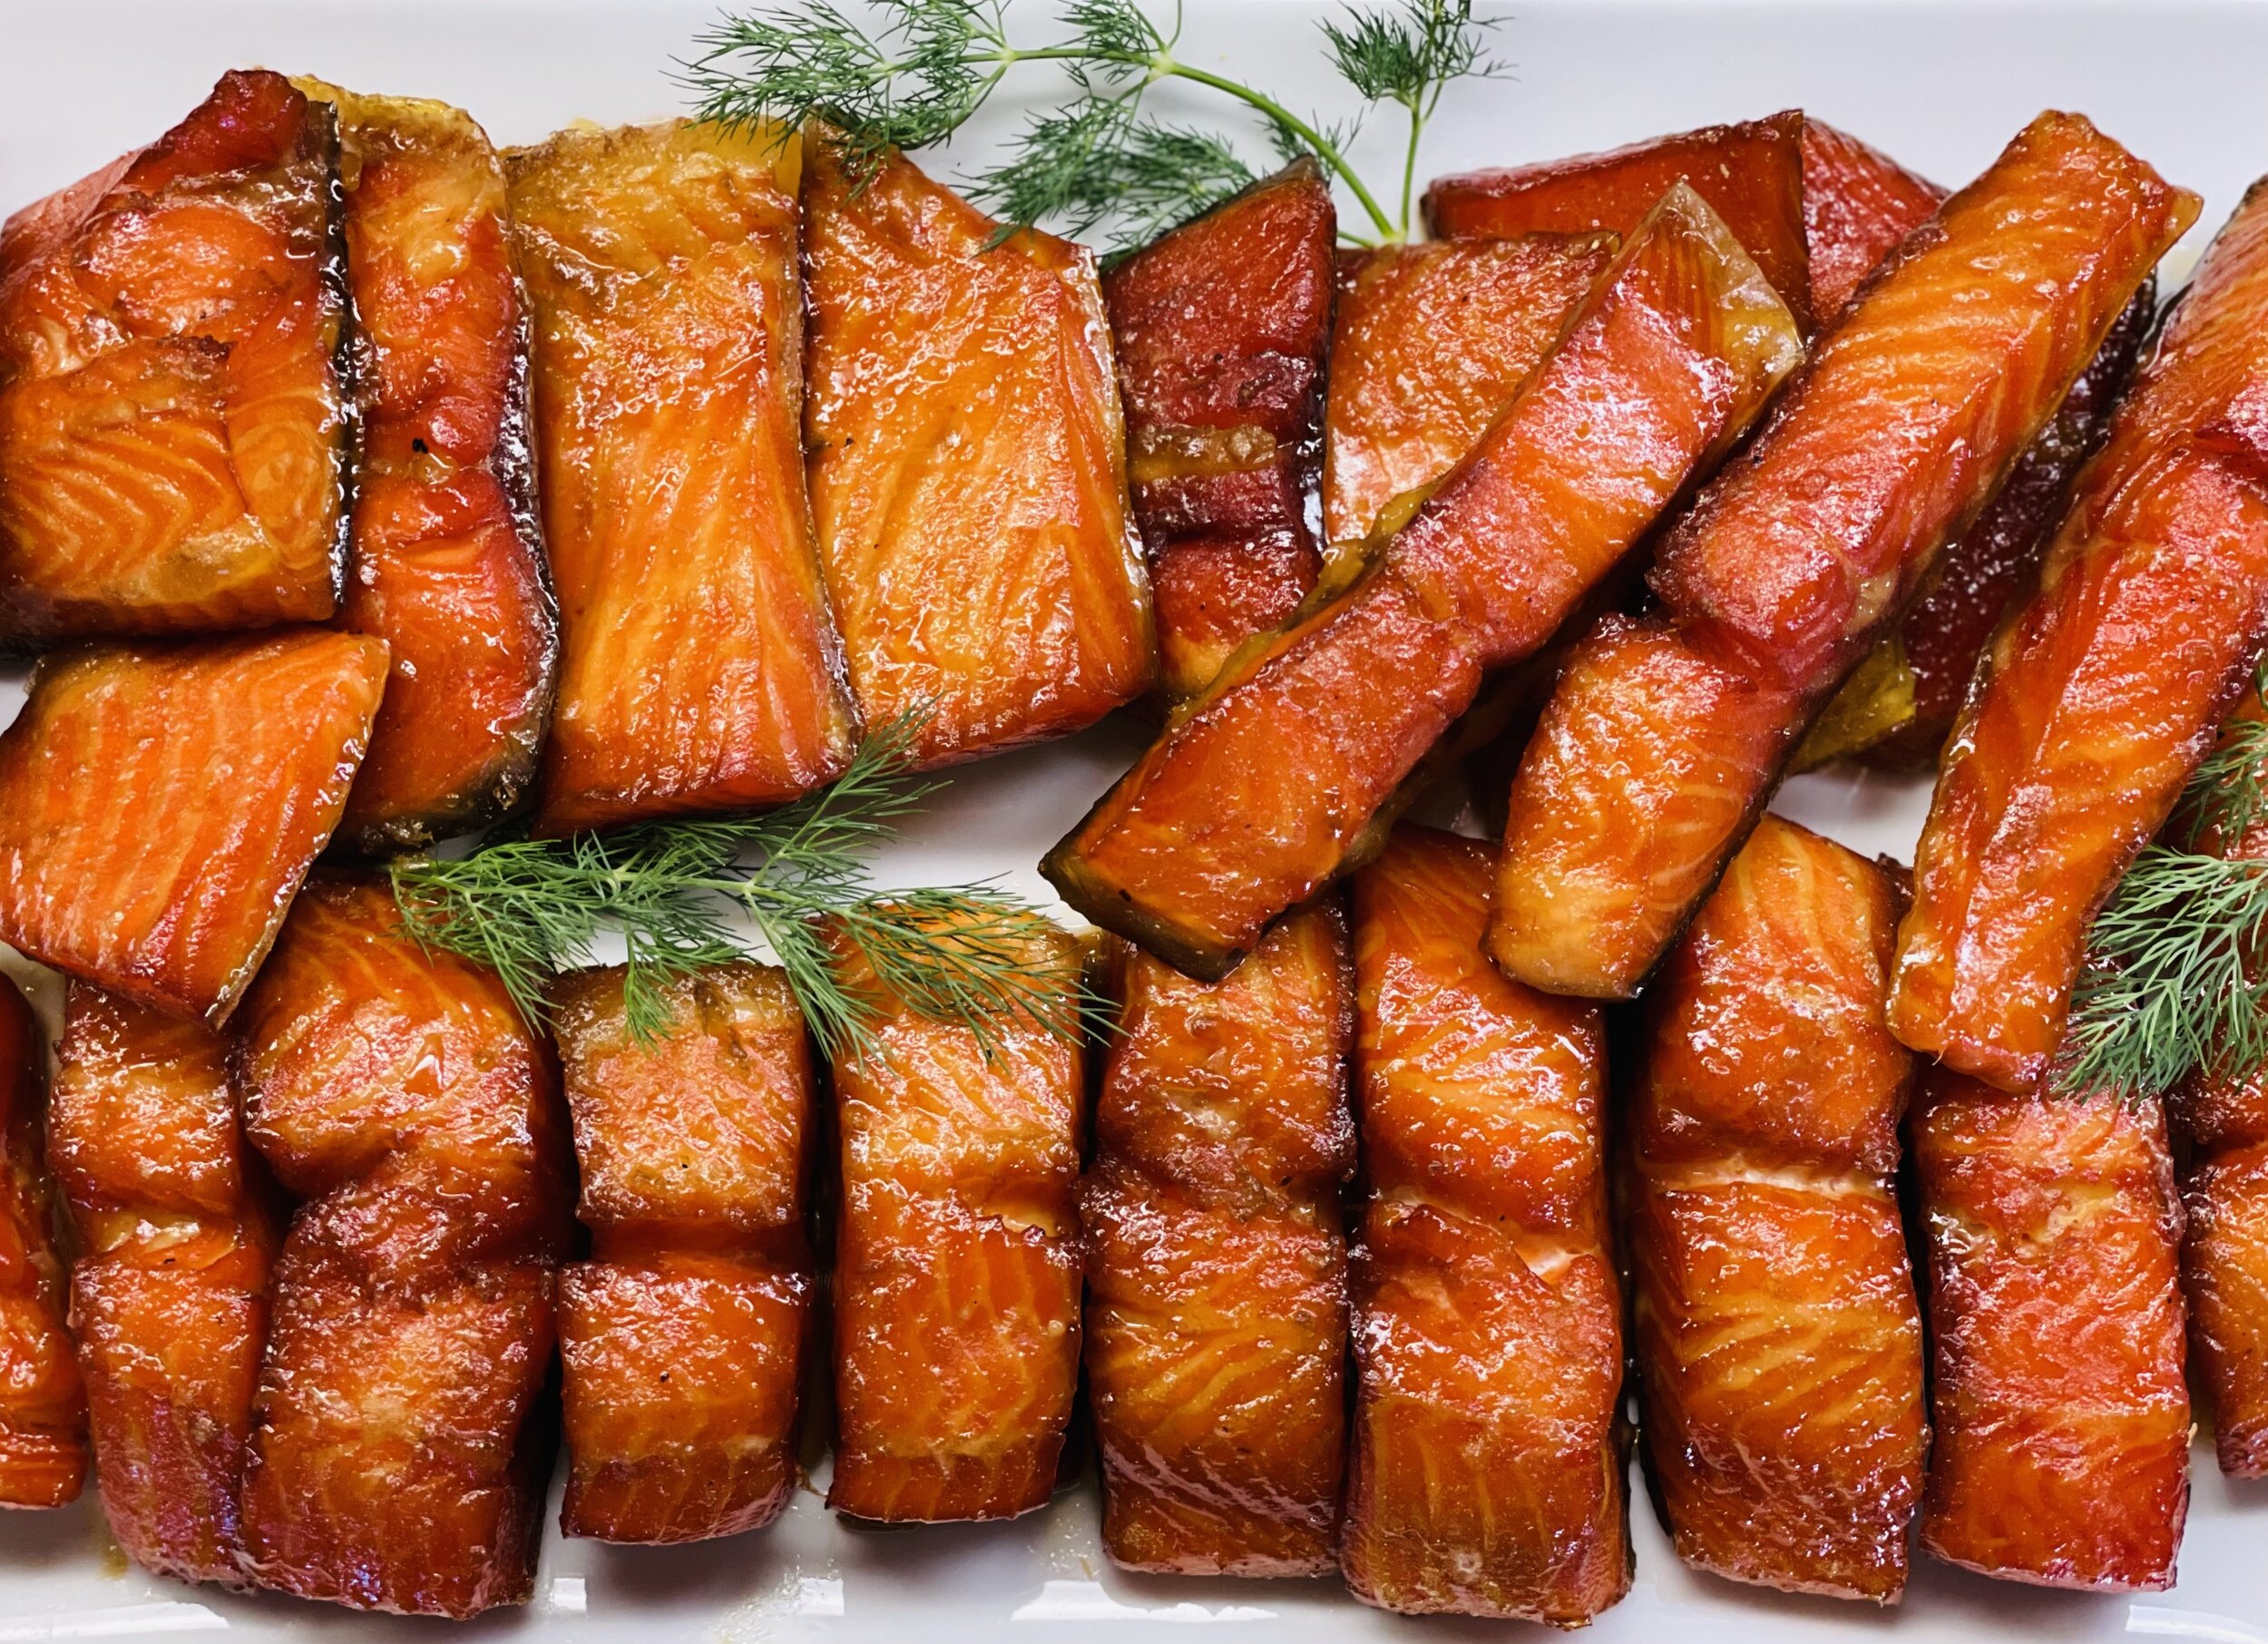
Super Simple Smoked Salmon (Low FODMAP)
5 Minutes prep • 4 Hours cook • Low FODMAP • Gluten-free • Lactose-free • Serves 6
5 Minutes prep • 3 - 4 Hours cook • Low FODMAP • Gluten-free • Lactose-free • Serves 6 • Ok to make ahead: Steps 1-3
This is one of the simplest and most flavorful recipes for salmon I have created. The combination of the sweet maple seasoning and the slow cook in the smoker makes for a perfectly delicious and balanced salty/sweet fish. I used fresh steelhead salmon—but you could use any fresh salmon you have available. Serve it hot off the grill, at room temperature, or even chilled on a salad.
Ingredients: Salmon
1 1/2 pounds steelhead salmon filet (skin on)
1 - 2 tablespoons Smoke N Sanity Sweet Maple Dust (use code IBSGC15 for 15% discount)
1 teaspoon Kosher salt
1/2 teaspoon red pepper flakes
1 tablespoon olive oil
Lemon slices and chopped chives for serving
Directions
(1) Prepare: Preheat the smoker or grill to 180 degrees F. Lay fish out, skin side down, on a piece of heavy aluminum foil. Sprinkle the sweet maple dust, salt, and red pepper flakes evenly over the fish. Drizzle with olive oil.
(2) Cook the fish: Put the fish in the foil directly on the grill grates. Do not wrap the fish in the foil—leave it flat. Cook with the grill lid closed for about 3 - 4 hours until the fish is cooked through.
(3) Finish: Remove fish from the grill and add lemon slices and chopped chives.
Make-ahead note: At this point, you may keep the fish in the refrigerator for 2 - 3 days until you’re ready to serve it. This fish is delicious cold so don’t be afraid to make it ahead.
(4) Plate and serve: Serve immediately or allow to cool to room temperature or even refrigerate.
Eat and enjoy every bite because you can!
Recipe note: I use Diamond Crystal Kosher salt in all my recipes because it has a wonderful flat and crisp flake that tastes delicious. It is also the least salty salt available so you can use it more liberally as a seasoning than you can table salt or sea salt. If you use another type of salt, you may need to reduce the amount so it is not over-salted.
Have a question you’d like to have answered? Email me at hello@ibsgamechanger.com
Link note: This post contains links for you to easily purchase items listed on the page. In some cases, we have provided a special discount code for IBS Game Changers so be sure to use it when you purchase an item to get the discount that has been arranged just for you! As an Amazon Associate, I earn a commission from qualifying Amazon purchases.
More Deliciously Low FODMAP™ seafood recipes
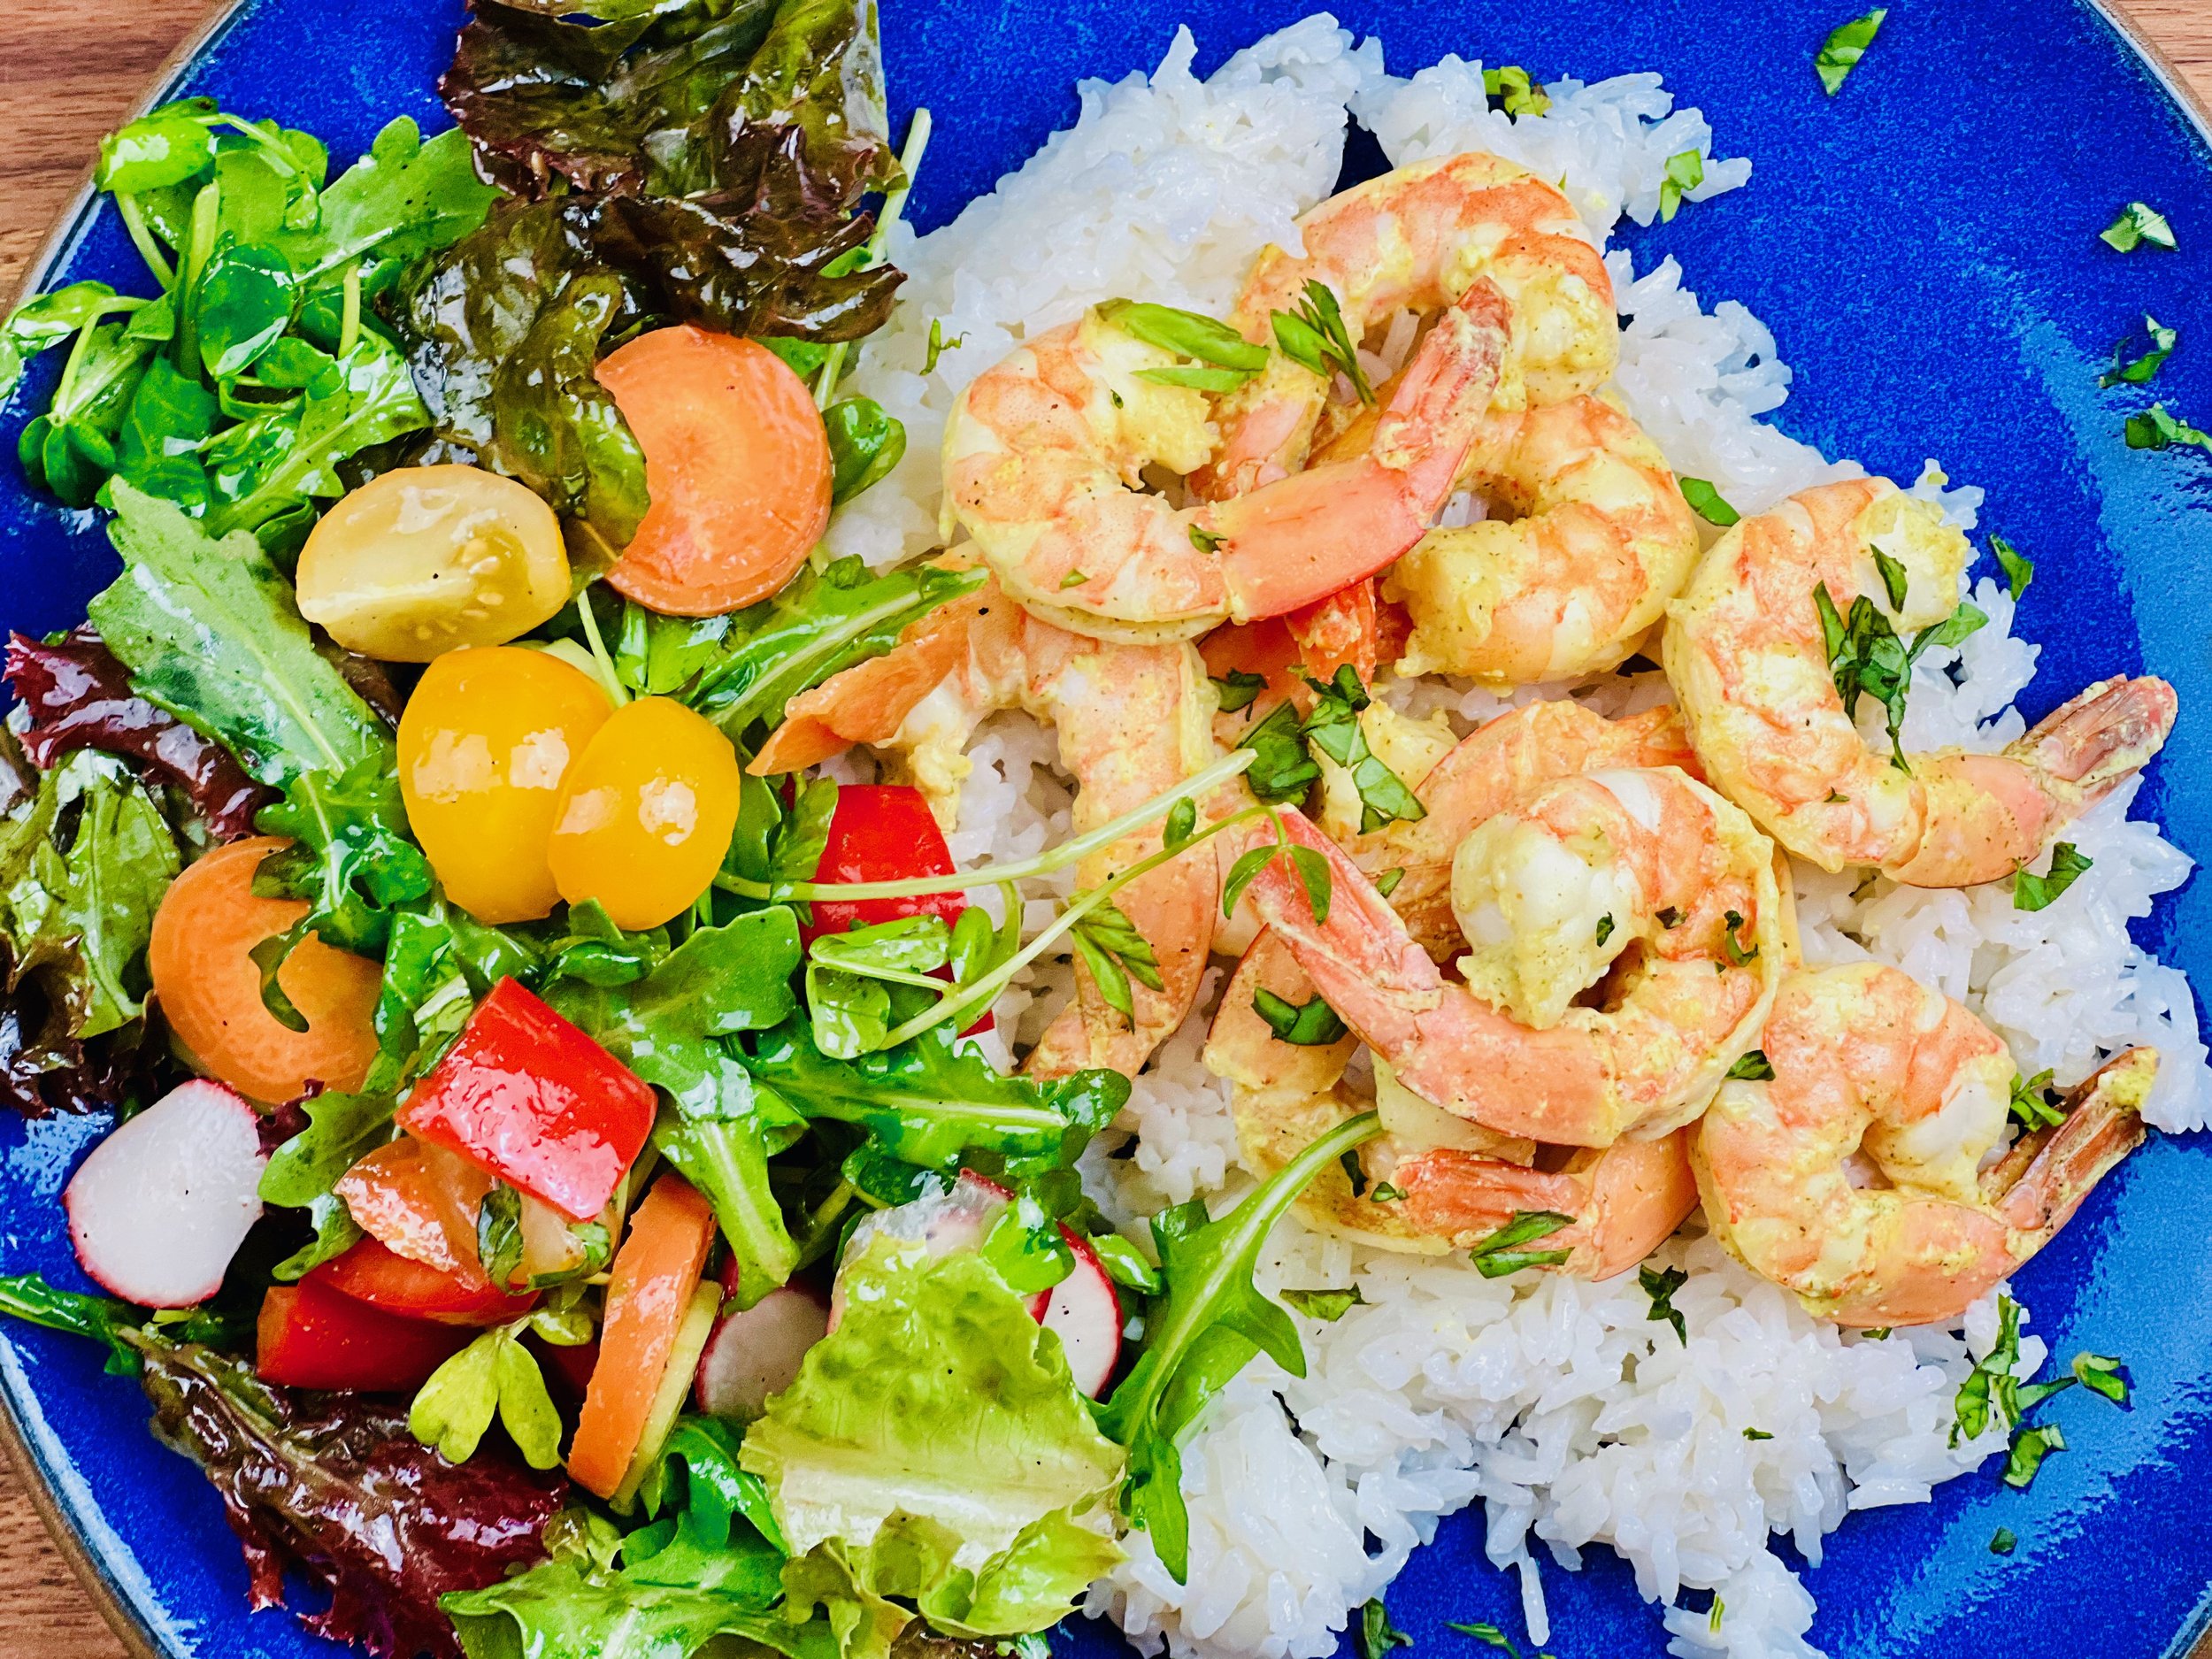
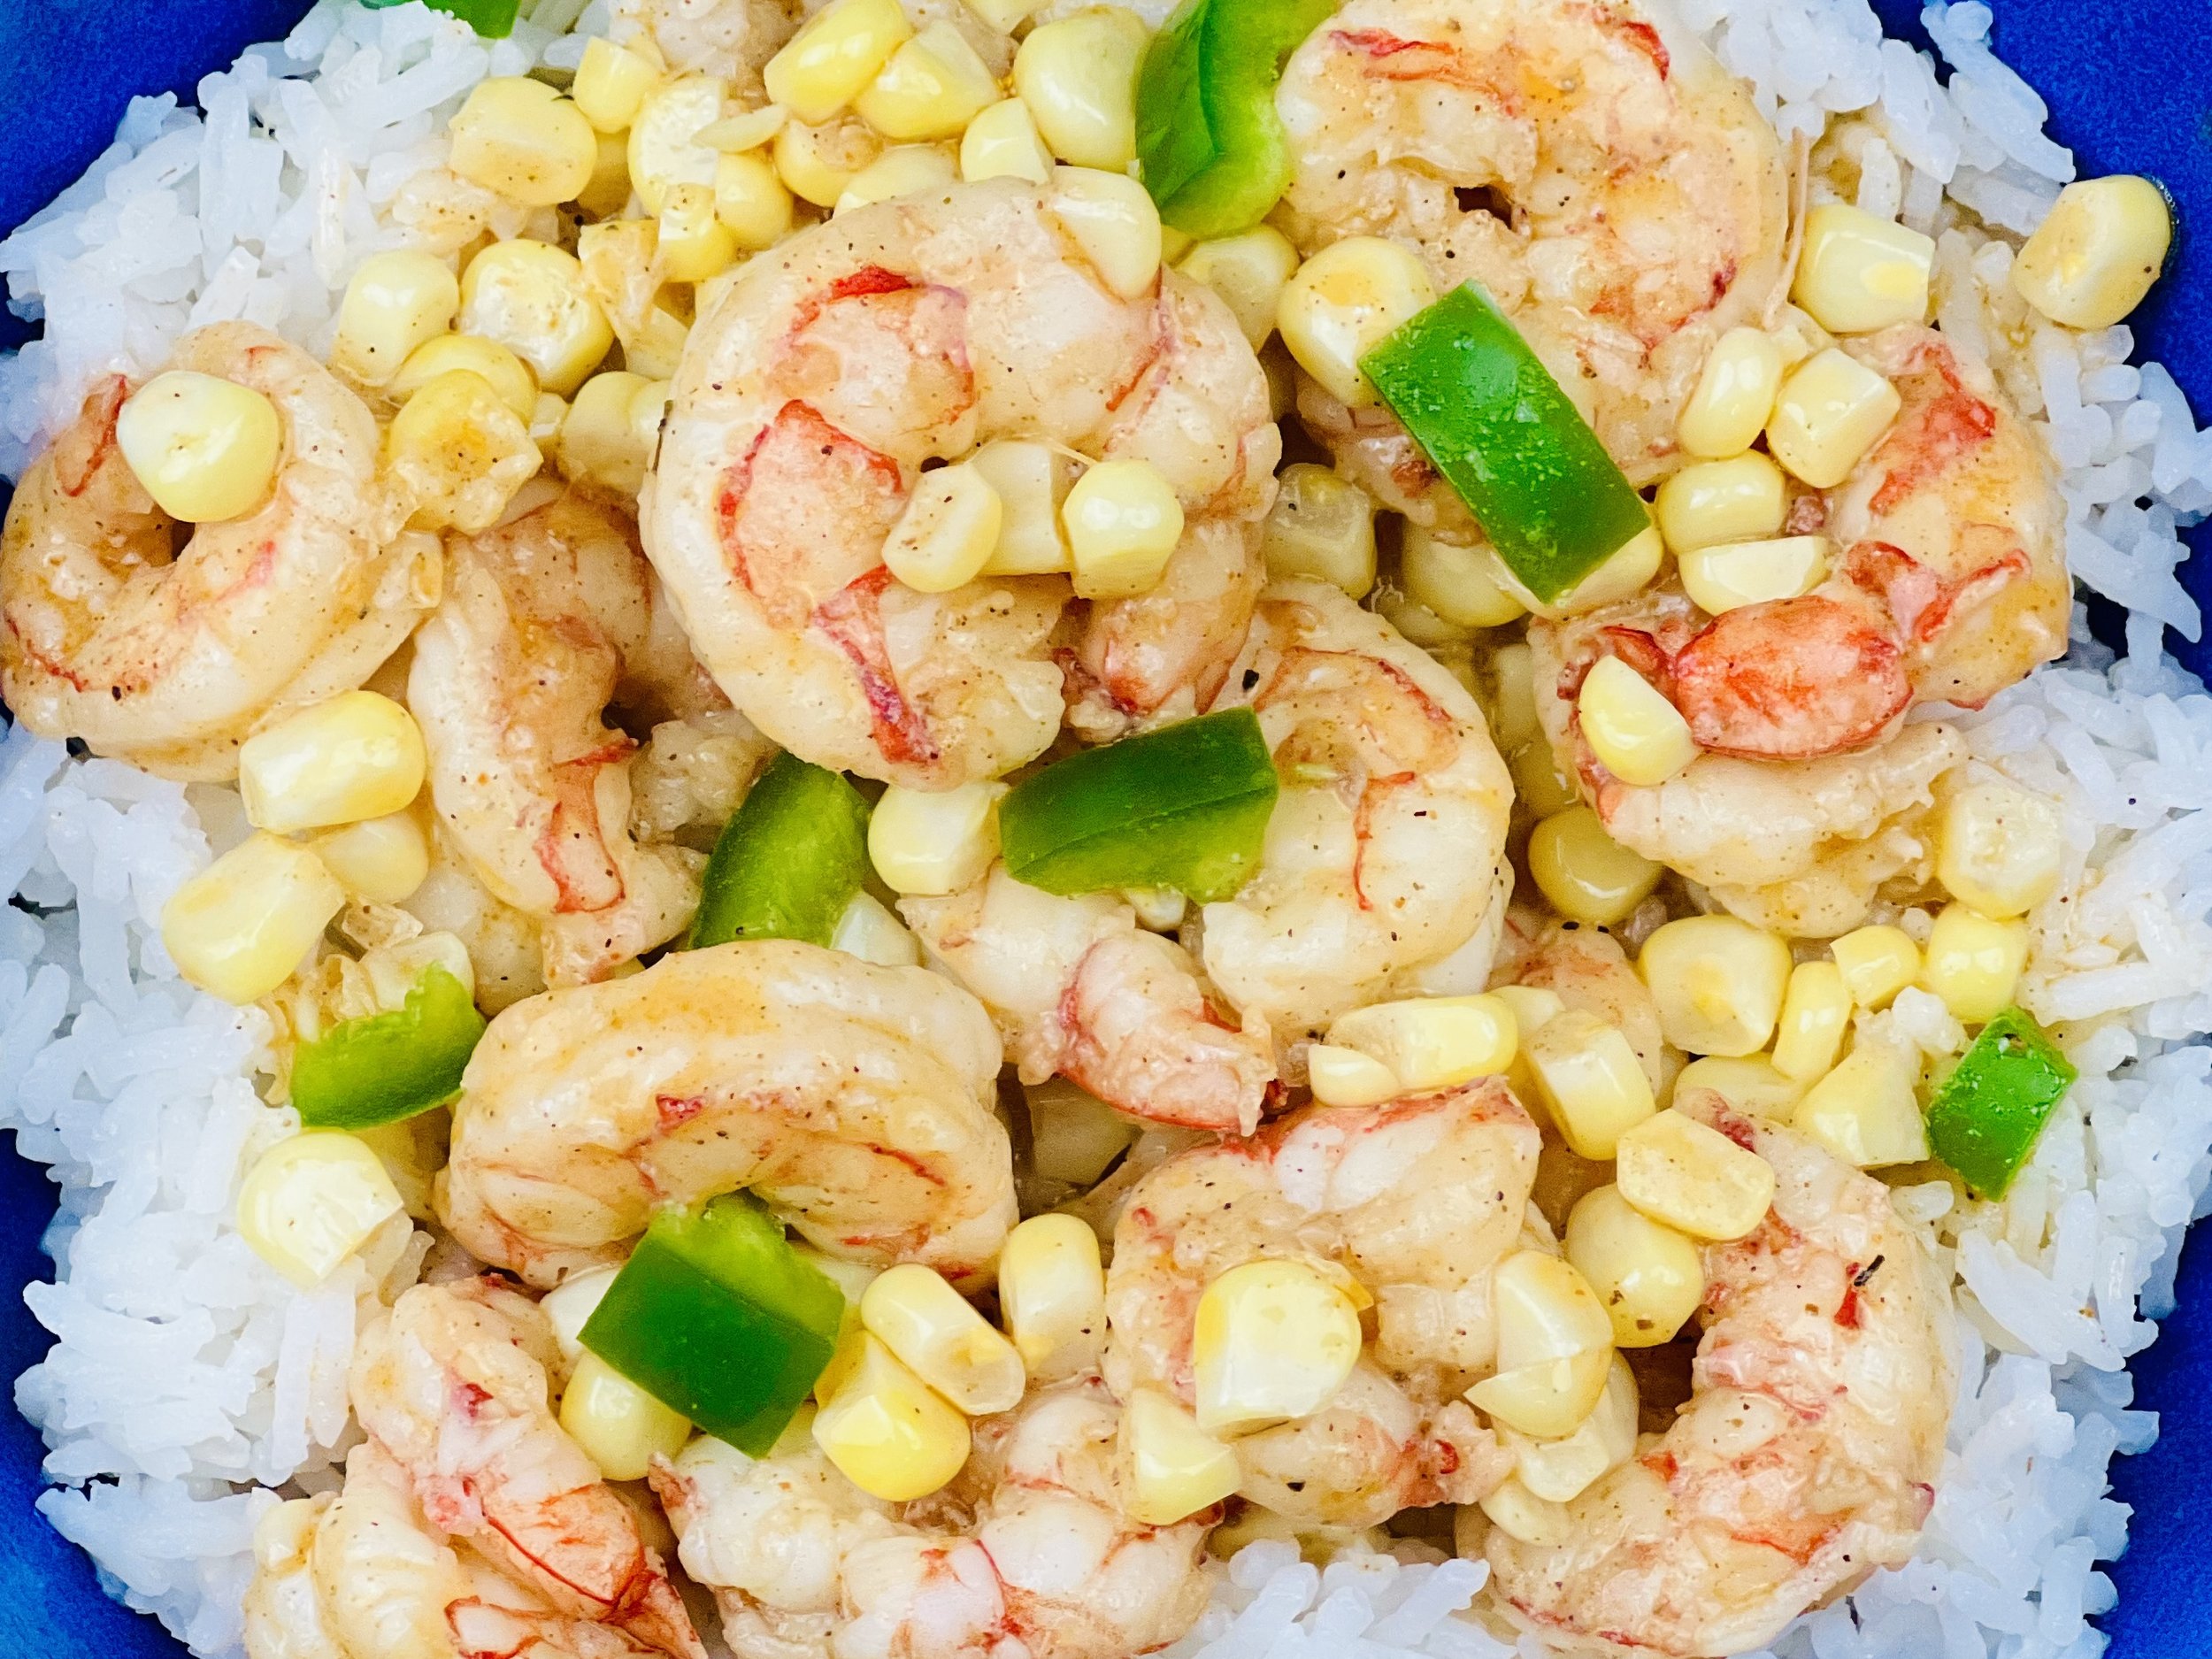
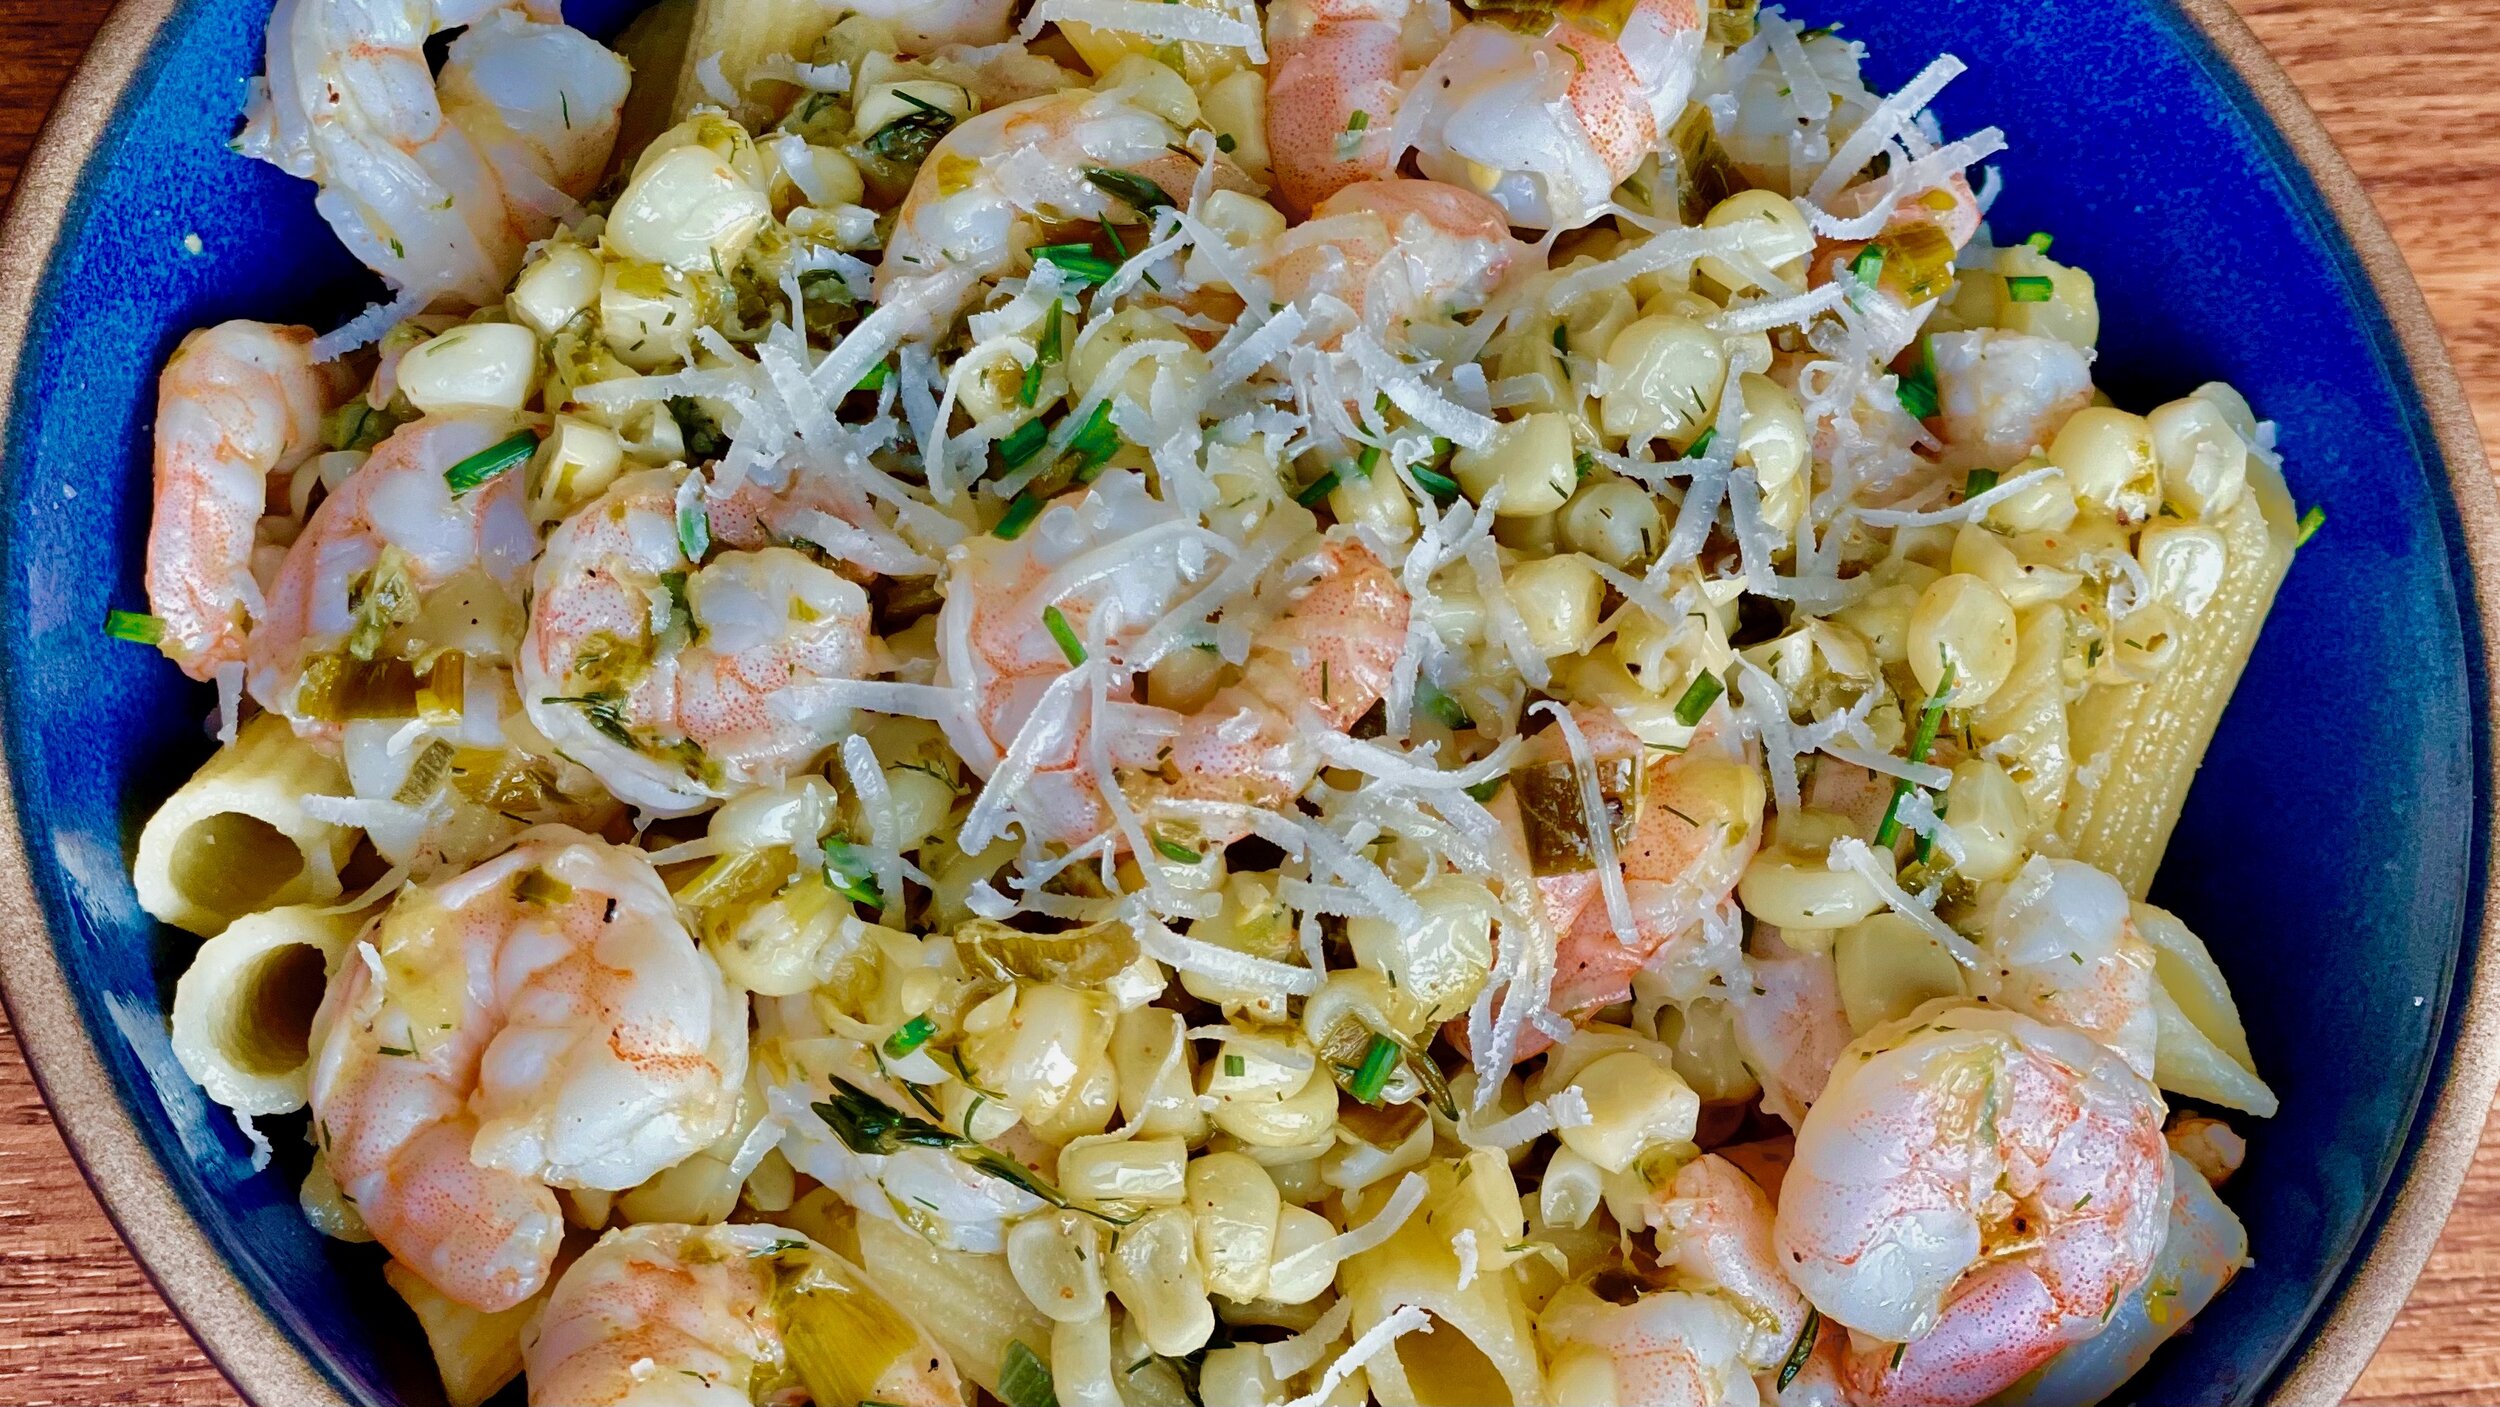
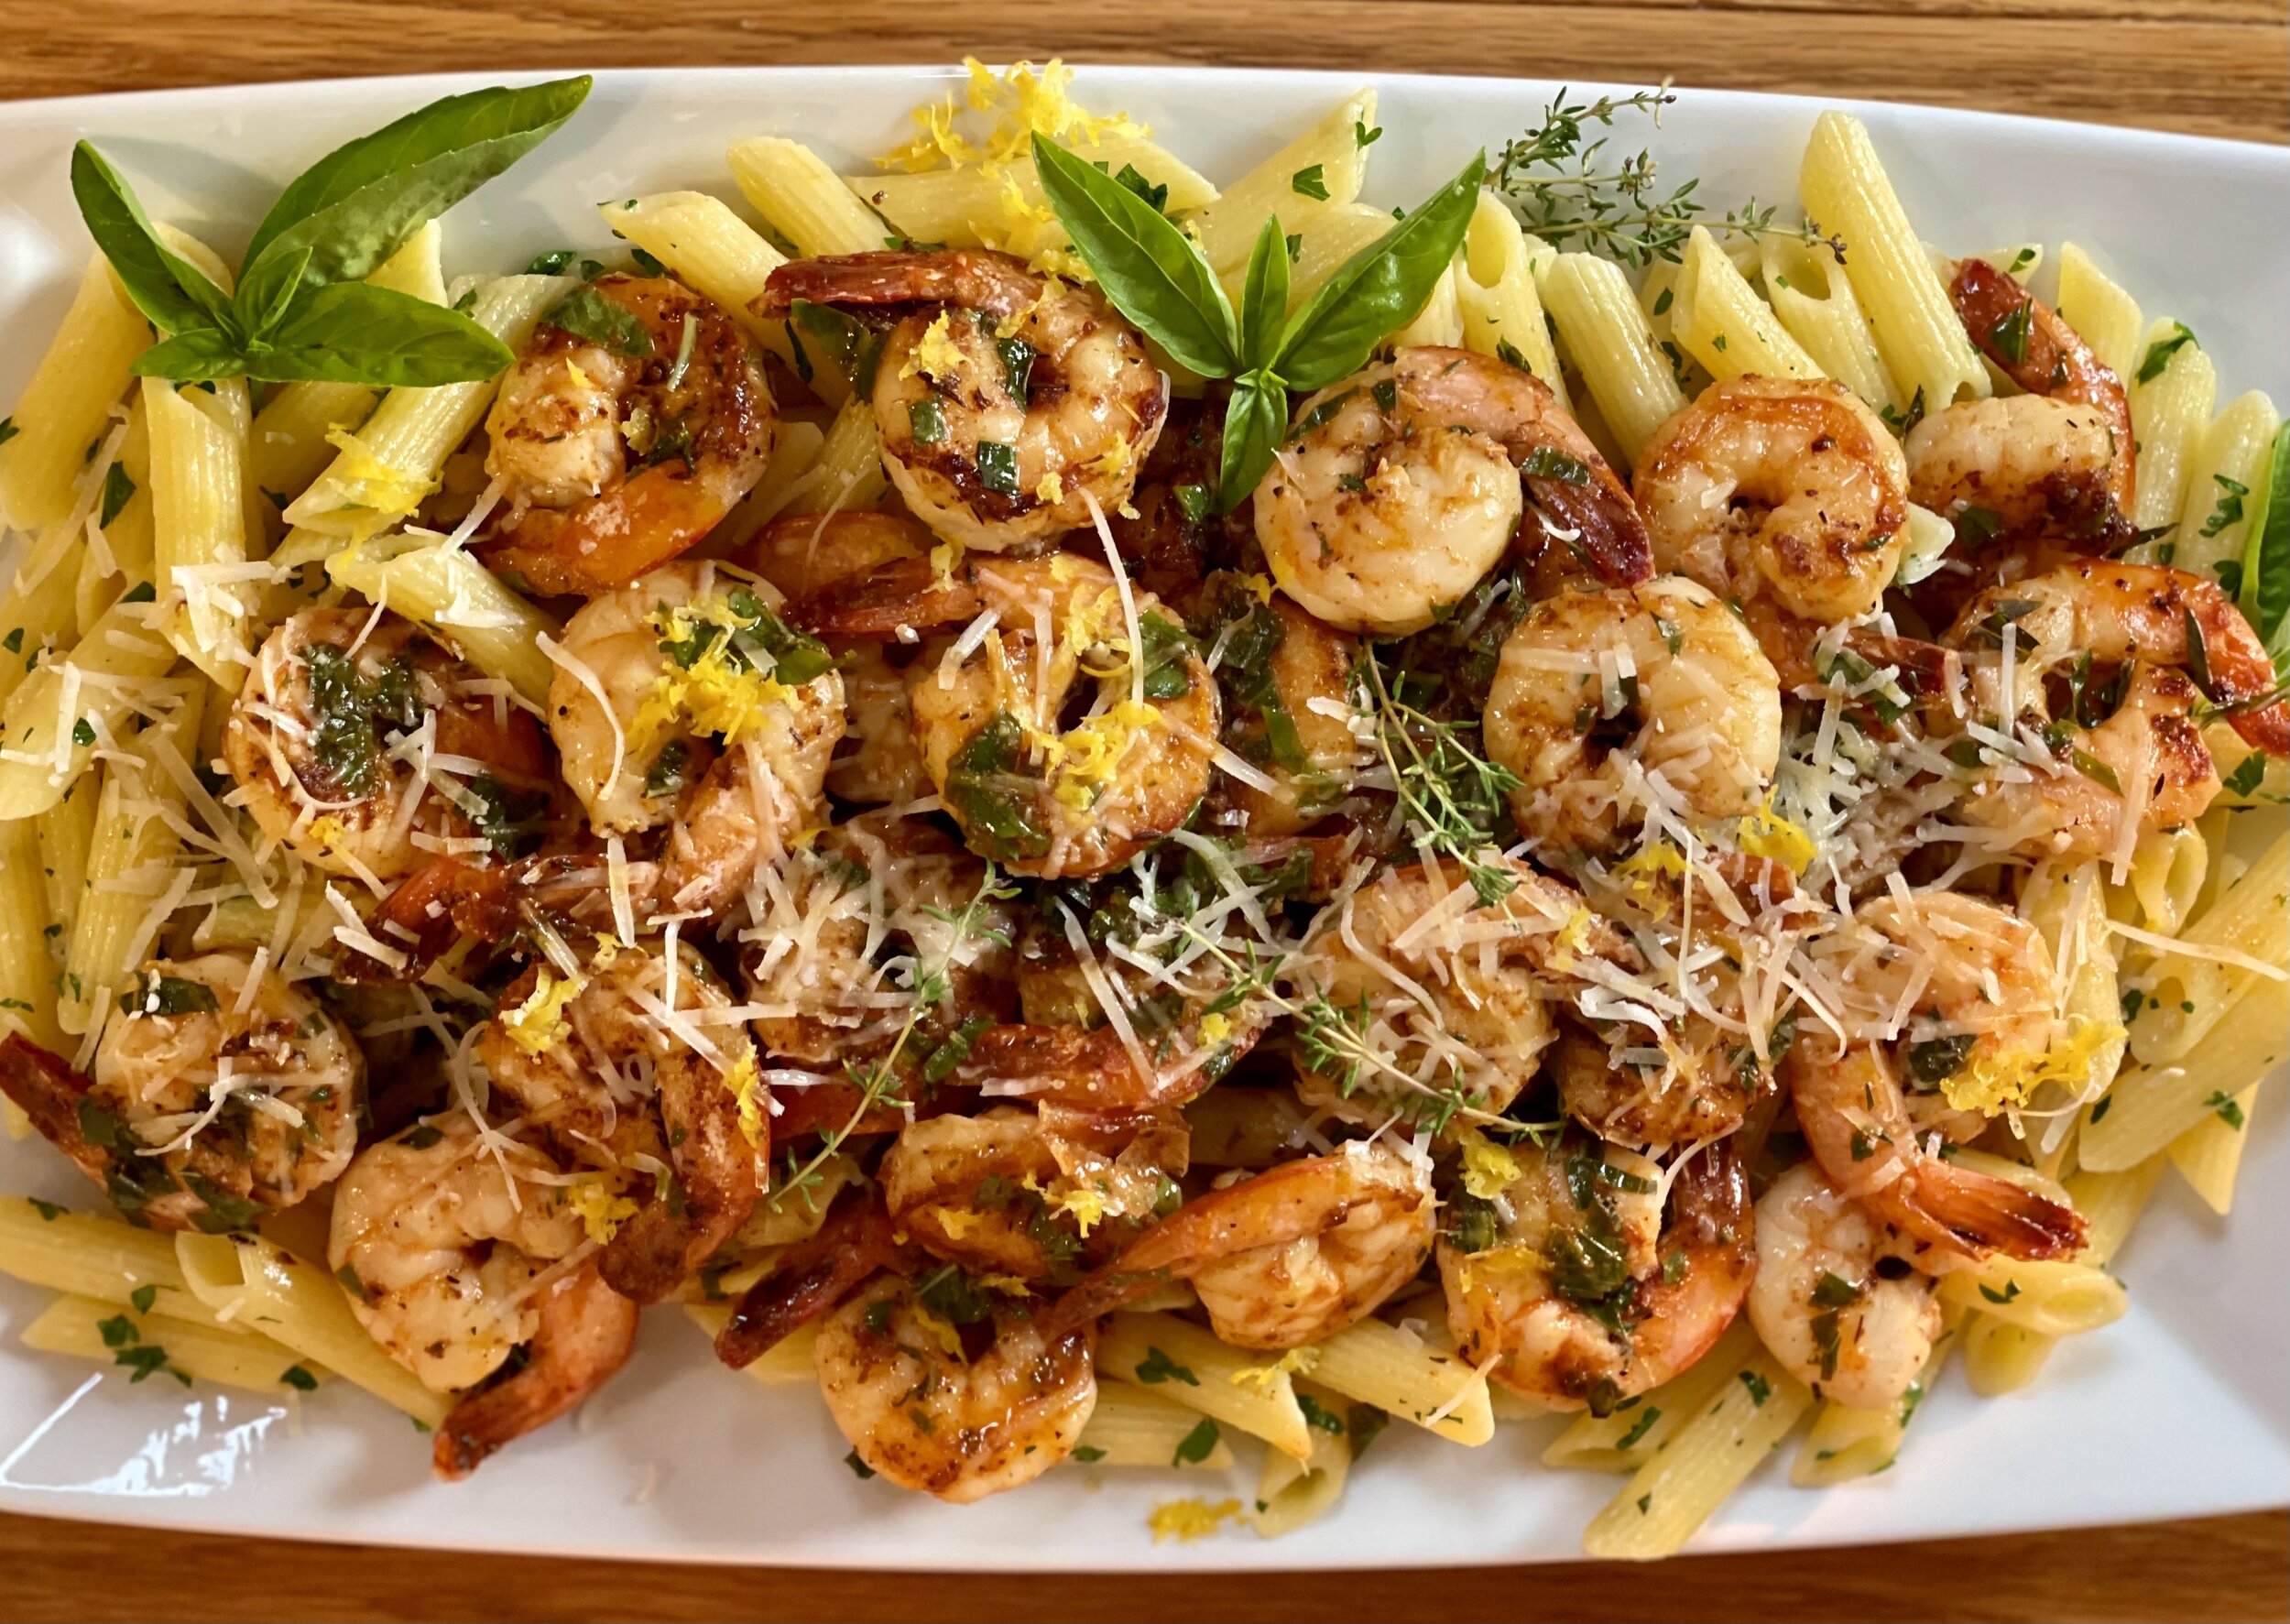
Tandoori Spiced Shrimp (low FODMAP)
20 Minutes prep • 15 Minutes cook • Low FODMAP • Gluten-free • Lactose-free • Serves 4
20 Minutes prep • 15 Minutes cook • Low FODMAP • Gluten-free • Lactose-free • Serves 4 • Ok to make ahead: Steps 1-5
Grilling shrimp that have been marinated with some flavorful spices is the perfect way to get the best out of your shrimp. It’s easy and fast and oh so delicious. This recipe was published by one of my favorite low FODMAP spice providers, Gourmend Foods and it uses their Garlic Chive or Garlic Scape powder to deliver garlicky taste without the FODMAPs. I served it with my Best Coconut Rice and one of my delicious green salads and it made a perfectly wonderful summer meal.
This is an exclusive recipe just for recipe club members.
In addition to the two free recipes I create each week I am creating and delivering one very special recipe just for my recipe club members. If you’re not yet a member, I encourage you to join! Membership in the club includes access to the complete archive of recipes with filters so it can become your virtual low FODMAP cookbook plus, I am creating and delivering one special NEW recipe every week ONLY for recipe club members. And, for my true fans, I’ll be sharing behind-the-scenes content, and updates on the progress of the new cookbook.
Your membership in the club helps me continue creating new, delicious, easy-to-make, low FODMAP recipes just for you.
As always, all recipes will emphasize simple ingredients, easy preparation, and delicious low FODMAP results. Recipes will be for everything from main courses, salads, soups, side dishes, appetizers, desserts, sauces, breakfast and lunch, and even mocktails and cocktails. Everything you need to prepare fantastic low FODMAP meals everyone will love.
Join the club. Become a Patron. Let’s keep making delicious Low FODMAP meals together.
Link note: This post contains links for you to easily purchase items listed on the page. In some cases, we have provided a special discount code for IBS Game Changers so be sure to use it when you purchase an item to get the discount that has been arranged just for you! As an Amazon Associate, I earn a commission from qualifying Amazon purchases.
More Deliciously Low FODMAP™ seafood recipes
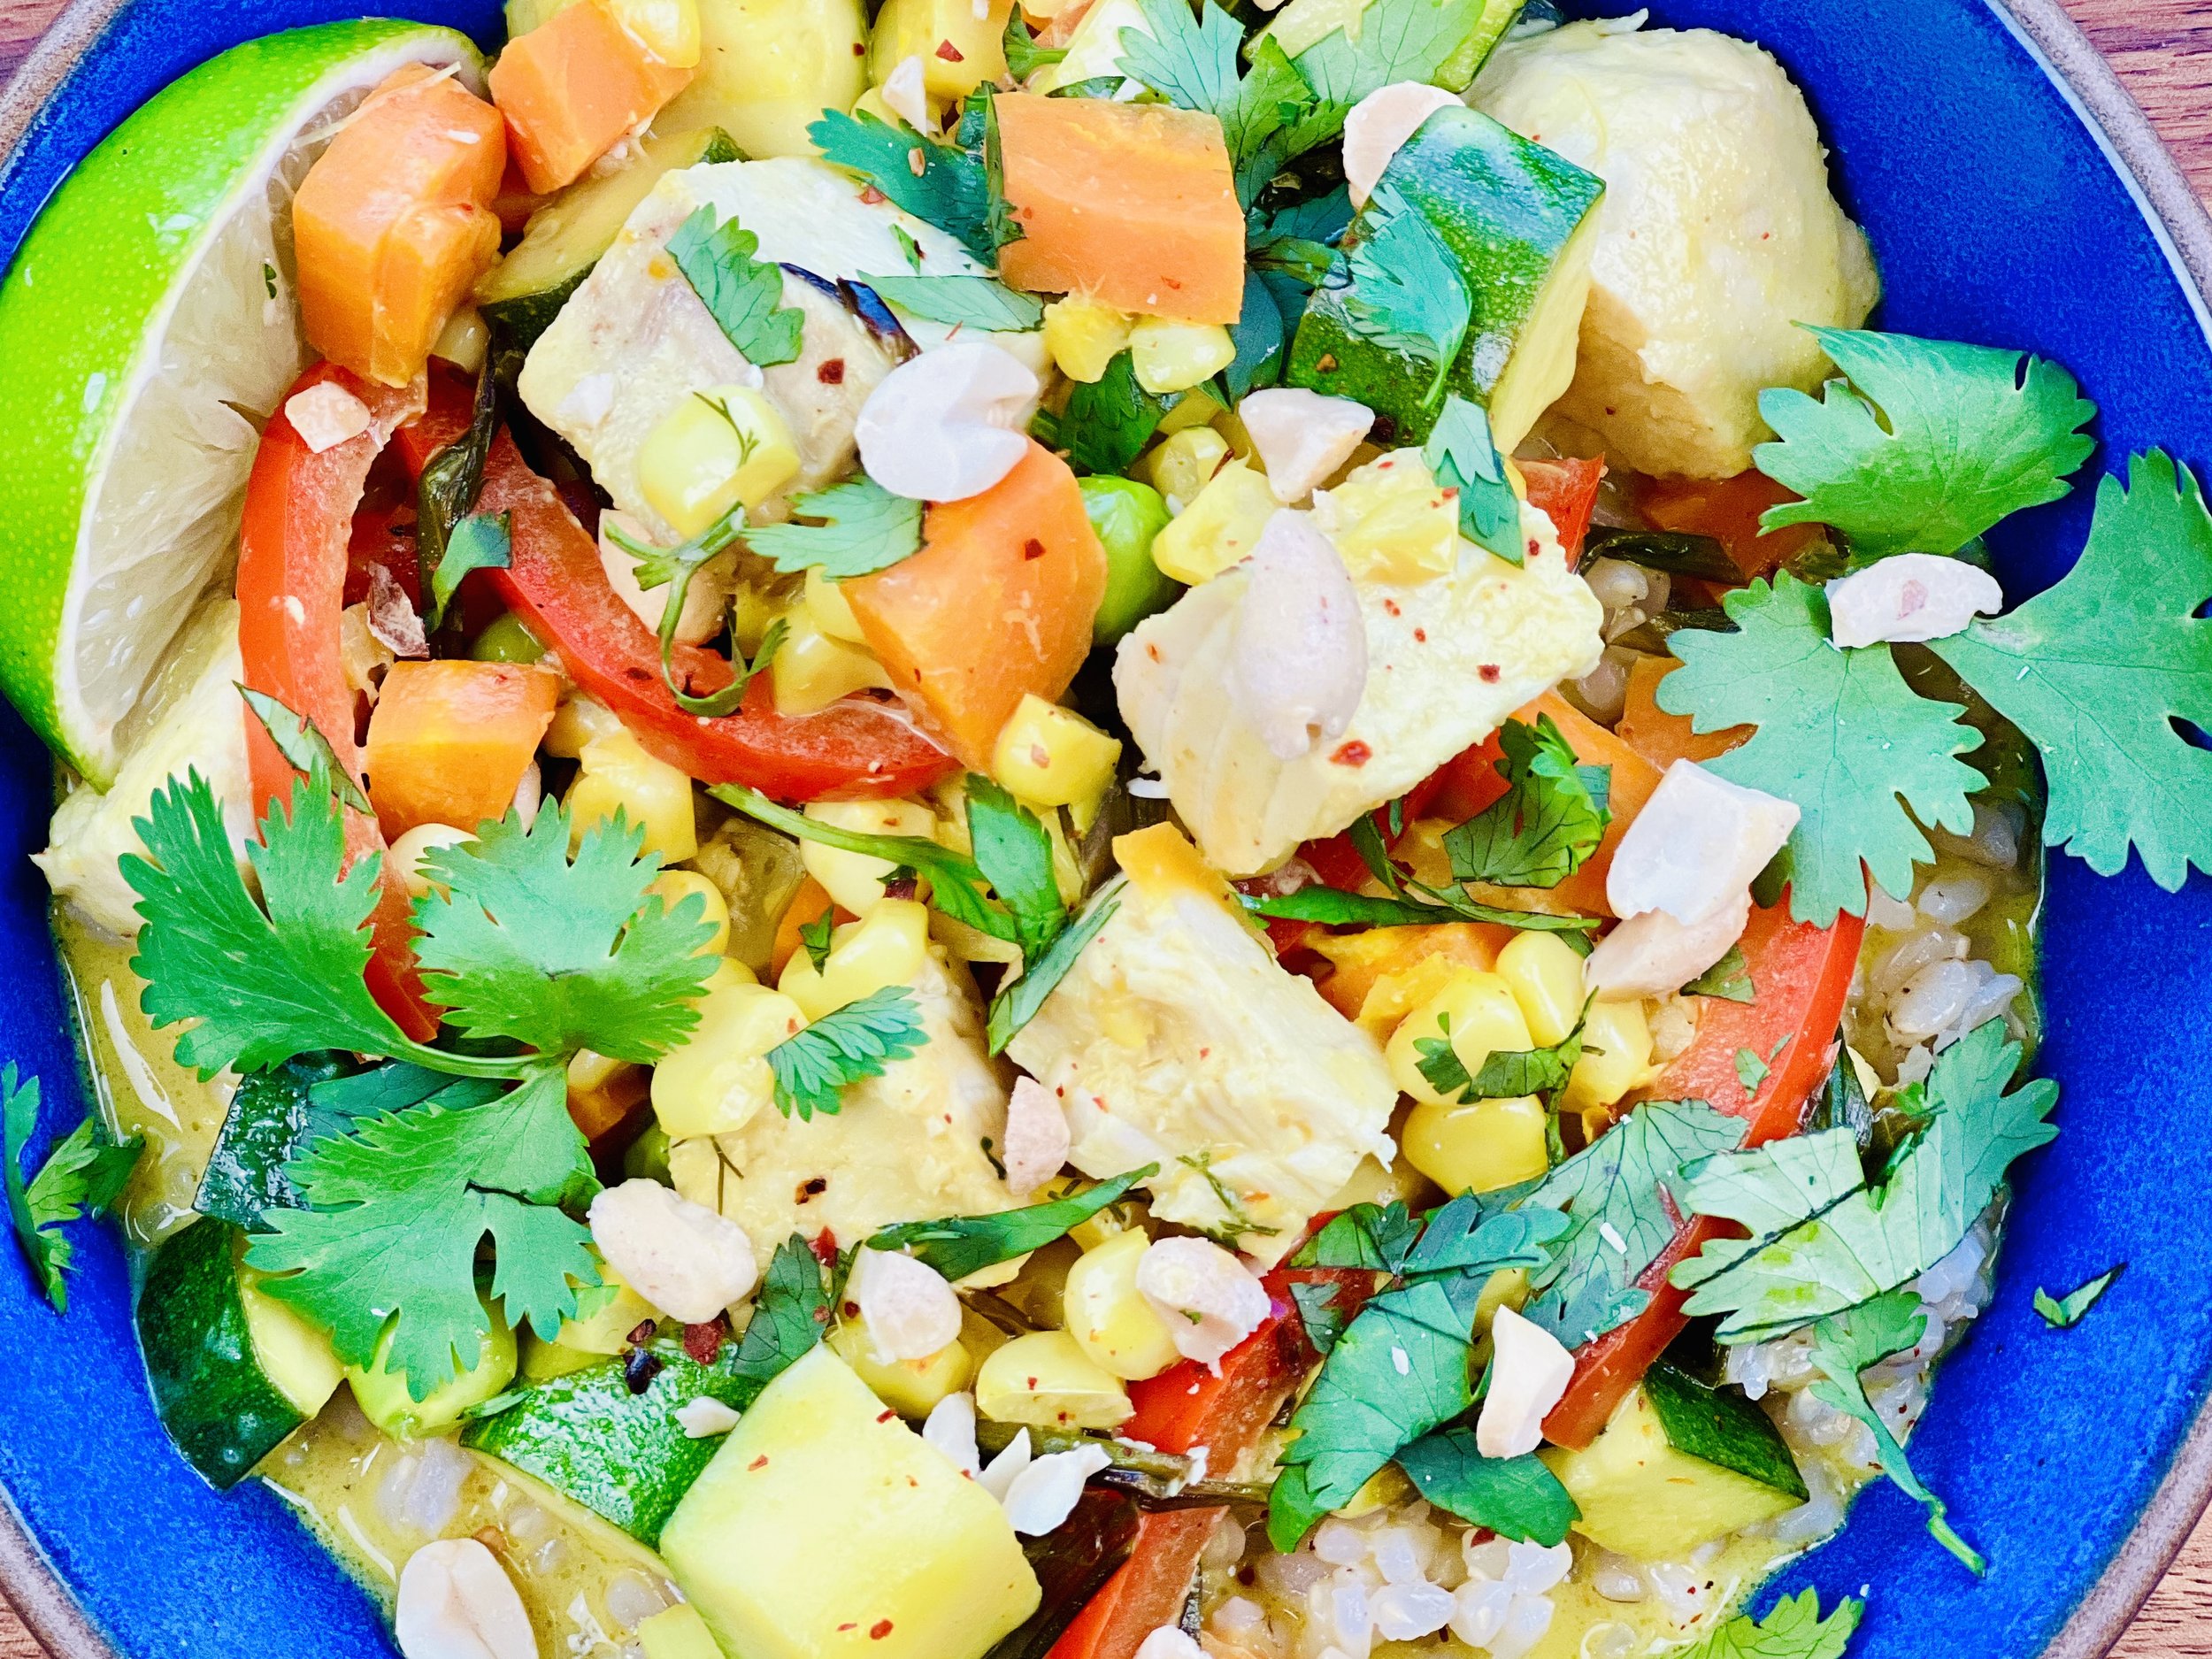
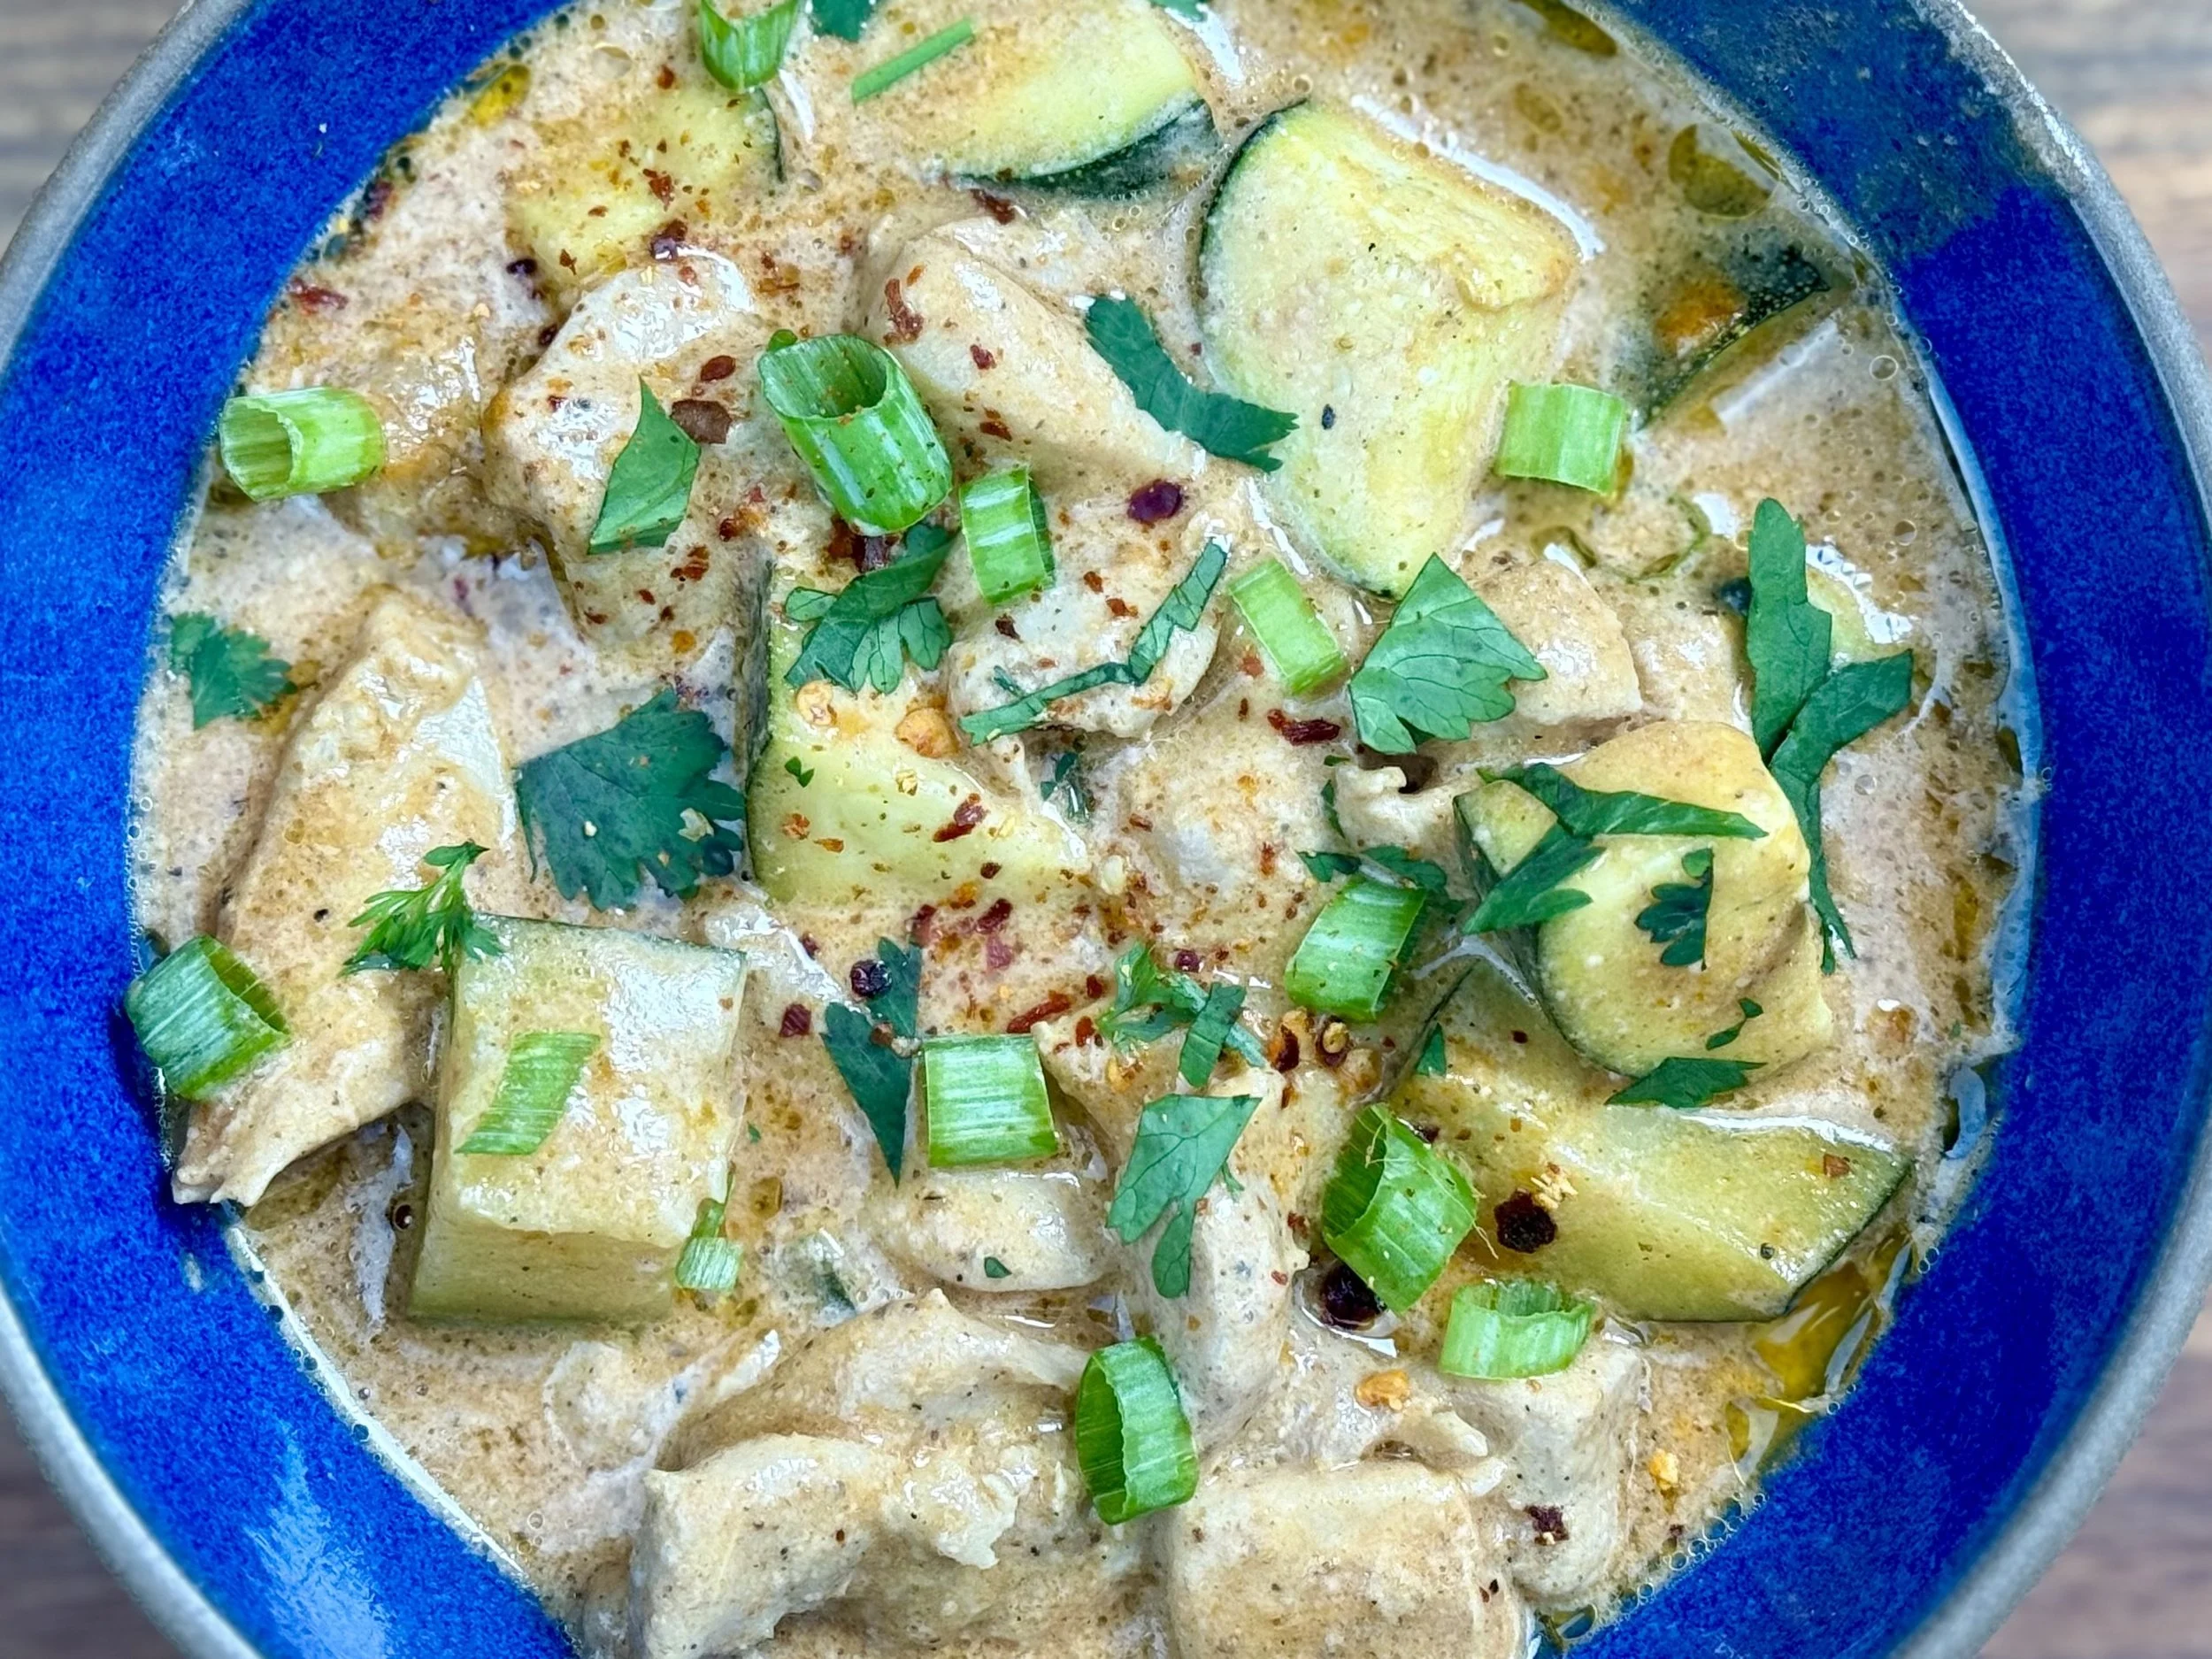
Creamy Coconut Curry with Vegetables and Halibut (low FODMAP)
10 Minutes prep • 20 Minutes cook • Low FODMAP • Gluten-free • Serves 4
10 Minutes prep • 20 Minutes cook • Low FODMAP • Gluten-free • Serves 4 • Ok to make ahead: Step 1
This recipe combines a full selection of vegetables with delicate halibut and a creamy coconut curry sauce to deliver a perfect one-bowl meal. The flavors and colors are wonderful together and you’ll find a total of 15 different plants in this recipe — so your gut biome will thank you! This dish could also be made with tofu for a vegetarian version, shrimp, or chicken if you prefer. To make it even easier, I used halibut that I had cooked the day before. I cut it into chunks and added it to the sauce to warm. It was delicious!
Ingredients
1 tablespoon garlic-infused olive oil
4 scallions (green part only, sliced thinly on the diagonal)
1 tablespoon fresh ginger, finely chopped
1 1/2 teaspoons dried turmeric
1/2 teaspoon curry powder
1 carrot (cut into small cubes or matchsticks)
1/4 cup English peas (or frozen peas)
1/2 red bell pepper (cut into matchsticks)
2 zucchini (cut into small cubes)
1 ear of corn, kernels removed
1 (14-ounce) can coconut milk (full fat)
1/4 cup cream (optional to thicken sauce if needed)
1/2 - 1 teaspoon red pepper flakes (or to taste)
1 tablespoon lime juice (or to taste)
1 tablespoon gluten-free, low sodium soy sauce (or to taste)
2 halibut fillets (8 to 12 ounces each)
1 1/2 cups brown rice or white rice, cooked per package instructions (or use Asian rice noodles)
Cilantro and dry roasted peanuts, chopped, for serving
Directions
(1) Prepare: Heat the oven to 400 degrees F. Wash and chop all vegetables. Put the rice on to cook.
Make-ahead note: At this point, you can set the rice aside and keep the vegetables in the refrigerator. You may also cook the fish ahead (step 5), then refrigerate until ready to use.
(2) Cook the vegetables: Heat the olive oil in a skillet or medium saucepan over medium heat. Add the scallions and cook for 1 minute, stirring frequently so they don’t burn. Add the ginger, turmeric, and curry and cook, stirring, for 1 minute longer. Add the carrots, corn, peas, and zucchini to the skillet and cook for another 2 minutes. Add the bell pepper and cook for 2 minutes longer. Remove the vegetables to a plate and set aside.
(3) Prepare the sauce: To the same pan, add the coconut milk, lime juice, and red pepper flakes. Stir to blend and bring to a simmer. Reduce the heat to low and simmer for about 5 minutes. Taste and adjust the seasonings and lime juice, as desired. Add the soy sauce, taste, and add a bit more if you think it needs it. If the sauce needs to be thicker/creamier, add the cream. Stir and simmer to heat. Add salt and pepper to taste.
(4) Combine sauce and vegetables: Add the vegetables back to the sauce and set aside.
(5) Cook the fish: Spray a baking sheet with nonstick cooking spray. Arrange the halibut fillets on the baking sheet; sprinkle with kosher salt and pepper. Bake the halibut for about 14 to 17 minutes, or until the fish flakes easily with a fork. (Target the minimum safe internal temperature for fish: 145 degrees F.) Cut the fish into bite-size chunks, or leave the pieces whole, whatever you prefer.
(6) Plate and serve: To plate, reheat the sauce. Add a mound of hot rice or noodles to a plate or wide bowl. Place the halibut on the rice or noodles and spoon the vegetables and sauce over the fish. Garnish with fresh chopped cilantro and chopped peanuts (if using).
Eat and enjoy every bite because you can!
Recipe note: I use Diamond Crystal Kosher salt in all my recipes because it has a wonderful flat and crisp flake that tastes delicious. It is also the least salty salt available so you can use it more liberally as a seasoning than you can table salt or sea salt. If you use another type of salt, you may need to reduce the amount so it is not over-salted.
Link note: This post contains links for you to easily purchase items listed on the page. In some cases, we have provided a special discount code for IBS Game Changers so be sure to use it when you purchase an item to get the discount that has been arranged just for you! As an Amazon Associate, I earn a commission from qualifying Amazon purchases.
More Deliciously Low FODMAP™ main course recipes
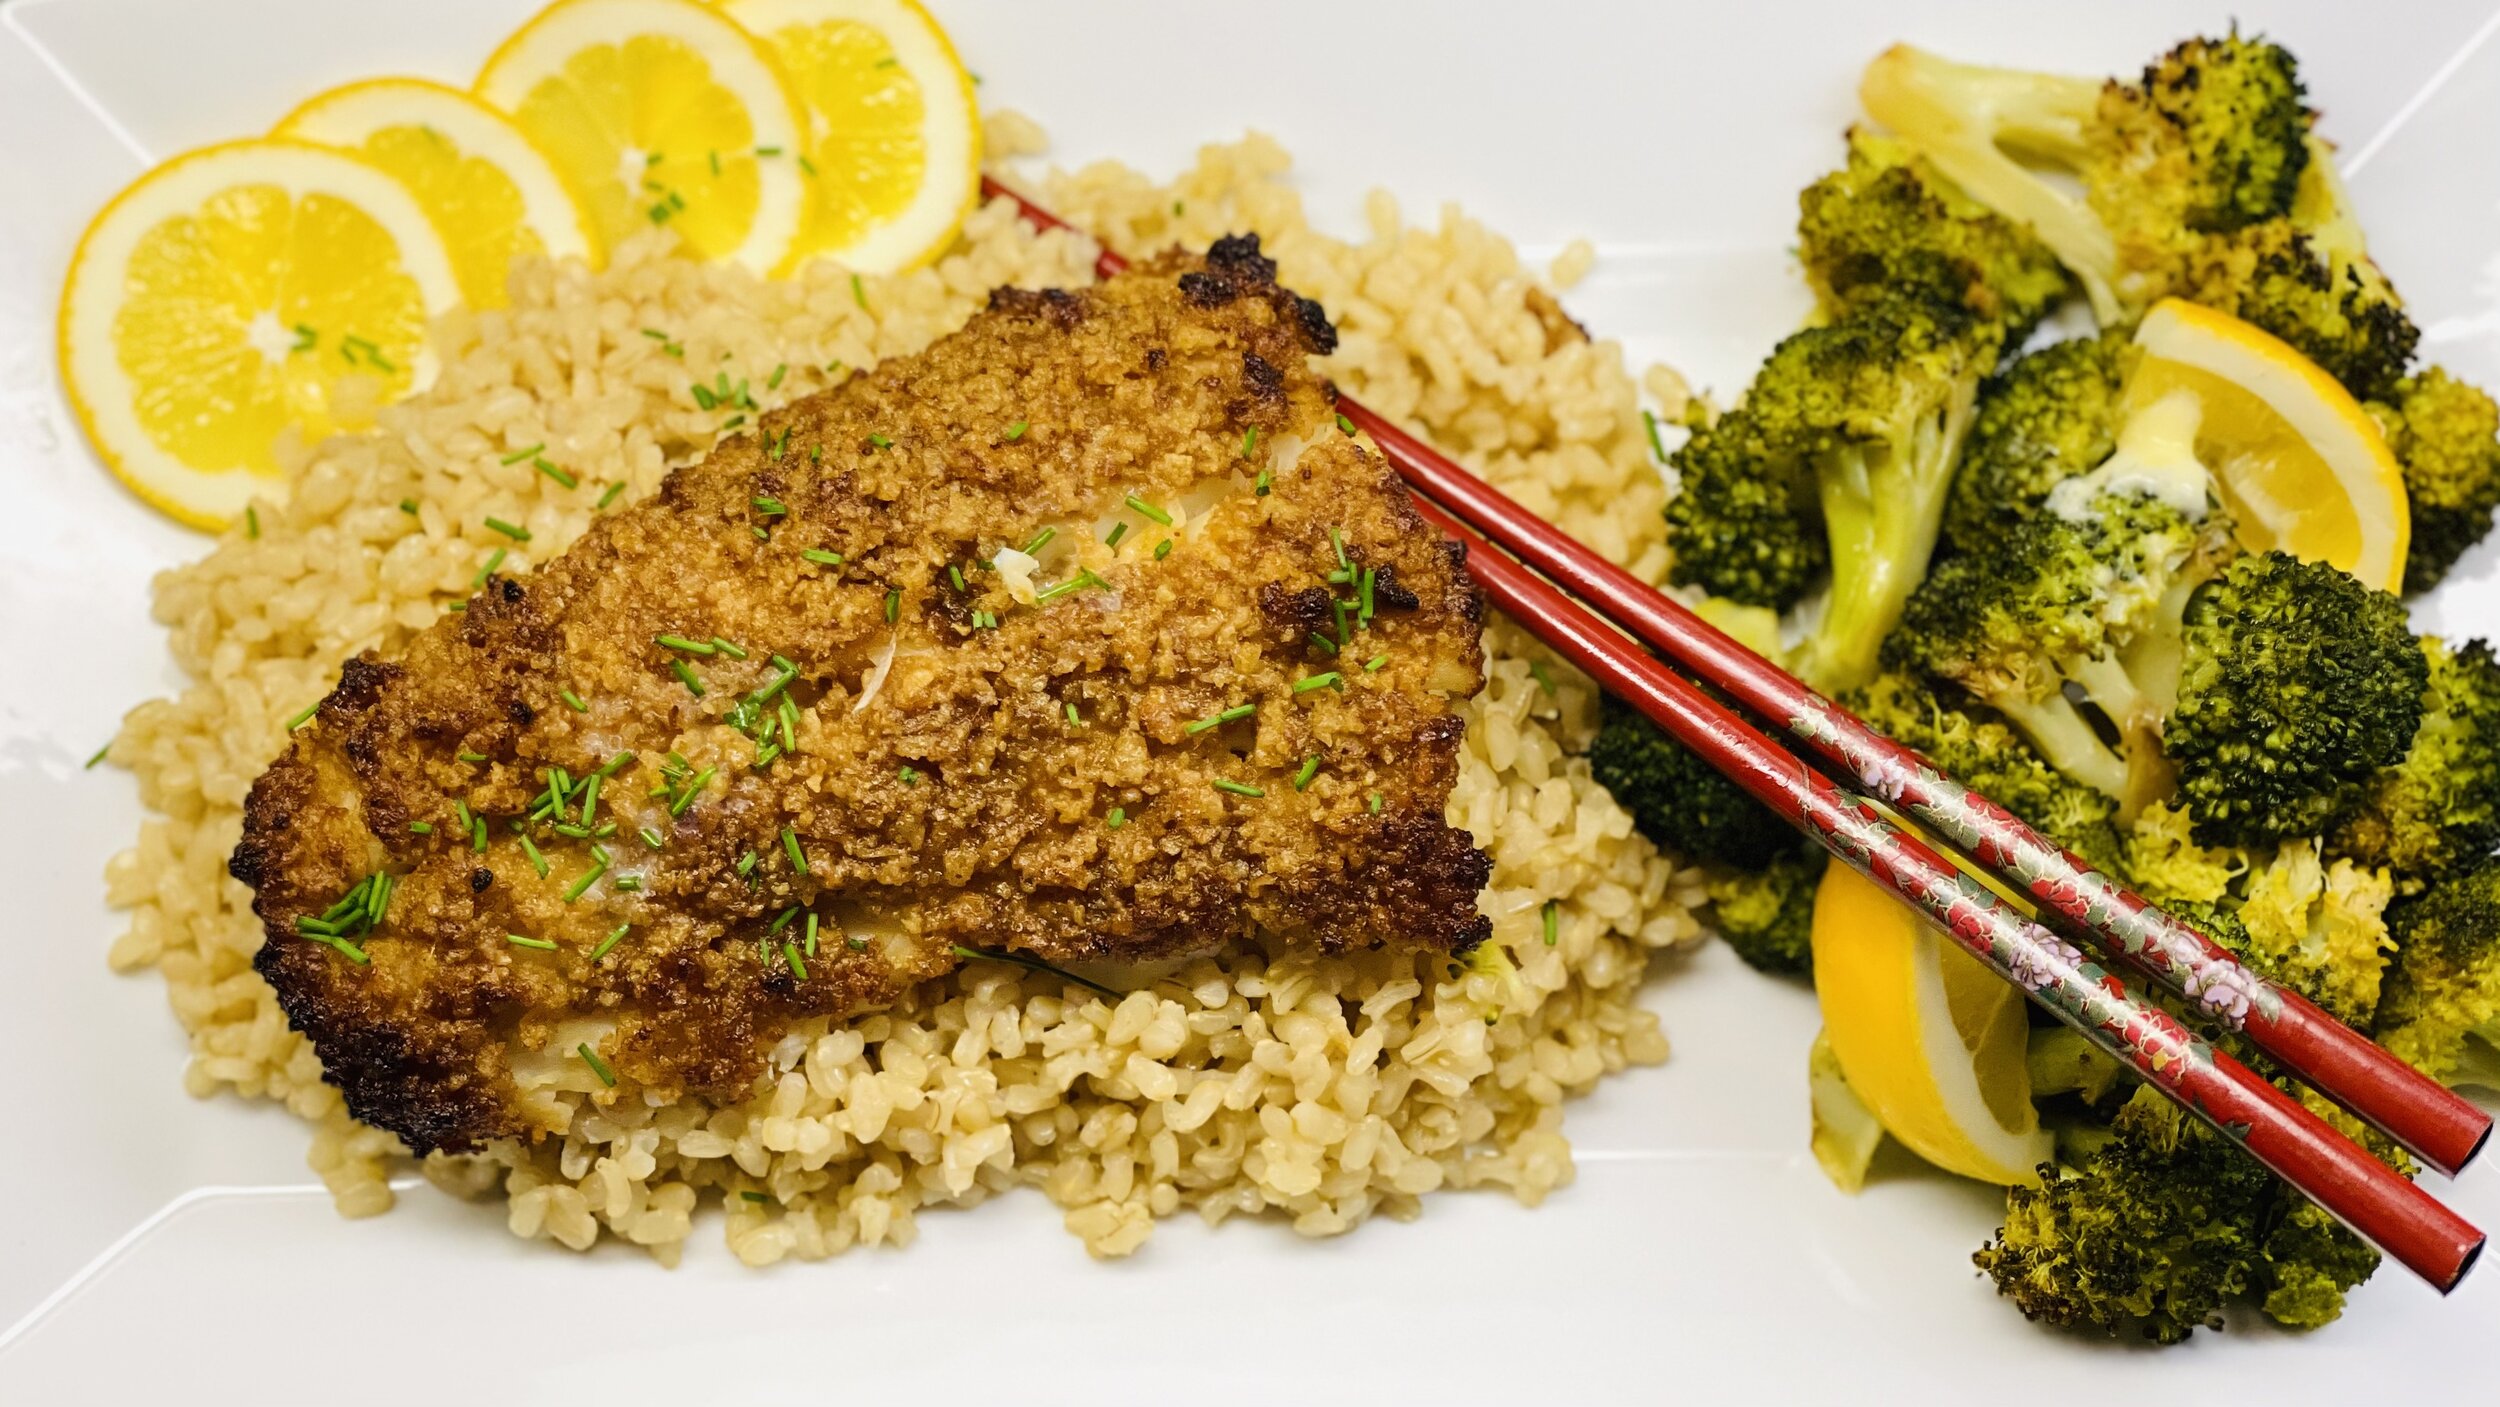
Lemon Butter Halibut (Low FODMAP)
5 Minutes prep • 15 Minutes cook • Low FODMAP • Gluten-free • Serves 2
5 Minutes prep • 15 Minutes cook • Low FODMAP • Gluten-free • Serves 2 • Ok to make ahead: Step 1
Fresh Halibut is one of my favorite fish to cook and eat. It has a beautiful texture that makes it easy to work with, and it has a delicate flavor so it pairs wonderfully with fresh herbs and seasonings. This recipe is simple and very good. It’s quick to make so it’s perfect for a weeknight dinner. Pair it with a salad for an excellent low-carb meal or layer it on a bed of buttered steamed rice. Either way, it’s delicious.
Ingredients
2 Halibut steaks
1 tablespoon garlic-infused olive oil
4 tablespoons salted butter
2 tablespoons fresh dill, chopped, plus more for serving
Two lemons, one juiced and one cut into wedges for serving
Directions
(1) Prepare: Squeeze the lemon, and wash and dry the dill if needed.
(2) Sear the fish: Heat a medium-size frying pan over nearly high heat. When the pan is warm, add the garlic-infused olive oil. When the oil is hot, spread it around the pan, then, lay the halibut steaks in the pan to sear. You want the oil to sizzle when you add the fish. If it doesn’t sizzle, it’s not hot enough. Cook for about 2 minutes, or until the fish starts to brown on the bottom. Then flip it and sear the fish on the other side.
(3) Add the lemon and dill: Pour the lemon juice over the halibut steaks, then put a pat of butter (about a tablespoon) on top of each steak. sprinkle with the chopped dill, a good grinding of black pepper, and about 1/4 - 1/2 teaspoon of salt. Cover the pan, turn the heat down to medium and let cook for about 5 minutes until the fish is just cooked through.
(4) Finish: Remove the fish from the pan. Put the remaining 2 tablespoons of butter in the pan with the juices. Melt the butter and whisk or stir with a wooden spoon. Pour the sauce over the fish. Serve with lemon wedges.
(5) Plate and serve: Pour the sauce over the fish. Serve with lemon wedges.
Eat and enjoy every bite because you can!
Recipe note: I use Diamond Crystal Kosher salt in all my recipes because it has a wonderful flat and crisp flake that tastes delicious. It is also the least salty salt available so you can use it more liberally as a seasoning than you can table salt or sea salt. If you use another type of salt, you may need to reduce the amount so it is not over-salted.
Link note: This post contains links for you to easily purchase items listed on the page. In some cases, we have provided a special discount code for IBS Game Changers so be sure to use it when you purchase an item to get the discount that has been arranged just for you! As an Amazon Associate, I earn a commission from qualifying Amazon purchases.
More Deliciously Low FODMAP™ main course recipes
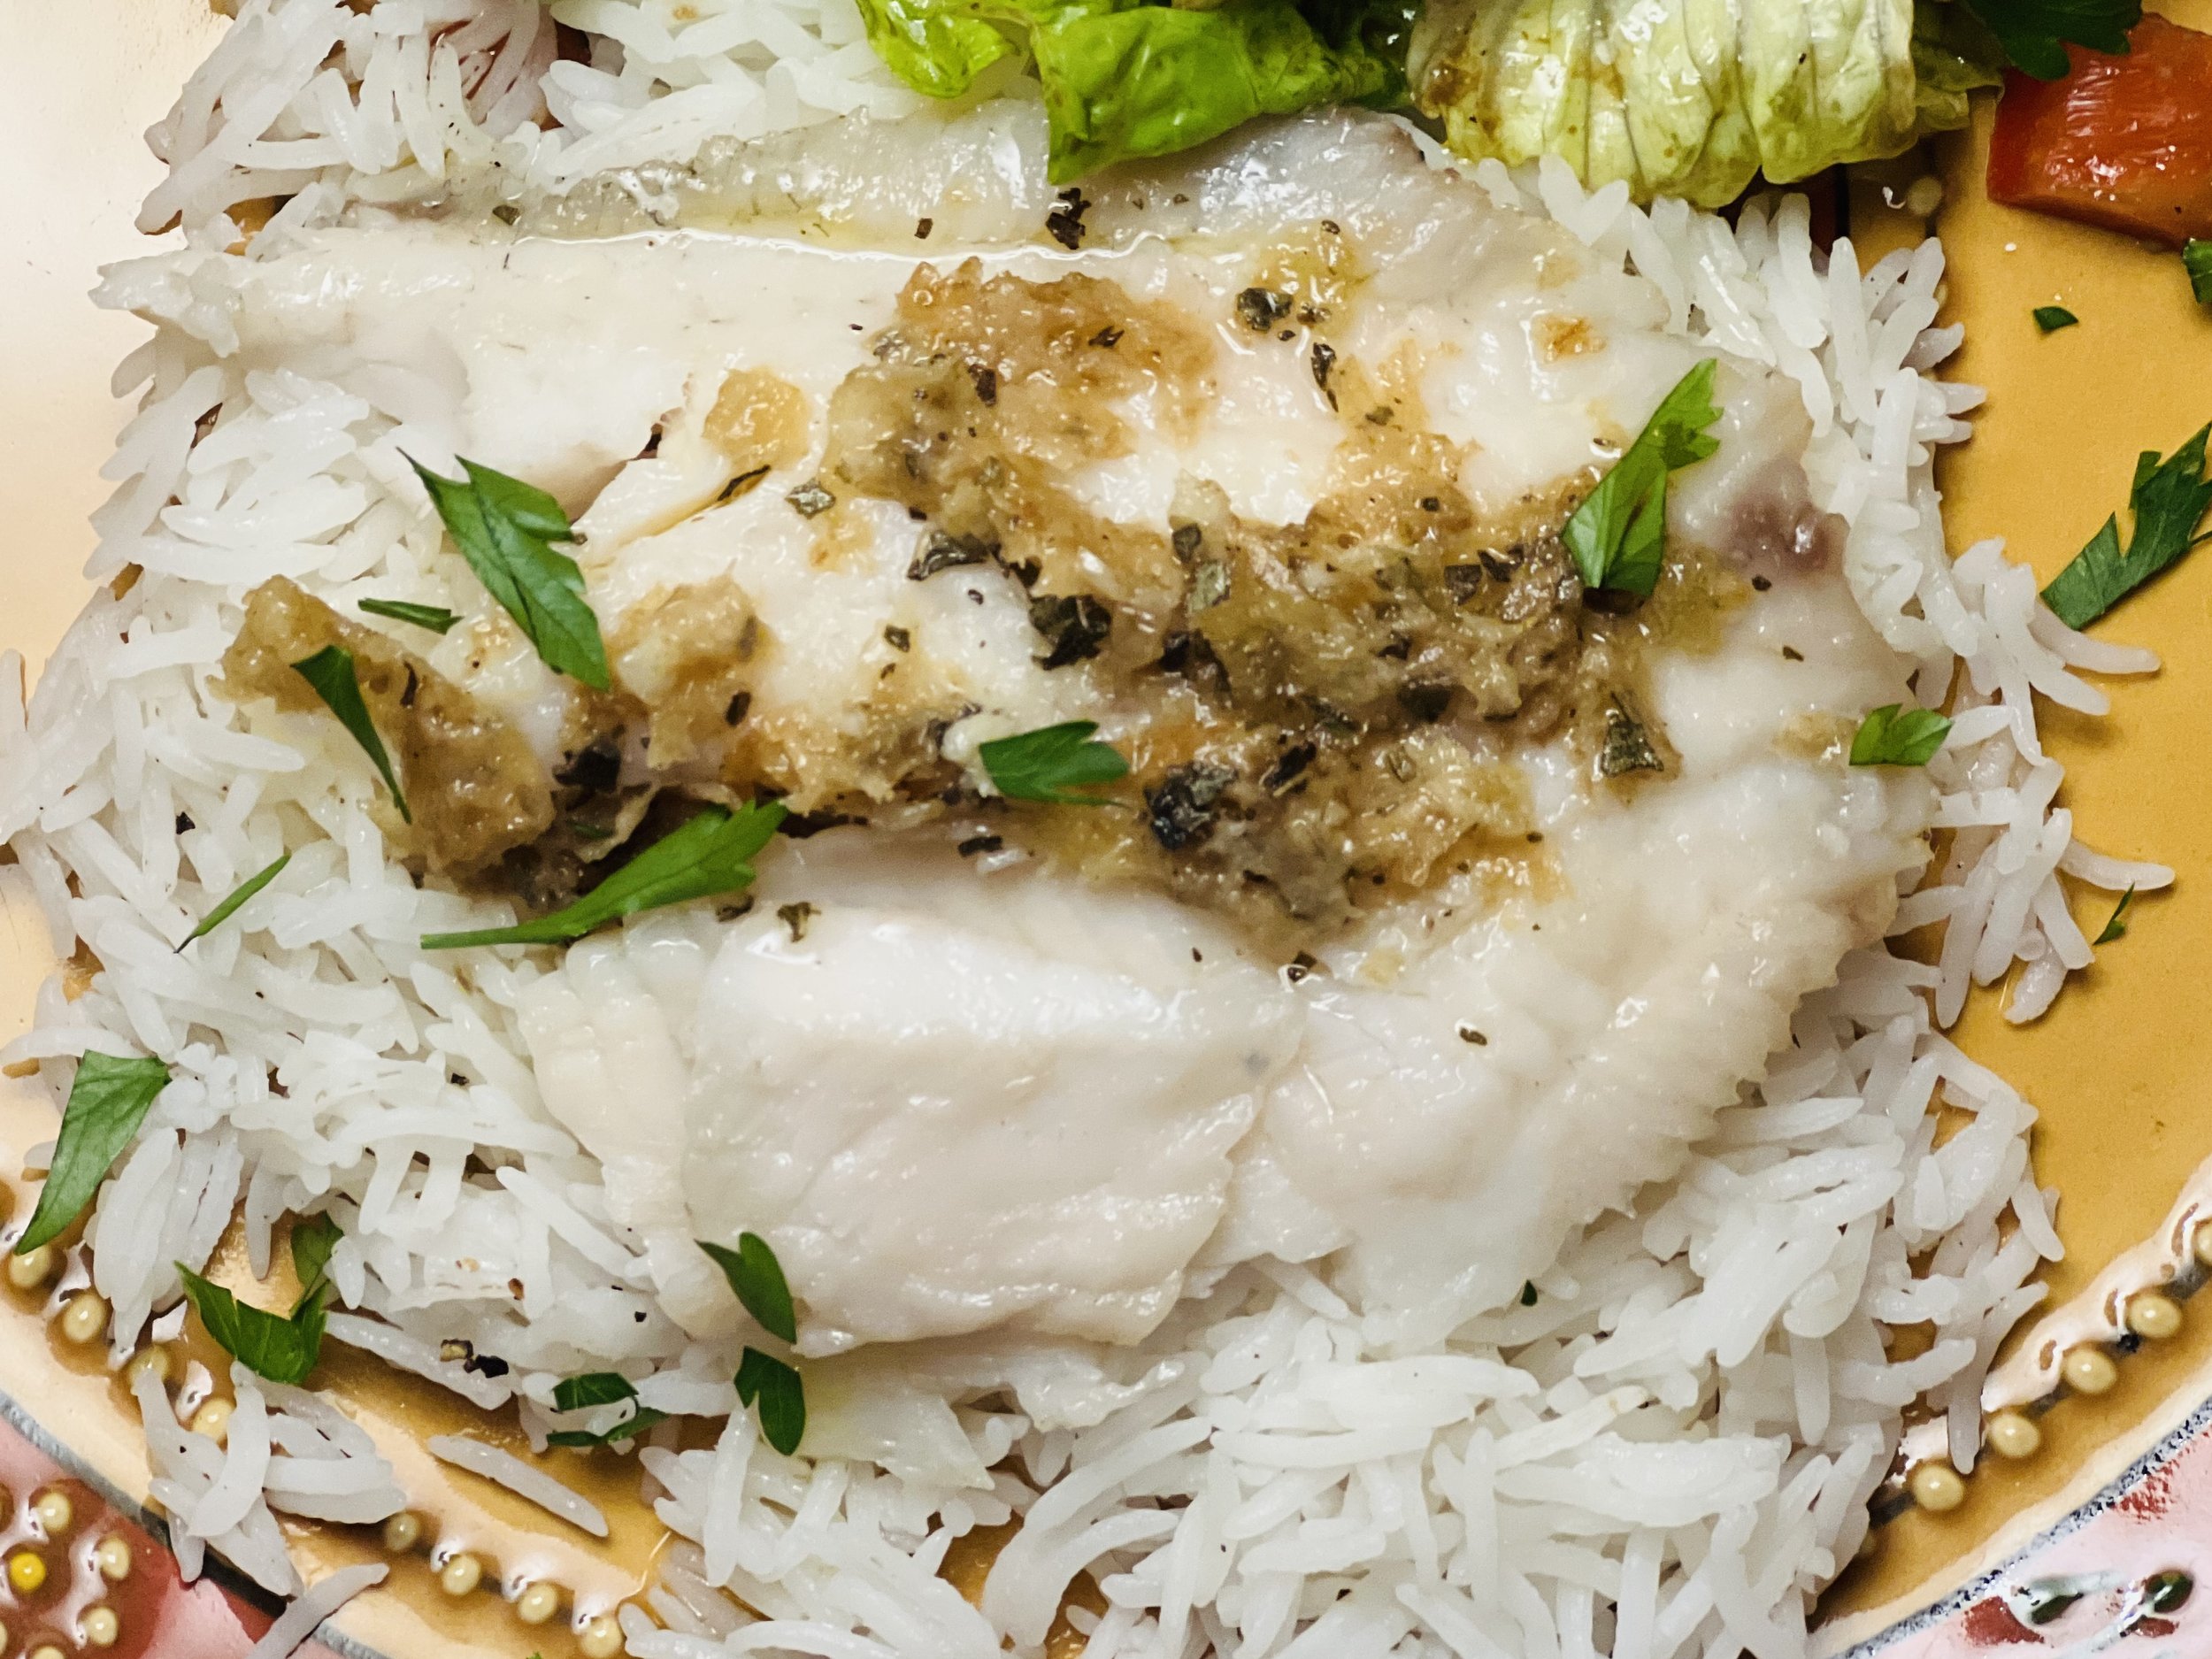
Brown Butter Lemon Halibut (Low FODMAP)
10 Minutes prep • 20 Minutes cook • Low FODMAP • Gluten-free • Serves 4
10 Minutes prep • 20 Minutes cook • Low FODMAP • Gluten-free • Serves 4
I like to challenge myself to make meals that cook in the time it takes to cook the rice. This dish comes together in under 30 minutes, including prep, from start to finish. Tender flaky fish with a lemony brown butter sauce makes a wonderful combination. You can use halibut or any other firm white fish available. The mild flavor is enhanced with the rich nuttiness of the browned butter.
Ingredients
2 cups white rice, prepared per package instructions
About 1 1/2 pounds of halibut fillets (or another firm white-fleshed fish), cut into 4 pieces
2 tablespoons olive oil
4 tablespoons butter
12 to 15 fresh sage leaves (or 2 teaspoons dry sage)
2 tablespoons freshly squeezed lemon juice
2 tablespoons finely chopped parsley (optional), for serving
Lemon wedges, for serving
Directions
(1) Prepare: Sprinkle both sides of each filet with salt and pepper and put the rice on the stove to cook.
(2) Cook the fish: Pour oil into a heavy skillet large enough for fish to cook in one layer, and set over medium-high heat. When oil is hot (but not smoking), swirl to coat the pan evenly, then add the fish in a single layer. Cook undisturbed for 3 to 4 minutes until nicely browned on one side. Adjust the heat as needed to produce a steady sizzle and prevent burning. Flip the fish and cook it for another 3 minutes or so, until just done. (It should flake easily.) Remove the fish and keep warm.
(3) Make the sauce: Place the skillet back over medium-high heat. Add butter and sage leaves (or dry sage). Cook butter, swirling the pan, until foamy and just beginning to brown, about 1 minute.
(4) Finish: Turn off the heat and stir in the fresh-squeezed lemon juice.
(5) Plate and serve: Serve the fish over the rice with the sage/butter sauce drizzled over the top. Sprinkle with chopped parsley and serve immediately, with lemon wedges and a crisp and colorful green salad alongside.
Eat and enjoy every bite because you can!
This post contains links for you to easily purchase items listed on the page. In some cases, we have provided a special discount code for IBS Game Changers so be sure to use it when you purchase an item to get the discount that has been arranged just for you! As an Amazon Associate, I earn a commission from qualifying Amazon purchases.
More Deliciously Low FODMAP™ seafood recipes
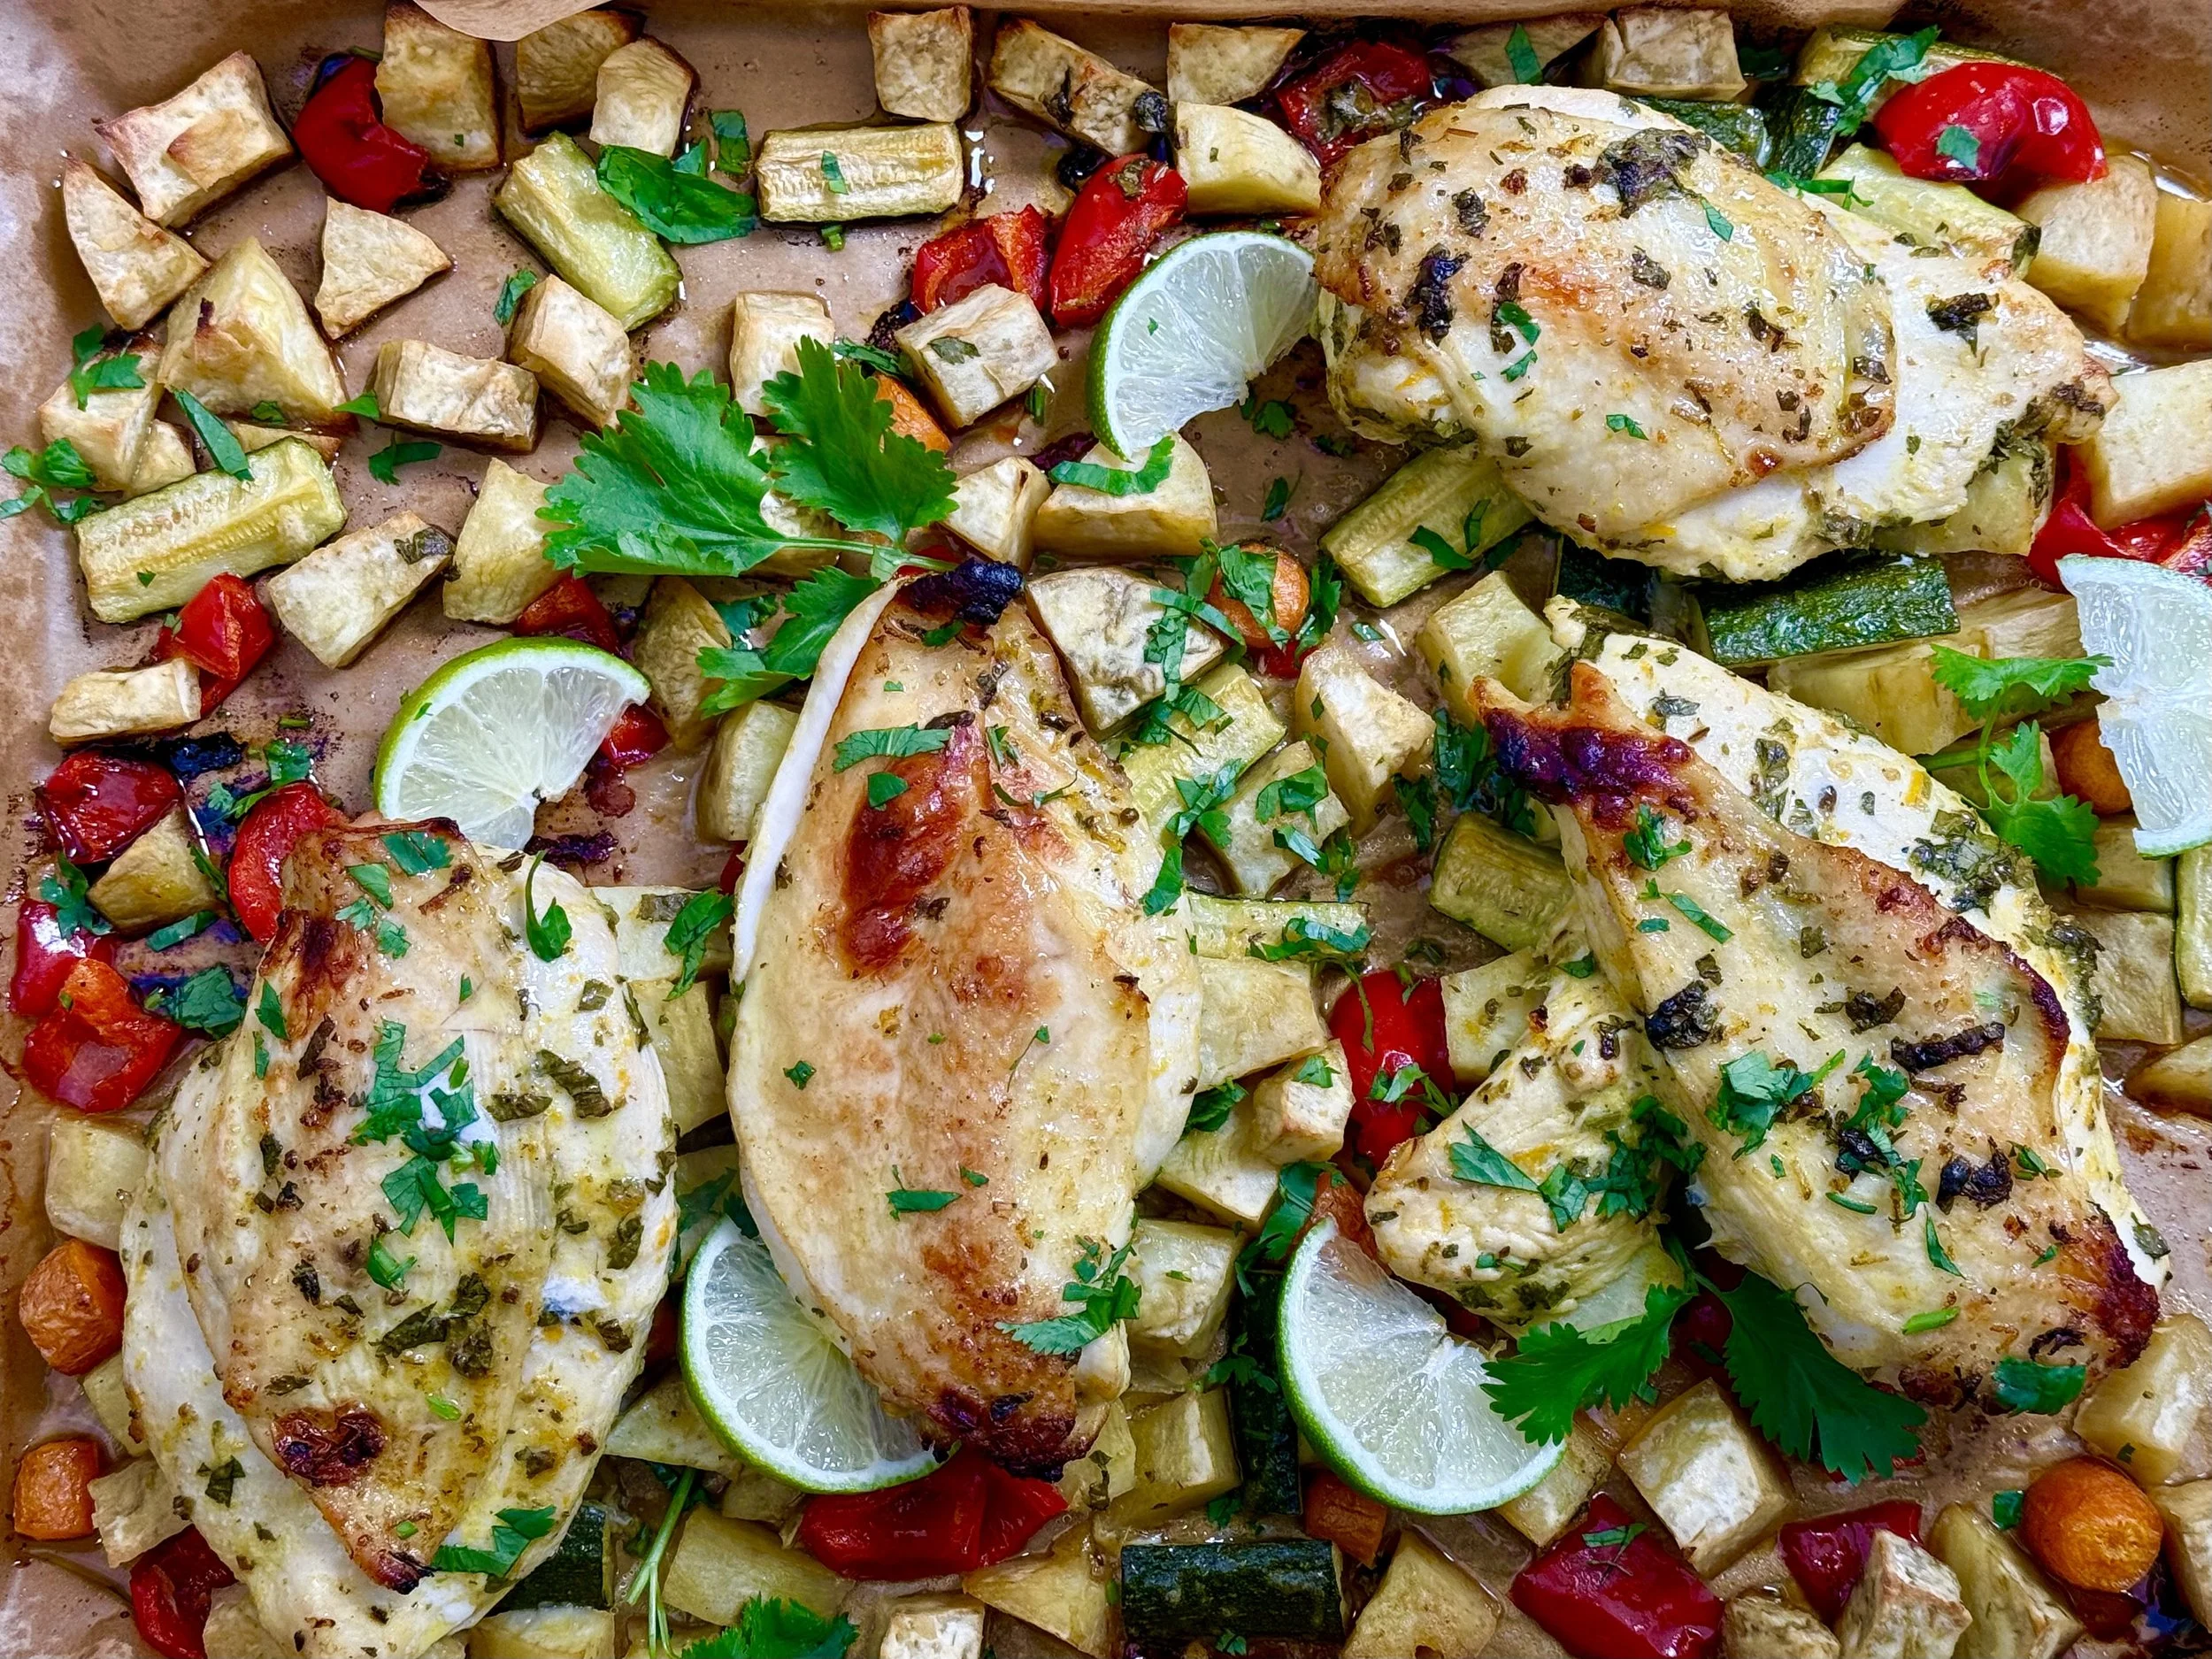
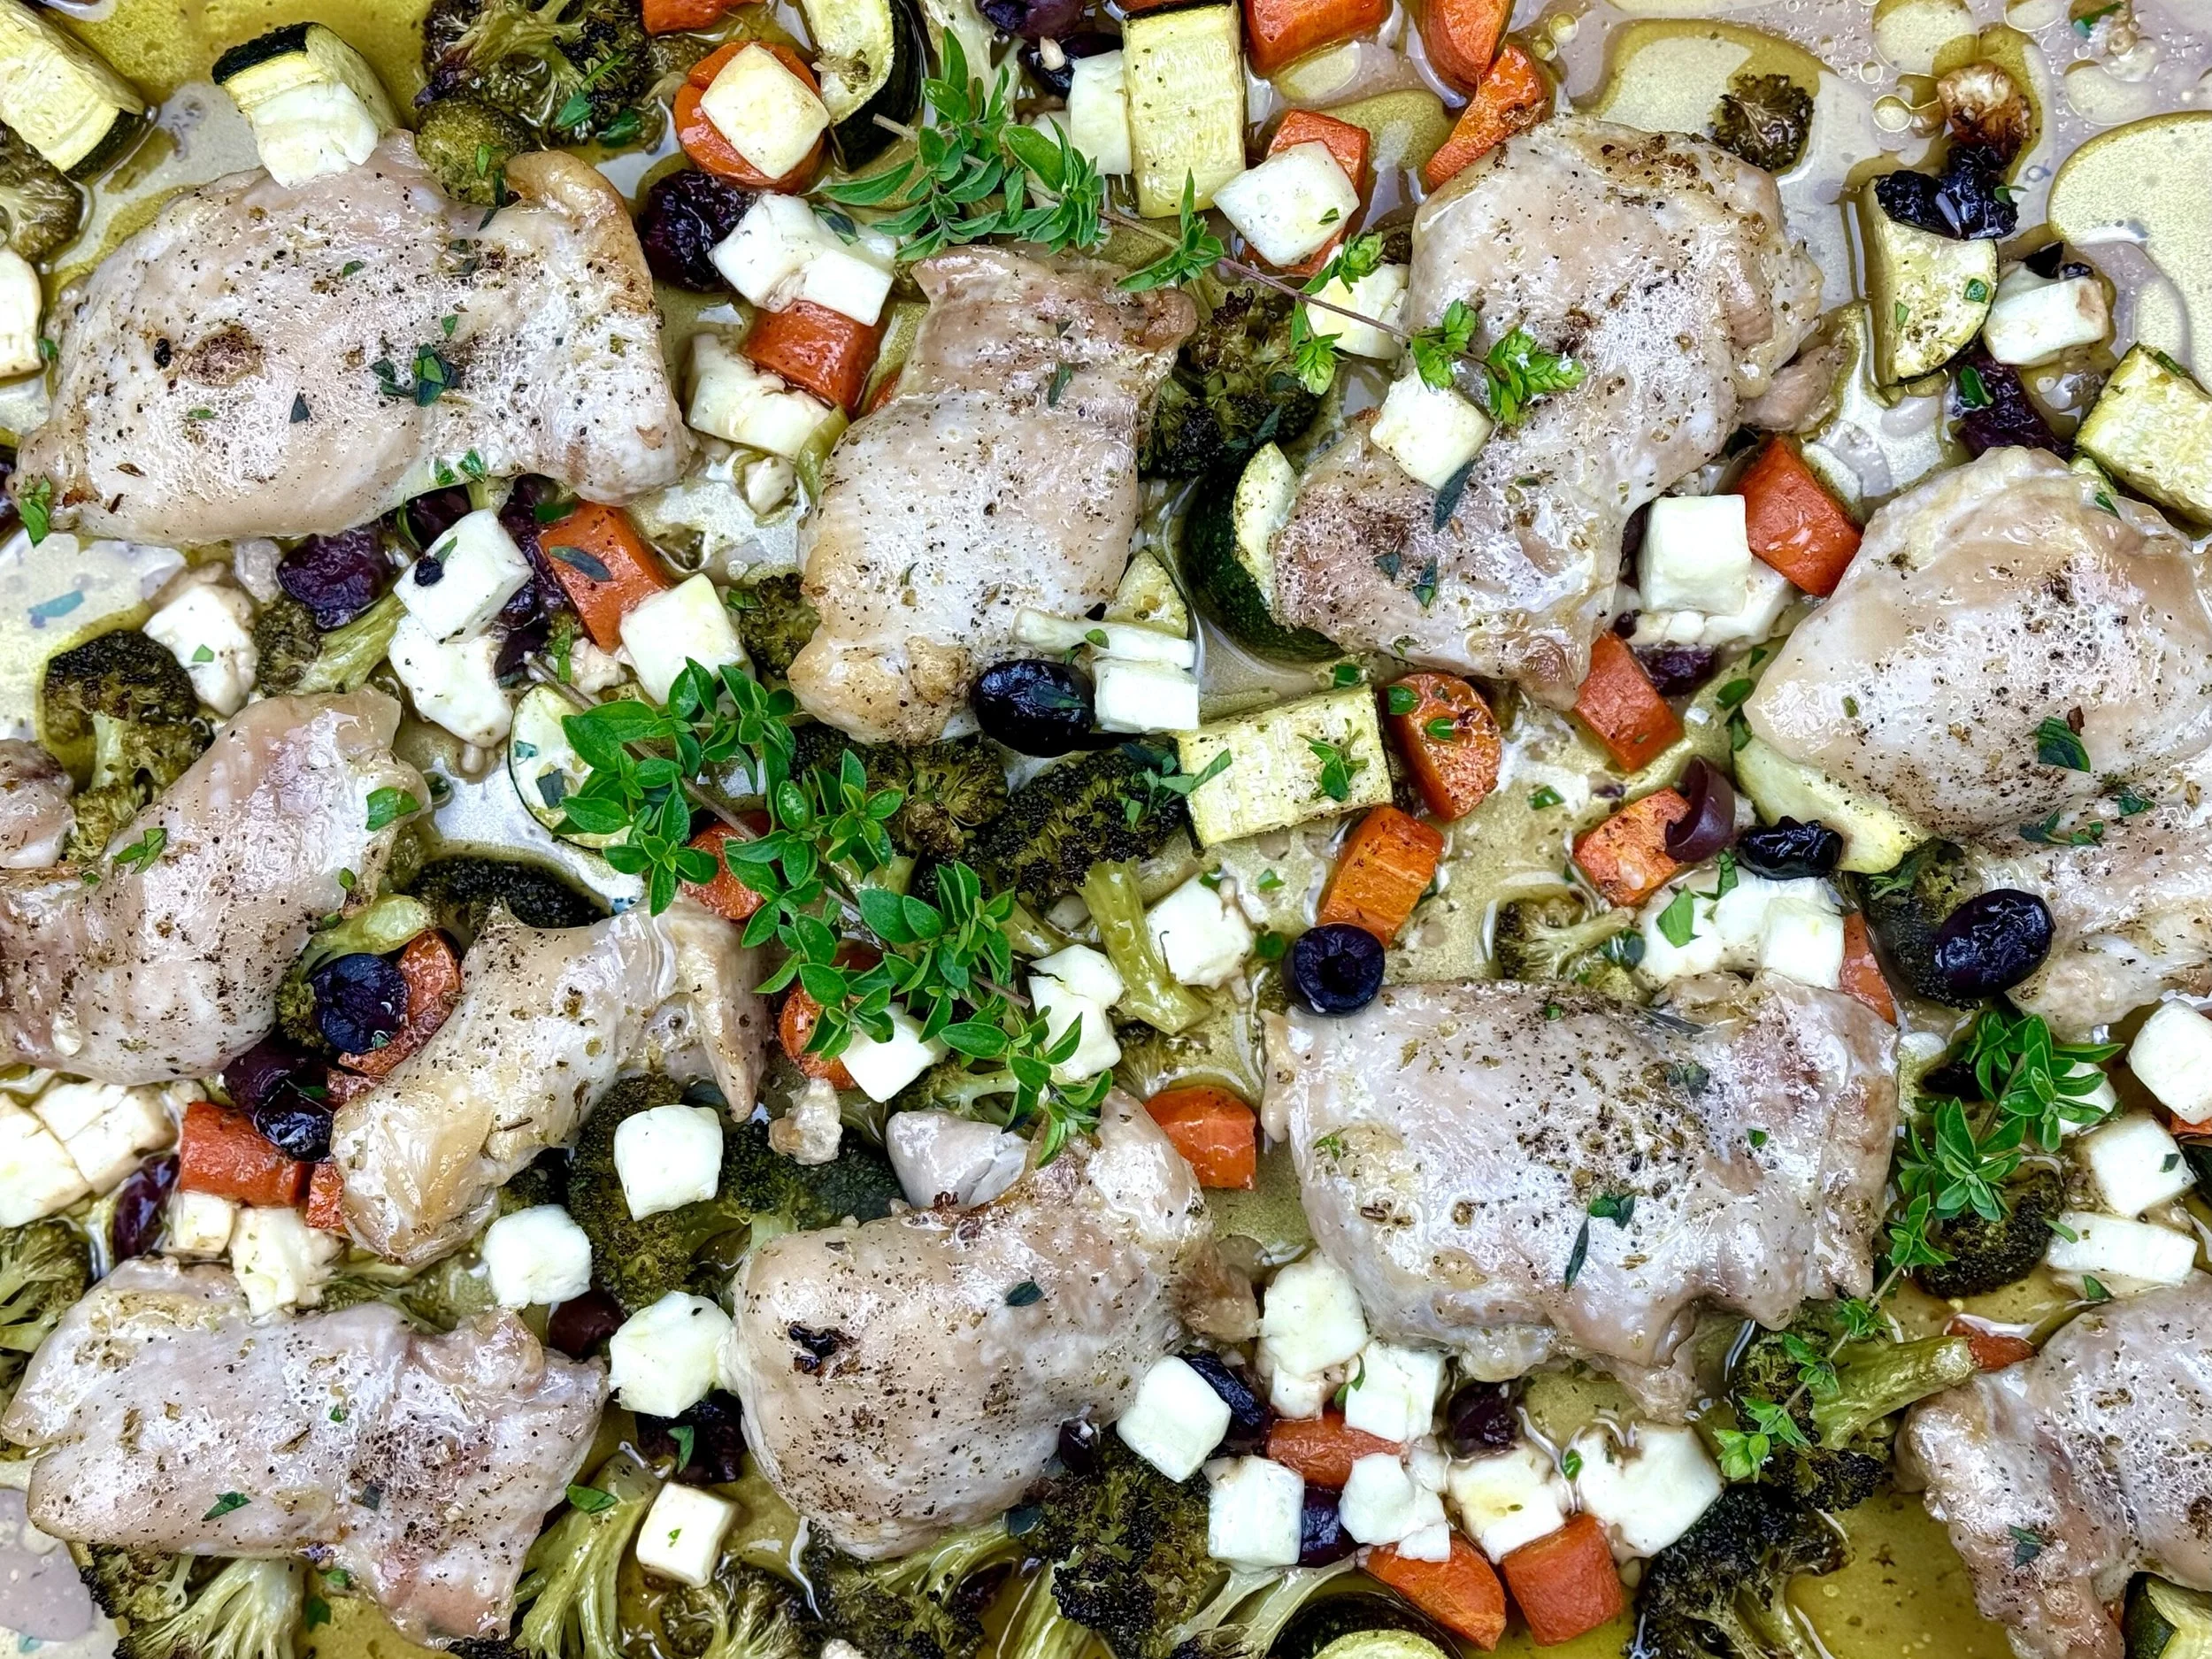
45 Minutes • Low FODMAP • Gluten-Free • Serves 4 • Ok to make-ahead: Steps 1 - 4