Deliciously Low FODMAP

Inspire yourself with hundreds of delicious low FODMAP recipes, tips, and tools, and enjoy the abundance that is yours even when you have IBS.
Use the buttons and filters to find something specific or browse the complete collection for inspiration.
Discover a treasure trove of recipes with my FREE recipe club! Get new ideas delivered straight to your inbox every week.
Deliciously Low FODMAP is a trademark of IBS Game Changer, LLC
Filter to find Recipes and Tools
More Filtering Options
- All 827
- Appetizer 56
- BBQ 49
- Bowl 32
- Breakfast 69
- Cocktails 13
- Collection 1 58
- Collection 10 27
- Collection 11 30
- Collection 12 27
- Collection 13 31
- Collection 14 29
- Collection 15 31
- Collection 16 34
- Collection 17 31
- Collection 18 33
- Collection 19 36
- Collection 2 32
- Collection 20 33
- Collection 21 33
- Collection 22 40
- Collection 23 63
- Collection 24 46
- Collection 3 28
- Collection 4 29
- Collection 5 30
- Collection 6 32
- Collection 7 31
- Collection 8 31
- Collection 9 32
- Condiments 6
- Crock Pot 4
- Dessert 119
- Diabetes Game Changer Exception Protocol Contains Alcohol 11
- Diabetes Game Changer Exception Protocol Contains Flour 113
- Diabetes Game Changer Exception Protocol Contains Flour AND Sugar 79
- Diabetes Game Changer Exception Protocol Contains Sugar 52
- Diabetes Game Changer First Four Weeks 405
- Dinner 371
- Drink 8
- Easter 1
- Free Guide 17
- Gluten-free 686
- Gut Microbiome 2
- Guthealth 3
- Holidays 73
- IBS Triggers 4
- Keto Friendly 178
- Lactose-Free 184
- Low Carb 22
Kalamata Olive and Parmesan Dressing (Low FODMAP)
10 Minutes prep • Low FODMAP • Gluten-Free • Lactose-Free • Makes 1 1/2 Cups
10 Minutes prep • Low FODMAP • Gluten-Free • Lactose-Free • Makes 1 1/2 Cups • Ok to make-ahead: 2 Weeks
This deeply savory, blender dressing is one you will put on everything. Briny Kalamata olives, sharp parmesan, Dijon, red wine vinegar, and bright parsley all blended into a thick, glossy dressing that keeps for two weeks in the fridge. Use it on salads, pasta, roasted vegetables, and more.
See this new recipe in my FREE recipe club.
To streamline your search through hundreds of existing recipes, I'm moving the release of my new weekly creations to the Recipe Club on Patreon. In the club, you’ll get access to a treasure trove of low-FODMAP goodness, complete with collections and filters to use as your virtual cookbook!
Here's what awaits you in the club:
Exclusive weekly recipes: Be the first to try my latest delicious low-FODMAP creations!
Simple & Easy: My recipes continue to focus on readily available ingredients and effortless preparation, perfect for family-friendly meals (no more separate low-FODMAP meal prep!).
Hundreds of existing recipes: Gain access to my entire library of low-FODMAP recipes, all conveniently organized.
You can join for free or sign up for only $5/month. Your support fuels my passion for creating new, delicious, and easy-to-make low-FODMAP recipes just for you.
Let's go on this delicious low-FODMAP journey together.
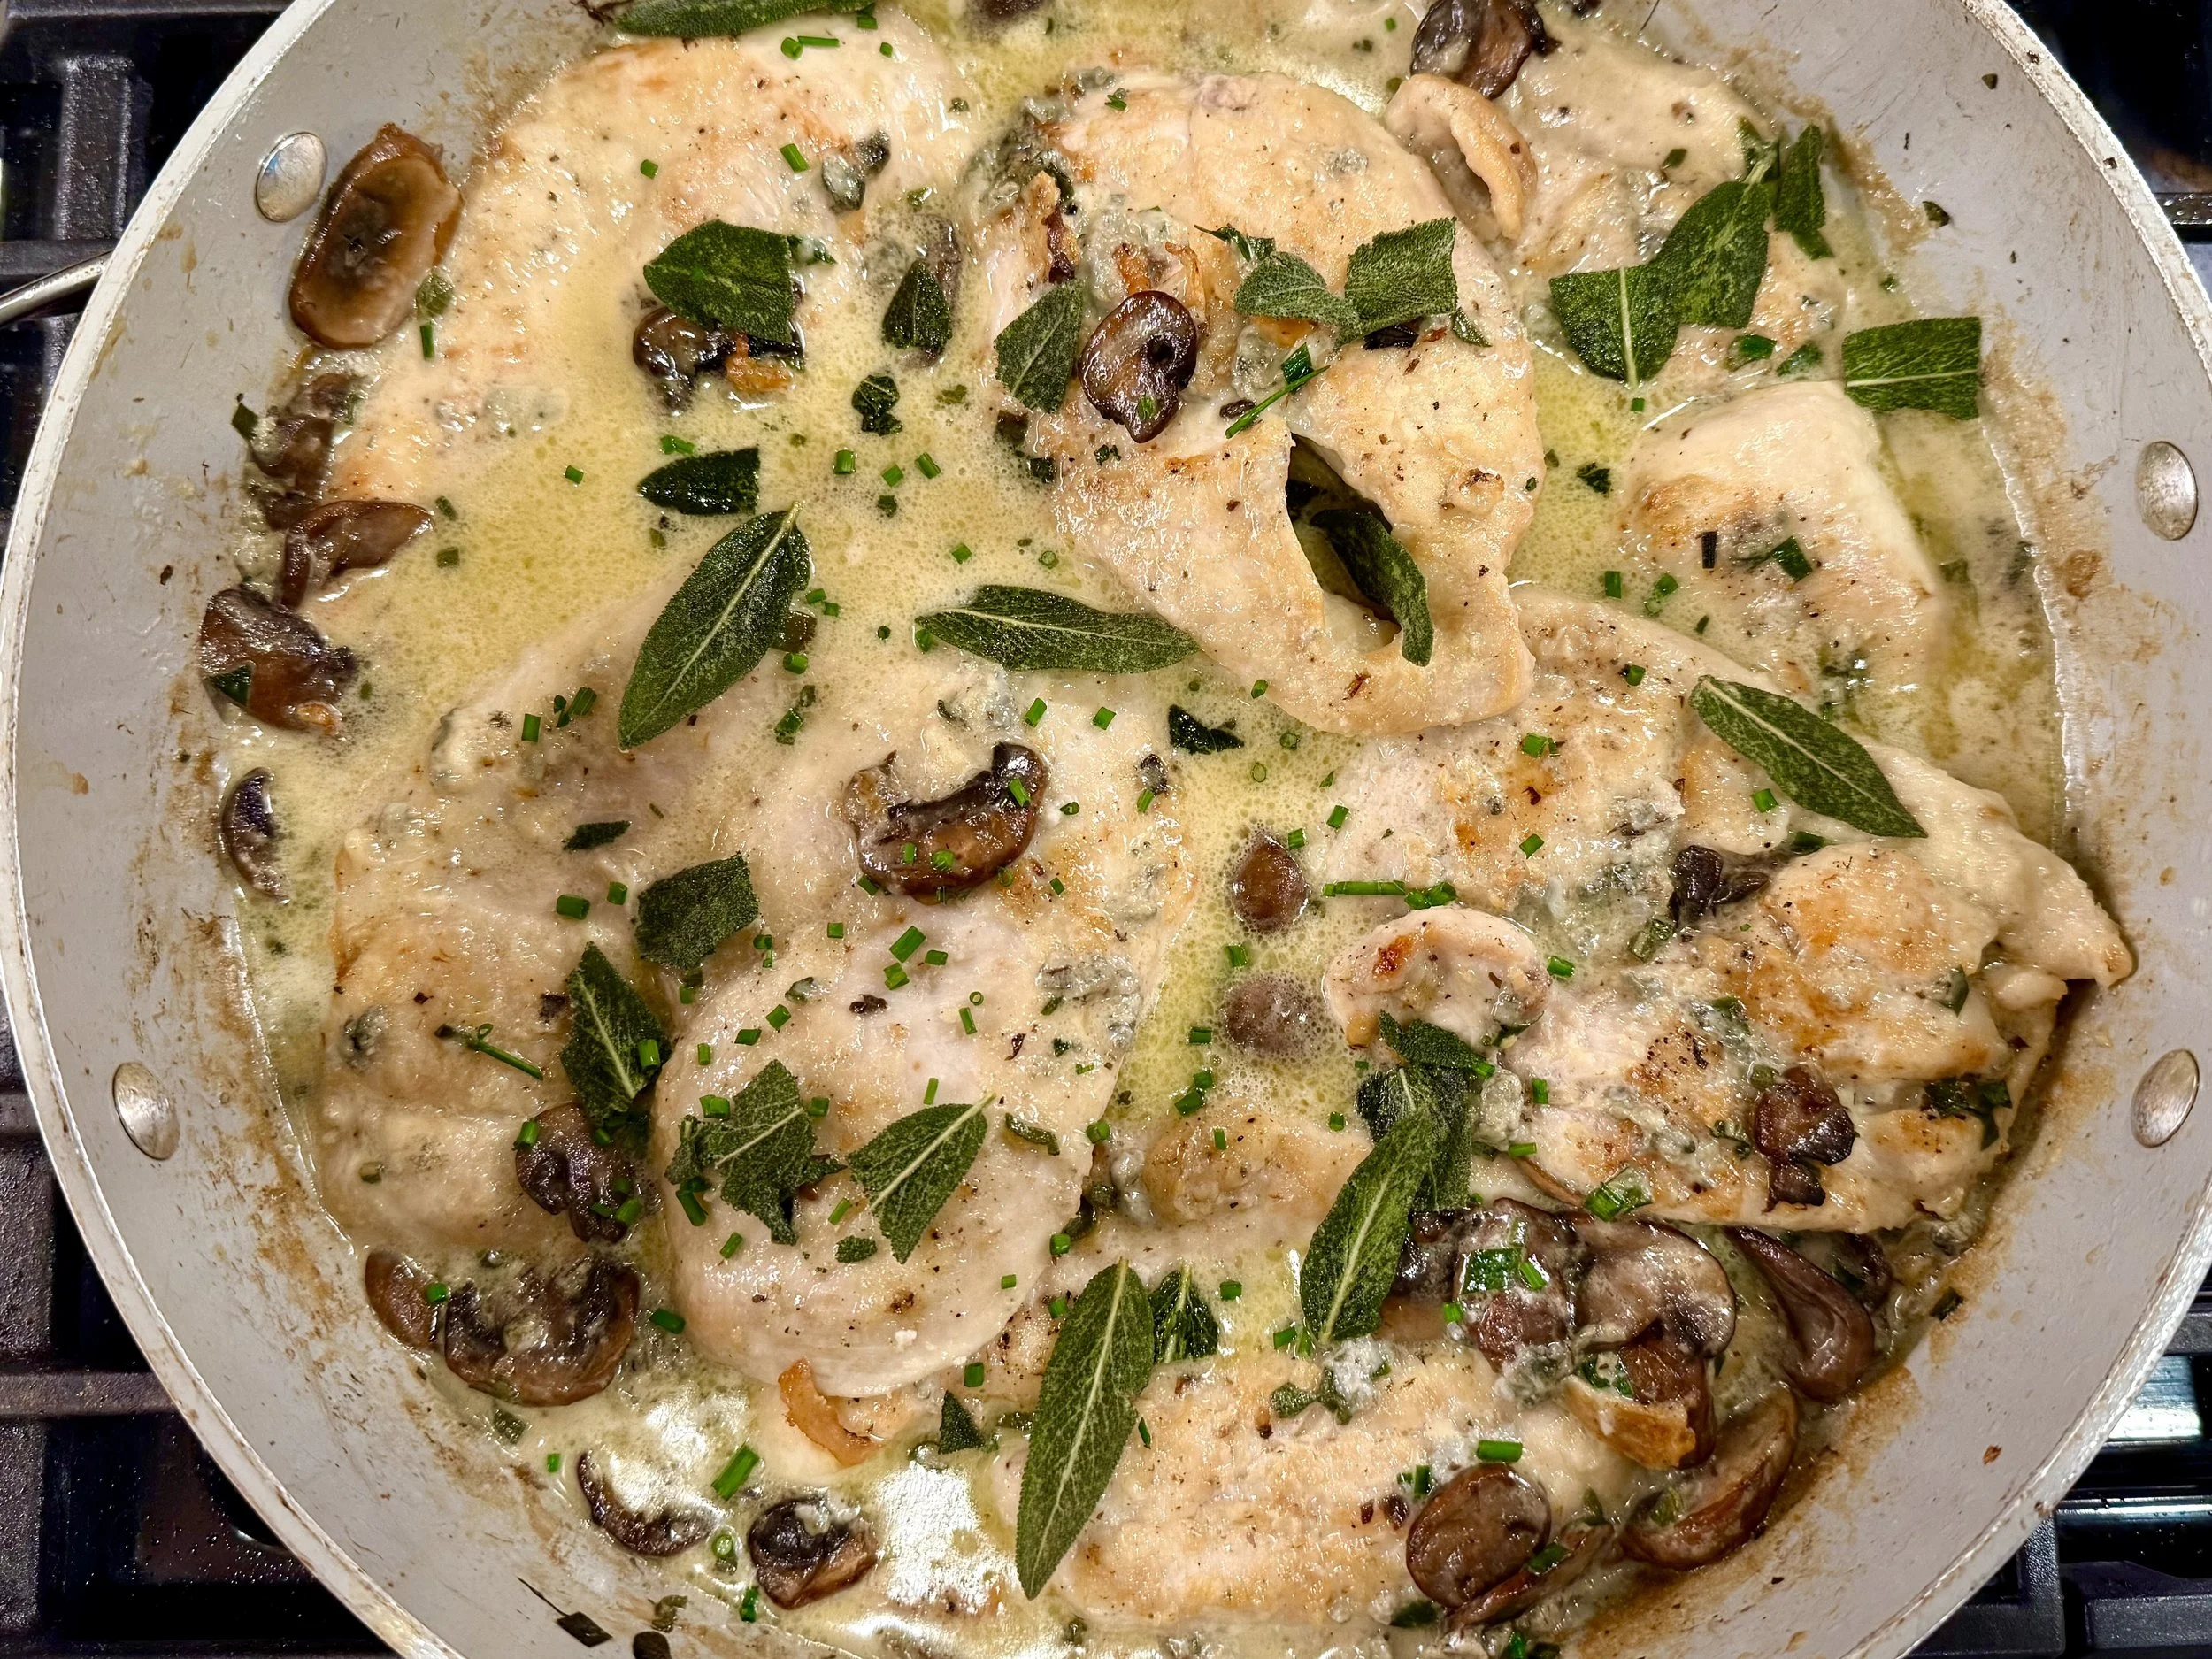
Creamy Gorgonzola Chicken with Mushrooms and Sage (Low FODMAP)
20 Minutes prep • 35 Minutes cook • Low FODMAP • Gluten-Free • Serves 4
20 Minutes prep • 35 Minutes cook • Low FODMAP • Gluten-Free • Serves 4 • Ok to make-ahead: Steps 1 - 3
If you thought bold, decadent, restaurant-worthy meals were off the table since your IBS diagnosis — think again. This Creamy Gorgonzola Chicken is flavorful, indulgent, and perfect for special occasions like birthdays, anniversaries, or Valentine’s Day. I’ve swapped out the FODMAP triggers and kept every bit of the dreamy, tangy gorgonzola sauce. Your gut is going to thank you.
This new recipe is available exclusively in the recipe club.
To streamline your search through hundreds of existing recipes, I'm moving the release of my all-new weekly creations to the Recipe Club on Patreon. This means you'll get ad-free access to a treasure trove of low-FODMAP goodness, complete with collections and filters to use as your virtual cookbook!
Here's what awaits you in the club:
Exclusive weekly recipes: Be the first to try my latest delicious low-FODMAP creations!
Simple & Easy: My recipes continue to focus on readily available ingredients and effortless preparation, perfect for family-friendly meals (no more separate low-FODMAP meal prep!).
Hundreds of existing recipes: Gain access to my entire library of low-FODMAP recipes, all conveniently organized.
Get your first week free, then enjoy full access for only $5/month. Your support fuels my passion for creating new, delicious, and easy-to-make low-FODMAP recipes just for you.
Let's go on this delicious low-FODMAP journey together.
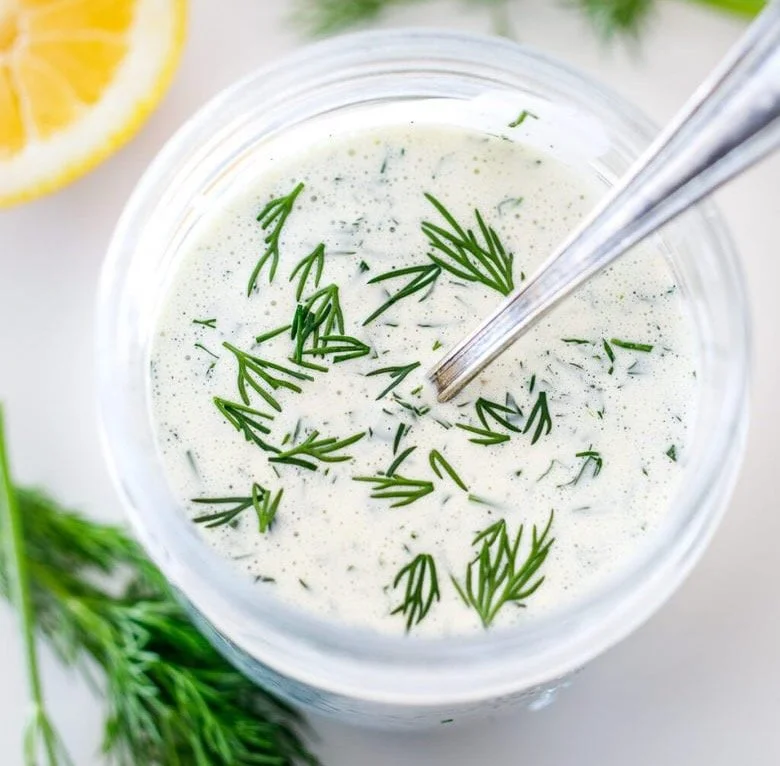
Sour Cream Dill Dressing (Low FODMAP)
10 Minutes prep • Low FODMAP • Gluten-Free • Lactose-Free • Makes 1 cup
10 Minutes prep • Low FODMAP • Gluten-Free • Lactose-Free • Makes 1 cup • Ok to make-ahead: Steps 1 - 4
This cool, herbaceous dressing is everything a salad deserves — tangy sour cream and yogurt layered with bright fresh dill, a hint of garlic (low FODMAP of course), and a splash of lemon. It comes together in minutes and tastes like it's been a favorite family recipe forever. Drizzle it over crisp greens, use it as a dip for cut veggies, or spoon it generously over roasted potatoes. Bonus: it's completely lactose-free, so everyone at the table can dig in.
See this new recipe in my FREE recipe club.
To streamline your search through hundreds of existing recipes, I'm moving the release of my new weekly creations to the Recipe Club on Patreon. In the club, you’ll get access to a treasure trove of low-FODMAP goodness, complete with collections and filters to use as your virtual cookbook!
Here's what awaits you in the club:
Exclusive weekly recipes: Be the first to try my latest delicious low-FODMAP creations!
Simple & Easy: My recipes continue to focus on readily available ingredients and effortless preparation, perfect for family-friendly meals (no more separate low-FODMAP meal prep!).
Hundreds of existing recipes: Gain access to my entire library of low-FODMAP recipes, all conveniently organized.
You can join for free or sign up for only $5/month. Your support fuels my passion for creating new, delicious, and easy-to-make low-FODMAP recipes just for you.
Let's go on this delicious low-FODMAP journey together.
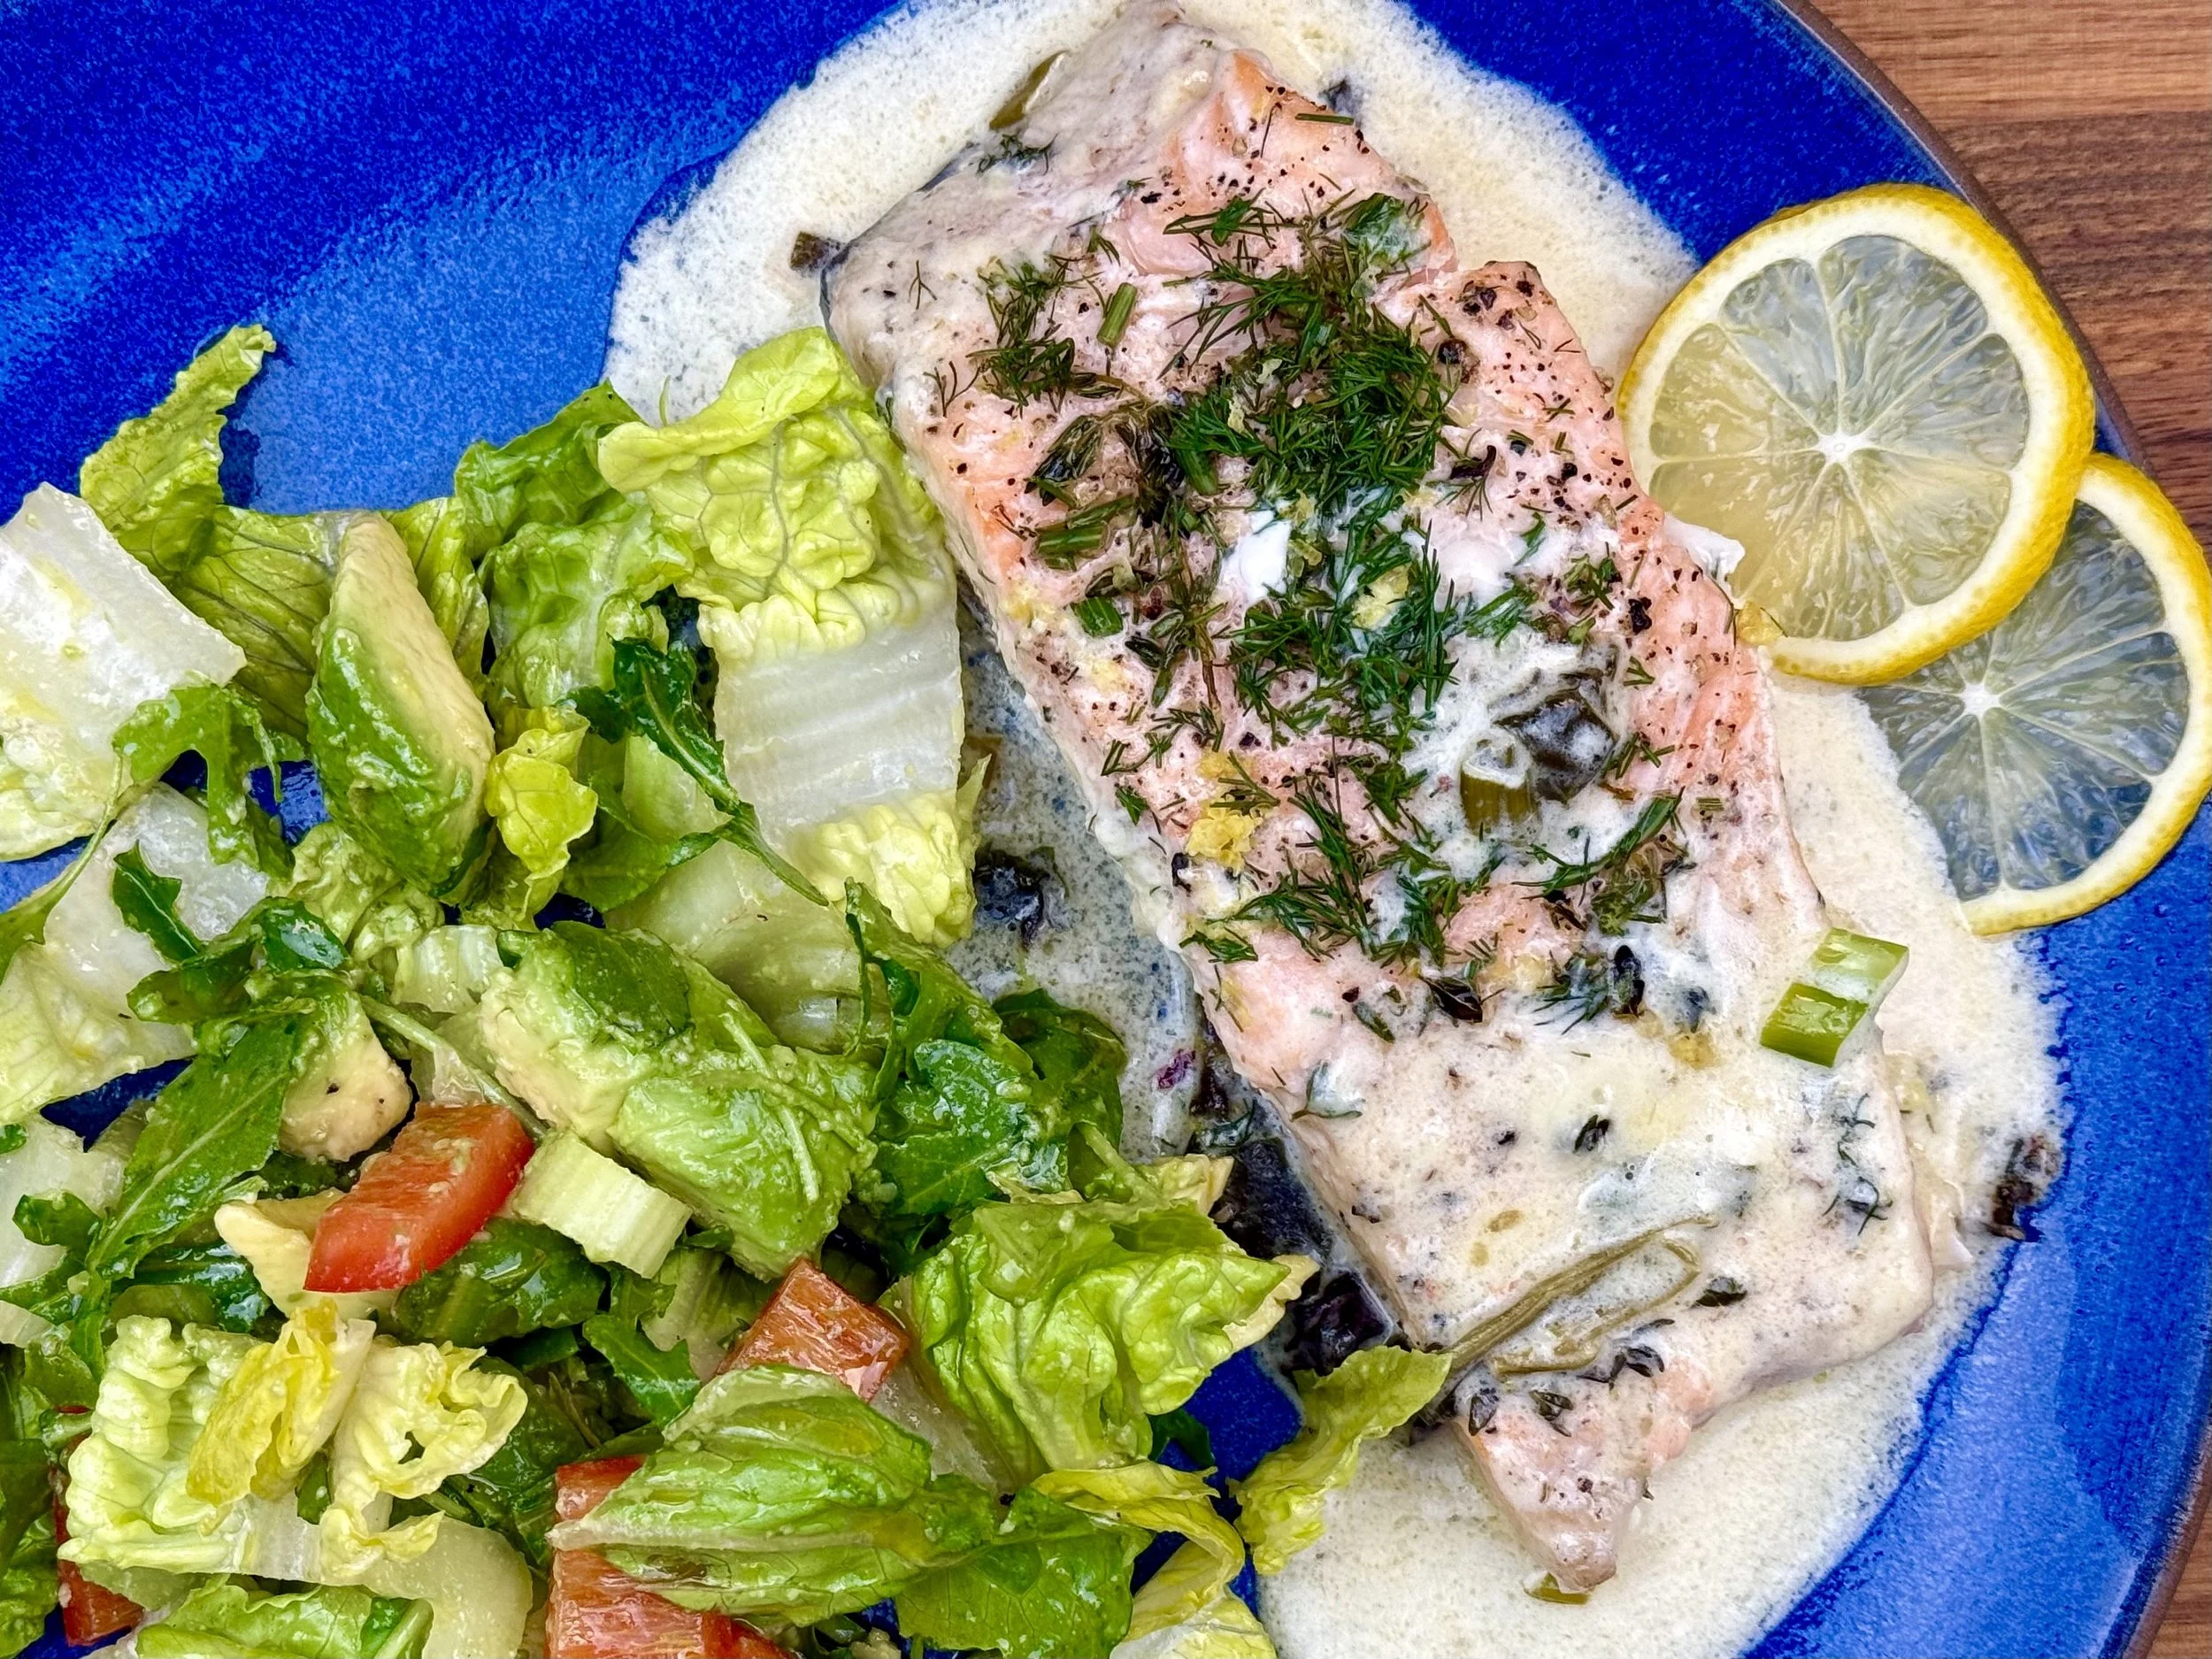
One Pan Creamy Baked Salmon with Dill (Low FODMAP)
15 Minutes prep • 20 Minutes cook • Low FODMAP • Gluten-Free • Serves 4
15 Minutes prep • 20 Minutes cook • Low FODMAP • Gluten-Free • Serves 4 • Ok to make-ahead: Steps 1 - 4
Some nights you want something that feels a little fancy without the fuss. This is that recipe. The secret is broiling the salmon first with butter and thyme until the edges are perfectly crisp, then finishing it in a silky Parmesan cream sauce with spinach, lemon, and fresh dill. Rich, bright, and deeply satisfying — and it all comes together in one skillet in about thirty minutes. Elegant enough for company. Easy enough for a Tuesday.
See this new recipe in my FREE recipe club.
To streamline your search through hundreds of existing recipes, I'm moving the release of my new weekly creations to the Recipe Club on Patreon. In the club, you’ll get access to a treasure trove of low-FODMAP goodness, complete with collections and filters to use as your virtual cookbook!
Here's what awaits you in the club:
Exclusive weekly recipes: Be the first to try my latest delicious low-FODMAP creations!
Simple & Easy: My recipes continue to focus on readily available ingredients and effortless preparation, perfect for family-friendly meals (no more separate low-FODMAP meal prep!).
Hundreds of existing recipes: Gain access to my entire library of low-FODMAP recipes, all conveniently organized.
You can join for free or sign up for only $5/month. Your support fuels my passion for creating new, delicious, and easy-to-make low-FODMAP recipes just for you.
Let's go on this delicious low-FODMAP journey together.
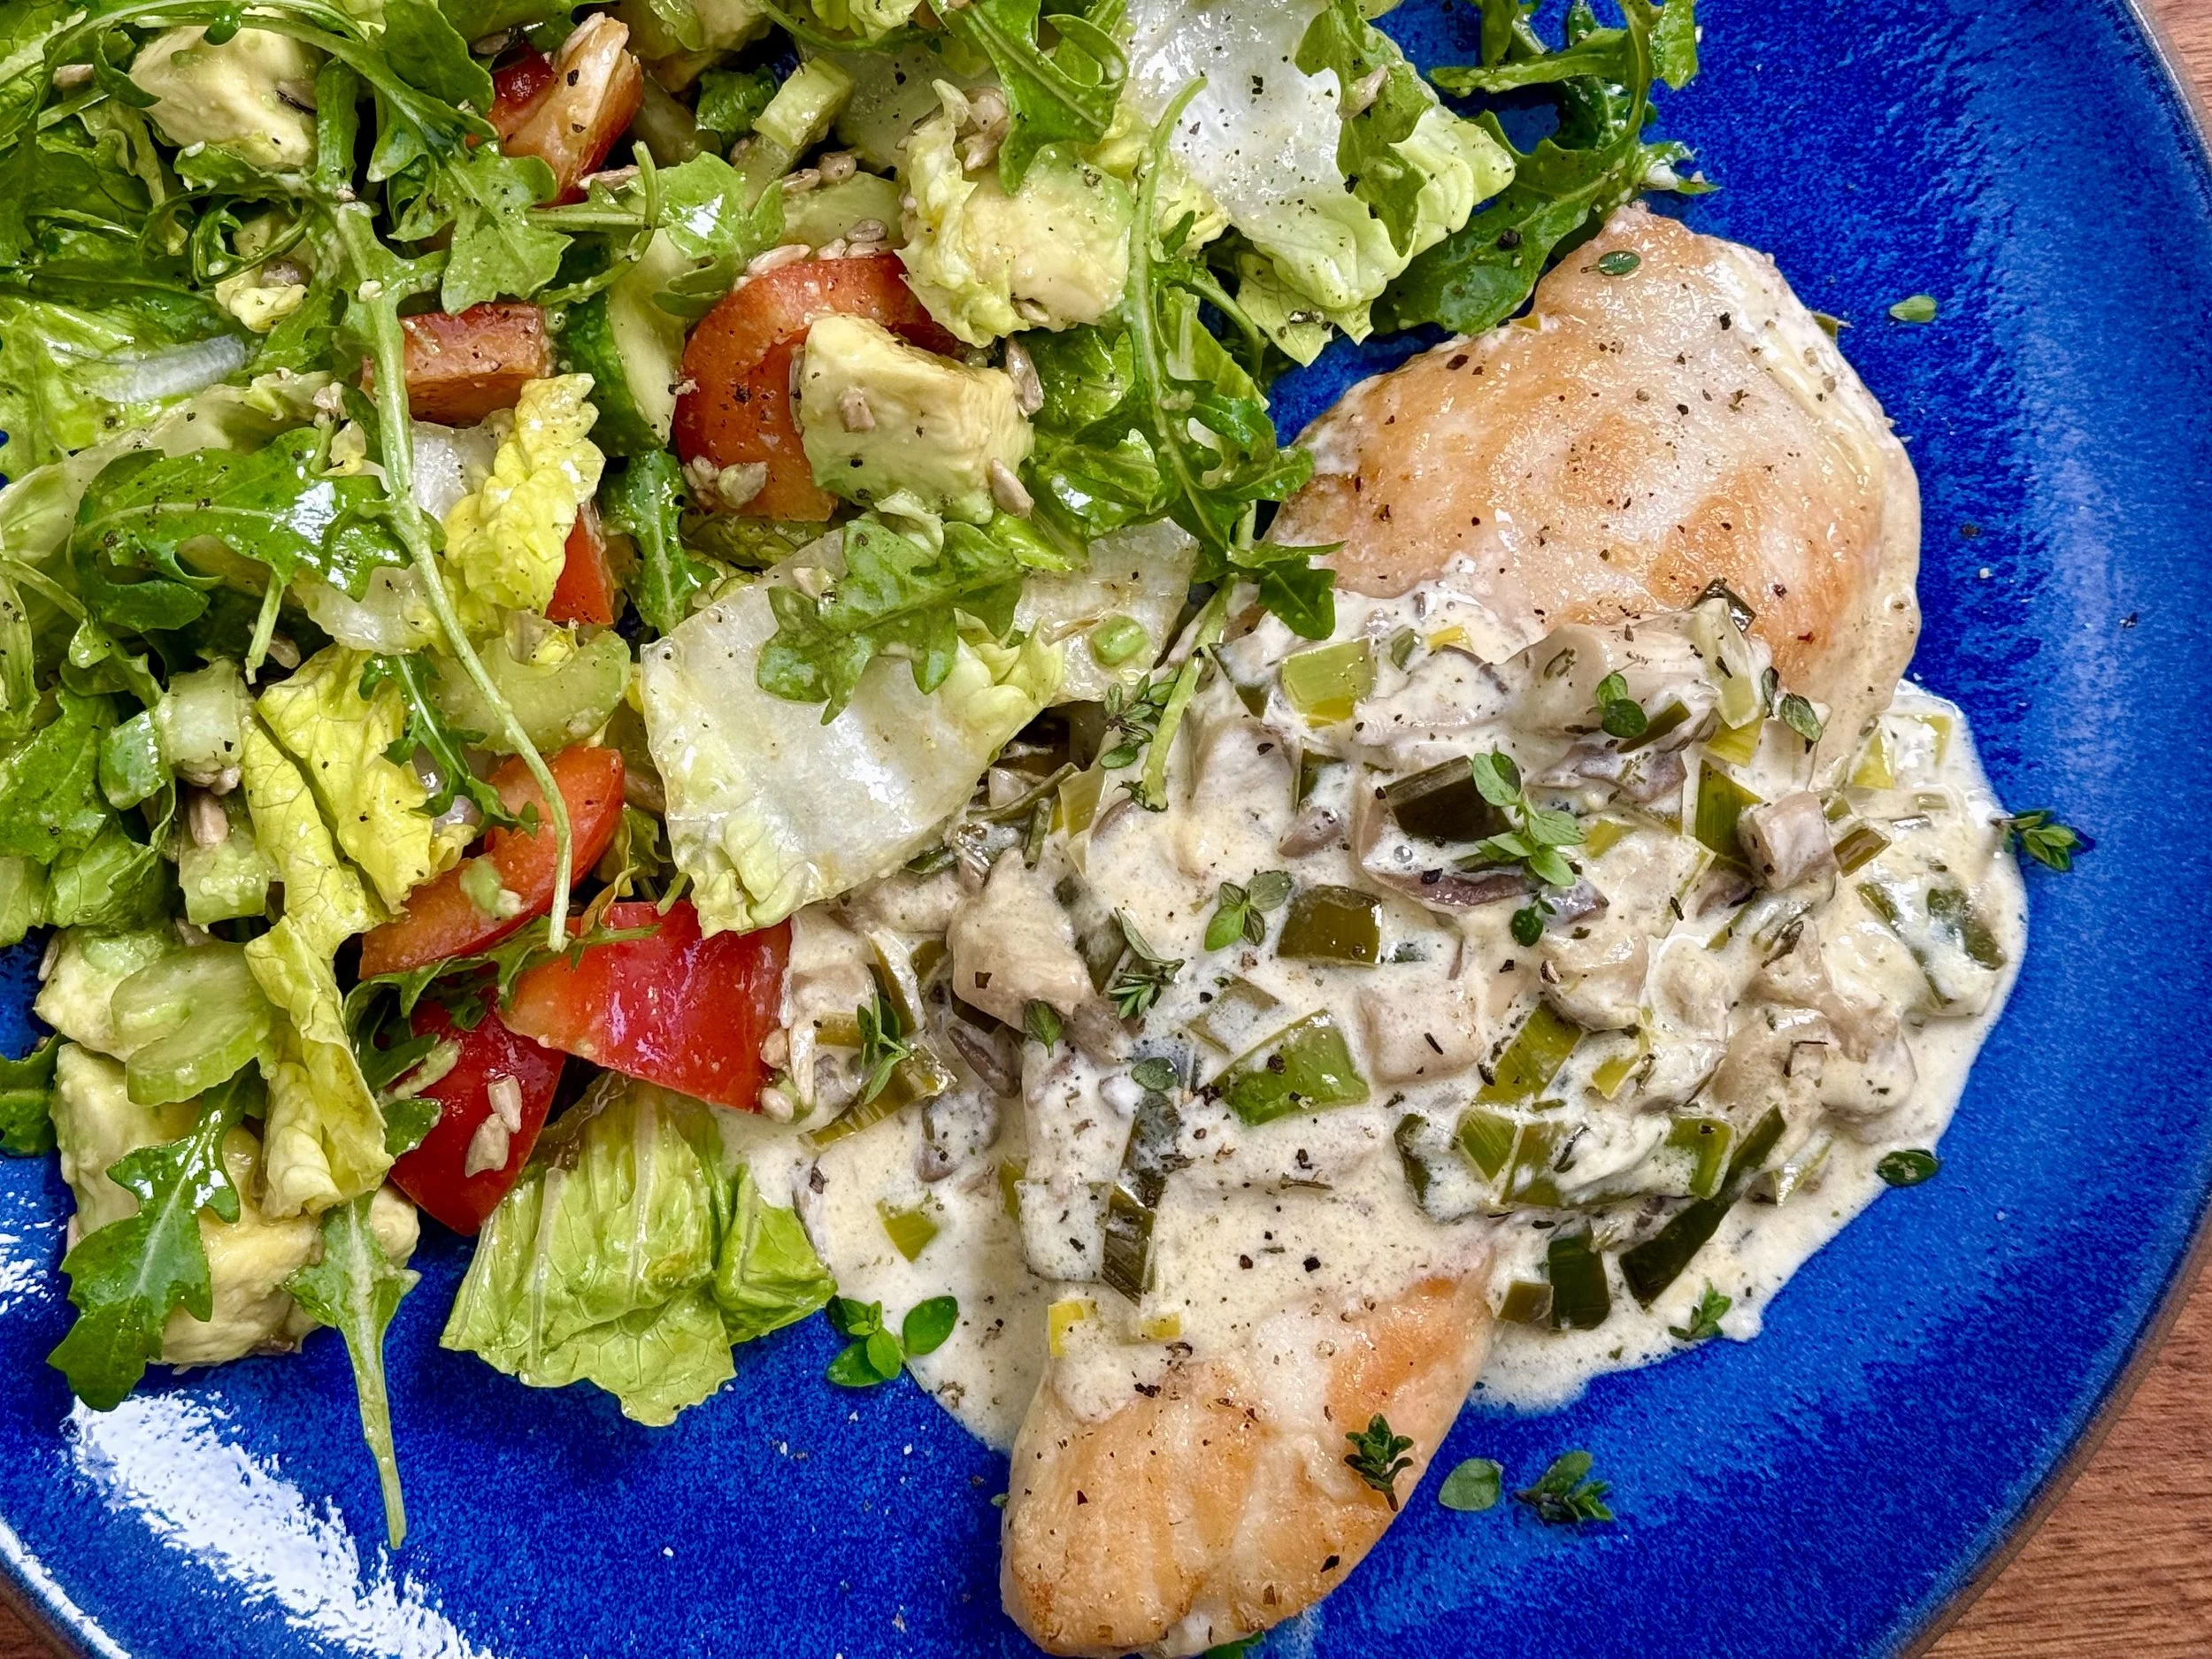
Creamy Dijon Chicken with Mushrooms and Leeks (Low FODMAP)
10 Minutes prep • 25 Minutes cook • Low FODMAP • Gluten-Free • Serves 4
10 Minutes prep • 25 Minutes cook • Low FODMAP • Gluten-Free • Serves 4 • Ok to make-ahead: Steps 1 - 2
A rich, velvety one-pan dinner that proves comfort food and dietary needs can beautifully coexist. Tender pan-seared chicken is nestled in a silky Dijon cream sauce with earthy oyster mushrooms and delicate leek greens — all completely low FODMAP without sacrificing an ounce of flavor. It's the kind of weeknight meal that tastes like it took all day, but comes together in under 40 minutes. Serve it over rice, gluten-free pasta, or creamy mashed potatoes for a dinner that will have everyone at the table asking for seconds.
See this new recipe in my FREE recipe club.
To streamline your search through hundreds of existing recipes, I'm moving the release of my new weekly creations to the Recipe Club on Patreon. In the club, you’ll get access to a treasure trove of low-FODMAP goodness, complete with collections and filters to use as your virtual cookbook!
Here's what awaits you in the club:
Exclusive weekly recipes: Be the first to try my latest delicious low-FODMAP creations!
Simple & Easy: My recipes continue to focus on readily available ingredients and effortless preparation, perfect for family-friendly meals (no more separate low-FODMAP meal prep!).
Hundreds of existing recipes: Gain access to my entire library of low-FODMAP recipes, all conveniently organized.
You can join for free or sign up for only $5/month. Your support fuels my passion for creating new, delicious, and easy-to-make low-FODMAP recipes just for you.
Let's go on this delicious low-FODMAP journey together.
Creamy Italian Dressing (Low FODMAP)
5 Minutes prep • Low FODMAP • Gluten-Free • Makes 1 cup
5 Minutes prep • Low FODMAP • Gluten-Free • Makes 1 cup • Ok to make-ahead: Step 1
If you've been missing bold, creamy Italian dressing since going low FODMAP, this homemade version is about to become your new favorite. Garlic-infused olive oil and Smoke N Sanity's Essence of Garlic and Onion Salts deliver all the savory, aromatic flavor you'd expect — without the digestive distress. A splash of red wine vinegar adds brightness, while heavy cream makes it irresistibly smooth and rich. It comes together in minutes with just a bowl and a whisk, and it's delicious drizzled over salads, tossed with grilled chicken, or used as a dipping sauce for roasted veggies.
See this new recipe in my FREE recipe club.
To streamline your search through hundreds of existing recipes, I'm moving the release of my new weekly creations to the Recipe Club on Patreon. In the club, you’ll get access to a treasure trove of low-FODMAP goodness, complete with collections and filters to use as your virtual cookbook!
Here's what awaits you in the club:
Exclusive weekly recipes: Be the first to try my latest delicious low-FODMAP creations!
Simple & Easy: My recipes continue to focus on readily available ingredients and effortless preparation, perfect for family-friendly meals (no more separate low-FODMAP meal prep!).
Hundreds of existing recipes: Gain access to my entire library of low-FODMAP recipes, all conveniently organized.
You can join for free or sign up for only $5/month. Your support fuels my passion for creating new, delicious, and easy-to-make low-FODMAP recipes just for you.
Let's go on this delicious low-FODMAP journey together.
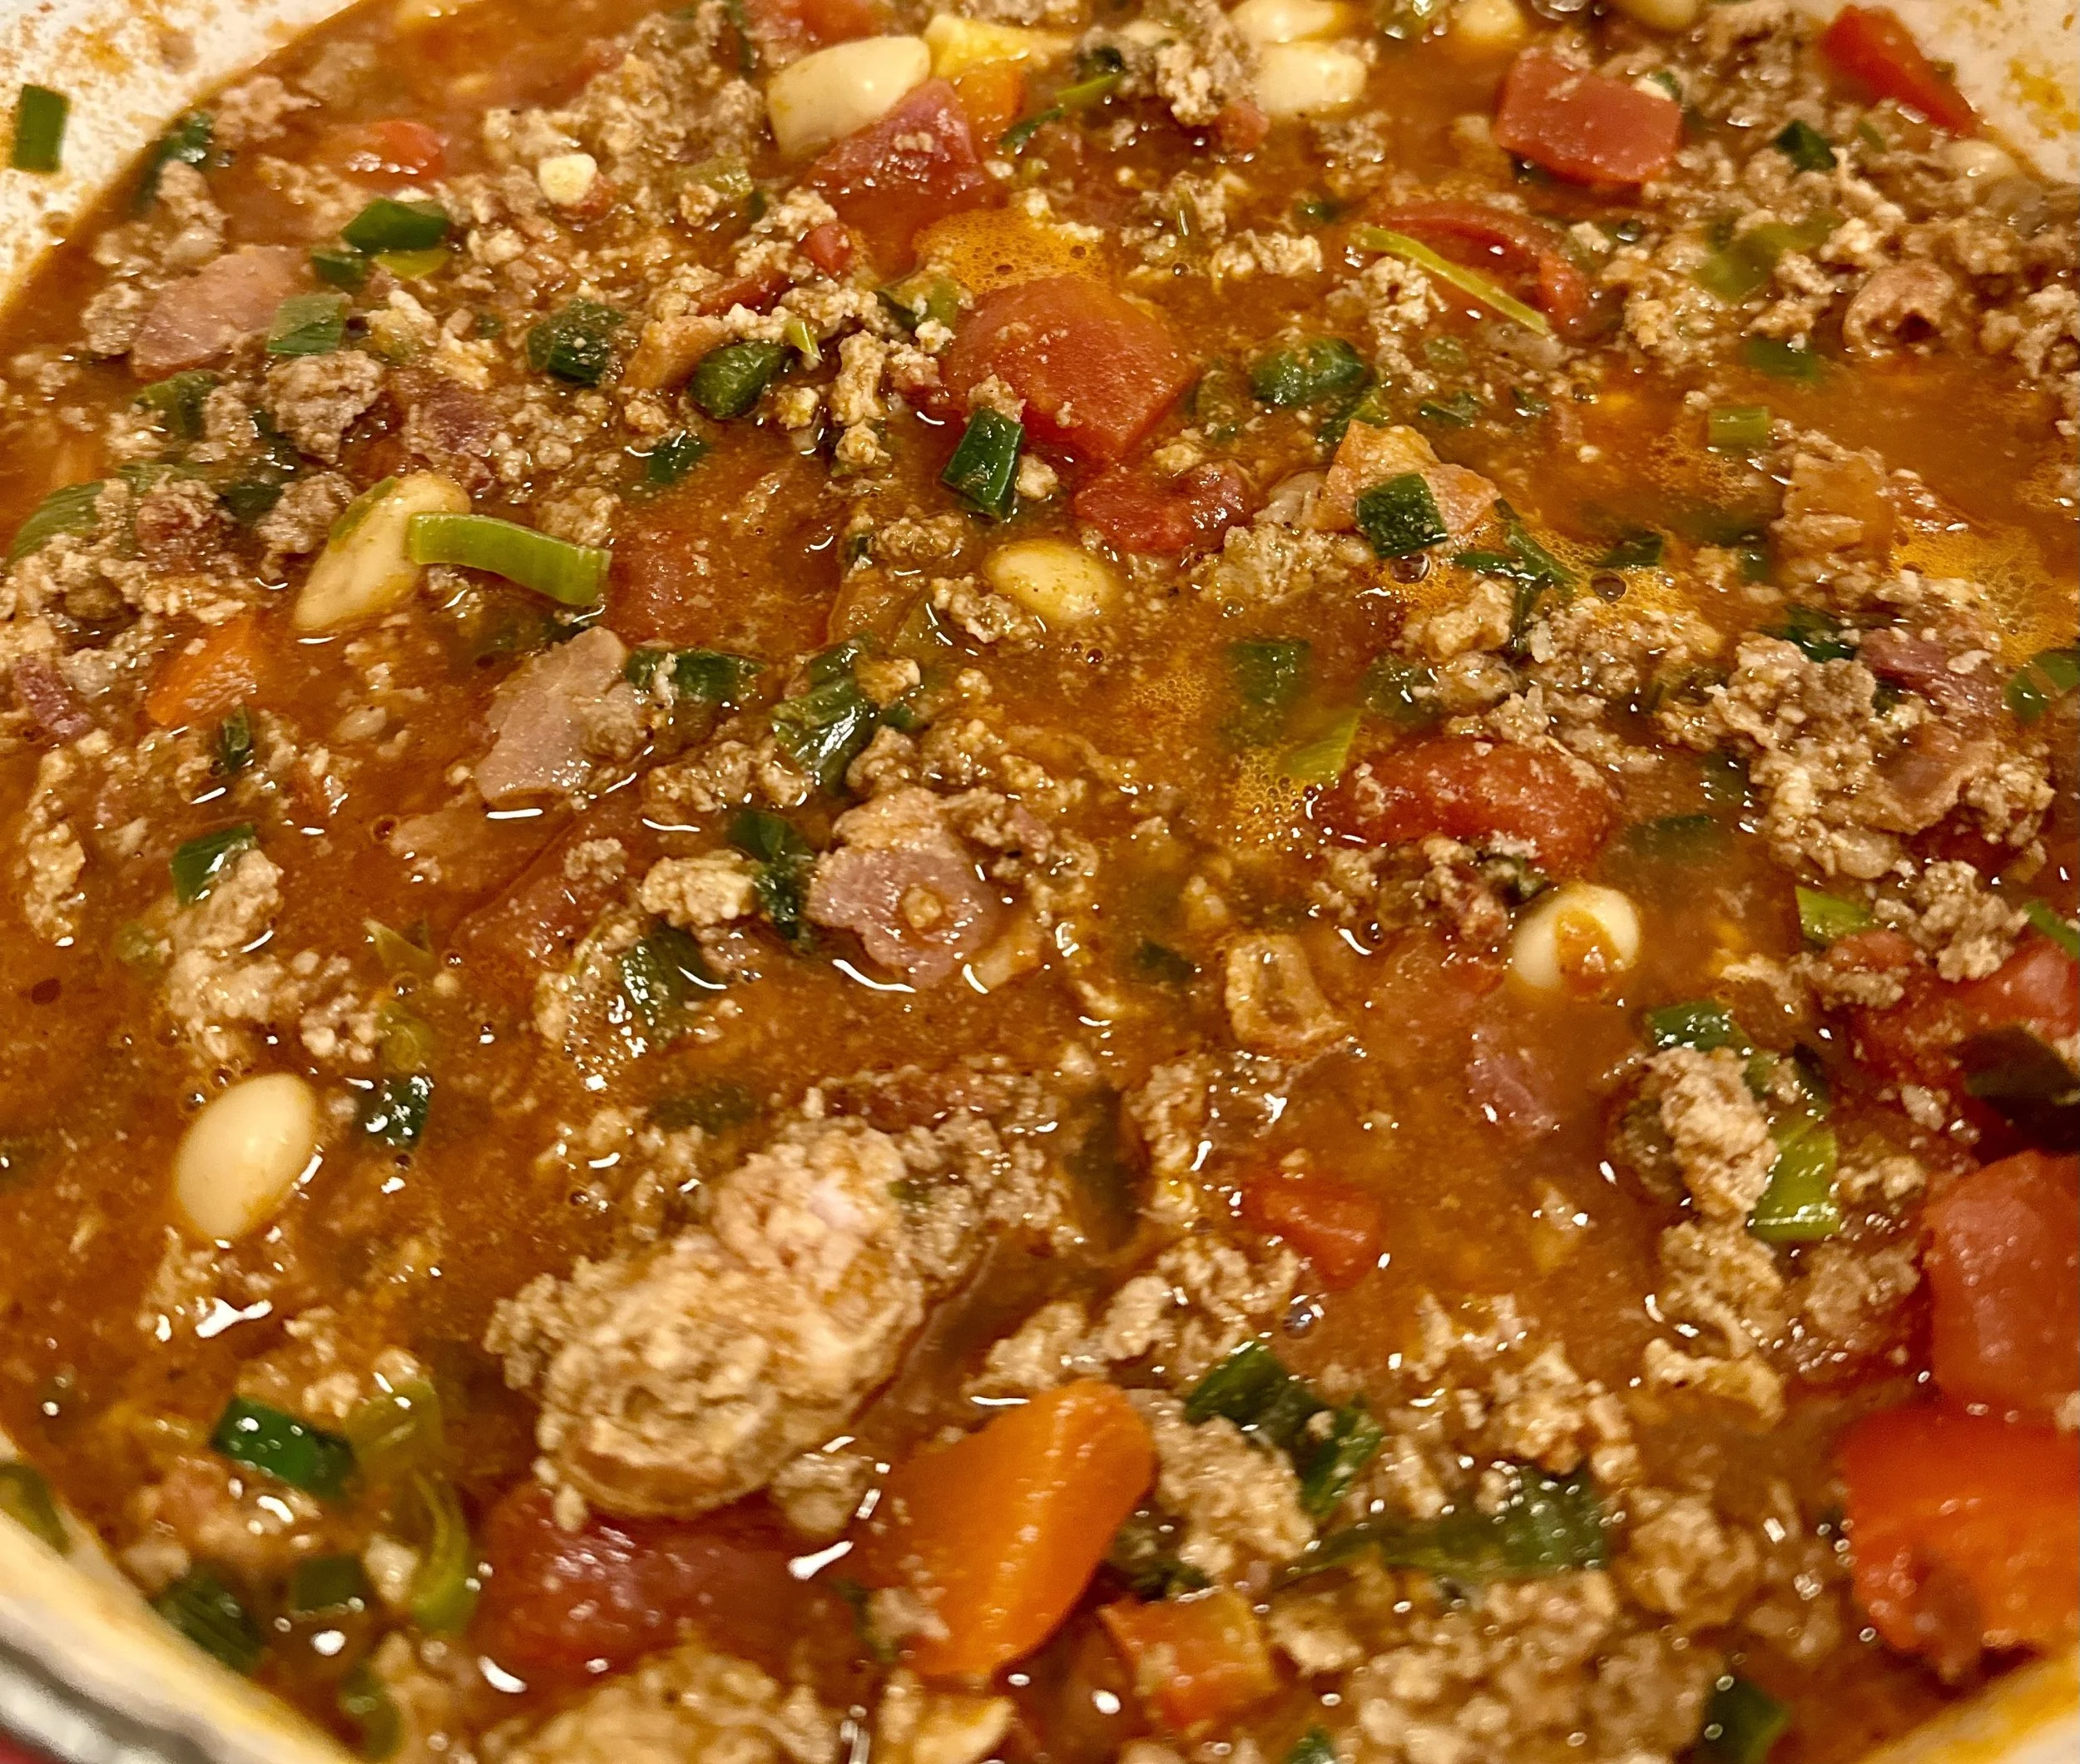
Smoky Bacon & Butter Bean Chili (low FODMAP)
20 Minutes prep • 90 Minutes cook • Low FODMAP • Gluten-Free • Makes 8 - 12 Servings
20 Minutes prep • 90 Minutes cook • Low FODMAP • Gluten-Free • Makes 8 - 12 Servings • Ok to make-ahead: Steps 1 - 4
This is a chili that earns its depth. Applewood smoked bacon and leek greens build a savory, aromatic base, while a generous hand with cumin, smoked paprika, and chili powder does the heavy lifting on flavor. A splash of beer deglazes everything beautifully, and two sneaky Parmesan rinds simmer away in the background, adding a quiet, rich umami that most people can't quite place but everyone notices. Butter beans bring a creamy, hearty texture that sets this apart from your standard bowl — rustic, smoky, and just a little unexpected.
See this new recipe in my FREE recipe club.
To streamline your search through hundreds of existing recipes, I'm moving the release of my new weekly creations to the Recipe Club on Patreon. In the club, you’ll get access to a treasure trove of low-FODMAP goodness, complete with collections and filters to use as your virtual cookbook!
Here's what awaits you in the club:
Exclusive weekly recipes: Be the first to try my latest delicious low-FODMAP creations!
Simple & Easy: My recipes continue to focus on readily available ingredients and effortless preparation, perfect for family-friendly meals (no more separate low-FODMAP meal prep!).
Hundreds of existing recipes: Gain access to my entire library of low-FODMAP recipes, all conveniently organized.
You can join for free or sign up for only $5/month. Your support fuels my passion for creating new, delicious, and easy-to-make low-FODMAP recipes just for you.
Let's go on this delicious low-FODMAP journey together.
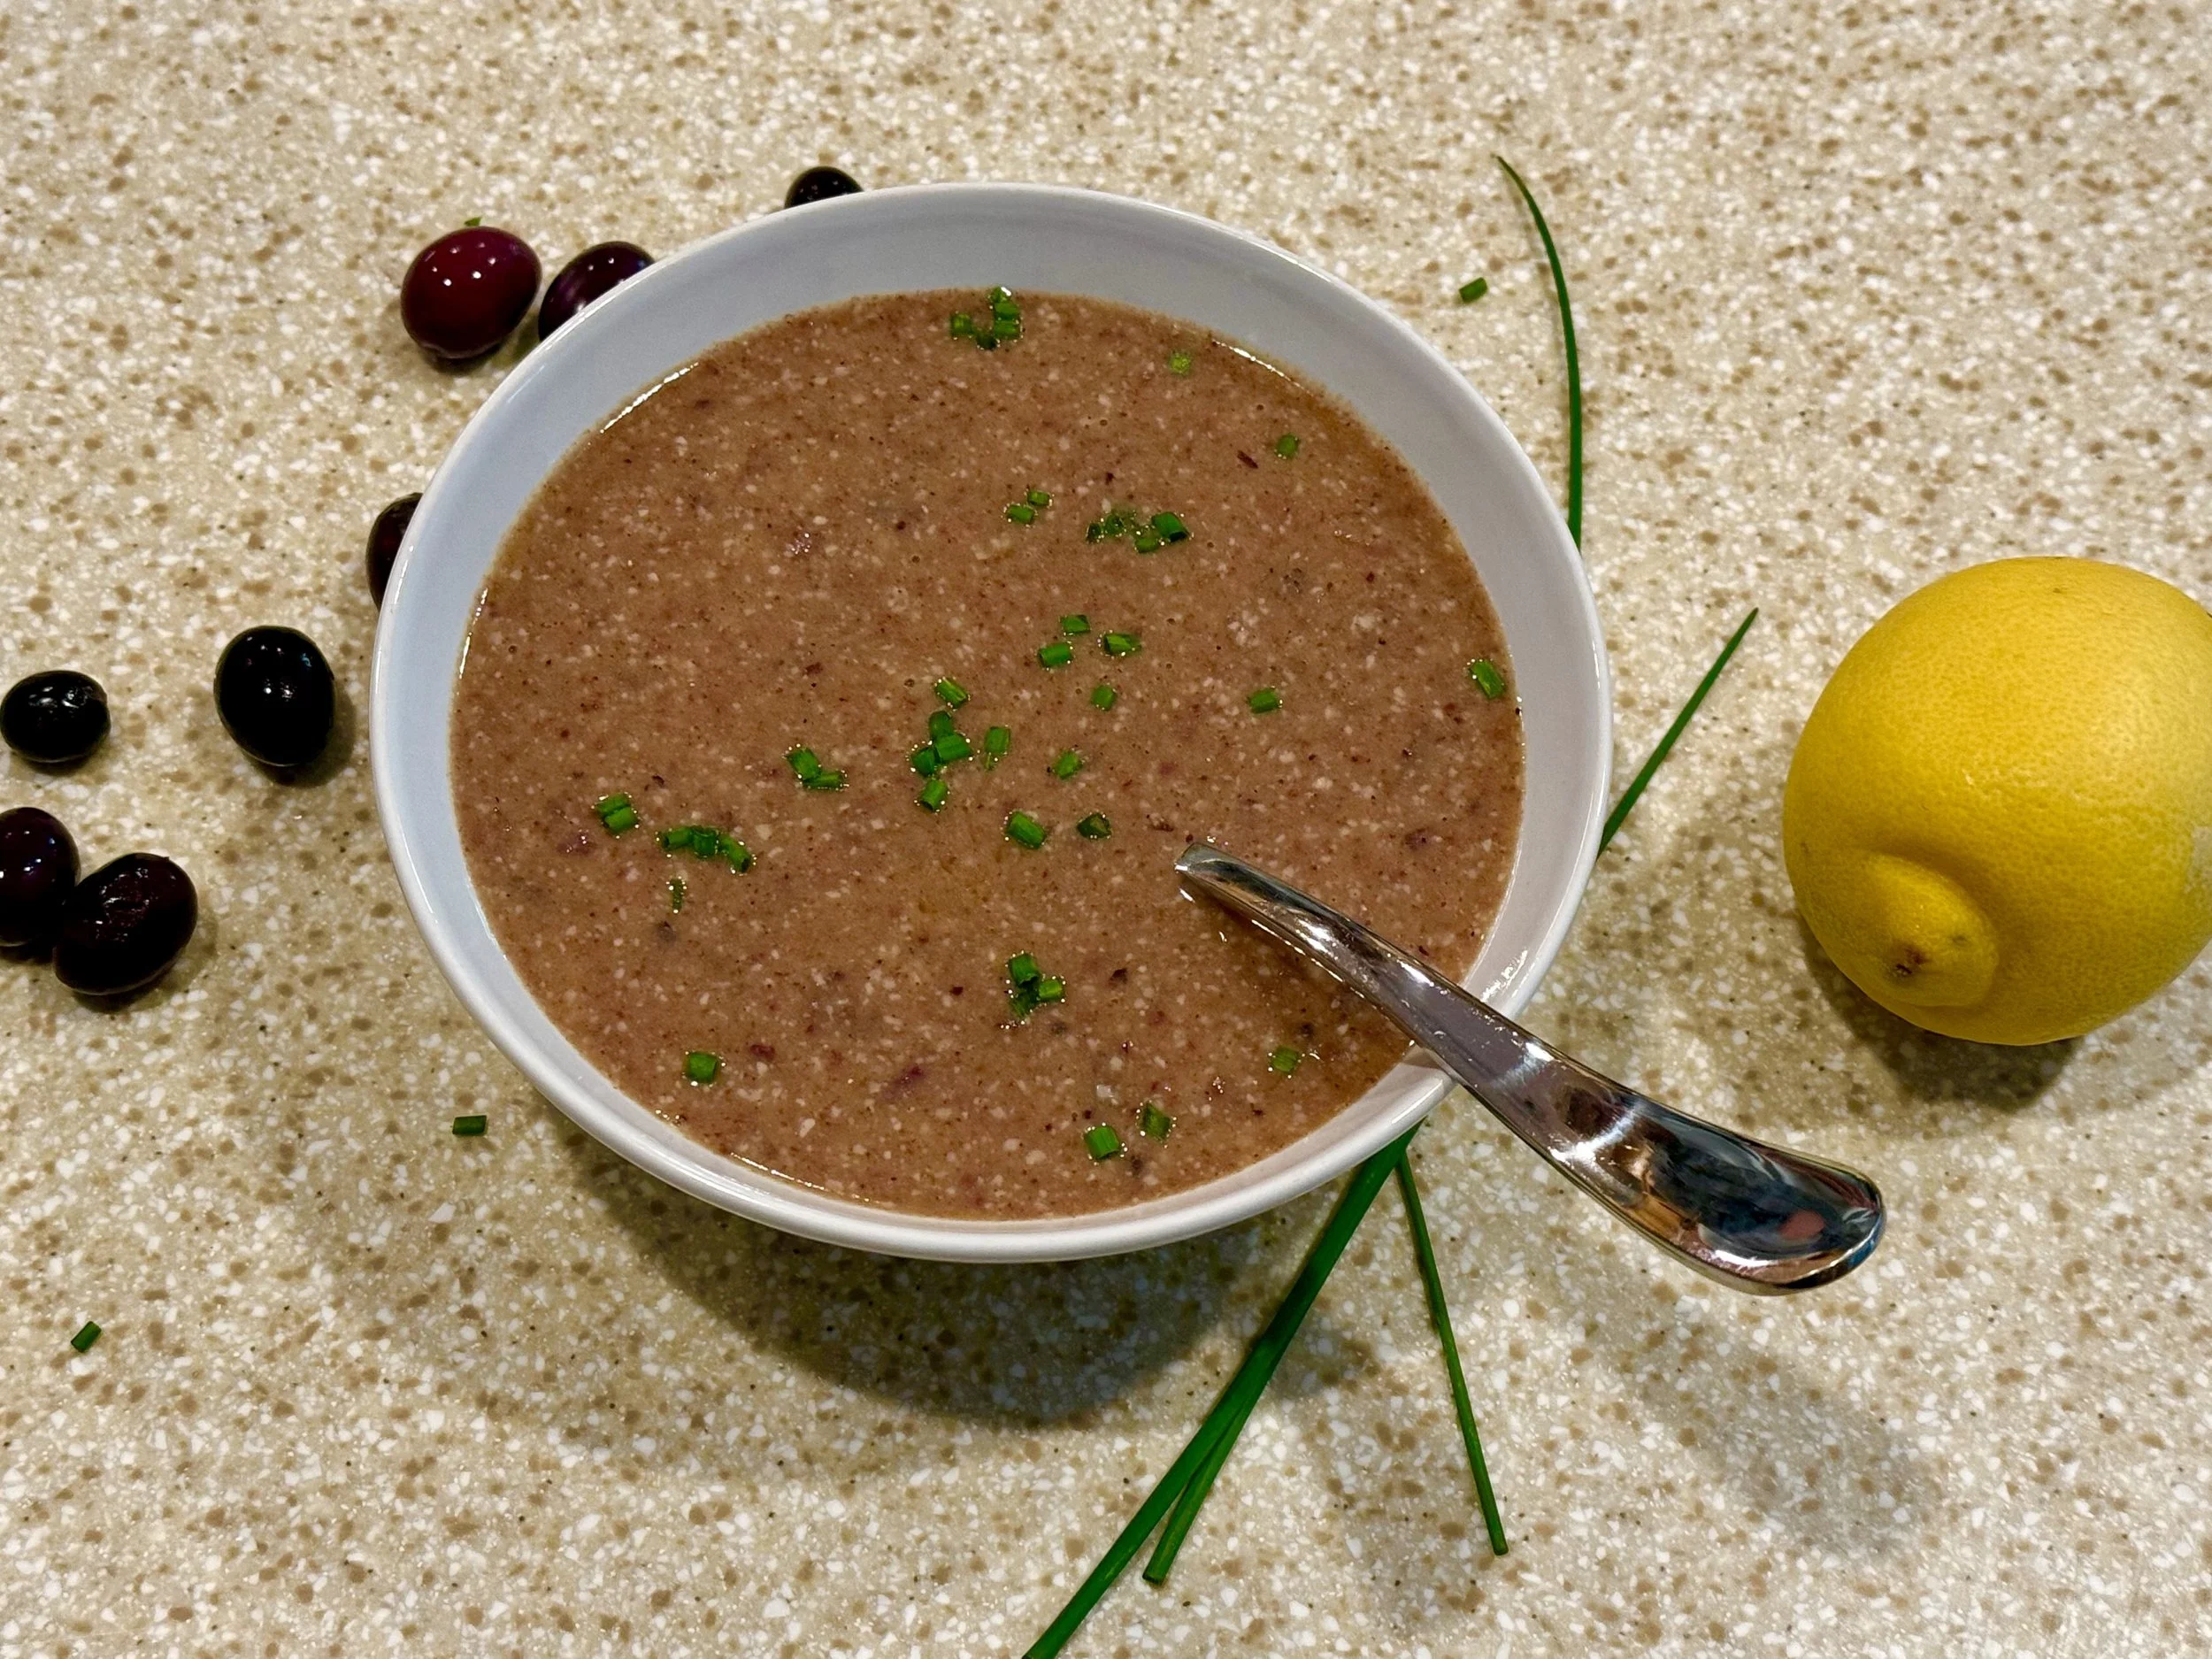
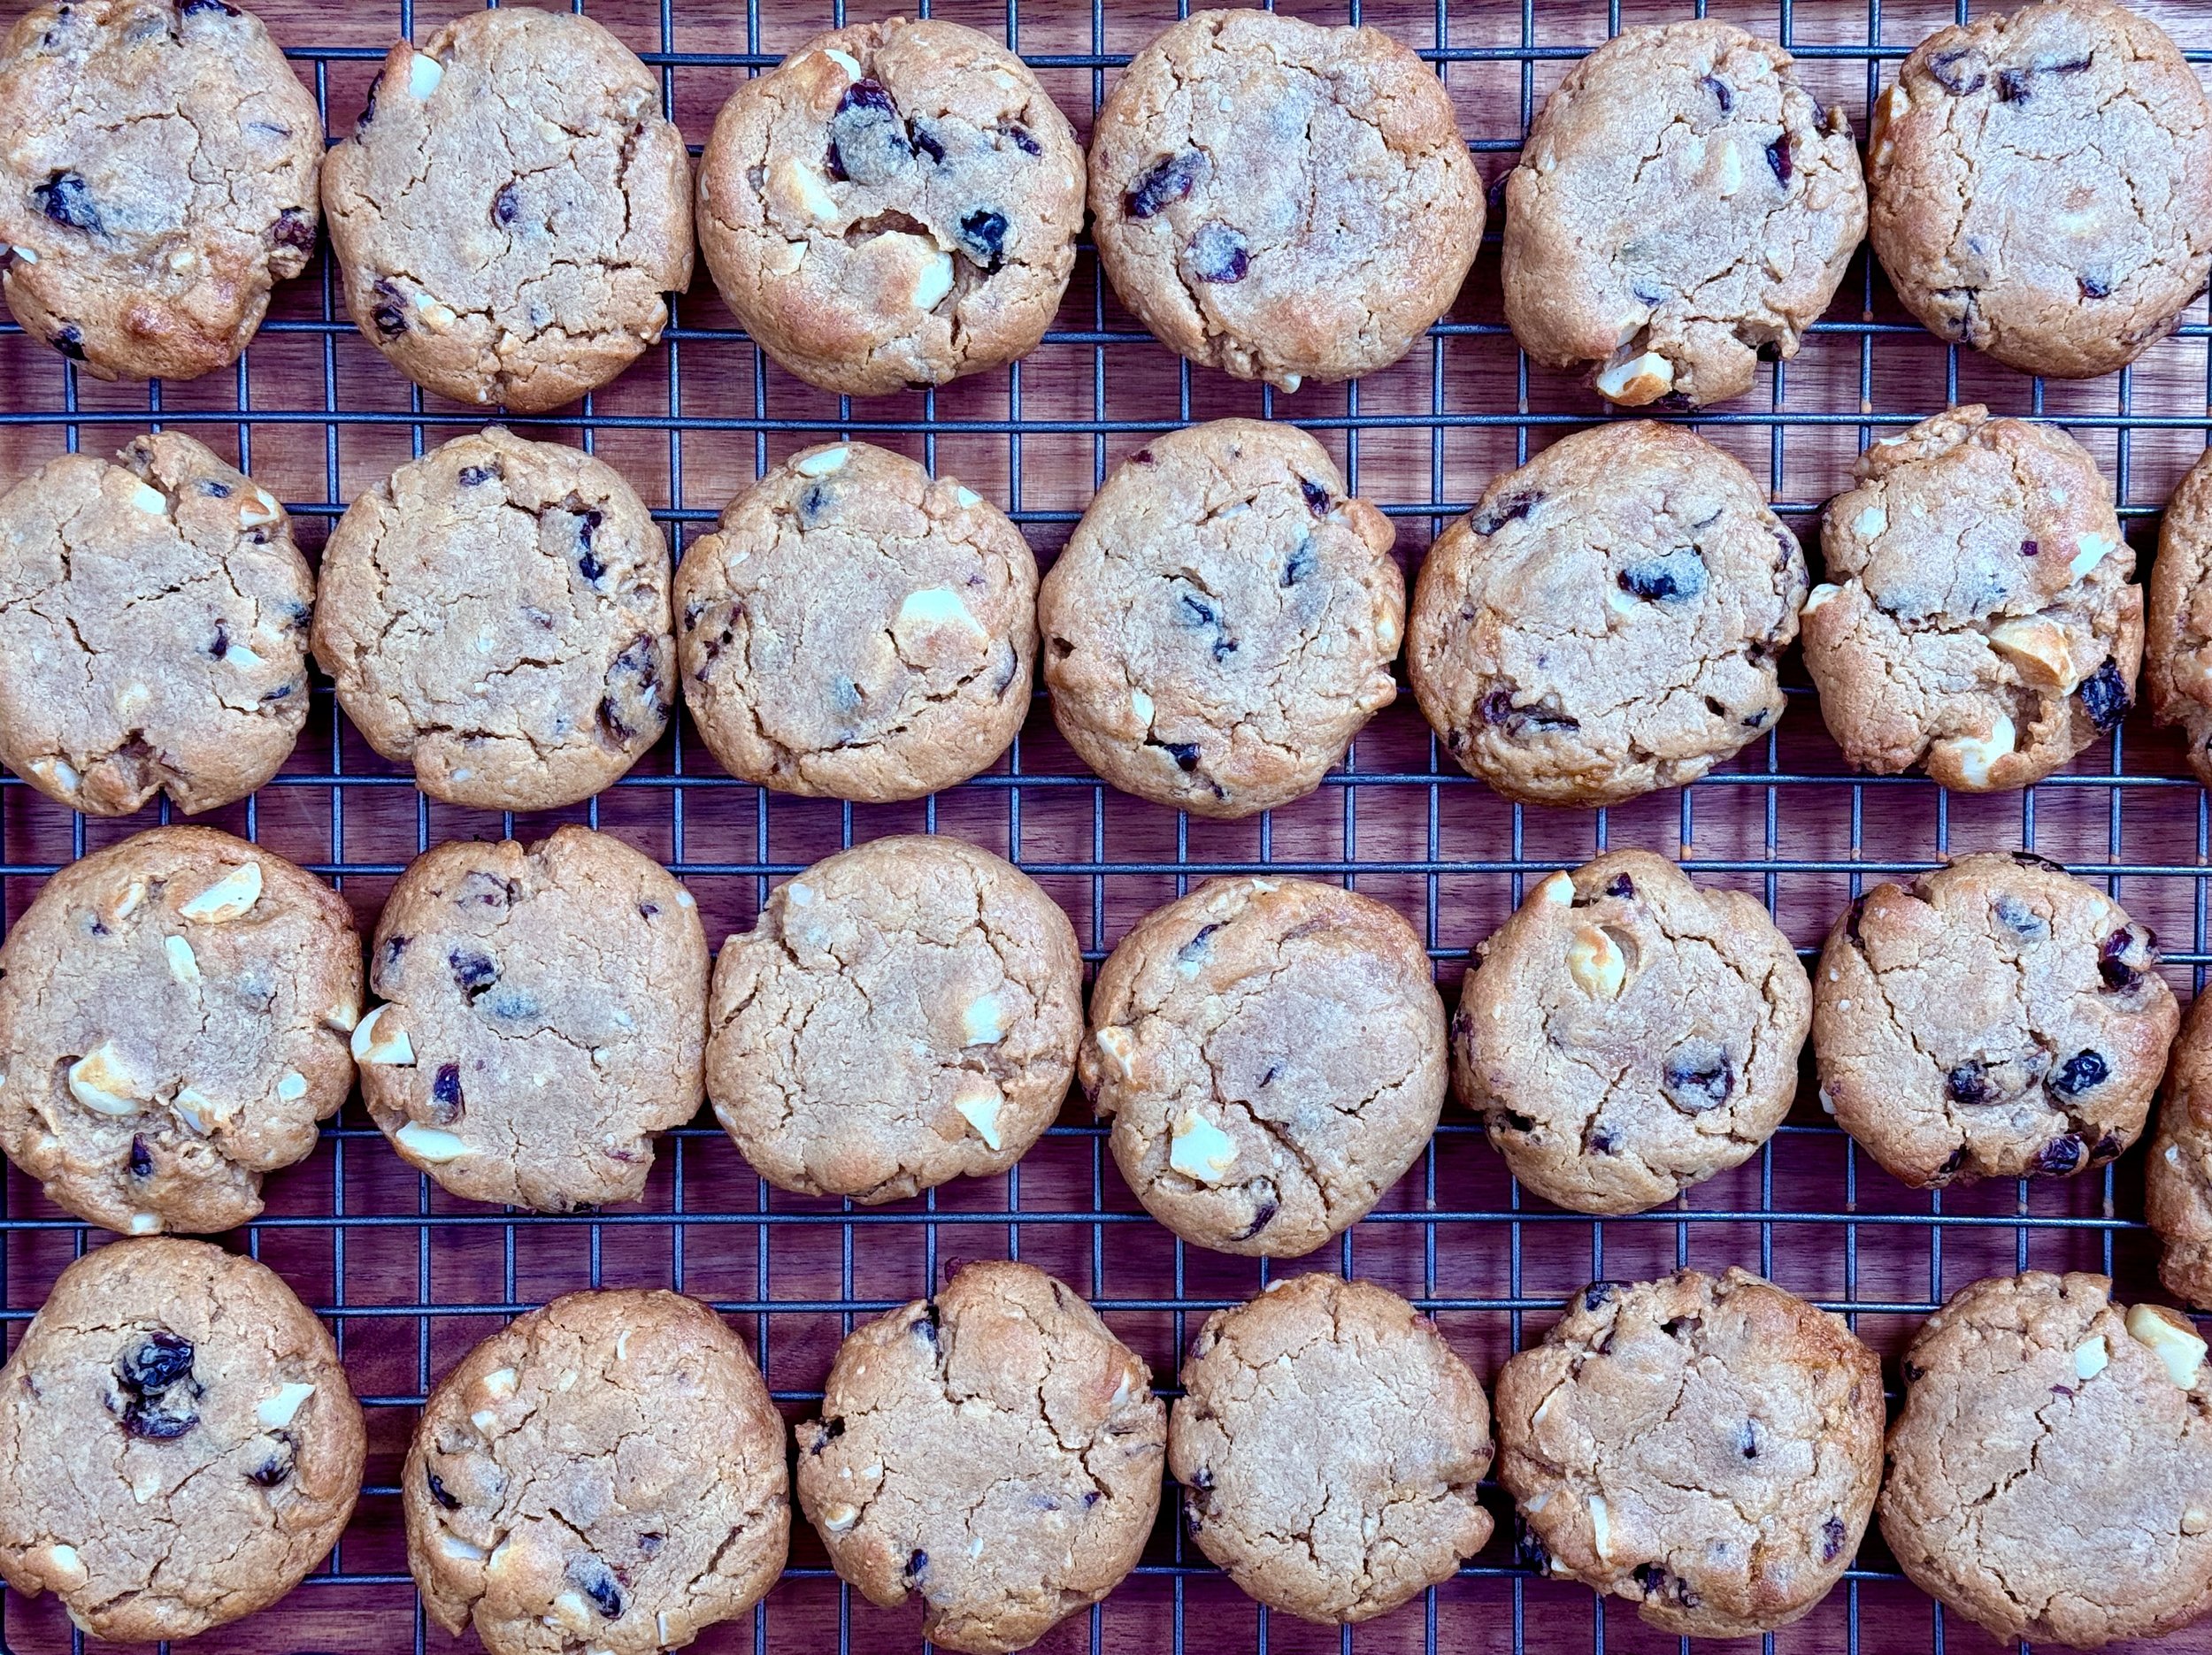
Peanut Butter Power Cookies (low FODMAP)
10 Minutes prep • 10 Minutes cook/tray • Low FODMAP • Gluten-Free • Makes 24
10 Minutes prep • 10 Minutes cook/tray • Low FODMAP • Gluten-Free • Makes 24 • Ok to make-ahead: Steps 1 - 6
These flourless peanut butter cookies are made with just a handful of real ingredients — creamy natural peanut butter, vanilla bean paste, eggs, and a crunchy/chewy combo of seeds and dried fruit. It’s a satisfying cookie that's naturally gluten-free and genuinely good for you! No flour, no weird additives, no blood sugar spike — just a cookie worth eating.
Note: Keep the serving size in mind (1) because both cranberries and currants contain fructans. One cookie is low FODMAP—but more than that may give you trouble.

See this new recipe in my FREE recipe club.
To streamline your search through hundreds of existing recipes, I'm moving the release of my new weekly creations to the Recipe Club on Patreon. In the club, you’ll get access to a treasure trove of low-FODMAP goodness, complete with collections and filters to use as your virtual cookbook!
Here's what awaits you in the club:
Exclusive weekly recipes: Be the first to try my latest delicious low-FODMAP creations!
Simple & Easy: My recipes continue to focus on readily available ingredients and effortless preparation, perfect for family-friendly meals (no more separate low-FODMAP meal prep!).
Hundreds of existing recipes: Gain access to my entire library of low-FODMAP recipes, all conveniently organized.
You can join for free or sign up for only $5/month. Your support fuels my passion for creating new, delicious, and easy-to-make low-FODMAP recipes just for you.
Let's go on this delicious low-FODMAP journey together.
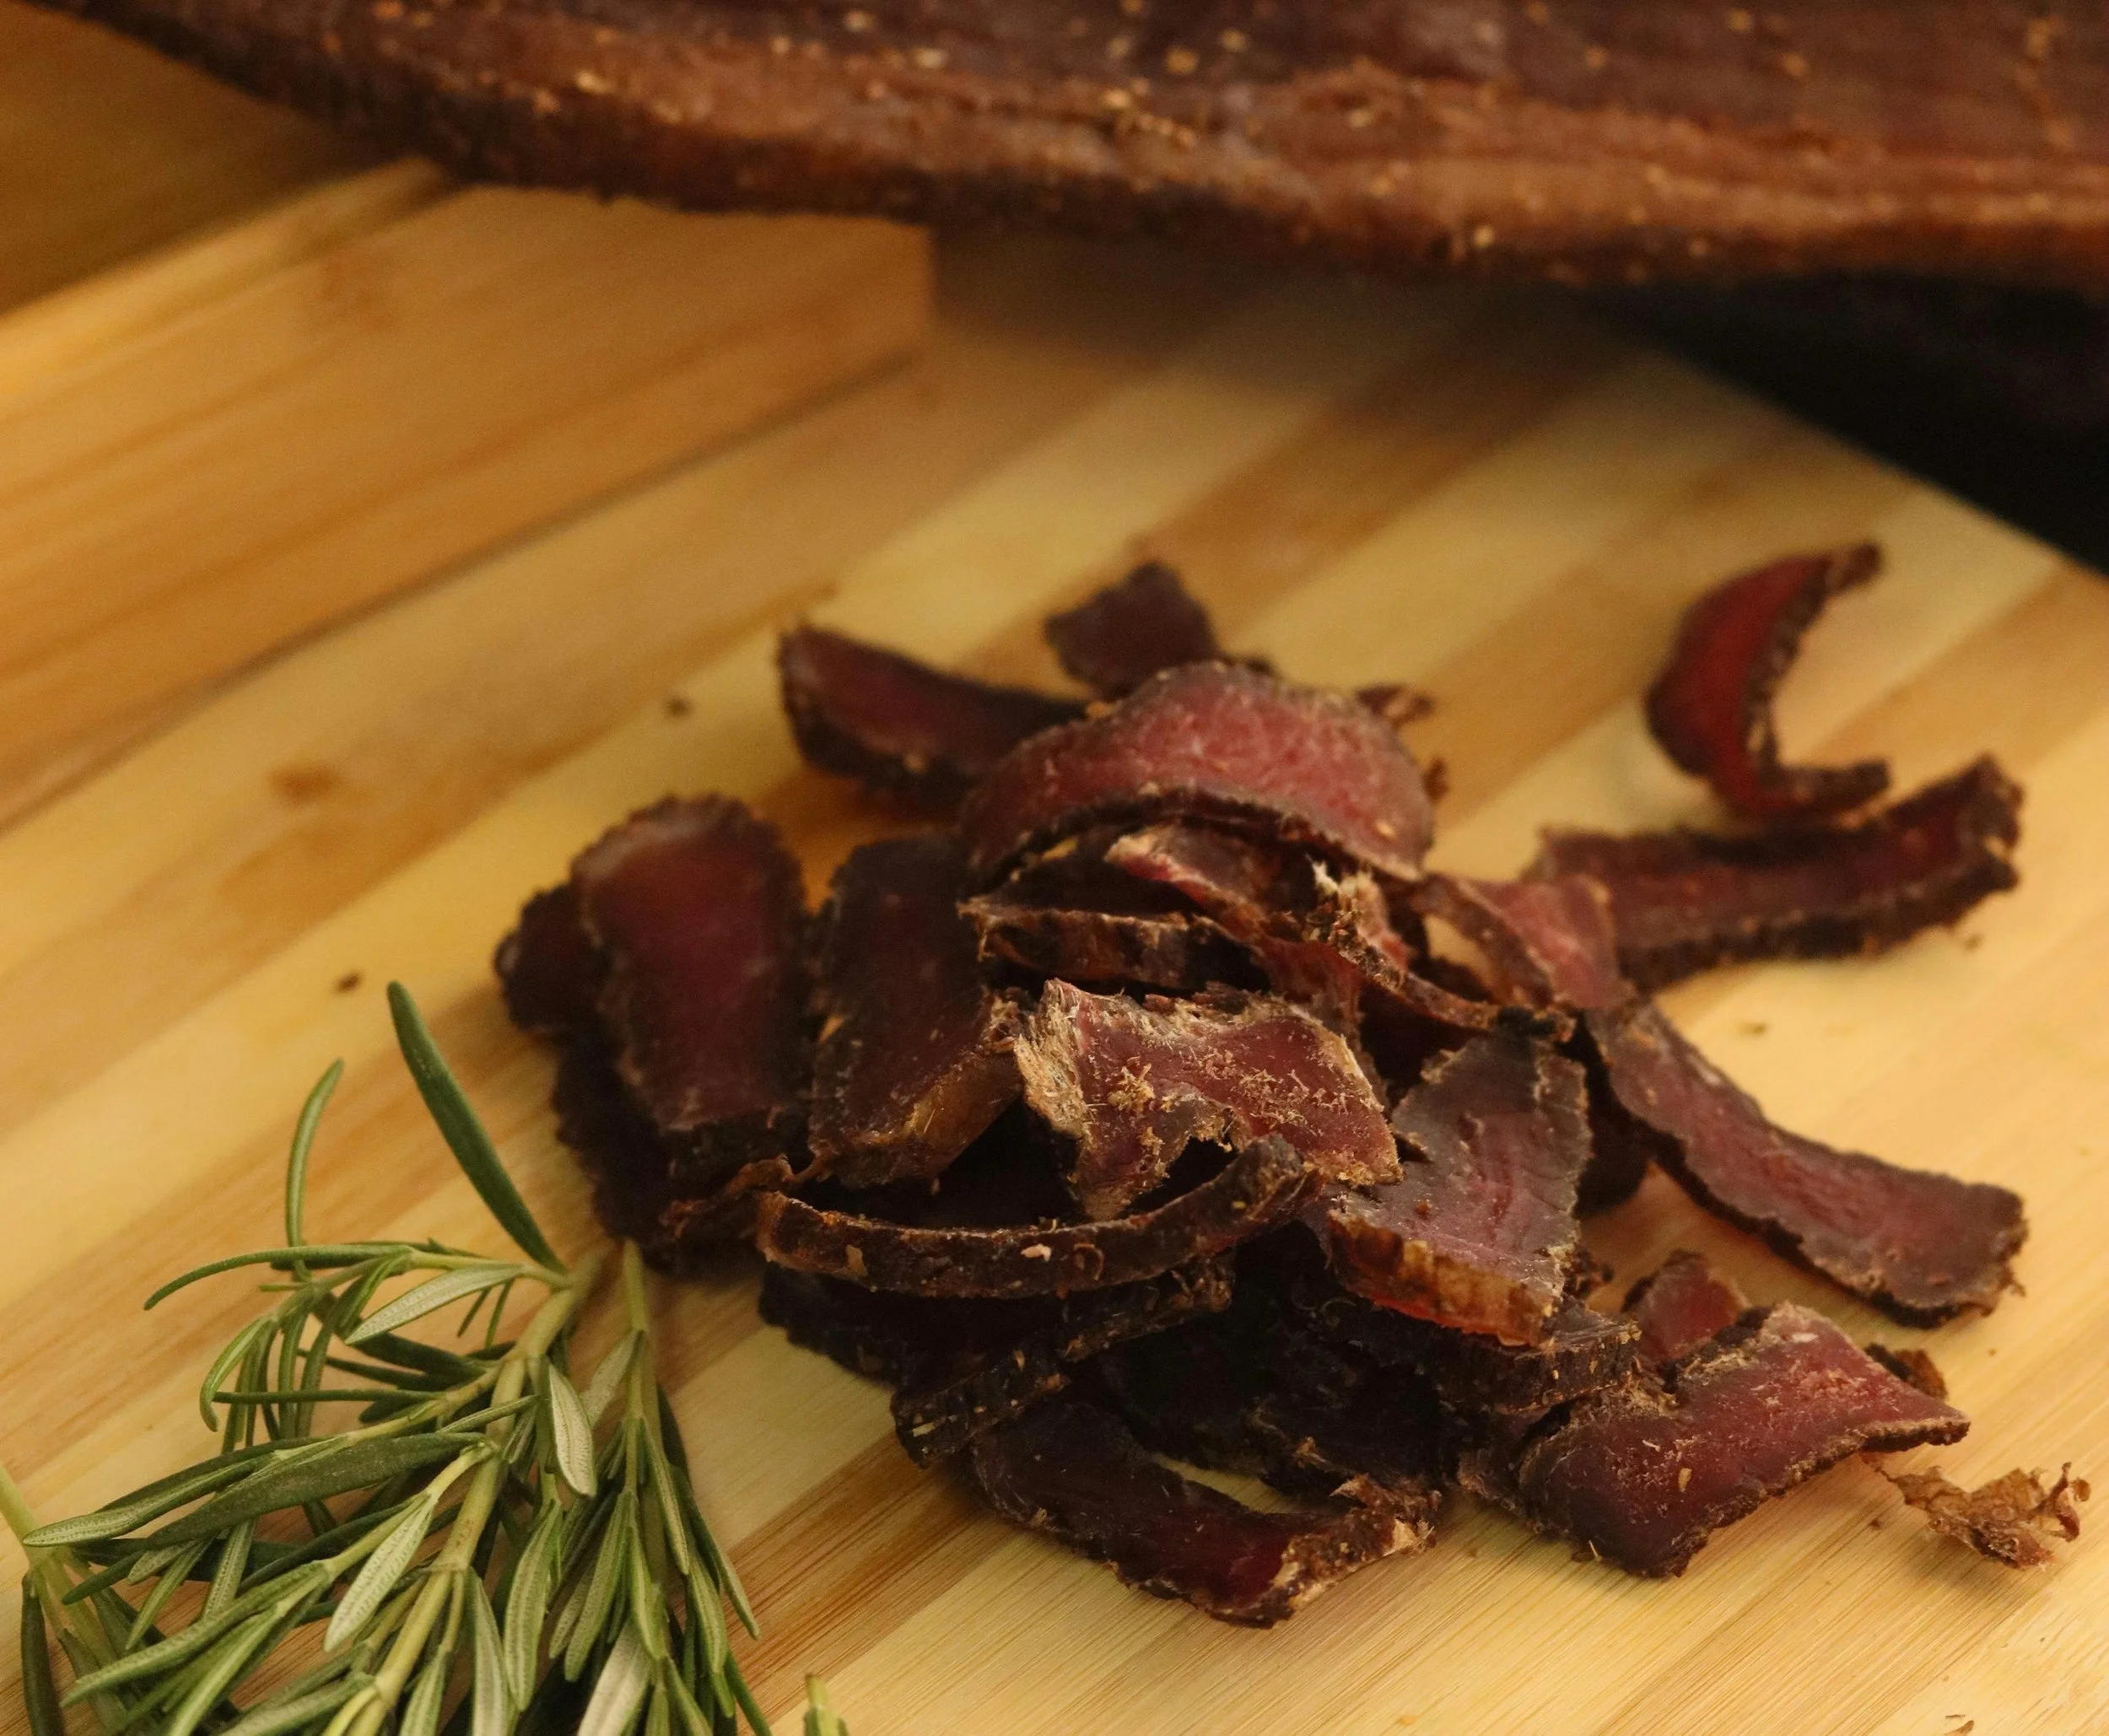
Homemade Low FODMAP Beef Jerky
60 Minutes prep • 3 - 6 Hours cook • Low FODMAP • Gluten-Free • Makes 24
60 Minutes prep • 3 - 6 Hours cook • Low FODMAP • Gluten-Free • Makes 24 • Ok to make-ahead: Steps 1 - 2
Tired of scanning jerky labels only to find onion powder, garlic powder, and gut-triggering mystery ingredients? This Low FODMAP Beef Jerky is your new go-to protein snack—portable, shelf-stable, and completely IBS-safe. I’ve replaced the usual offenders with the umami flavor of soy sauce, a touch of IBS-friendly sweetness, and the zesty flavor of lime. No onion, no garlic, no honey—just delicious jerky that won't send your stomach into chaos. Perfect for road trips, hiking, or emergency desk snacks when you need protein you can actually trust.
See this new recipe in my FREE recipe club.
To streamline your search through hundreds of existing recipes, I'm moving the release of my new weekly creations to the Recipe Club on Patreon. In the club, you’ll get access to a treasure trove of low-FODMAP goodness, complete with collections and filters to use as your virtual cookbook!
Here's what awaits you in the club:
Exclusive weekly recipes: Be the first to try my latest delicious low-FODMAP creations!
Simple & Easy: My recipes continue to focus on readily available ingredients and effortless preparation, perfect for family-friendly meals (no more separate low-FODMAP meal prep!).
Hundreds of existing recipes: Gain access to my entire library of low-FODMAP recipes, all conveniently organized.
You can join for free or sign up for only $5/month. Your support fuels my passion for creating new, delicious, and easy-to-make low-FODMAP recipes just for you.
Let's go on this delicious low-FODMAP journey together.
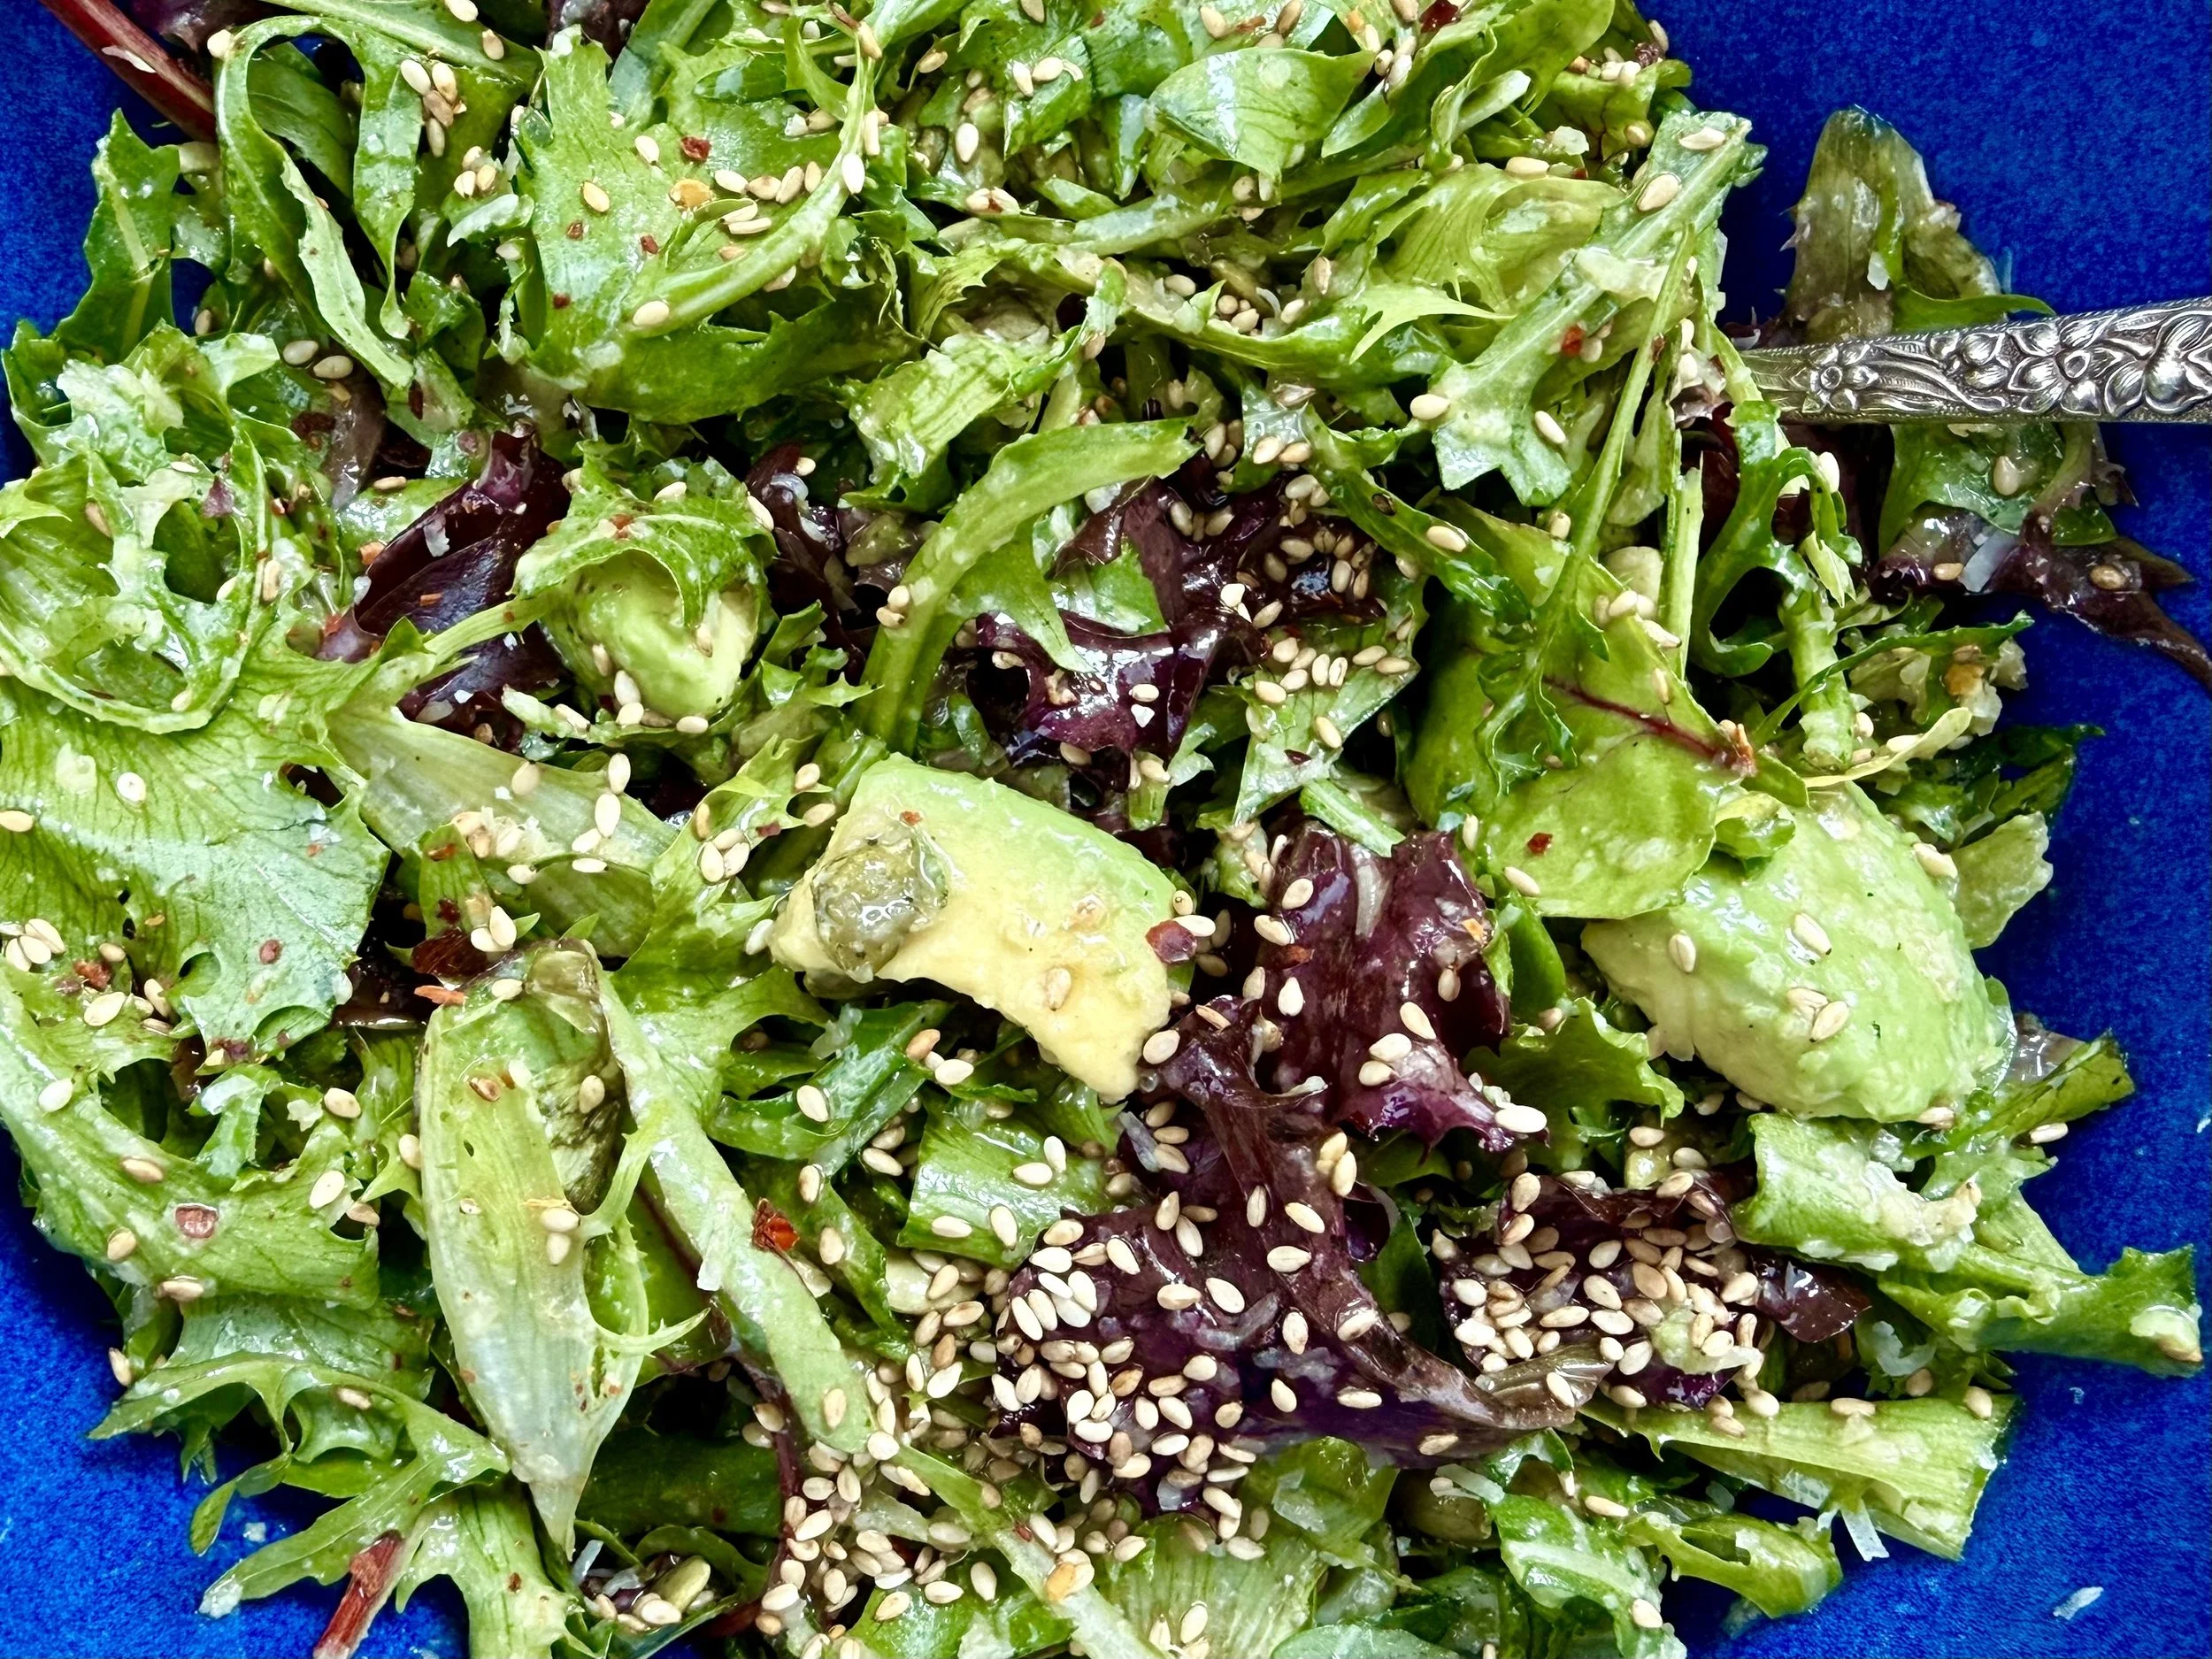
Herbed Greens with Parmesan, Avocado & Toasted Sesame (Low FODMAP)
15 Minutes prep • Low FODMAP • Gluten-Free • Serves 4
15 Minutes prep • Low FODMAP • Gluten-Free • Serves 4 • Ok to make-ahead: Steps 1 - 3
This salad is all about layers of flavor and texture—crisp greens meet fragrant fresh herbs, creamy avocado, nutty parmesan, and the quiet crunch of toasted sesame seeds. The dressing brings it all together with bright citrus, a whisper of sweetness, and the deep, toasty richness of sesame oil. It's the kind of salad that feels both elegant and effortless, perfect for when you want something that tastes special but comes together quickly.
See this new recipe in my FREE recipe club.
To streamline your search through hundreds of existing recipes, I'm moving the release of my new weekly creations to the Recipe Club on Patreon. In the club, you’ll get access to a treasure trove of low-FODMAP goodness, complete with collections and filters to use as your virtual cookbook!
Here's what awaits you in the club:
Exclusive weekly recipes: Be the first to try my latest delicious low-FODMAP creations!
Simple & Easy: My recipes continue to focus on readily available ingredients and effortless preparation, perfect for family-friendly meals (no more separate low-FODMAP meal prep!).
Hundreds of existing recipes: Gain access to my entire library of low-FODMAP recipes, all conveniently organized.
You can join for free or sign up for only $5/month. Your support fuels my passion for creating new, delicious, and easy-to-make low-FODMAP recipes just for you.
Let's go on this delicious low-FODMAP journey together.
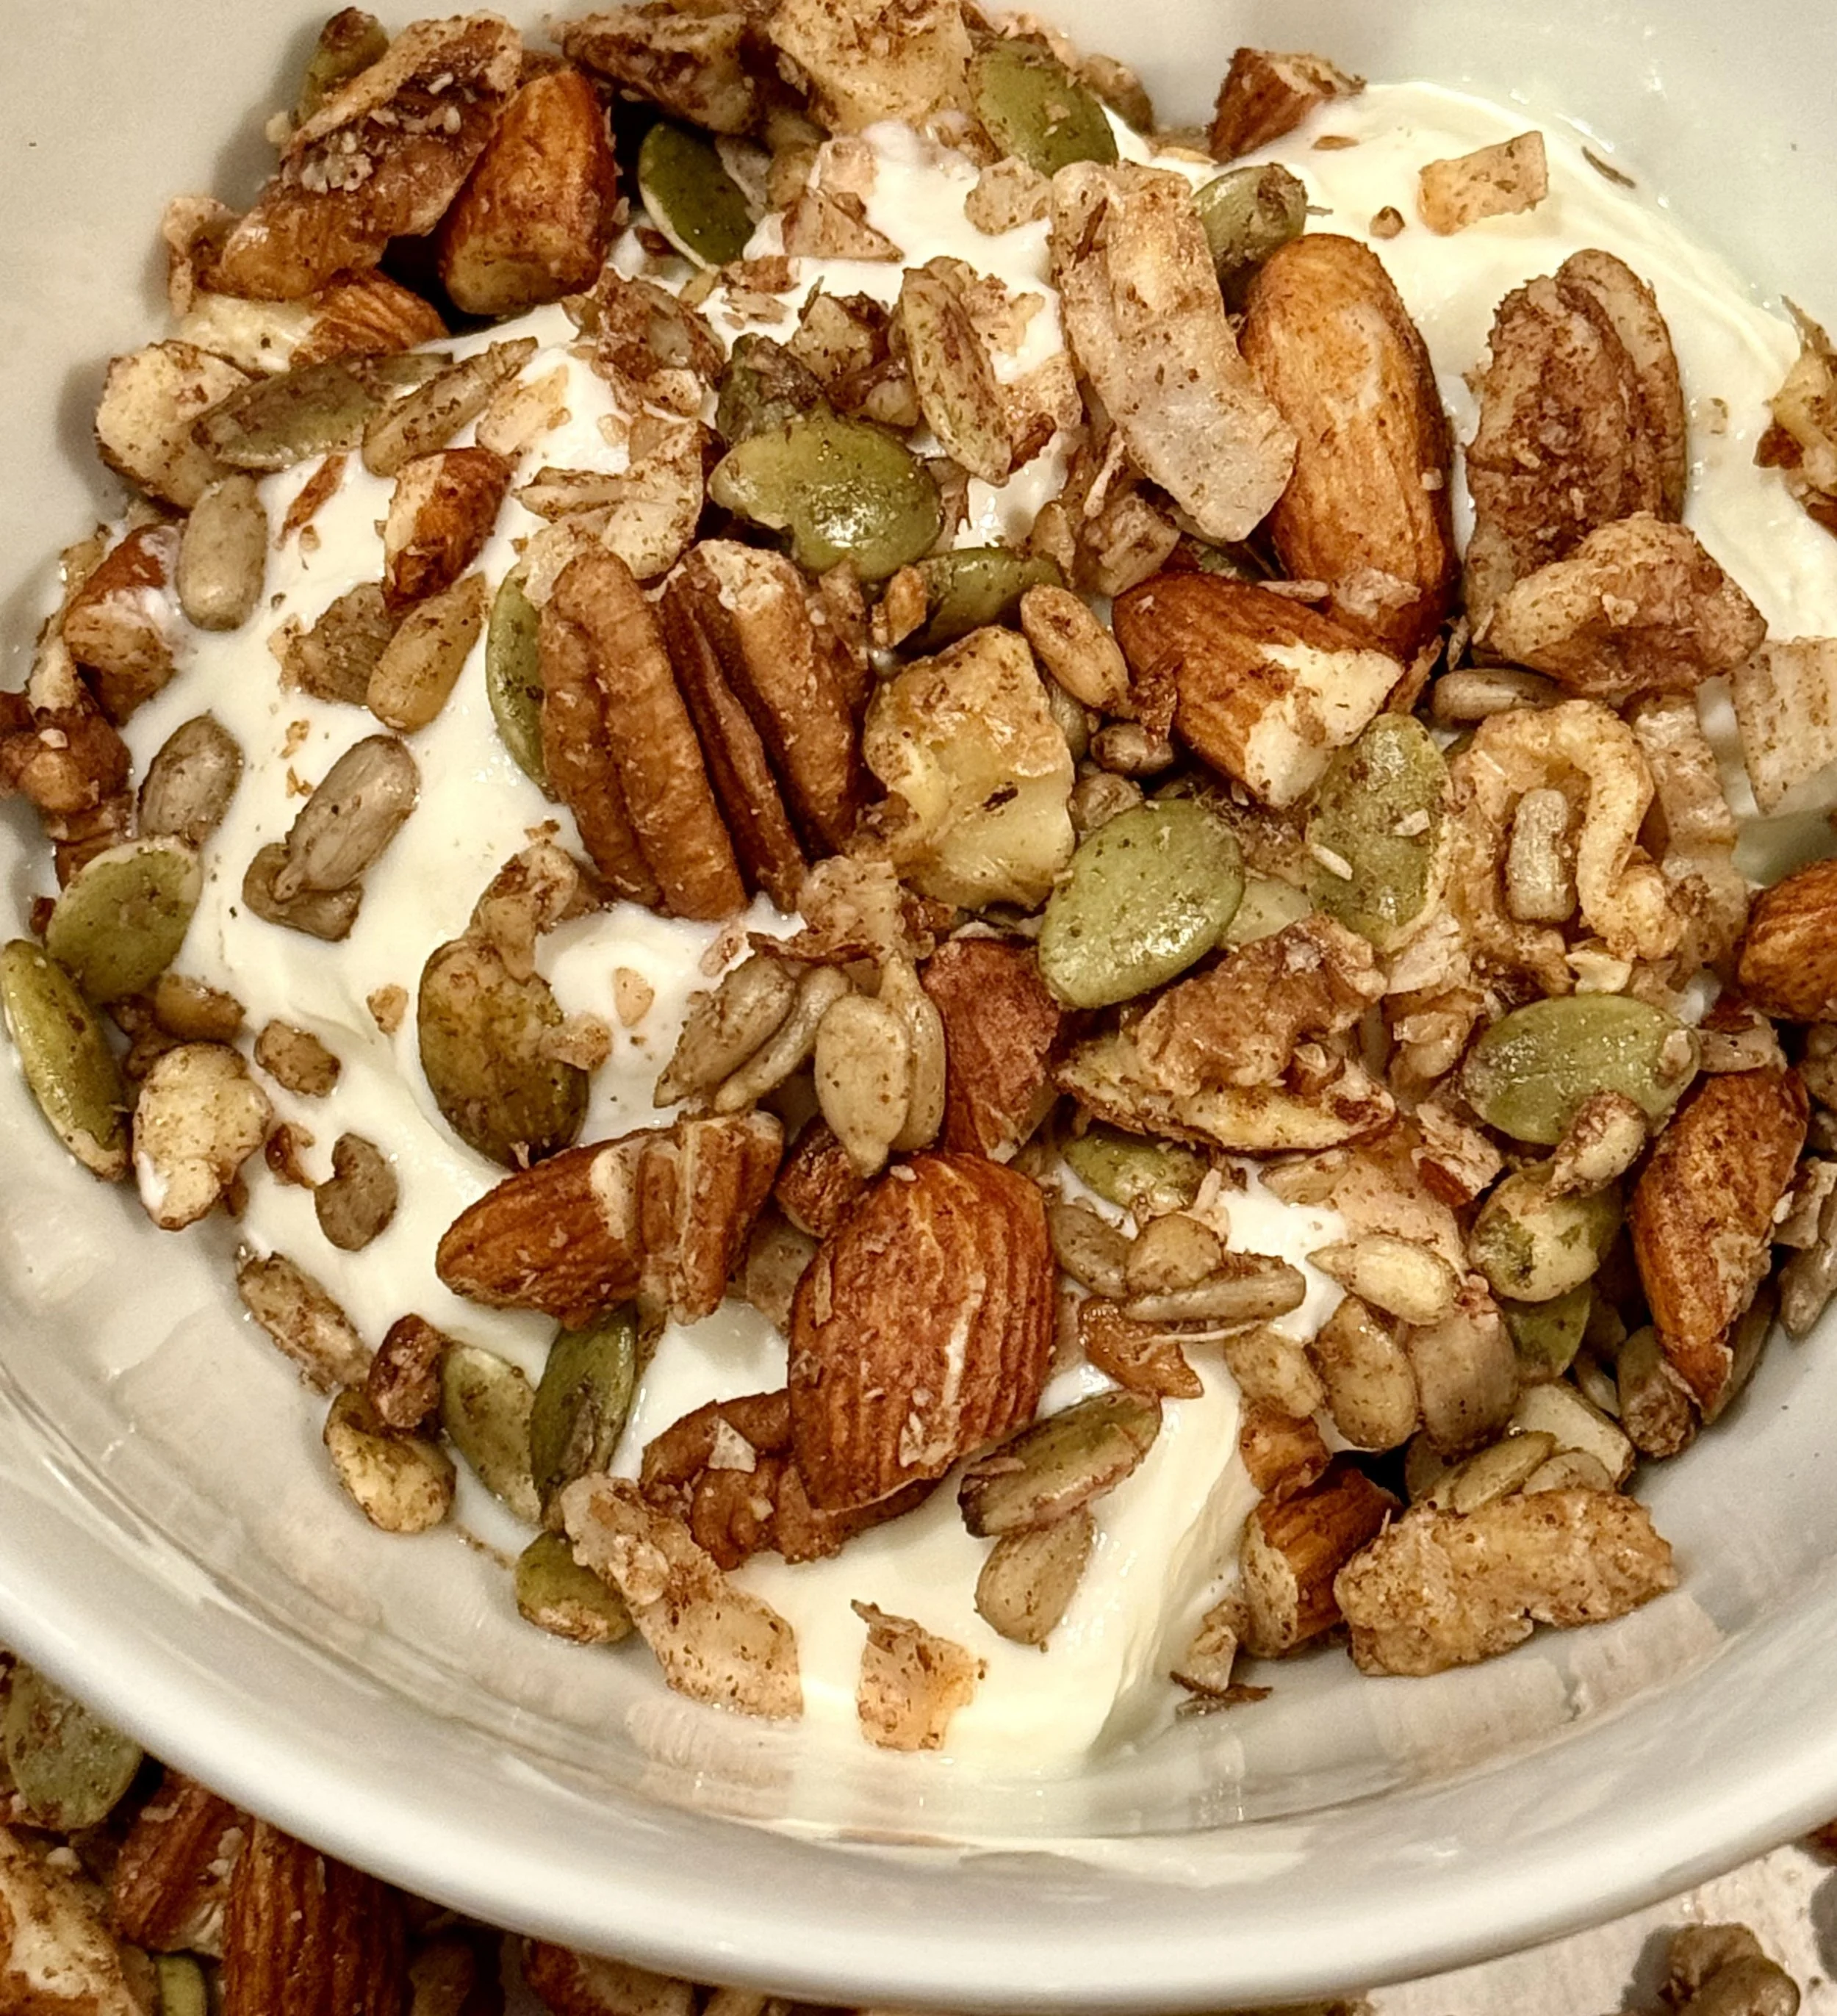
Crunchy Nut & Seed Granola (Low FODMAP)
10 Minutes prep • 20 Minutes cook • Low FODMAP • Gluten-Free • Makes 4 Cups
10 Minutes prep • 20 Minutes cook • Low FODMAP • Gluten-Free • Makes 4 Cups • Ok to make-ahead: Steps 1 - 5
Missing that satisfying crunch of traditional granola? This IBS-friendly version delivers all the toasty, nutty goodness without the gut-disrupting oats, honey, or dried fruit that can trigger symptoms. Packed with protein-rich nuts and seeds, lightly sweetened with gut-friendly allulose, and perfectly customizable to your taste, this granola proves that eating for your IBS doesn't mean sacrificing flavor or texture. Whether you sprinkle it over lactose-free yogurt, enjoy it by the handful, or use it as an ice cream topper, you're getting a genuinely satisfying snack that won't leave you bloated or uncomfortable. It's a true game changer for breakfast and beyond.
See this new recipe in my FREE recipe club.
To streamline your search through hundreds of existing recipes, I'm moving the release of my new weekly creations to the Recipe Club on Patreon. In the club, you’ll get access to a treasure trove of low-FODMAP goodness, complete with collections and filters to use as your virtual cookbook!
Here's what awaits you in the club:
Exclusive weekly recipes: Be the first to try my latest delicious low-FODMAP creations!
Simple & Easy: My recipes continue to focus on readily available ingredients and effortless preparation, perfect for family-friendly meals (no more separate low-FODMAP meal prep!).
Hundreds of existing recipes: Gain access to my entire library of low-FODMAP recipes, all conveniently organized.
You can join for free or sign up for only $5/month. Your support fuels my passion for creating new, delicious, and easy-to-make low-FODMAP recipes just for you.
Let's go on this delicious low-FODMAP journey together.
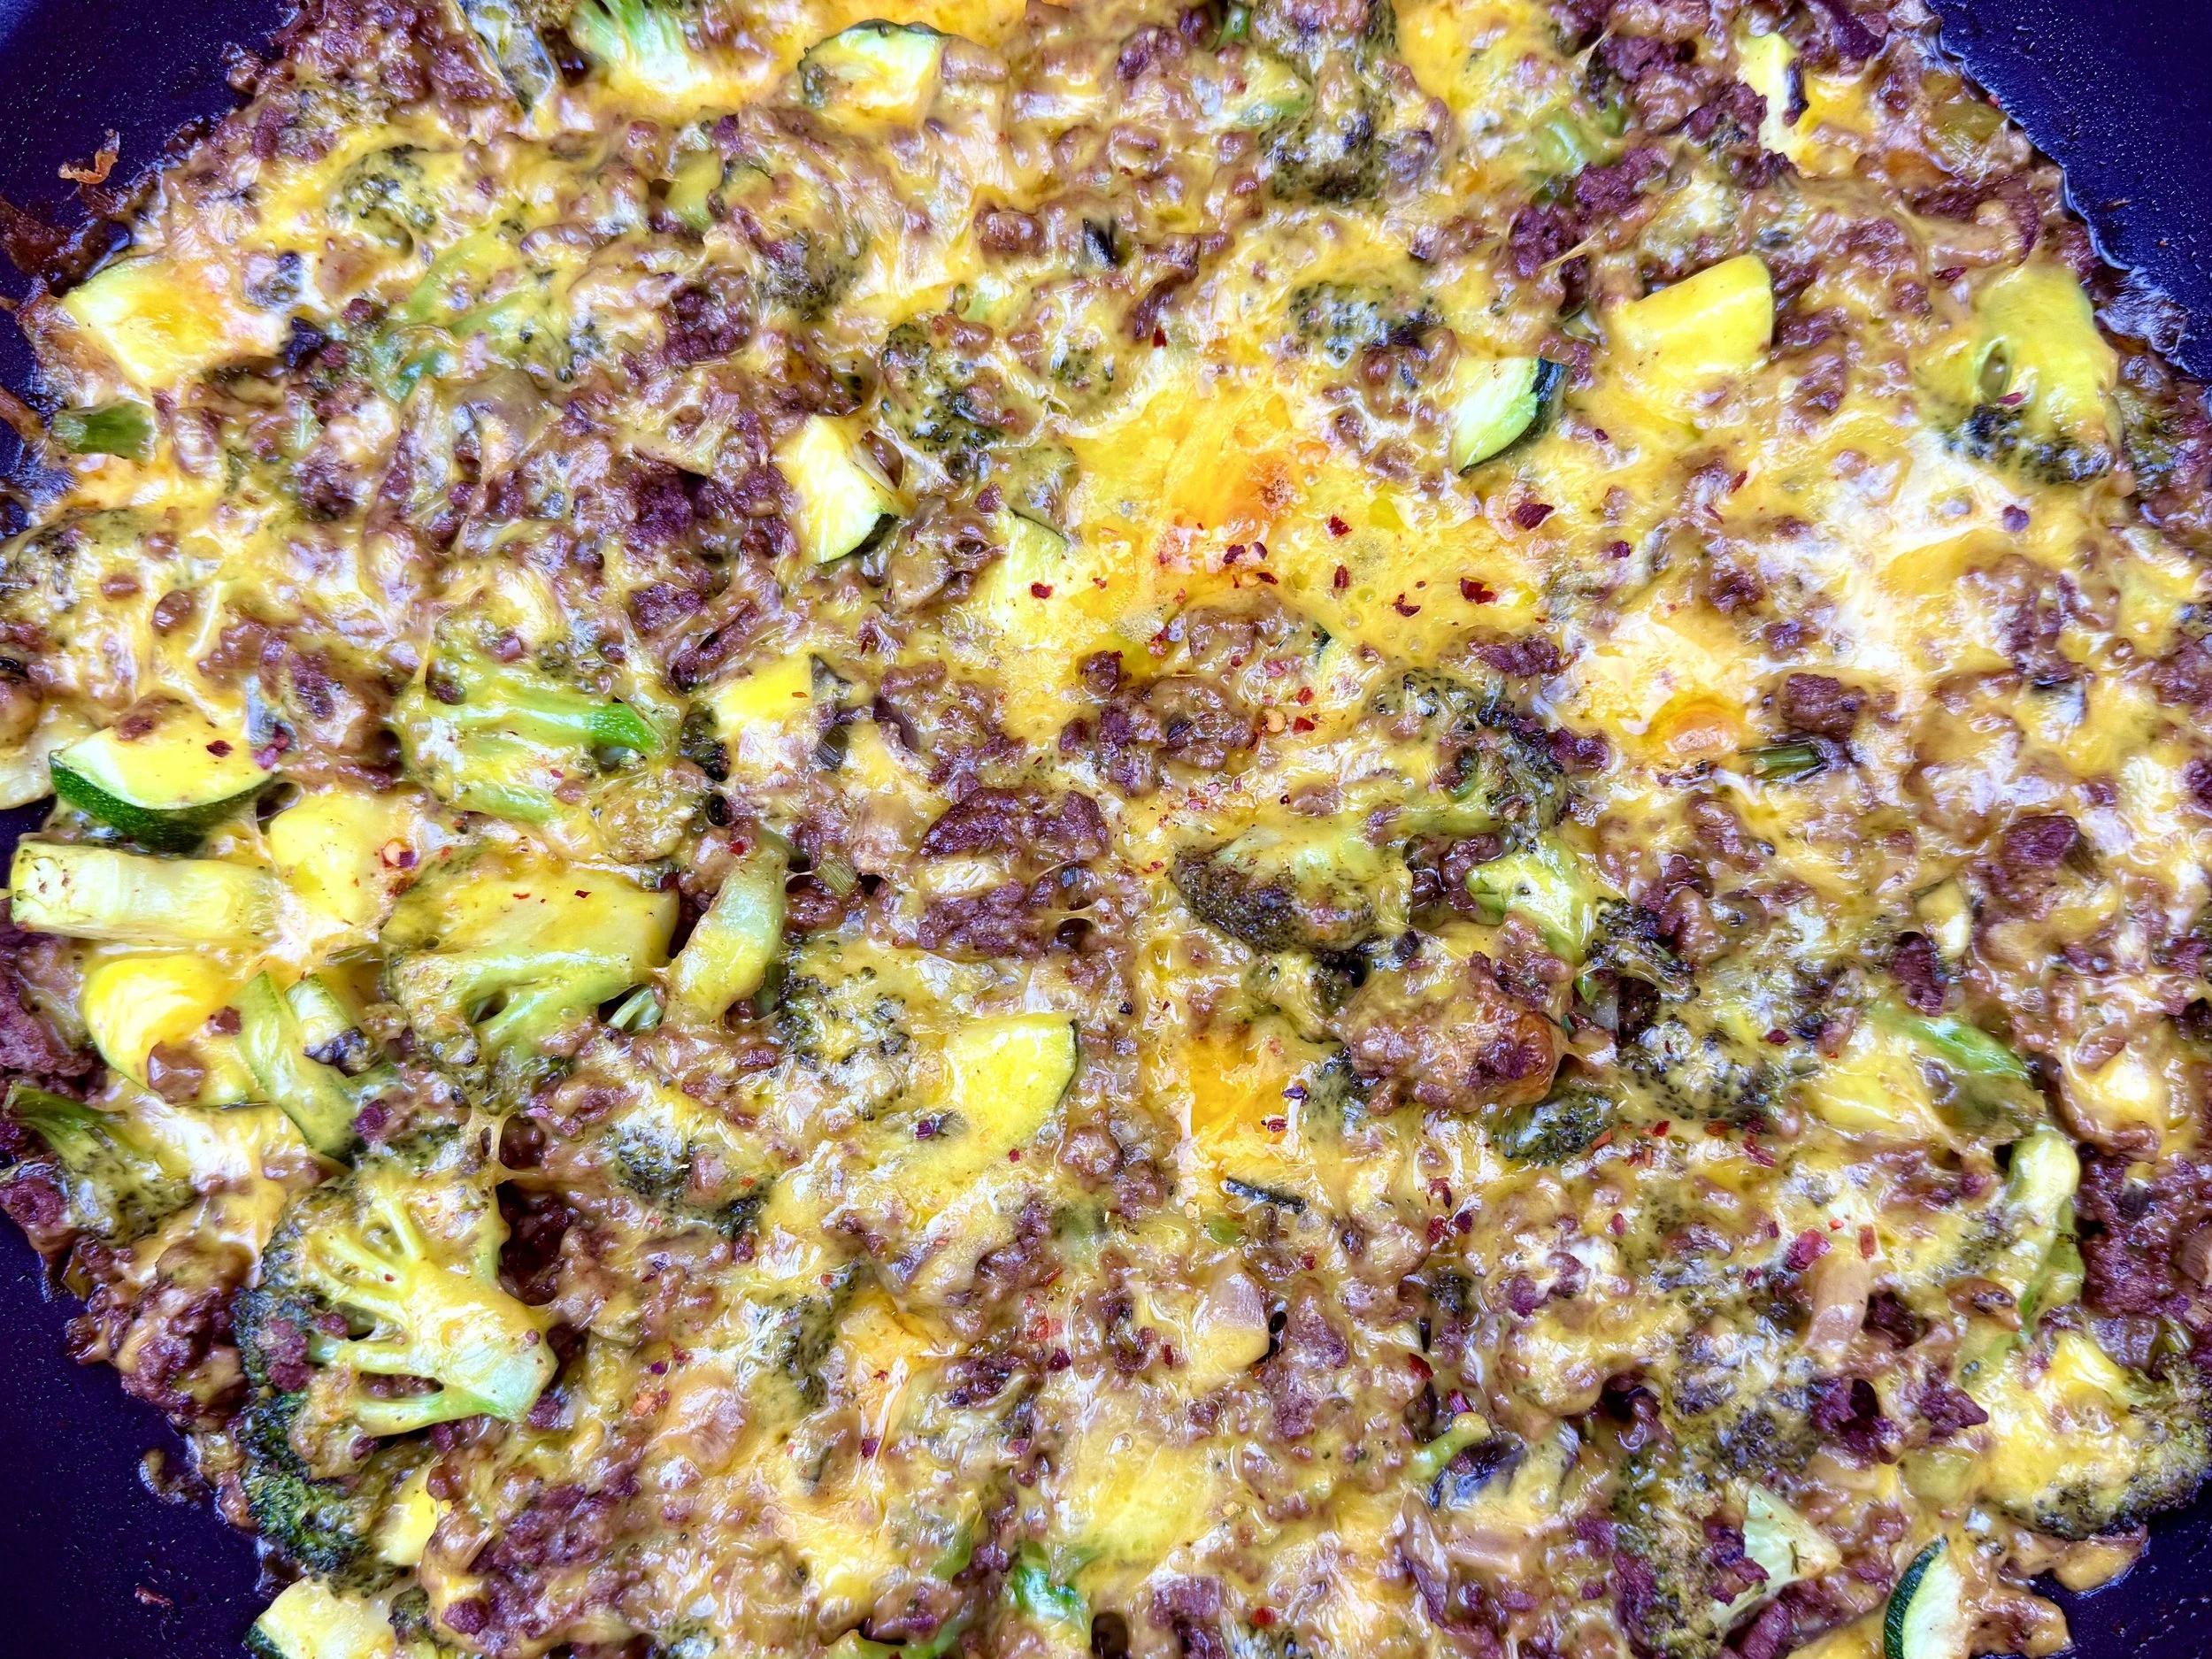
Smoky Beef & Veggie Skillet with Melted Cheddar (Low FODMAP)
10 Minutes prep • 20 Minutes cook • Low FODMAP • Gluten-Free • Serves 6
10 Minutes prep • 20 Minutes cook • Low FODMAP • Gluten-Free • Serves 6 • Ok to make-ahead: Steps 1 - 5
This hearty one-pan wonder brings together seasoned ground beef, tender vegetables, and two types of melted cheese for a satisfying weeknight dinner that's surprisingly simple. The combination of smoked paprika and ancho chili powder gives the dish a warm, smoky depth, while broccoli, mushrooms, and zucchini add color, texture, and nutrition to every bite. Best of all, it goes from stovetop to oven in the same skillet, meaning minimal cleanup and maximum flavor. The creamy, cheesy sauce ties everything together, creating a comforting meal that's perfect for busy evenings when you want something delicious without the fuss. Serve it straight from the skillet with a fresh green salad on the side for a complete, crowd-pleasing dinner.
See this new recipe in my FREE recipe club.
To streamline your search through hundreds of existing recipes, I'm moving the release of my new weekly creations to the Recipe Club on Patreon. In the club, you’ll get access to a treasure trove of low-FODMAP goodness, complete with collections and filters to use as your virtual cookbook!
Here's what awaits you in the club:
Exclusive weekly recipes: Be the first to try my latest delicious low-FODMAP creations!
Simple & Easy: My recipes continue to focus on readily available ingredients and effortless preparation, perfect for family-friendly meals (no more separate low-FODMAP meal prep!).
Hundreds of existing recipes: Gain access to my entire library of low-FODMAP recipes, all conveniently organized.
You can join for free or sign up for only $5/month. Your support fuels my passion for creating new, delicious, and easy-to-make low-FODMAP recipes just for you.
Let's go on this delicious low-FODMAP journey together.
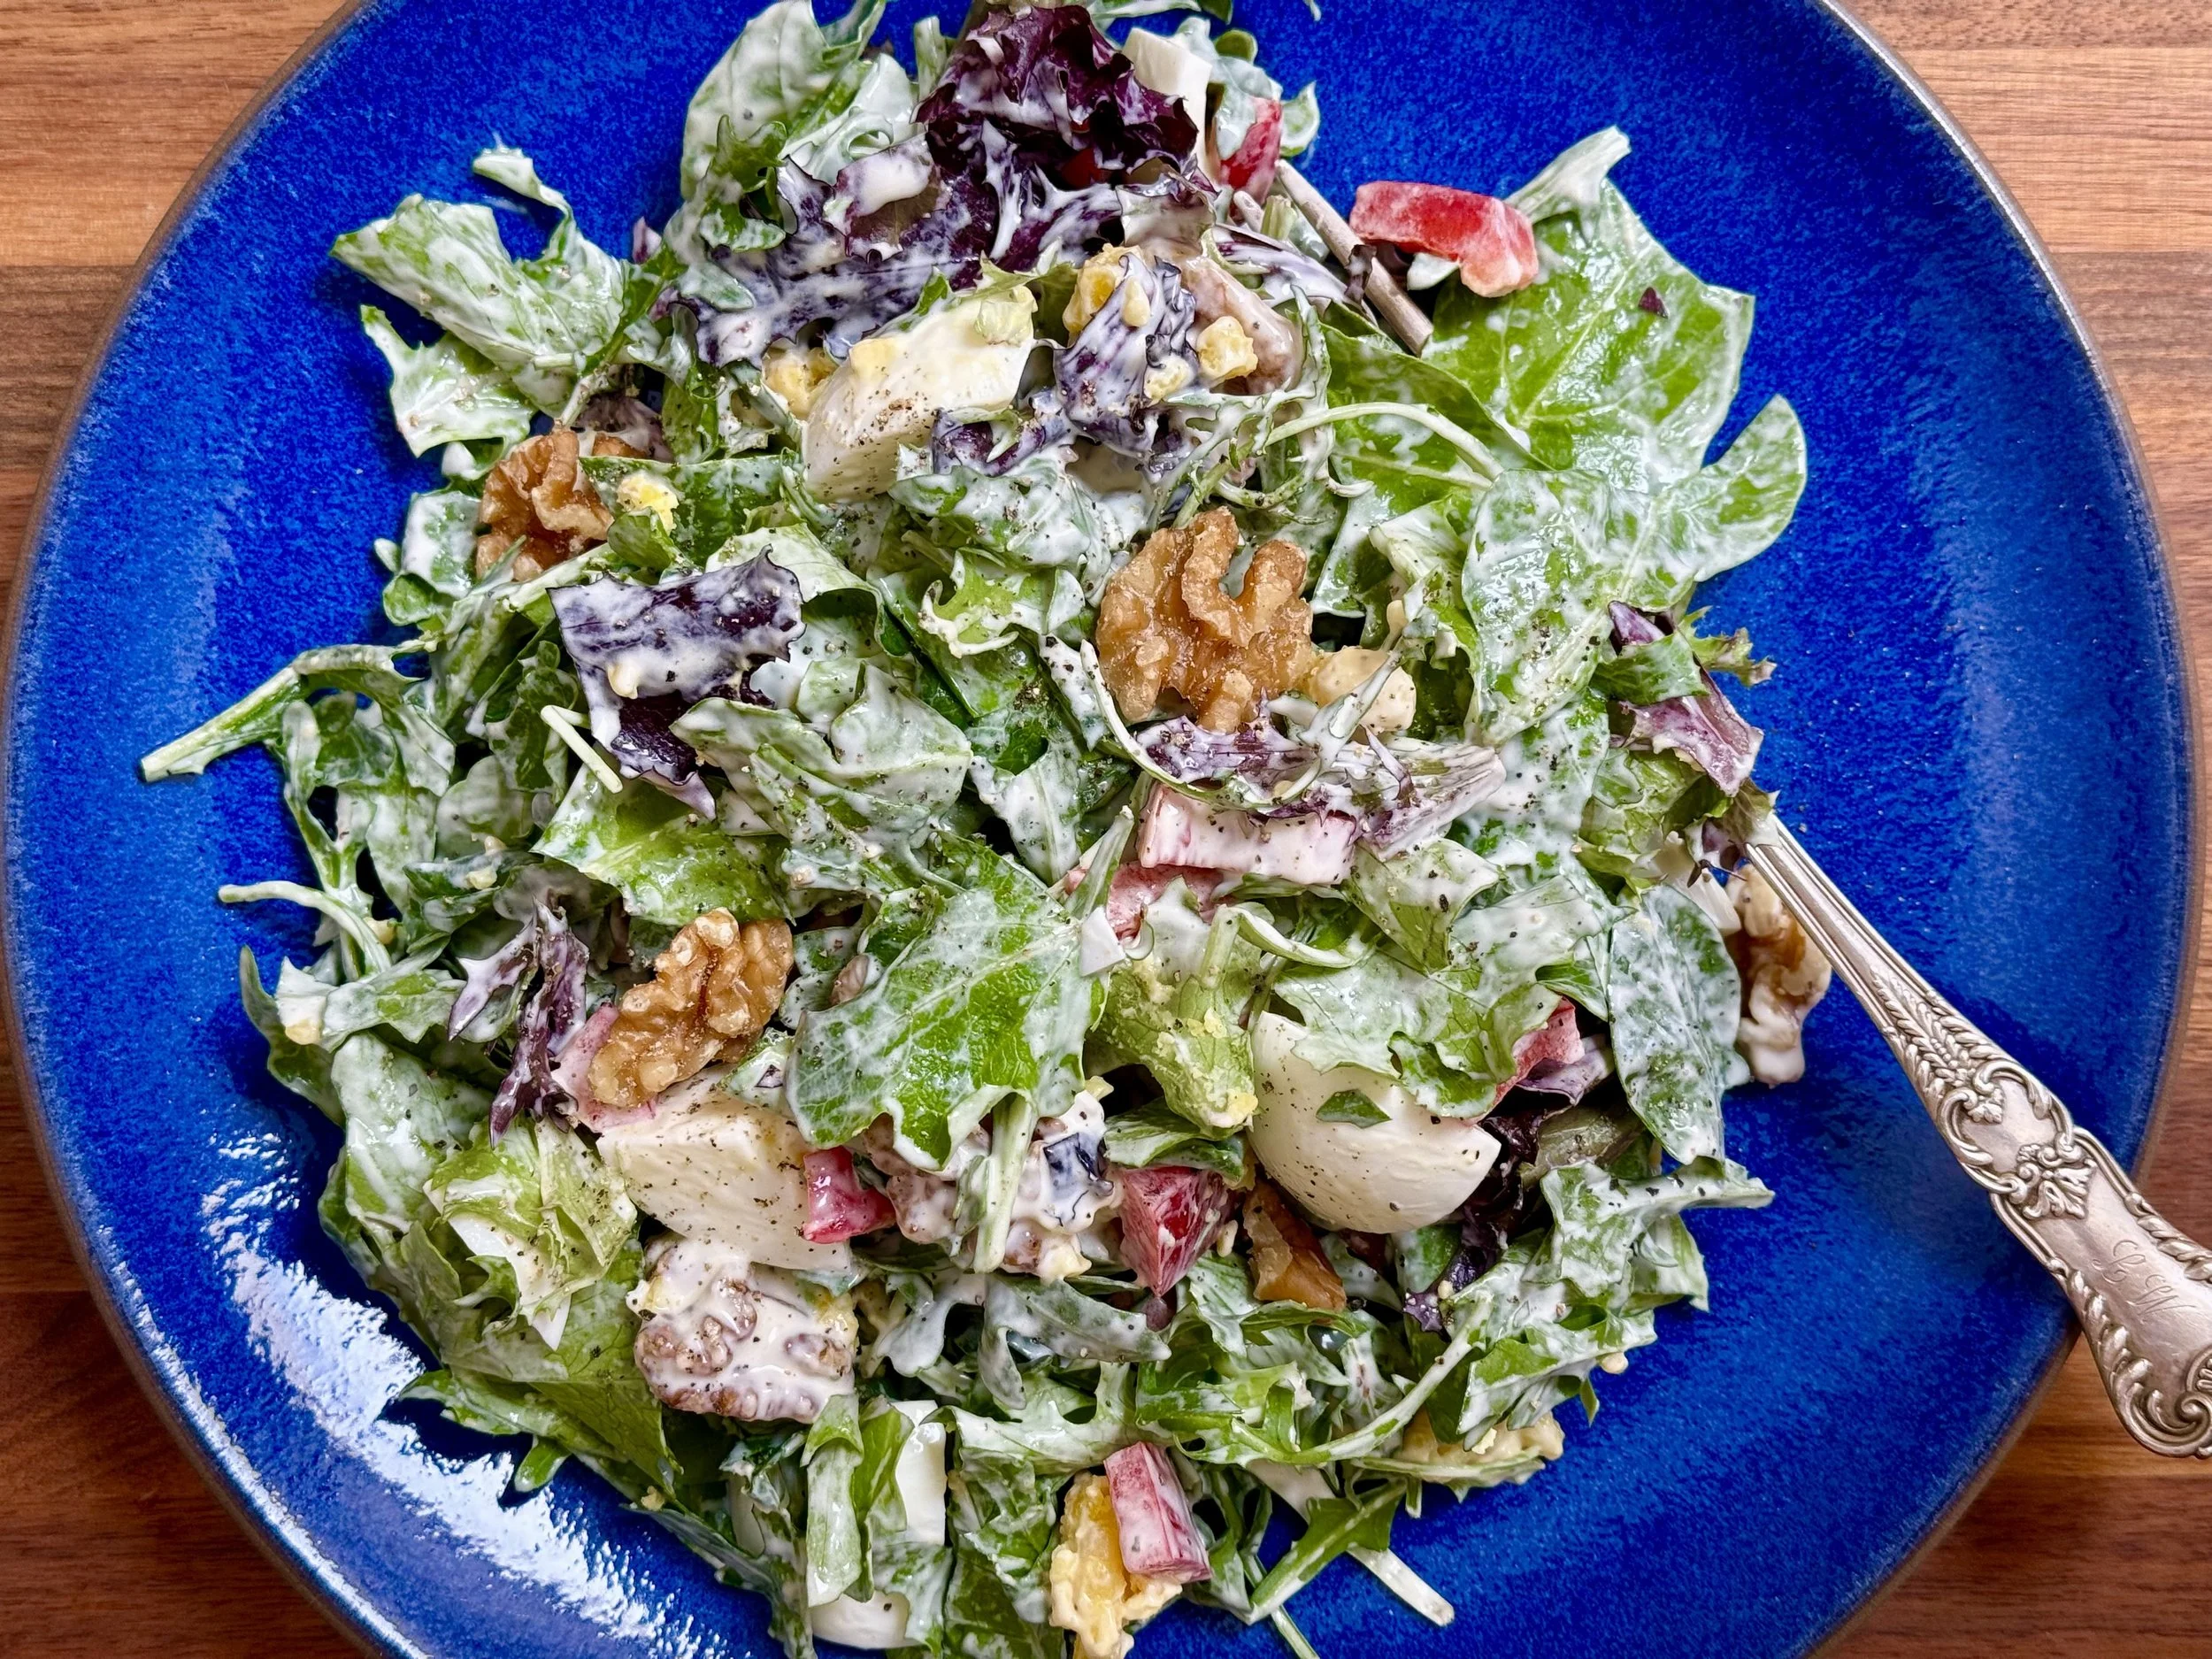
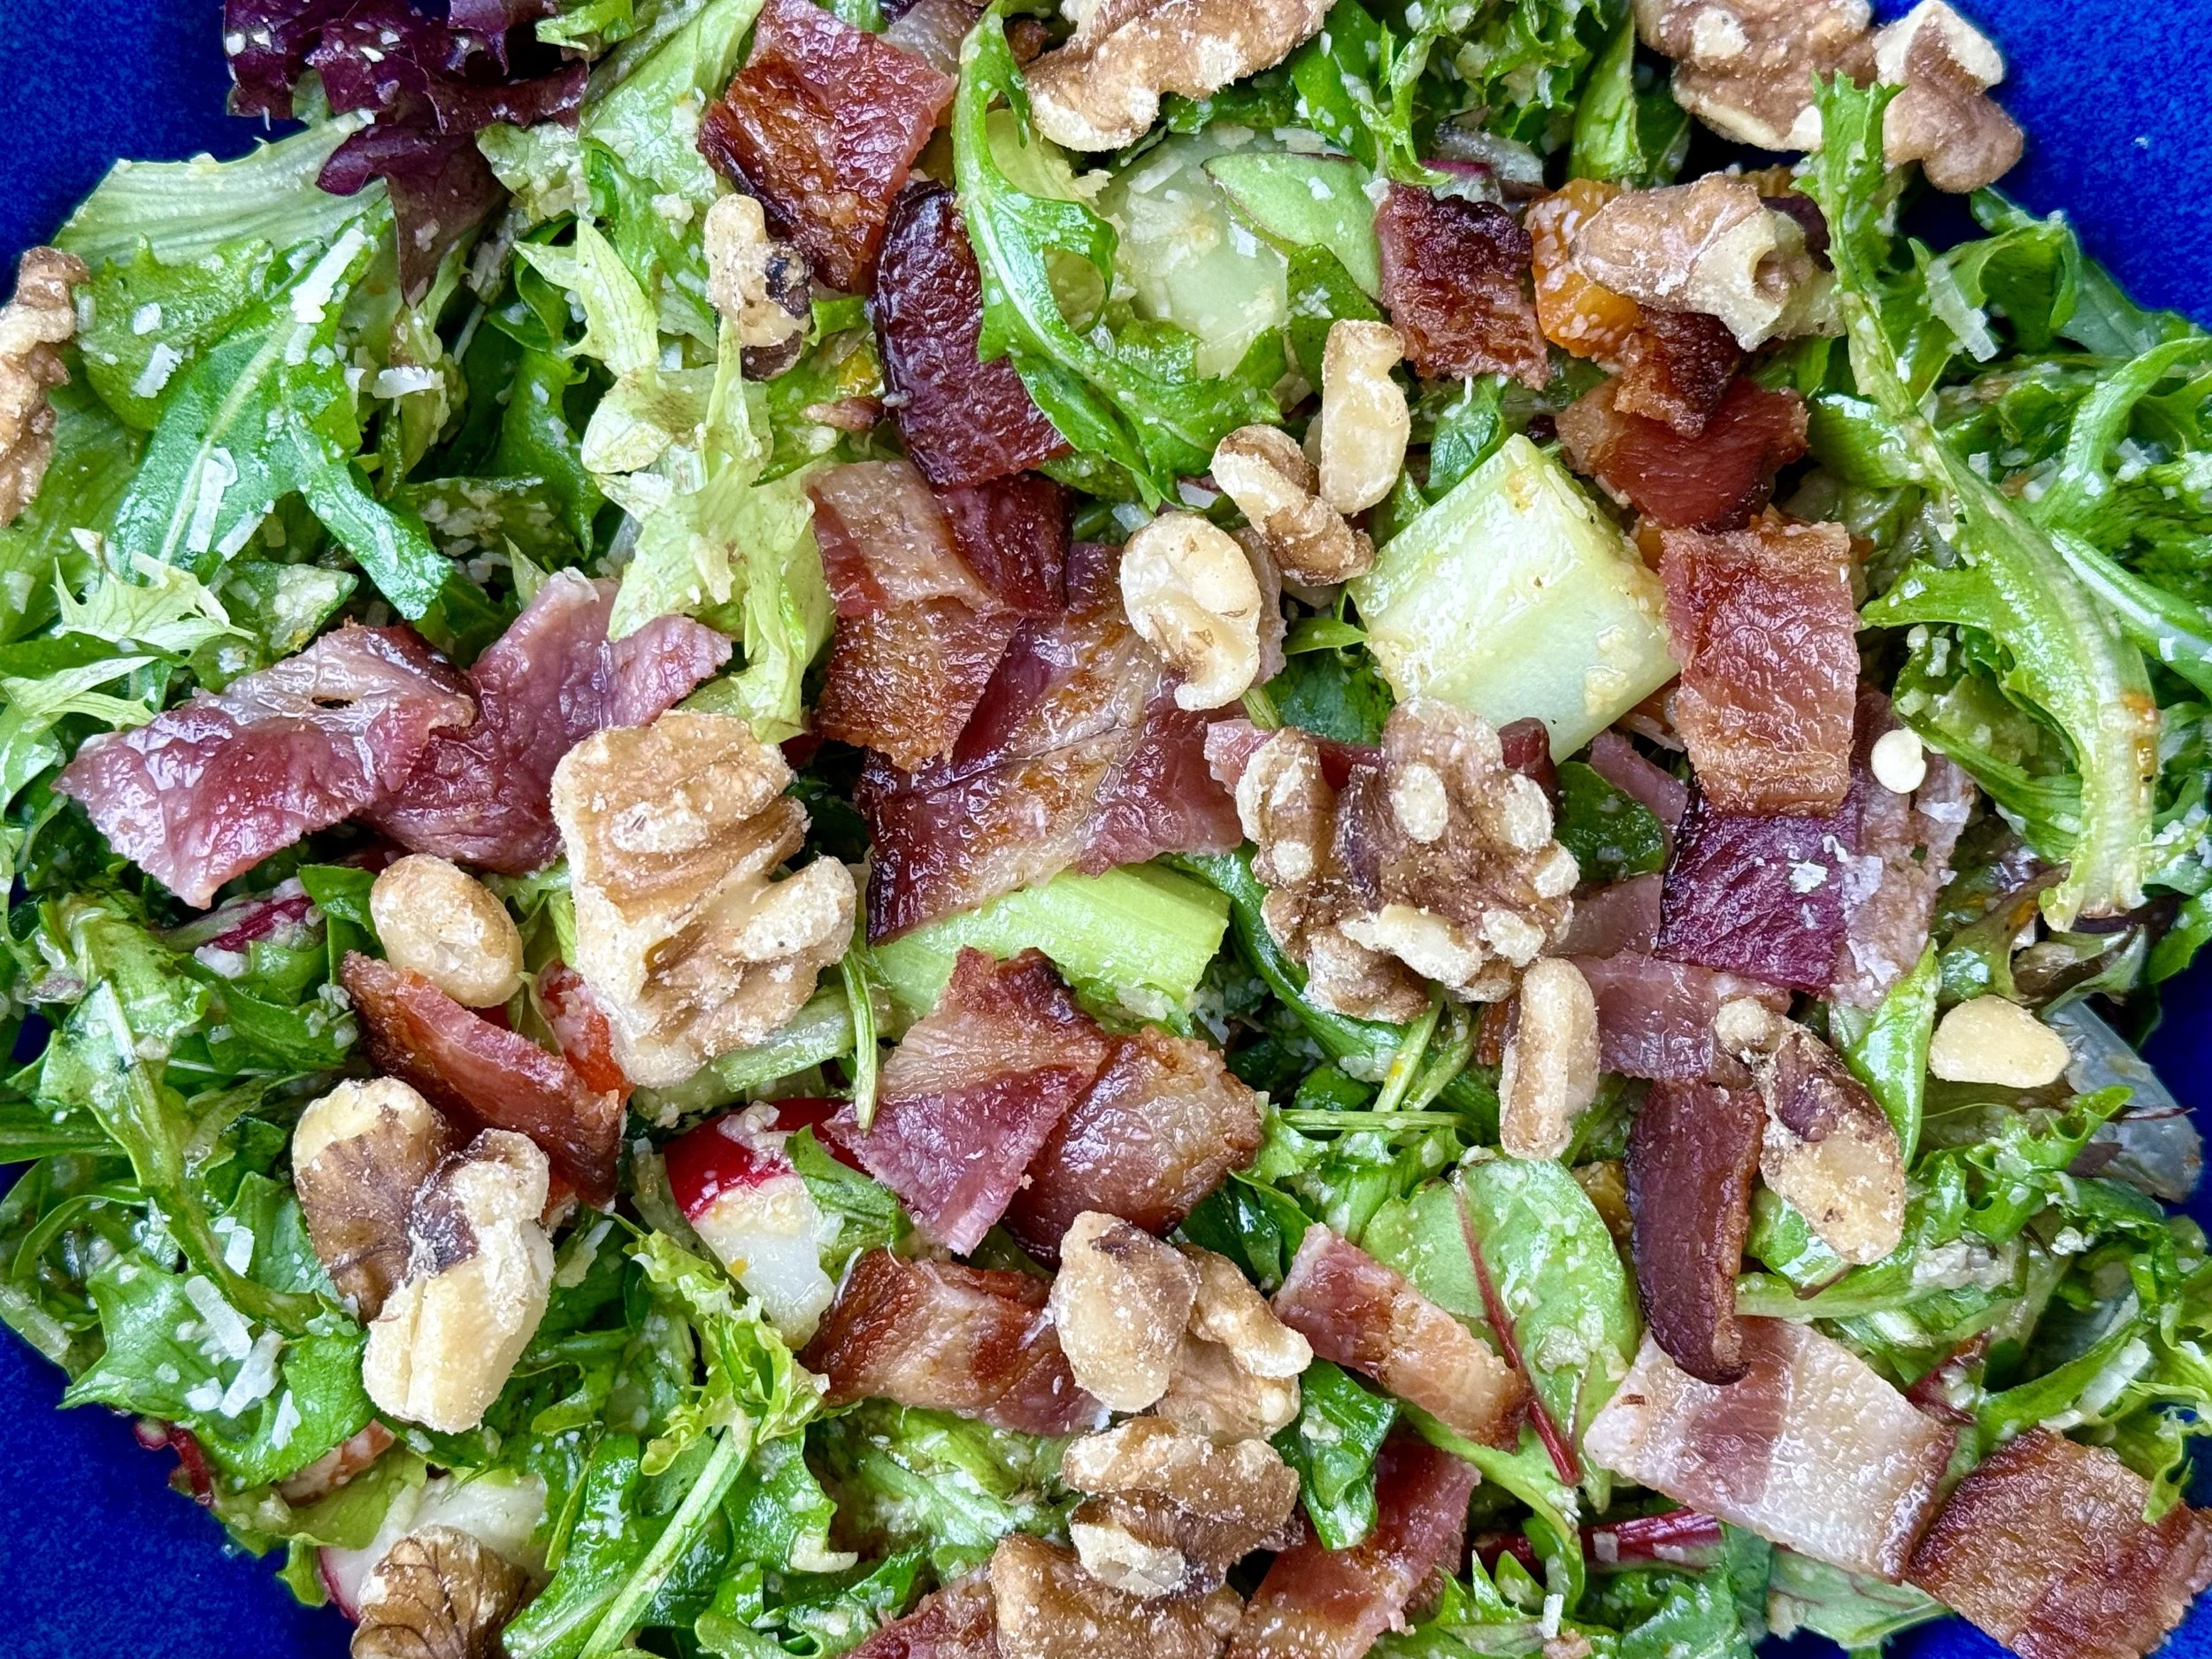
Winter Salad with Bacon, Walnuts, and Orange Thyme Vinaigrette (Low FODMAP)
15 Minutes prep • 10 Minutes cook • Low FODMAP • Gluten-Free • Serves 6
15 Minutes prep • 10 Minutes cook • Low FODMAP • Gluten-Free • Serves 6 • Ok to make-ahead: Steps 1 - 3
This vibrant, nutrient-packed salad is a true IBS game changer! Loaded with gut-friendly ingredients, it delivers satisfying crunch and bold flavors without triggering digestive distress.
Walnuts and pumpkin seeds bring healthy fats and gentle fiber, while baby arugula and mixed greens provide vitamins without the gas-inducing cruciferous overload. Crispy bacon adds irresistible savory notes, and dried cranberries offer natural sweetness that won't spike your blood sugar.
The real magic happens in the orange-thyme vinaigrette—bright, herbaceous, and made with Allulose, a low-FODMAP sweetener that's gentle on your gut while delivering perfect sweet-tart balance (you can also use white sugar if you’re not watching your carbs!) Parmesan brings aged-cheese umami without the lactose concerns of softer cheeses.
See this new recipe in my FREE recipe club.
To streamline your search through hundreds of existing recipes, I'm moving the release of my new weekly creations to the Recipe Club on Patreon. In the club, you’ll get access to a treasure trove of low-FODMAP goodness, complete with collections and filters to use as your virtual cookbook!
Here's what awaits you in the club:
Exclusive weekly recipes: Be the first to try my latest delicious low-FODMAP creations!
Simple & Easy: My recipes continue to focus on readily available ingredients and effortless preparation, perfect for family-friendly meals (no more separate low-FODMAP meal prep!).
Hundreds of existing recipes: Gain access to my entire library of low-FODMAP recipes, all conveniently organized.
You can join for free or sign up for only $5/month. Your support fuels my passion for creating new, delicious, and easy-to-make low-FODMAP recipes just for you.
Let's go on this delicious low-FODMAP journey together.
Peanut Butter Kitchen Sink Cookies (Low FODMAP)
10 Minutes prep • 10 Minutes cook • Low FODMAP • Gluten-Free • Makes 24
10 Minutes prep • 10 Minutes cook • Low FODMAP • Gluten-Free • Makes 24 • Ok to make-ahead: Steps 1 - 7
Sometimes the best recipes are the ones that seem too simple to be true—and these cookies are living proof. With just a handful of pantry staples and no flour in sight, you'd never guess these chewy, nutty cookies are both low FODMAP and keto-friendly. Natural peanut butter creates an incredibly rich base, while chopped macadamia nuts add buttery crunch, and tart cranberries bring pops of fruity brightness. Sweetened with allulose, they're gentle on blood sugar without any weird aftertaste (though regular sugar works great too). Whether you need a quick dessert or a portable snack, these cookies prove that gut-friendly eating doesn't mean boring eating. Mix, scoop, bake, and watch them disappear.
See this new recipe in my FREE recipe club.
To streamline your search through hundreds of existing recipes, I'm moving the release of my new weekly creations to the Recipe Club on Patreon. In the club, you’ll get access to a treasure trove of low-FODMAP goodness, complete with collections and filters to use as your virtual cookbook!
Here's what awaits you in the club:
Exclusive weekly recipes: Be the first to try my latest delicious low-FODMAP creations!
Simple & Easy: My recipes continue to focus on readily available ingredients and effortless preparation, perfect for family-friendly meals (no more separate low-FODMAP meal prep!).
Hundreds of existing recipes: Gain access to my entire library of low-FODMAP recipes, all conveniently organized.
You can join for free or sign up for only $5/month. Your support fuels my passion for creating new, delicious, and easy-to-make low-FODMAP recipes just for you.
Let's go on this delicious low-FODMAP journey together.
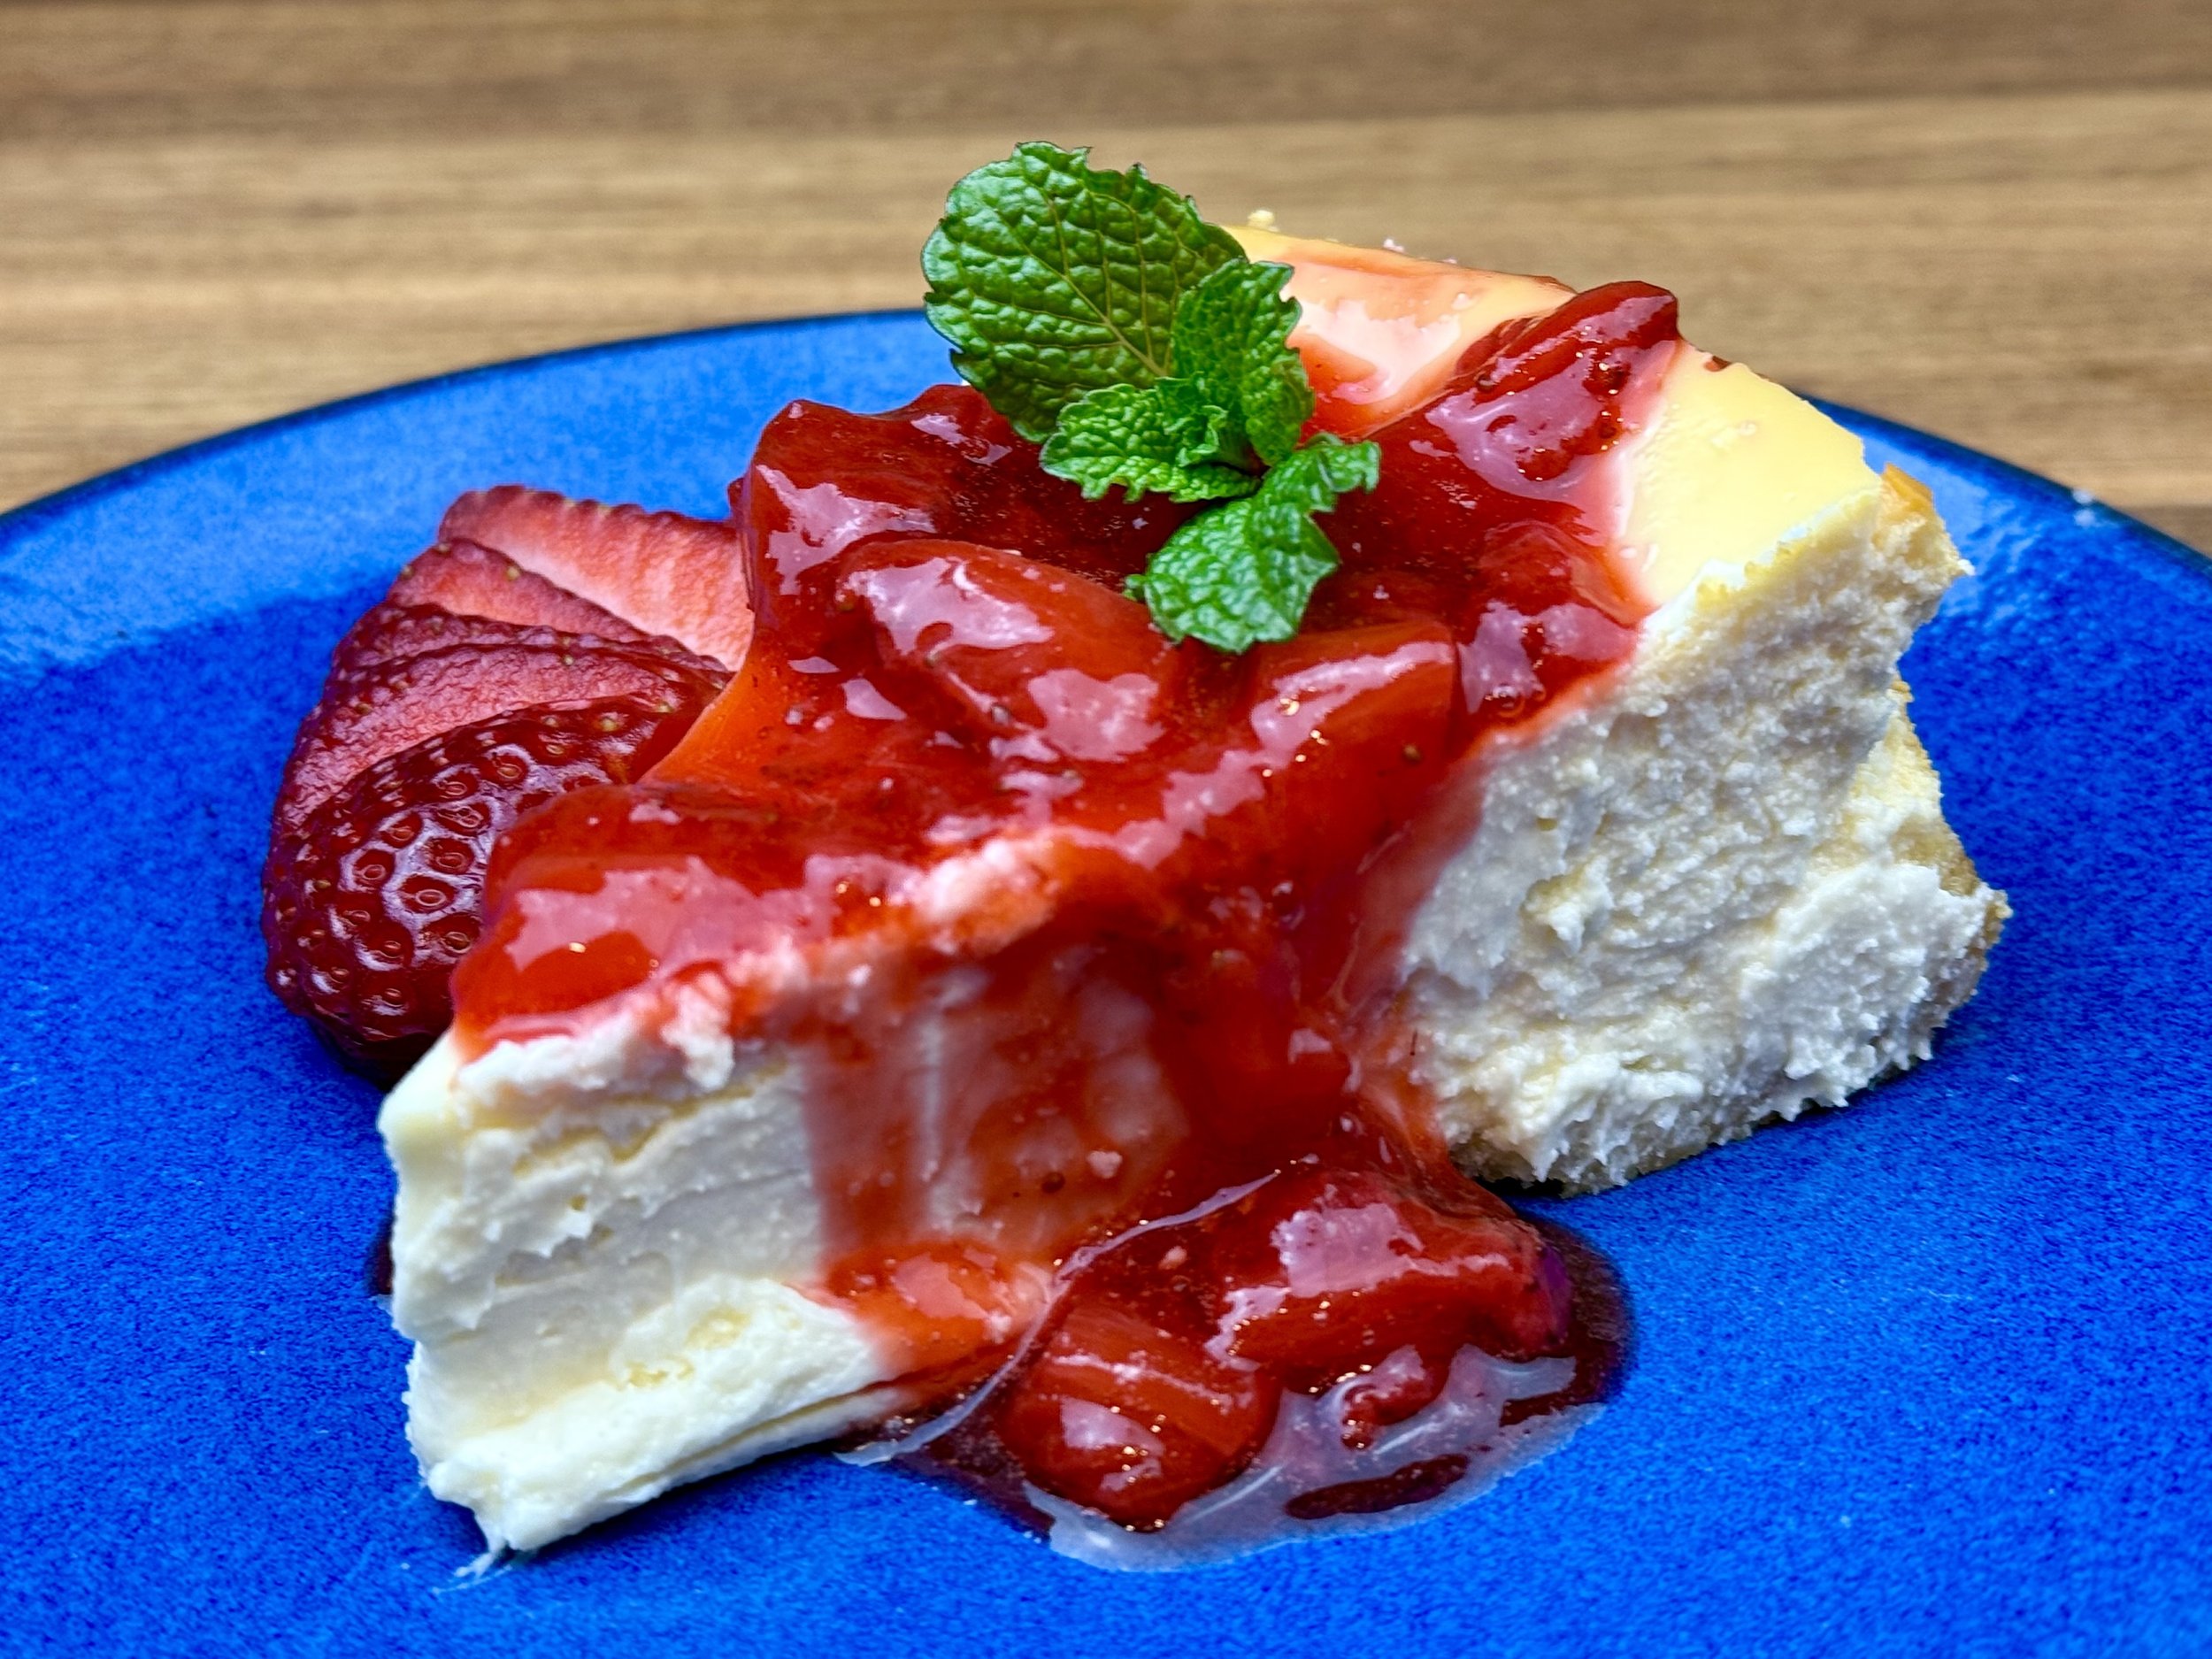
Gut-Friendly Strawberry Cheesecake (low FODMAP)
20 Minutes prep • 60 Minutes cook • 60 Minutes chill • Low FODMAP • Gluten-Free • Serves 8
20 Minutes prep • 60 Minutes cook • 60 Minutes chill • Low FODMAP • Gluten-Free • Serves 8 • Ok to make-ahead: Steps 1 - 6
Finally, a cheesecake that loves your gut back! This isn't some sad imitation—it's the real deal, with a buttery almond-coconut crust and impossibly silky filling. By swapping in lactose-free cream cheese and sour cream, we've eliminated the FODMAPs without sacrificing that tangy richness, and with allulose as a sugar alternative, keto friends can dive in too. This cheesecake proves that eating for your gut health doesn't mean giving up the foods you love—it just means getting a little creative.
See this new recipe in my FREE recipe club.
To streamline your search through hundreds of existing recipes, I'm moving the release of my new weekly creations to the Recipe Club on Patreon. In the club, you’ll get access to a treasure trove of low-FODMAP goodness, complete with collections and filters to use as your virtual cookbook!
Here's what awaits you in the club:
Exclusive weekly recipes: Be the first to try my latest delicious low-FODMAP creations!
Simple & Easy: My recipes continue to focus on readily available ingredients and effortless preparation, perfect for family-friendly meals (no more separate low-FODMAP meal prep!).
Hundreds of existing recipes: Gain access to my entire library of low-FODMAP recipes, all conveniently organized.
You can join for free or sign up for only $5/month. Your support fuels my passion for creating new, delicious, and easy-to-make low-FODMAP recipes just for you.
Let's go on this delicious low-FODMAP journey together.
Cranberry Orange Muffin Tops (Low FODMAP)
15 Minutes prep • 15 Minutes cook • Low FODMAP • Gluten-Free • Makes 12 - 16
15 Minutes prep • 15 Minutes cook • Low FODMAP • Gluten-Free • Makes 12 - 16 • Ok to make-ahead: Step 1
Traditional muffins can wreak havoc on sensitive stomachs. The gluten, the sugar crash, the bloat that hits an hour later. But what if you could have that perfect golden muffin top without the digestive drama? Enter almond flour: naturally gluten-free, grain-free, and surprisingly gut-friendly. Swap in allulose for a low-FODMAP AND lower-carb version, add fiber-rich cranberries and bright orange zest, and you've got a delicious sweet treat that actually agrees with you.

See this new recipe in my FREE recipe club.
To streamline your search through hundreds of existing recipes, I'm moving the release of my new weekly creations to the Recipe Club on Patreon. In the club, you’ll get access to a treasure trove of low-FODMAP goodness, complete with collections and filters to use as your virtual cookbook!
Here's what awaits you in the club:
Exclusive weekly recipes: Be the first to try my latest delicious low-FODMAP creations!
Simple & Easy: My recipes continue to focus on readily available ingredients and effortless preparation, perfect for family-friendly meals (no more separate low-FODMAP meal prep!).
Hundreds of existing recipes: Gain access to my entire library of low-FODMAP recipes, all conveniently organized.
You can join for free or sign up for only $5/month. Your support fuels my passion for creating new, delicious, and easy-to-make low-FODMAP recipes just for you.
Let's go on this delicious low-FODMAP journey together.
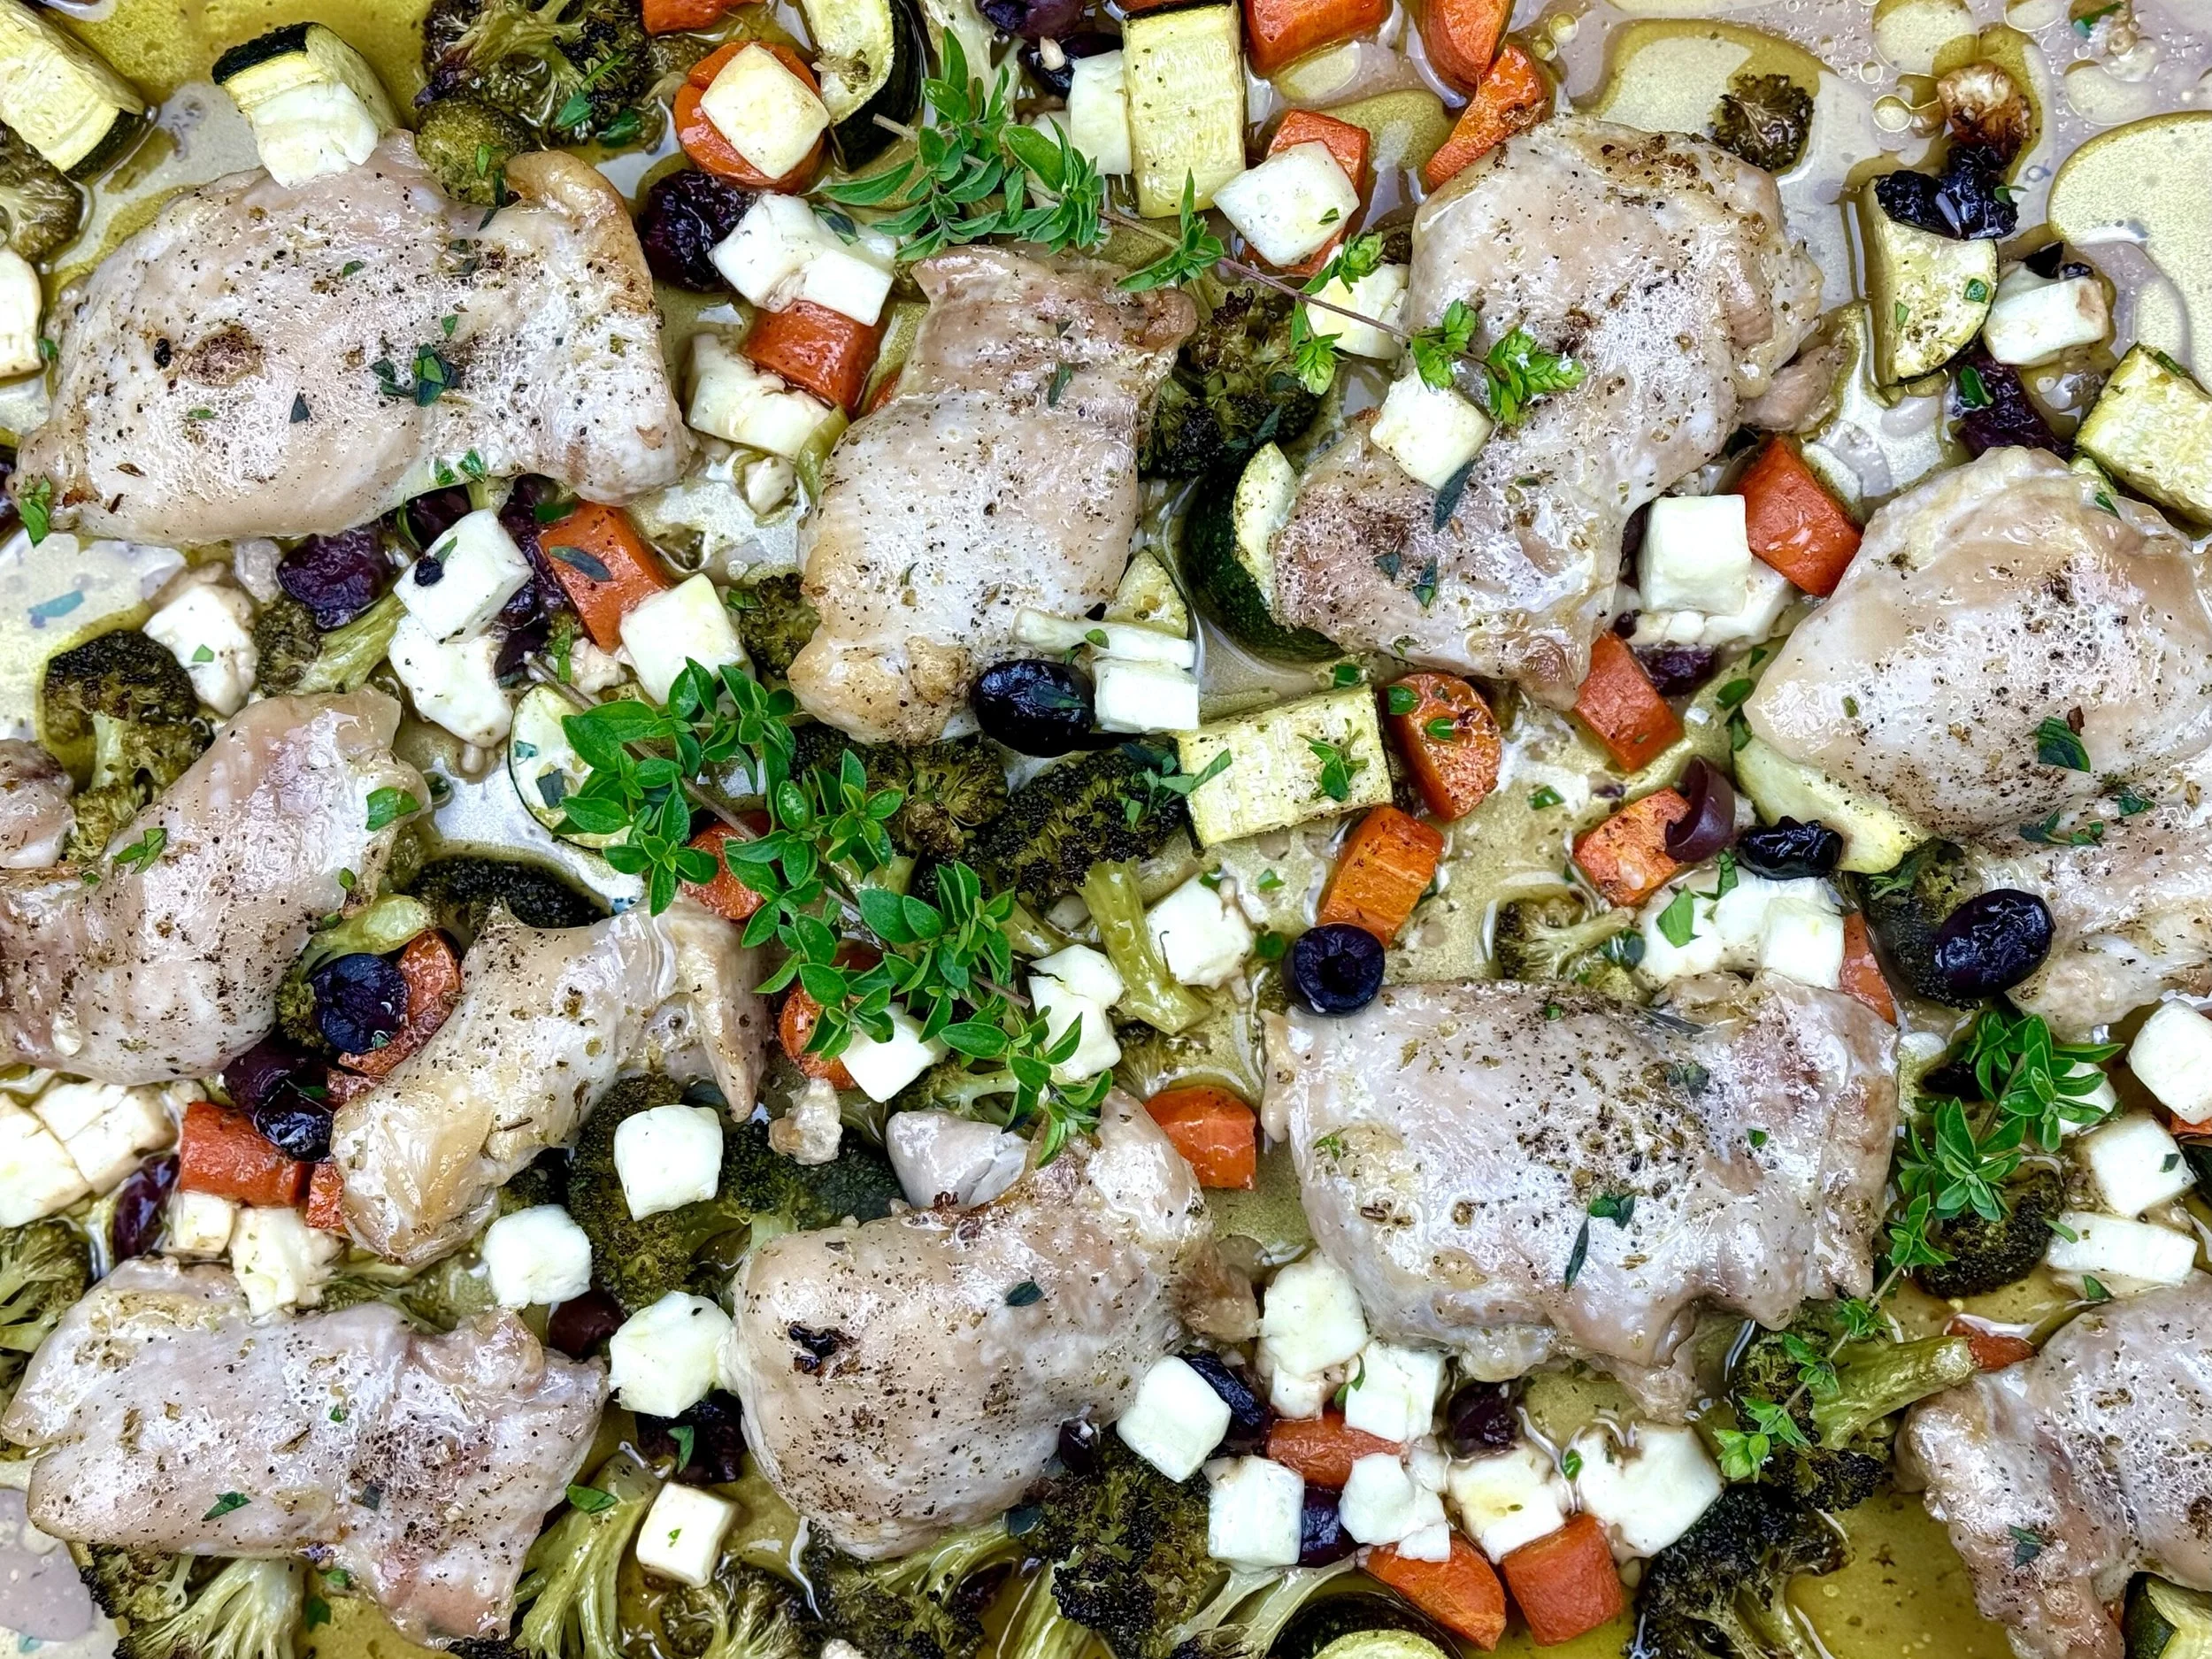
Sheet Pan Greek Chicken with Feta and Roasted Veggies (Low FODMAP)
10 Minutes prep • 35 Minutes cook • Low FODMAP • Gluten-Free • Serves 4
10 Minutes prep • 35 Minutes cook • Low FODMAP • Gluten-Free • Serves 4
When you're craving bright, bold Mediterranean flavors but can't handle the garlic bombs that come with most Greek food, this sheet pan dinner is about to become your new obsession. Juicy chicken thighs, colorful roasted vegetables, and big chunks of tangy feta all get coated in a garlicky-lemony dressing (made gut-friendly with garlic-infused oil) and roasted until everything is golden, tender, and absolutely irresistible.
The best part? Everything cooks together on one pan, creating a rich, flavorful sauce at the bottom that's perfect for soaking up with gluten-free bread or spooning over rice. It's the kind of meal that looks impressive enough for company but is actually easier than ordering takeout, with minimal cleanup to boot.
See this new recipe in my FREE recipe club.
To streamline your search through hundreds of existing recipes, I'm moving the release of my new weekly creations to the Recipe Club on Patreon. In the club, you’ll get access to a treasure trove of low-FODMAP goodness, complete with collections and filters to use as your virtual cookbook!
Here's what awaits you in the club:
Exclusive weekly recipes: Be the first to try my latest delicious low-FODMAP creations!
Simple & Easy: My recipes continue to focus on readily available ingredients and effortless preparation, perfect for family-friendly meals (no more separate low-FODMAP meal prep!).
Hundreds of existing recipes: Gain access to my entire library of low-FODMAP recipes, all conveniently organized.
You can join for free or sign up for only $5/month. Your support fuels my passion for creating new, delicious, and easy-to-make low-FODMAP recipes just for you.
Let's go on this delicious low-FODMAP journey together.
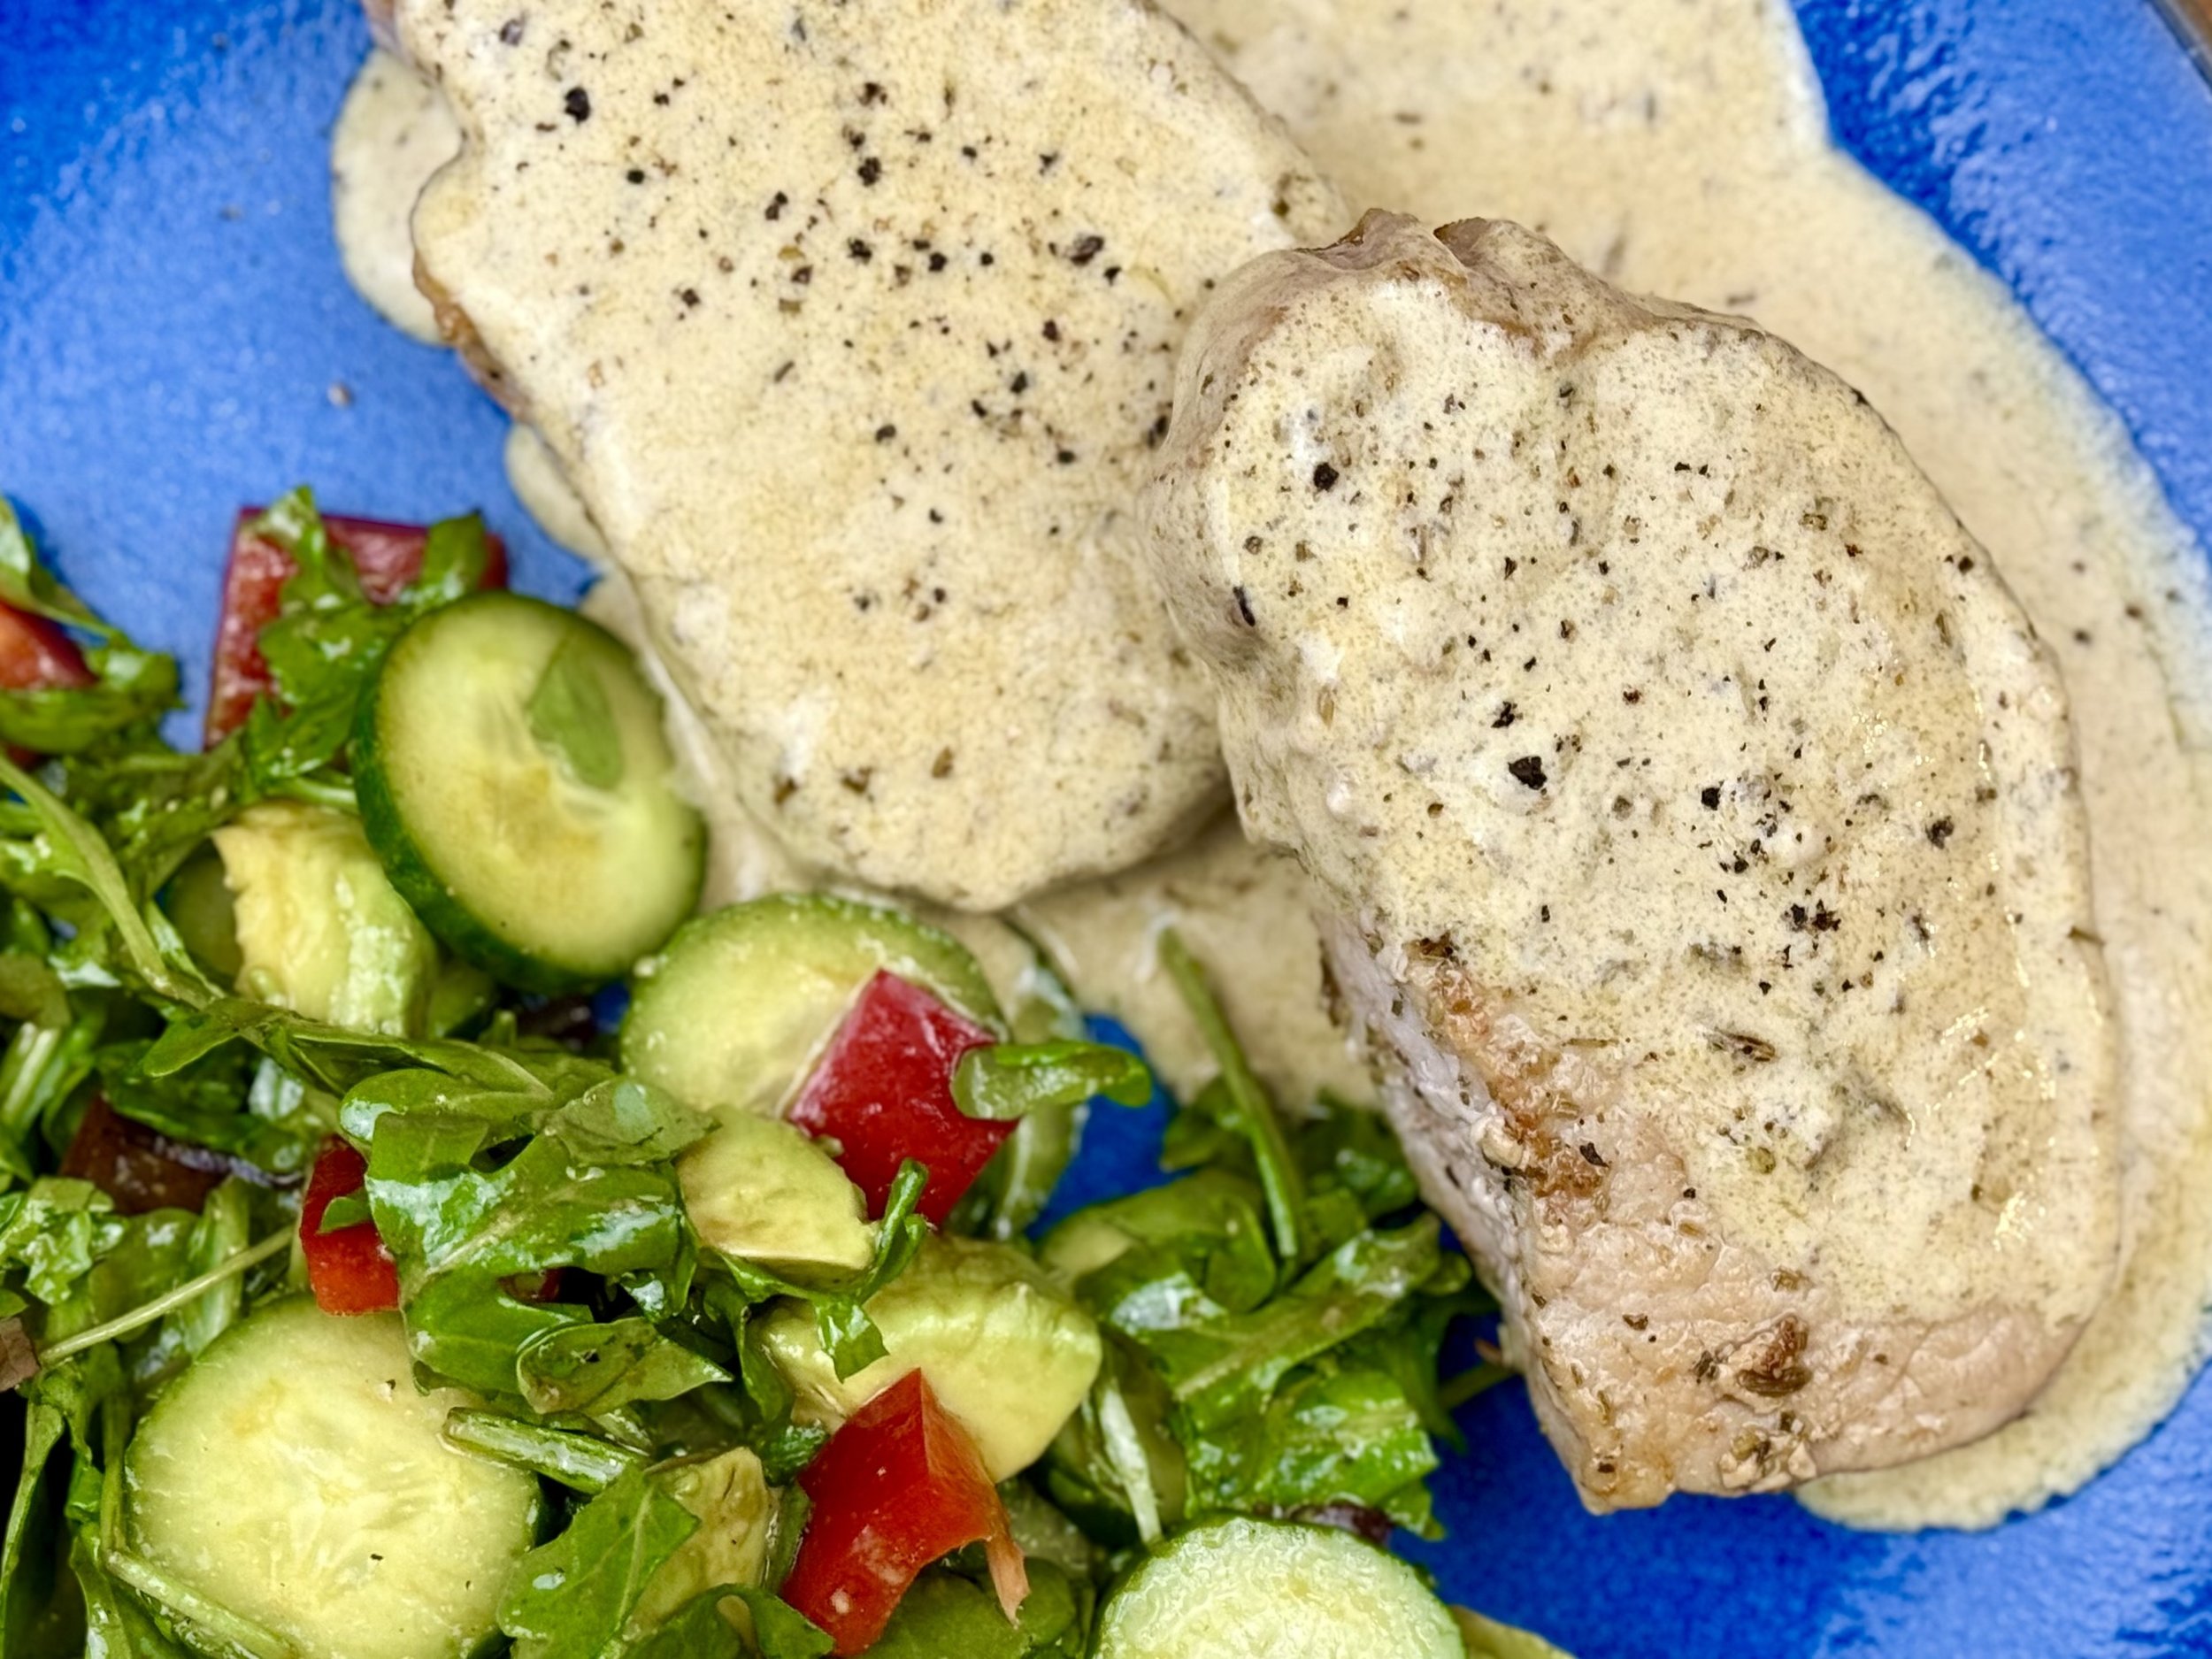
Easy Porchetta Style Pork Chops with Rosemary Cream (Low FODMAP)
5 Minutes prep • 20 Minutes cook • Low FODMAP • Gluten-Free • Serves 4
5 Minutes prep • 20 Minutes cook • Low FODMAP • Gluten-Free • Serves 4 • Ok to make-ahead: Step 1
Missing the flavors of Italian porchetta but can't handle all that garlic and onion? These pork chops deliver all those gorgeous herb-forward, fennel-kissed flavors without any of the FODMAP drama. Thick, juicy bone-in pork chops get rubbed with classic porchetta seasonings - rosemary, fennel, and red pepper flakes - then finished with a luxurious cream sauce that tastes like you've been simmering it for hours.This is the kind of dinner that makes you forget you're following any dietary restrictions at all.
See this new recipe in my FREE recipe club.
To streamline your search through hundreds of existing recipes, I'm moving the release of my new weekly creations to the Recipe Club on Patreon. In the club, you’ll get access to a treasure trove of low-FODMAP goodness, complete with collections and filters to use as your virtual cookbook!
Here's what awaits you in the club:
Exclusive weekly recipes: Be the first to try my latest delicious low-FODMAP creations!
Simple & Easy: My recipes continue to focus on readily available ingredients and effortless preparation, perfect for family-friendly meals (no more separate low-FODMAP meal prep!).
Hundreds of existing recipes: Gain access to my entire library of low-FODMAP recipes, all conveniently organized.
You can join for free or sign up for only $5/month. Your support fuels my passion for creating new, delicious, and easy-to-make low-FODMAP recipes just for you.
Let's go on this delicious low-FODMAP journey together.
Roasted Salmon with Lemony Horseradish Cream (Low FODMAP)
5 Minutes prep • 20 Minutes cook • Low FODMAP • Gluten-Free • Serves 2 - 4
5 Minutes prep • 20 Minutes cook • Low FODMAP • Gluten-Free • Serves 2 - 4 • Ok to make-ahead: Steps 1 - 4
When you need a weeknight dinner that feels restaurant-quality, but won't leave you standing over the stove for hours, this sheet pan salmon is your answer. The secret to perfectly moist, flavorful salmon is roasting it at high heat for just a short time - no complicated techniques required. The horseradish mayo adds a tangy, creamy kick that cuts through the richness of the salmon beautifully, while fresh lemon brightens everything up. This is the kind of meal that looks impressive enough for guests but is actually easier than ordering takeout. Plus, cleanup is a breeze with everything cooking in one pan on foil.

See this new recipe in my FREE recipe club.
To streamline your search through hundreds of existing recipes, I'm moving the release of my new weekly creations to the Recipe Club on Patreon. In the club, you’ll get access to a treasure trove of low-FODMAP goodness, complete with collections and filters to use as your virtual cookbook!
Here's what awaits you in the club:
Exclusive weekly recipes: Be the first to try my latest delicious low-FODMAP creations!
Simple & Easy: My recipes continue to focus on readily available ingredients and effortless preparation, perfect for family-friendly meals (no more separate low-FODMAP meal prep!).
Hundreds of existing recipes: Gain access to my entire library of low-FODMAP recipes, all conveniently organized.
You can join for free or sign up for only $5/month. Your support fuels my passion for creating new, delicious, and easy-to-make low-FODMAP recipes just for you.
Let's go on this delicious low-FODMAP journey together.
Easy Baked Parmesan Chicken On Cherry Tomatoes (Low FODMAP)
45 Minutes • Low FODMAP • Gluten-free • Serves 4
45 Minutes prep • 10 Minutes cook • Low FODMAP • Gluten-Free • Serves 4 • Ok to make-ahead: Steps 1 - 4
This is a perfect weeknight dinner. It’s everything you want when you’re craving something crispy, saucy, and satisfying. Simply toss a few handfuls of cherry tomatoes into a baking dish, drizzle them with olive oil, salt, then lay the chicken right on top and bake.
As it bakes, the tomatoes burst and turn into this jammy, sweet-tart sauce that tastes like it’s been simmering all day. The Parmesan melts and crisps up around the edges, creating this salty, golden crust that’s delicious perfection.
It’s high-protein, super simple, and feels like comfort food — without the bloat, fatigue, or food hangover that used to come with dinner. My kind of meal: minimal effort, maximum flavor, totally gut-friendly.

See this new recipe in my FREE recipe club.
To streamline your search through hundreds of existing recipes, I'm moving the release of my new weekly creations to the Recipe Club on Patreon. In the club, you’ll get access to a treasure trove of low-FODMAP goodness, complete with collections and filters to use as your virtual cookbook!
Here's what awaits you in the club:
Exclusive weekly recipes: Be the first to try my latest delicious low-FODMAP creations!
Simple & Easy: My recipes continue to focus on readily available ingredients and effortless preparation, perfect for family-friendly meals (no more separate low-FODMAP meal prep!).
Hundreds of existing recipes: Gain access to my entire library of low-FODMAP recipes, all conveniently organized.
You can join for free or sign up for only $5/month. Your support fuels my passion for creating new, delicious, and easy-to-make low-FODMAP recipes just for you.