Deliciously Low FODMAP

Inspire yourself with hundreds of delicious low FODMAP recipes, tips, and tools, and enjoy the abundance that is yours even when you have IBS.
Use the buttons and filters to find something specific or browse the complete collection for inspiration.
Discover a treasure trove of recipes with my FREE recipe club! Get new ideas delivered straight to your inbox every week.
Deliciously Low FODMAP is a trademark of IBS Game Changer, LLC
Filter to find Recipes and Tools
More Filtering Options
- All 739
- Appetizer 50
- BBQ 46
- Bowl 32
- Breakfast 58
- Cocktails 13
- Collection 1 58
- Collection 10 27
- Collection 11 30
- Collection 12 27
- Collection 13 31
- Collection 14 29
- Collection 15 31
- Collection 16 34
- Collection 17 31
- Collection 18 33
- Collection 19 36
- Collection 2 32
- Collection 20 33
- Collection 21 33
- Collection 22 40
- Collection 23 21
- Collection 24 1
- Collection 3 28
- Collection 4 29
- Collection 5 30
- Collection 6 32
- Collection 7 31
- Collection 8 31
- Collection 9 32
- Condiments 6
- Crock Pot 4
- Dessert 109
- Diabetes Game Changer Exception Protocol Contains Alcohol 11
- Diabetes Game Changer Exception Protocol Contains Flour 109
- Diabetes Game Changer Exception Protocol Contains Flour AND Sugar 78
- Diabetes Game Changer Exception Protocol Contains Sugar 49
- Diabetes Game Changer First Four Weeks 371
- Dinner 338
- Drink 8
- Easter 1
- Free Guide 17
- Gluten-free 600
- Gut Microbiome 2
- Guthealth 3
- Holidays 69
- IBS Triggers 4
- Keto Friendly 129
- Lactose-Free 175
- Low FODMAP Diet 725
30-minute low FODMAP Kung Pao chicken
30 Minutes • Gluten-free • Dairy-free • Low FODMAP • Serves 4
30 Minutes • Gluten-free • Dairy-free • Low FODMAP • Serves 4 • Skip the takeout. This kung pao chicken has an authentic taste without any of the ingredients that trigger your IBS. It’s even better the next day so make enough for leftovers!

INGREDIENTS:
3 cups of cooked jasmine or other white rice
1 1/2 pounds boneless skinless chicken breasts, cubed
1 tablespoon arrowroot powder or cornstarch
1 tablespoon dry sherry
1 tablespoon gluten-free low sodium soy sauce
1 teaspoon garlic scape powder
INGREDIENTS SAUCE:
1/3 cup gluten-free low sodium soy sauce
1 tablespoon dry sherry
2 tablespoons maple syrup
1 tablespoon hoisin sauce (make our Hoisin Sauce)
2 tablespoons balsamic vinegar
1/2-2 teaspoons red pepper flakes (or to your taste)
1 teaspoon arrowroot powder or cornstarch
8 ounces oyster mushrooms – chopped (optional)
4 tablespoons toasted sesame oil or avocado oil
2 red bell peppers, thinly sliced
1-inch fresh ginger, grated
Freshly ground black pepper
1/2 cup roasted peanuts
4 green onions thinly, sliced, plus more for serving
DIRECTIONS:
Prepare your rice according to package instructions.
In a medium bowl, combine 1 tablespoon arrowroot powder or cornstarch, 1 tablespoon sherry, 1 tablespoon soy sauce, and the garlic scape powder. Stir to combine, then add the cubed chicken and toss to combine.
To make the sauce: In a mason jar, combine 1/2 cup water, 1/3 cup soy sauce, 1 tablespoon sherry, the maple syrup, hoisin, balsamic, pepper flakes, and 1 teaspoon arrowroot powder or cornstarch. Shake to combine and set aside.
Heat 2 tablespoons of toasted sesame oil over medium heat. When the oil shimmers add the meat in one layer and spread out so it cooks quickly. Stir 1-2 times, until it becomes crispy, about 5 minutes. Remove from heat and keep warm. Add another tablespoon of oil and cook the rest of the meat in batches and then cook the mushrooms, bell peppers, and ginger in the same way, cook the vegetables another 2-3 minutes. Add the meat back to the pan with the cooked vegetables. Add a good grinding for fresh black pepper. Pour in the sauce and bring to a boil over medium-high heat. Reduce heat and cook until the sauce thickens and coats the chicken, about 5 minutes. Stir in peanuts, and green onions, cook for another 2 minutes.
Serve the chicken over bowls of steamed rice or even better, with our best coconut rice.
Top with additional green onions.
Enjoy!
Original recipe inspired by Tieghan Gerard of Half Baked Harvest
This post contains affiliate links so you can easily purchase items listed on the page. This is for your information and convenience. If you purchase through this link, I may earn a commission but there is no additional cost to you. Please read my disclosure for more information.
Better than Waldorf salad with gorgonzola cream (low FODMAP)
20 Minutes • Gluten-free • Vegetarian • Low FODMAP • Serves 4 - 6
20 Minutes • Gluten-free • Vegetarian • Low FODMAP • Serves 4 - 6 • This salad is crunchy, flavorful, high protein, and packed with low FODMAP goodies! It’s a perfect vegetarian main course or hearty side salad. Don’t like gorgonzola? Pick a different dressing from our Salad Pantry!
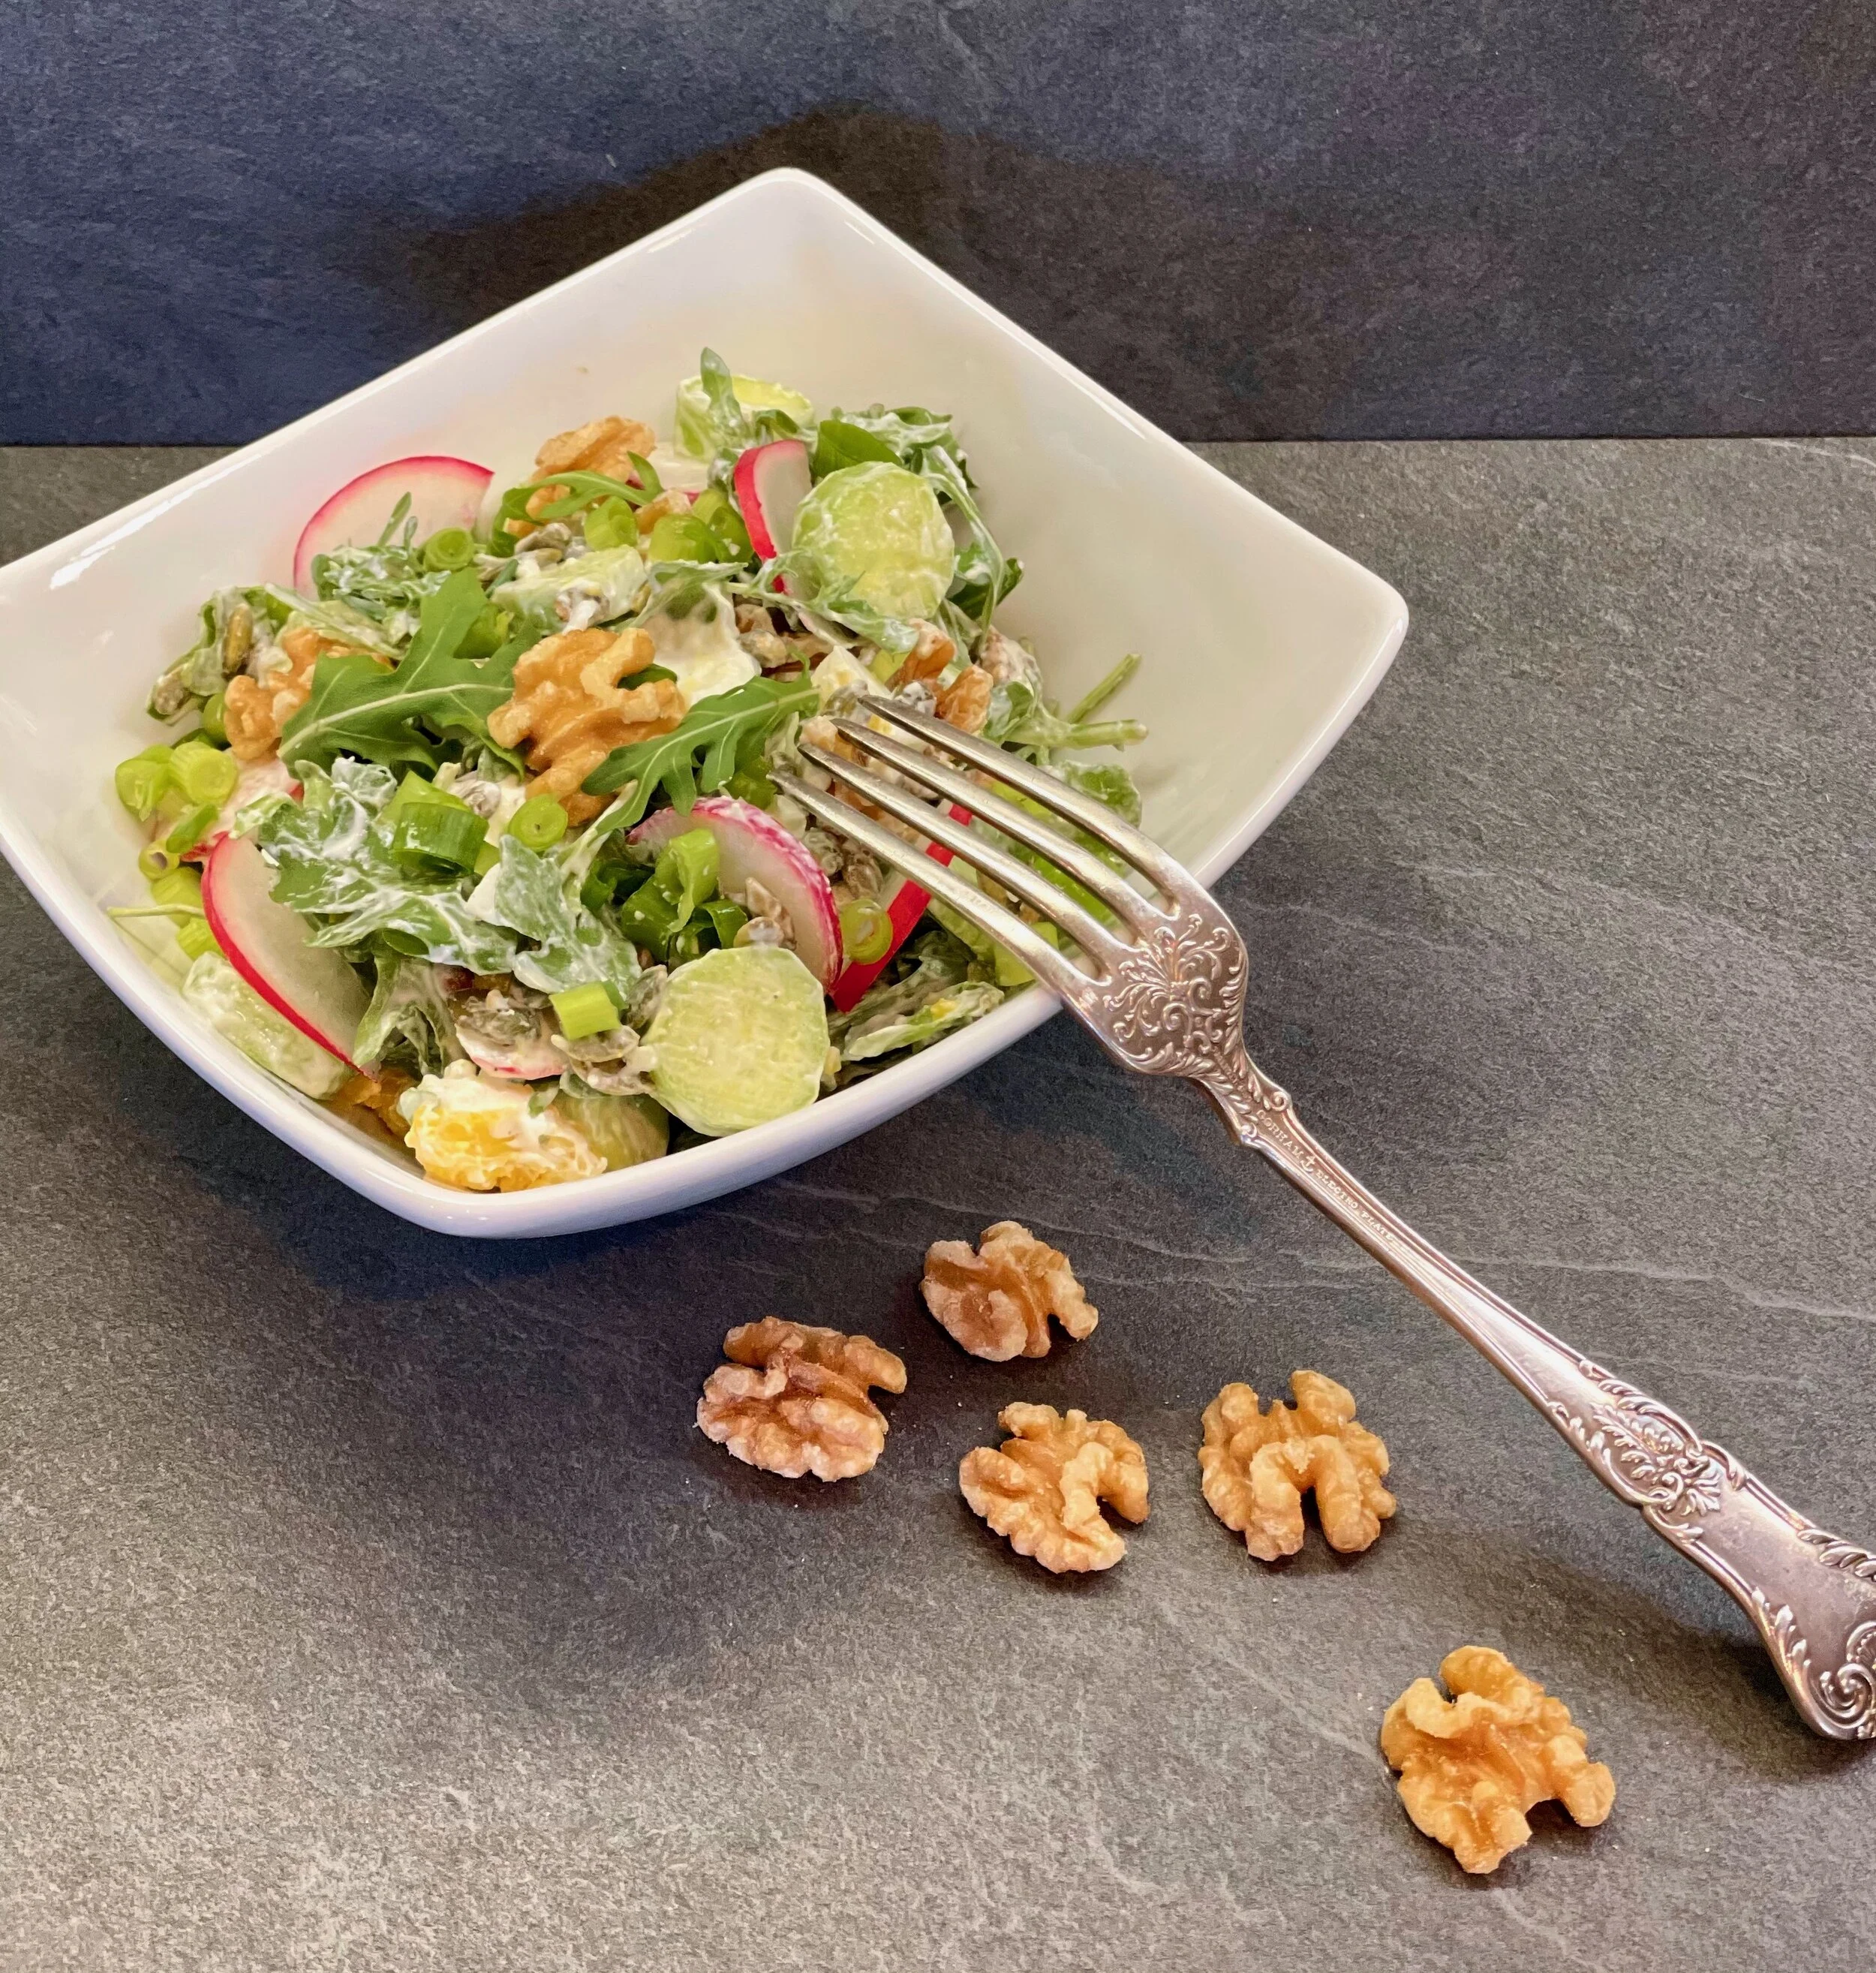
SALAD INGREDIENTS:
3 - 4 cups baby arugula or romaine - washed and as dry as possible
3 - 4 mini Persian or English cucumbers - peeled and thinly sliced
1 bunch radishes - thinly sliced
5 green onions or spring onions (green part only) - thinly sliced
1/2 cup flat-leaf parsley - chopped
1 hard-boiled egg per serving - chopped
1/2 cup walnut halves (leave whole)
1/2 cup roasted and salted pumpkin seeds - see our recipe here
DRESSING INGREDIENTS:
3 tablespoons gorgonzola or blue cheese crumbles at room temperature
2 tablespoons low FODMAP mayonnaise
1/2 cup lactose-free sour cream
Zest of one lime (2 teaspoons)
2 tablespoons freshly squeezed lime juice
1/2 - 1 teaspoon Kosher salt or sea salt
10 grinds of black pepper
DIRECTIONS:
In a small bowl, whisk together the gorgonzola or blue cheese crumbles, mayonnaise, sour cream, lime juice and zest, salt, and pepper, and stir until well combined. Taste adjust seasoning as needed. Cover and chill until ready to serve.
In a large bowl, add all the ingredients except the hard-boiled eggs. Pour on the dressing and toss well to combine. Peel and chop the eggs and fold gently into the salad. Alternatively, peel and slice the hard-boiled eggs. Fan the eggs on each plate next to the salad. Add a dash of salt and a light grinding of pepper to the fanned eggs.
Why is it called Waldorf Salad? Waldorf salad is named for the Waldorf-Astoria hotel in New York City, where it was first created for a charity ball given in honor of the St. Mary's Hospital for Children on March 14, 1896 (which also happens to be Einstein’s 17th Birthday).
This post contains affiliate links so you can easily purchase items listed on the page. This is for your information and convenience. If you purchase through this link, I may earn a commission but there is no additional cost to you. Please read my disclosure for more information.
Winter vegetable and chicken soup
45 Minutes • Gluten-free • Low FODMAP • Serves 8
45 Minutes • Gluten-free • Low FODMAP • Serves 8 • The flavors in this low FODMAP winter vegetable and chicken soup are fresh and delicious. You can be creative with the vegetables you include or stick to our recipe. Pairing with our sourdough parmesan crostini is the perfect match.

INGREDIENTS:
2 tablespoons olive oil
3 green onions (green part only) chopped
1 leek (green part only) finely chopped
4 carrots chopped
Salt and pepper to taste
1 tablespoon fresh ginger peeled and grated
6 cups low sodium chicken broth
2 sprigs of fresh thyme
3 skinless chicken breasts or thighs cut into thirds
1-2 cups swiss chard chopped (or kale or spinach)
Zest + juice of 1 lemon
8 ounces gluten-free pasta of your choice
2 tablespoons garlic-infused olive oil or butter
1/4 cup fresh parsley and basil finely chopped
DIRECTIONS
Heat a large dutch oven or soup pot over medium-high heat. Add the olive oil. Once hot, add the green onions and leek. Cook until the greens are softened and fragrant. Add the carrots. Season with salt and pepper and continue cooking for 1-2 minutes or until the carrots have softened a bit and their color is bright. Stir in the ginger and cook a minute longer.
Slowly pour in the chicken broth. Add the thyme, bay leaves, and chicken. Cover the pot and simmer for 20-25 minutes or until the chicken is cooked through and shreds easily.
Remove chicken from the pot and shred (remove any bones that may be in the chicken). Add the kale and the swiss chard, lemon juice, and lemon zest. Cook until the kale and chard have wilted slightly, about 3 - 5 minutes. Taste and adjust the salt and pepper to your liking.
Bring a large pot of salted water to a boil. Cook the pasta according to package directions. Drain and toss the pasta with the garlic-infused olive oil or butter, parsley, and basil.
Divide the pasta among bowls and ladle the soup over the pasta.
Serve with our sourdough parmesan crostini.
To store any leftover soup, keep the pasta and the soup separate or the pasta will continue to soak up the broth of the soup.
This post contains affiliate links so you can easily purchase items listed on the page. This is for your information and convenience. If you purchase through this link, I may earn a commission but there is no additional cost to you. Please read my disclosure for more information.
Buffalo chicken wraps
25 Minutes • Gluten-free • Low FODMAP • Serves 4 • Learn the tortilla folding method that has taken Tik Tok by storm!
25 Minutes • Gluten-free • Low FODMAP • Serves 4 • Crunchy on the outside, spicy and cheesy inside. These come together in minutes...perfect for a weeknight, Sunday night, or game night.

INGREDIENTS:
1 cup cooked shredded chicken
1/4 cup lactose-free sour cream
1/3 cup buffalo sauce, plus more for serving (low FODMAP recipe below)
2 tablespoons chopped fresh chives
1 tablespoon dried parsley
1 teaspoon dried dill
3 green onions (green part only) chopped
4 large (burrito size) low FODMAP gluten-free tortillas (I like brown rice tortillas)
2 cups shredded romaine lettuce
2 celery stalks, finely chopped
3 green onions, chopped
1/2 cup shredded cheddar cheese
1/2 cup shredded pepper jack cheese
1 jalapeno pepper seeded and chopped (optional for serving)
olive oil, for cooking
RANCH DRESSING INGREDIENTS:
1 cup lactose-free sour cream
1/2 cup fresh cilantro (or chives), finely chopped
2 teaspoons Smoke n Sanity Supper Club low FODMAP Ranch Seasoning (alternatively add salt, pepper, and a teaspoon of garlic-infused olive oil in place of this seasoning)
BUFFALO SAUCE INGREDIENTS:
¼ cup water
2 tablespoons white vinegar
1/2 teaspoon cayenne pepper (or to your taste)
1 tablespoon garlic-infused olive oil
1 – 2 tablespoons maple syrup (to your taste)
1 - 2 teaspoons salt (to your taste)
1 teaspoon tapioca starch (or corn starch) to thicken
BUFFALO SAUCE DIRECTIONS:
Combine all ingredients in a small jar and shake to combine. Taste and adjust seasoning to your preference. Voila! You’re done.
BUFFALO WRAP DIRECTIONS:
In a bowl, combine the chicken, sour cream, buffalo sauce, chives, parsley, dill, and chopped green onions. Set aside.
To make the ranch. Combine all ingredients in a bowl. Stir to combine. Set aside.

To assemble, cut down from the center of the tortilla to the edge. Spread the chicken in the bottom left corner, then add a handful of the lettuce, celery, and green onions on the top left corner. Spread the ranch on the top right corner and the cheese on the bottom right corner.
Fold the buffalo chicken over the lettuce. Then, working clock-wise, folding that quarter over the ranch. And finally, fold that quarter over the cheese.
Heat a drizzle of olive oil in a skillet, add 1 wrap and cook 2-3 minutes per side until crisp and golden brown. Serve warm with extra buffalo sauce, ranch dip, and chopped jalapenos.
Original recipe inspired by Tieghan Gerard of Half Baked Harvest.
This post contains affiliate links so you can easily purchase items listed on the page. This is for your information and convenience. If you purchase through this link, I may earn a commission but there is no additional cost to you. Please read my disclosure for more information.
Low FODMAP Korean bibimbap
45 minutes • Gluten-free • Low FODMAP • Serves 4
45 minutes • Gluten-free • Low FODMAP • Serves 4 • Bibimbap is a Korean mixed rice and vegetable dish, classically served in a sizzling hot stone bowl. The hot stone bowl caramelizes the rice and forms a crispy crust on the bottom, which tastes fantastic with the meat, and vegetables. In this recipe, we use a non-stick skillet to create the crispy rice and it works remarkably well! Everything gets cooked in one pan, which helps with cleanup. This is a great meal to clean out your fridge—so be creative based on what you have on-hand (low FODMAP of course!)

INGREDIENTS:
Meat and marinade:
1 pound boneless, skinless chicken breast or tender cut of beef, thinly sliced
¼ cup gluten-free low sodium soy sauce
1 tablespoon miso
1 tablespoon sugar (optional)
1 tablespoon garlic-infused olive oil
1 tablespoon toasted sesame oil
Freshly ground black pepper
3/4 teaspoon baking soda if using beef
Bibimbap:
2 cups short-grain white rice
3 cups low FODMAP chicken broth (to cook the rice)
8 ounces oyster mushrooms, sliced thinly and sauteed (optional)
1 cup thinly sliced radishes
1 cup thinly sliced cucumbers
½ cup carrot peeled and grated
¼ cup rice vinegar
Kosher salt and freshly ground black pepper, to taste
4 - 6 tablespoons toasted sesame oil, used to cook the mushrooms, meat, kale, and crispy rice
8 cups Tuscan kale, roughly chopped
5 green onions chopped or cut into slivers
Sesame seeds (optional for garnish)
½ avocado (optional for garnish)
4 large eggs
DIRECTIONS:
If using beef, in a small bowl, combine the sliced beef with the baking soda. Mix it around to get the baking soda on all the meat and let sit in the refrigerator for 15 - 30 minutes then proceed with the recipe. This will make the beef more tender and silky.
In a small bowl, combine the marinade ingredients and the chicken or beef and marinate the chicken for 15 – 30 minutes in the fridge.
Prepare the white rice using chicken broth in place of water. I like to cook rice in a non-stick saucepan but you can make it per package instructions however you like. Start with 2 cups of dry white rice.
In a small bowl, toss together the radishes, cucumbers, carrots, rice vinegar, and a pinch of salt and black pepper. Stir to combine. Set aside.
Meanwhile, heat a medium-size non-stick or cast-iron skillet over medium heat, then add 1-2 tablespoons of the sesame oil. When hot, add the kale and season with salt and pepper. Cook for a good 2 to 3 minutes, until charred at the edges. Remove from pan and set aside.
Add another 1 tablespoon of sesame oil and fry the marinated chicken or beef for 5 to 7 minutes, or until it starts to brown on the outside and is just cooked through. Remove from pan and set aside.
Add another tablespoon of sesame oil and fry your mushrooms and any other low FODMAP vegetables you’ve decided to add.
Add the remaining tablespoon of sesame oil and all of the cooked white rice. Stir the rice in the oil just a bit and fry for a minute, then distribute rice evenly on the bottom of the skillet and continue cooking until crisp on the bottom (about 5 minutes).
While the rice cooks, prepare an over-easy egg to top each serving.
Put crispy rice in bowls and add the meat, cooked kale, mushrooms, and any other vegetables you’ve cooked to include. Top with radishes, cucumbers, and carrots. Add the over-easy egg to the top, sprinkle with green onions and sesame seeds and enjoy!
Original recipe inspired by Food52.
This post contains affiliate links so you can easily purchase items listed on the page. This is for your information and convenience. If you purchase through this link, I may earn a commission but there is no additional cost to you. Please read my disclosure for more information.
Sourdough Parmesan Crostini (low FODMAP)
30 Minutes • Low FODMAP • Serves 6 - 8
30 Minutes • Low FODMAP • Serves 6 - 8 • Excellent crisp and flavorful crostini that’s perfect with soup, salad, or as a delicious accompaniment to your next cheese board. They’re so good you’ll want to eat them for a snack. The best part? They’re low FODMAP so you can!

Ingredients
1 traditional sourdough baguette cut in thin diagonal slices
1/4 cup olive oil
1/4 cup fresh-grated parmesan cheese
Salt and fresh-ground pepper to taste
Directions
Preheat oven to 350 degrees F.
Arrange baguette slices on a rimmed baking sheet (or two) in a single layer.
Brush both sides of the baguette slices with olive oil, season with salt and pepper.
Bake for about 8 minutes on one side, then turn over, sprinkle with parmesan and continue baking until golden and crisp, about another 8 minutes.
Let cool on baking sheets.
This post contains affiliate links so you can easily purchase items listed on the page. This is for your information and convenience. If you purchase through this link, I may earn a commission but there is no additional cost to you. Please read my disclosure for more information.
Blueberry power crumble
60 minutes (mostly cooking time) • Gluten-free • Dairy-free • Very low sugar • Low FODMAP • Makes 8 servings
60 minutes (mostly cooking time) • Gluten-free • Dairy-free • Very low sugar • Low FODMAP • Makes 8 servings • This crumble matches the sweet tang of blueberries with the hearty nuttiness of oatmeal, pumpkin seeds, and sunflower seeds to make it not only a perfect breakfast but also delicious with a dollop of whipped coconut cream for dessert! Make them ahead and pop them in the microwave when you’re ready to enjoy them.

INGREDIENTS:
2 cups fresh blueberries (low FODMAP serving size for blueberries is 1/4 cup)
1 tablespoon lemon juice
1 teaspoon lemon zest
2-3 tablespoon maple syrup
1 tablespoon arrowroot (or corn starch)
1½ cups gluten-free rolled oats
3 tablespoon raw pumpkin seeds
3 tablespoon raw sunflower seeds
1 tablespoon white chia seeds
⅓ cup coconut oil
Pinch of sea salt
INSTRUCTIONS:
Preheat oven to 375 degrees F.
In a bowl, combine blueberries, lemon juice, lemon rind, maple syrup, and arrowroot (or corn starch) or arrowroot. Mix together and set aside.
In a food processor pulse sunflower seeds and pumpkin seeds until they become finely chopped. Add oats, chia seeds, salt, and coconut oil, pulse until the mixture becomes moist and crumbly.
Lightly oil your ramekins or baking dish with coconut oil and put the blueberries in the bottom of the dish. Place crumble mixture on top of blueberries in the baking dish, until the entire top is covered with the crumble mixture.
Cook for 40 minutes or until the top just starts to brown and the blueberries are bubbling. Let cool for 10-15 minutes and enjoy! Alternatively cool and refrigerate for up to 3 days and heat before serving for the best flavor.
PRO TIP: This “breakfast crumble” makes a great dessert when paired with a scoop of lactose-free vanilla ice cream or a dollop of our real whipped cream or whipped coconut cream.
This recipe contains affiliate links so you can easily purchase items listed on the page. This is for your information and convenience. If you purchase through this link, I may earn a commission but there is no additional cost to you. Please read my disclosure for more information.
Whipped coconut cream
10 Minutes • Gluten-free • Dairy-free • Low FODMAP • Makes about 1 ½ cups
10 Minutes • Gluten-free • Dairy-free • Low FODMAP • Makes about 1 ½ cups • This creamy whipped coconut cream can be used in place of dairy-based whipped cream in your favorite recipes. You might just find you like it even better!

INGREDIENTS:
1 can chilled coconut cream (refrigerated at least overnight)
6 tablespoons arrowroot powder
1 - 2 tablespoons powdered sugar (or to your taste)
2 teaspoons vanilla extract or vanilla bean paste
DIRECTIONS:
Carefully open the can of refrigerated coconut cream, being careful to keep it level. The coconut cream will be firm, waxy, and thick.
Scoop out the coconut cream into a large bowl or the bowl of a stand mixer. (If it is hot in your kitchen, place your mixing bowl in the freezer for 5 minutes before mixing.) Stop scooping when you reach the water in the bottom of the can. Don't add the water into the solid cream for whipping.
Using a stand mixer or hand-held mixer on high speed - whip the coconut cream for 3 to 5 minutes until it becomes fluffy and light, with soft peaks. Mix in the powdered sugar and vanilla, if using.
Whipped coconut cream is best served immediately but can be stored in an airtight container for up to a week. It will harden in the fridge, the longer it stays chilled, simply mix until creamy again, when ready to serve.
Thai Kitchen coconut cream is recommended. Other brands may work but this brand seems to yield the best results.
Original recipe inspired by Allison Lubert of Sweet Freedom Bakery
60 minutes (mostly cooking time) • Gluten-free • Dairy-free • Very low sugar • Makes 4 servings • This crumble matches the sweet tang of blueberries with the hearty nuttiness of oatmeal, pumpkin seeds, and sunflower seeds to make it not only a perfect breakfast but also delicious with a scoop of lactose-free ice cream or whipped coconut cream for dessert! Make them ahead and pop them in the microwave when you’re ready to enjoy them.
Fully loaded twice baked potatoes (low FODMAP)
2 hours (mostly cooking time) • Gluten-free • Low FODMAP • Serves 4
2 hours (mostly cooking time) • Gluten-free • Low FODMAP • Serves 4 • These twice-baked potatoes feature a lemon sour cream you’ll want to use on everything! The flavors of this loaded baked potato come together in a rich, filling, and delicious blend. Plan on ½ potato per person and serve with a salad such as our lemony Arugula salad.

INGREDIENTS:
2 - 4 slices of bacon
2 medium-sized Russet potatoes, scrubbed and dried (leave the peel on)
1 tablespoon garlic-infused olive oil
Kosher salt
Freshly ground black pepper
1 1/2 cups lactose-free sour cream (or lactose-free Greek yogurt)
1 tablespoon freshly squeezed lemon juice, plus more as needed to taste
1 cup finely chopped green onions (green part only), divided into 3/4 cup and 1/4 cup
½ cup fresh-grated Parmesan
½ cup grated extra sharp cheddar
DIRECTIONS:
Preheat oven to 400°F and line a rimmed baking sheet with foil.
Lay bacon slices close together on the foil and cook until crisp (about 10 minutes).
Cool bacon on paper towels then chop into small pieces and set aside. You may also cook your bacon on the stove or in the microwave. I just find this method the simplest and the least messy!
Make-ahead tip: you can make the bacon ahead of time and refrigerate until needed.
Adjust oven temperature to 475°F and line a rimmed baking sheet with parchment.
Poke potatoes all over with a fork to allow the steam to escape as they cook. Rub the skins with 1 tablespoon oil, then sprinkle with salt and pepper. Place on a parchment-lined baking sheet and cook for 45 to 50 minutes, until skins are crispy and you can insert a knife into the center with very little resistance beyond the skin. Make-ahead tip: You can bake your potatoes a few hours in advance, and just let them sit at room temperature until you’re ready to proceed.
While the potatoes are baking, prepare the sour cream. In a large mixing bowl, whisk together 1/2 teaspoon salt, lemon juice, and sour cream. Taste, and adjust seasoning accordingly with more salt and/or lemon juice as needed. Reserve 1/4 cup of the sour cream mixture for garnish—leave the rest in the large mixing bowl for use when the potatoes come out of the oven.
Once the potatoes are ready to come out, remove them from the oven and turn the oven temperature down to 375°F.
Let the potatoes cool for a couple of minutes until you can handle them. Cut each in half lengthwise, and scoop out most of the softened flesh, leaving about 1/4-inch around the inner peels, and transfer the potato flesh to the large mixing bowl with the sour cream in it. Leave the potato skins on the baking sheet.
Add 3/4 cup chopped green onions and 1/2 cup Parmesan to the bowl. Mix the potato flesh with the sour cream, green onions, and Parmesan until everything is smooth and combined (don’t overmix or it will become gluey). Taste and add additional salt, if needed to make the flavors “pop.” Spoon the mashed potato mixture back into the potato skins, sprinkle the tops with the cheddar and remaining Parmesan, and bake for 15 to 20 minutes, until cheese on top of potatoes is fully melted and bubbling.
Remove the potatoes from the oven and add the bacon pieces to the top. Broil for about 1 minute until the cheese starts to crisp.
To serve, top each potato half with a dollop of reserved sour cream, a sprinkling of chopped scallions, and a dusting of fresh-ground black pepper (optional).
Variations:
Add cooked broccoli (tops only) or sautéed oyster mushrooms to the potato mixture before you put it back in the skin for baking.
Use Japanese sweet potatoes instead of Russet potatoes. Or do one of each! (Just keep the mashed potatoes mixtures separate so as not to blend the flavors)
Use your imagination!
Original recipe inspired by Food52.
This recipe contains affiliate links so you can easily purchase items listed on the page. This is for your information and convenience. If you purchase through this link, I may earn a commission but there is no additional cost to you. Please read my disclosure for more information.
Why you should eat more plants, preferably organic and non-GMO
Why eat organic and non-GMO? Because we have even found ways to expose plants to harmful chemicals!
Humans are not meant to eat processed foods. For those of us with IBS, the more we eat processed foods, the more that concept becomes clear. Highly processed foods often contain hidden IBS triggers like high fructose corn syrup, artificial sweeteners, wheat-based thickeners and coatings, garlic and onion powder described as “spices,” and just plain non-food colors, preservatives, flavor and texture enhancers, and other chemicals of all kinds.
Why do we do this when eating more plants can help decrease your risk of heart disease, high blood pressure, and type 2 diabetes? Why do we do this when eating more plants can help you maintain optimal weight and bowel function? Because it’s “easier” and we have been trained by the food industry to demand efficiency with our food. But is it really easier if it leaves you feeling terrible, overweight, and suffering needlessly from life-altering illness? I think not!
That’s where the plants come in. A carrot is a fully self-contained snack. And it has one ingredient: carrot! The same is true for a tangerine. And a tangerine even comes in its own wrapper! When you eat plants, each of the foods you put in your mouth is real, nutritious, food full of vitamins, flavor, and fiber. And devoid of all the added ingredients and chemicals that make you feel sick.

Why eat organic and non-GMO?
Because we have even found ways to expose plants to harmful chemicals! Nearly all genetically modified crops worldwide are engineered to be grown with glyphosate-based herbicides such as Roundup. (There’s a ton of published research on this topic. Please reference this article for more depth on this subject.) Once contaminated with glyphosate, plants are no longer strictly a source of nutrients and fiber. They become a vehicle for us to consume a potentially harmful environmental toxin. If it kills bugs, it probably isn’t good for you either!
Research shows us that exposure to glyphosate has a negative impact on gut biome and this is potentially especially bad for those of us with IBS. More research must be done to determine the effect of the changes in the gut biome but suffice it to say, we don’t expect it to be good news. Even worse, animals that eat the plants that have been sprayed with glyphosate-based herbicides, store some of that in their tissue. So, when we eat meat, we also want to choose grass-fed and organic options to avoid the glyphosate trigger.
The regulations for organic produce and non-GMO labeling aren’t perfect, but they’re a lot better than nothing. Yes, it’s a bit more expensive to buy organic and non-GMO but it’s a lot LESS expensive than dealing with the health consequences of eating genetically-modified food that is potentially chemically-contaminated.
So…my challenge to you? Make it your habit to eat more organic, non-GMO plants. Eat grass-fed non-GMO meat. And give your gut (and your liver) a break from processing poison out of your food. Your body will thank you!
FODMAP friendly avocado toast
20 Minutes • Low FODMAP • Serves as many as you like
20 Minutes • Low FODMAP • Serves as many as you like • Oh yes. That’s right. It’s what’s for breakfast. Or lunch. Or even dinner! We’ve added a thin layer of brie cheese to the traditional avocado toast and it’s a game changer!
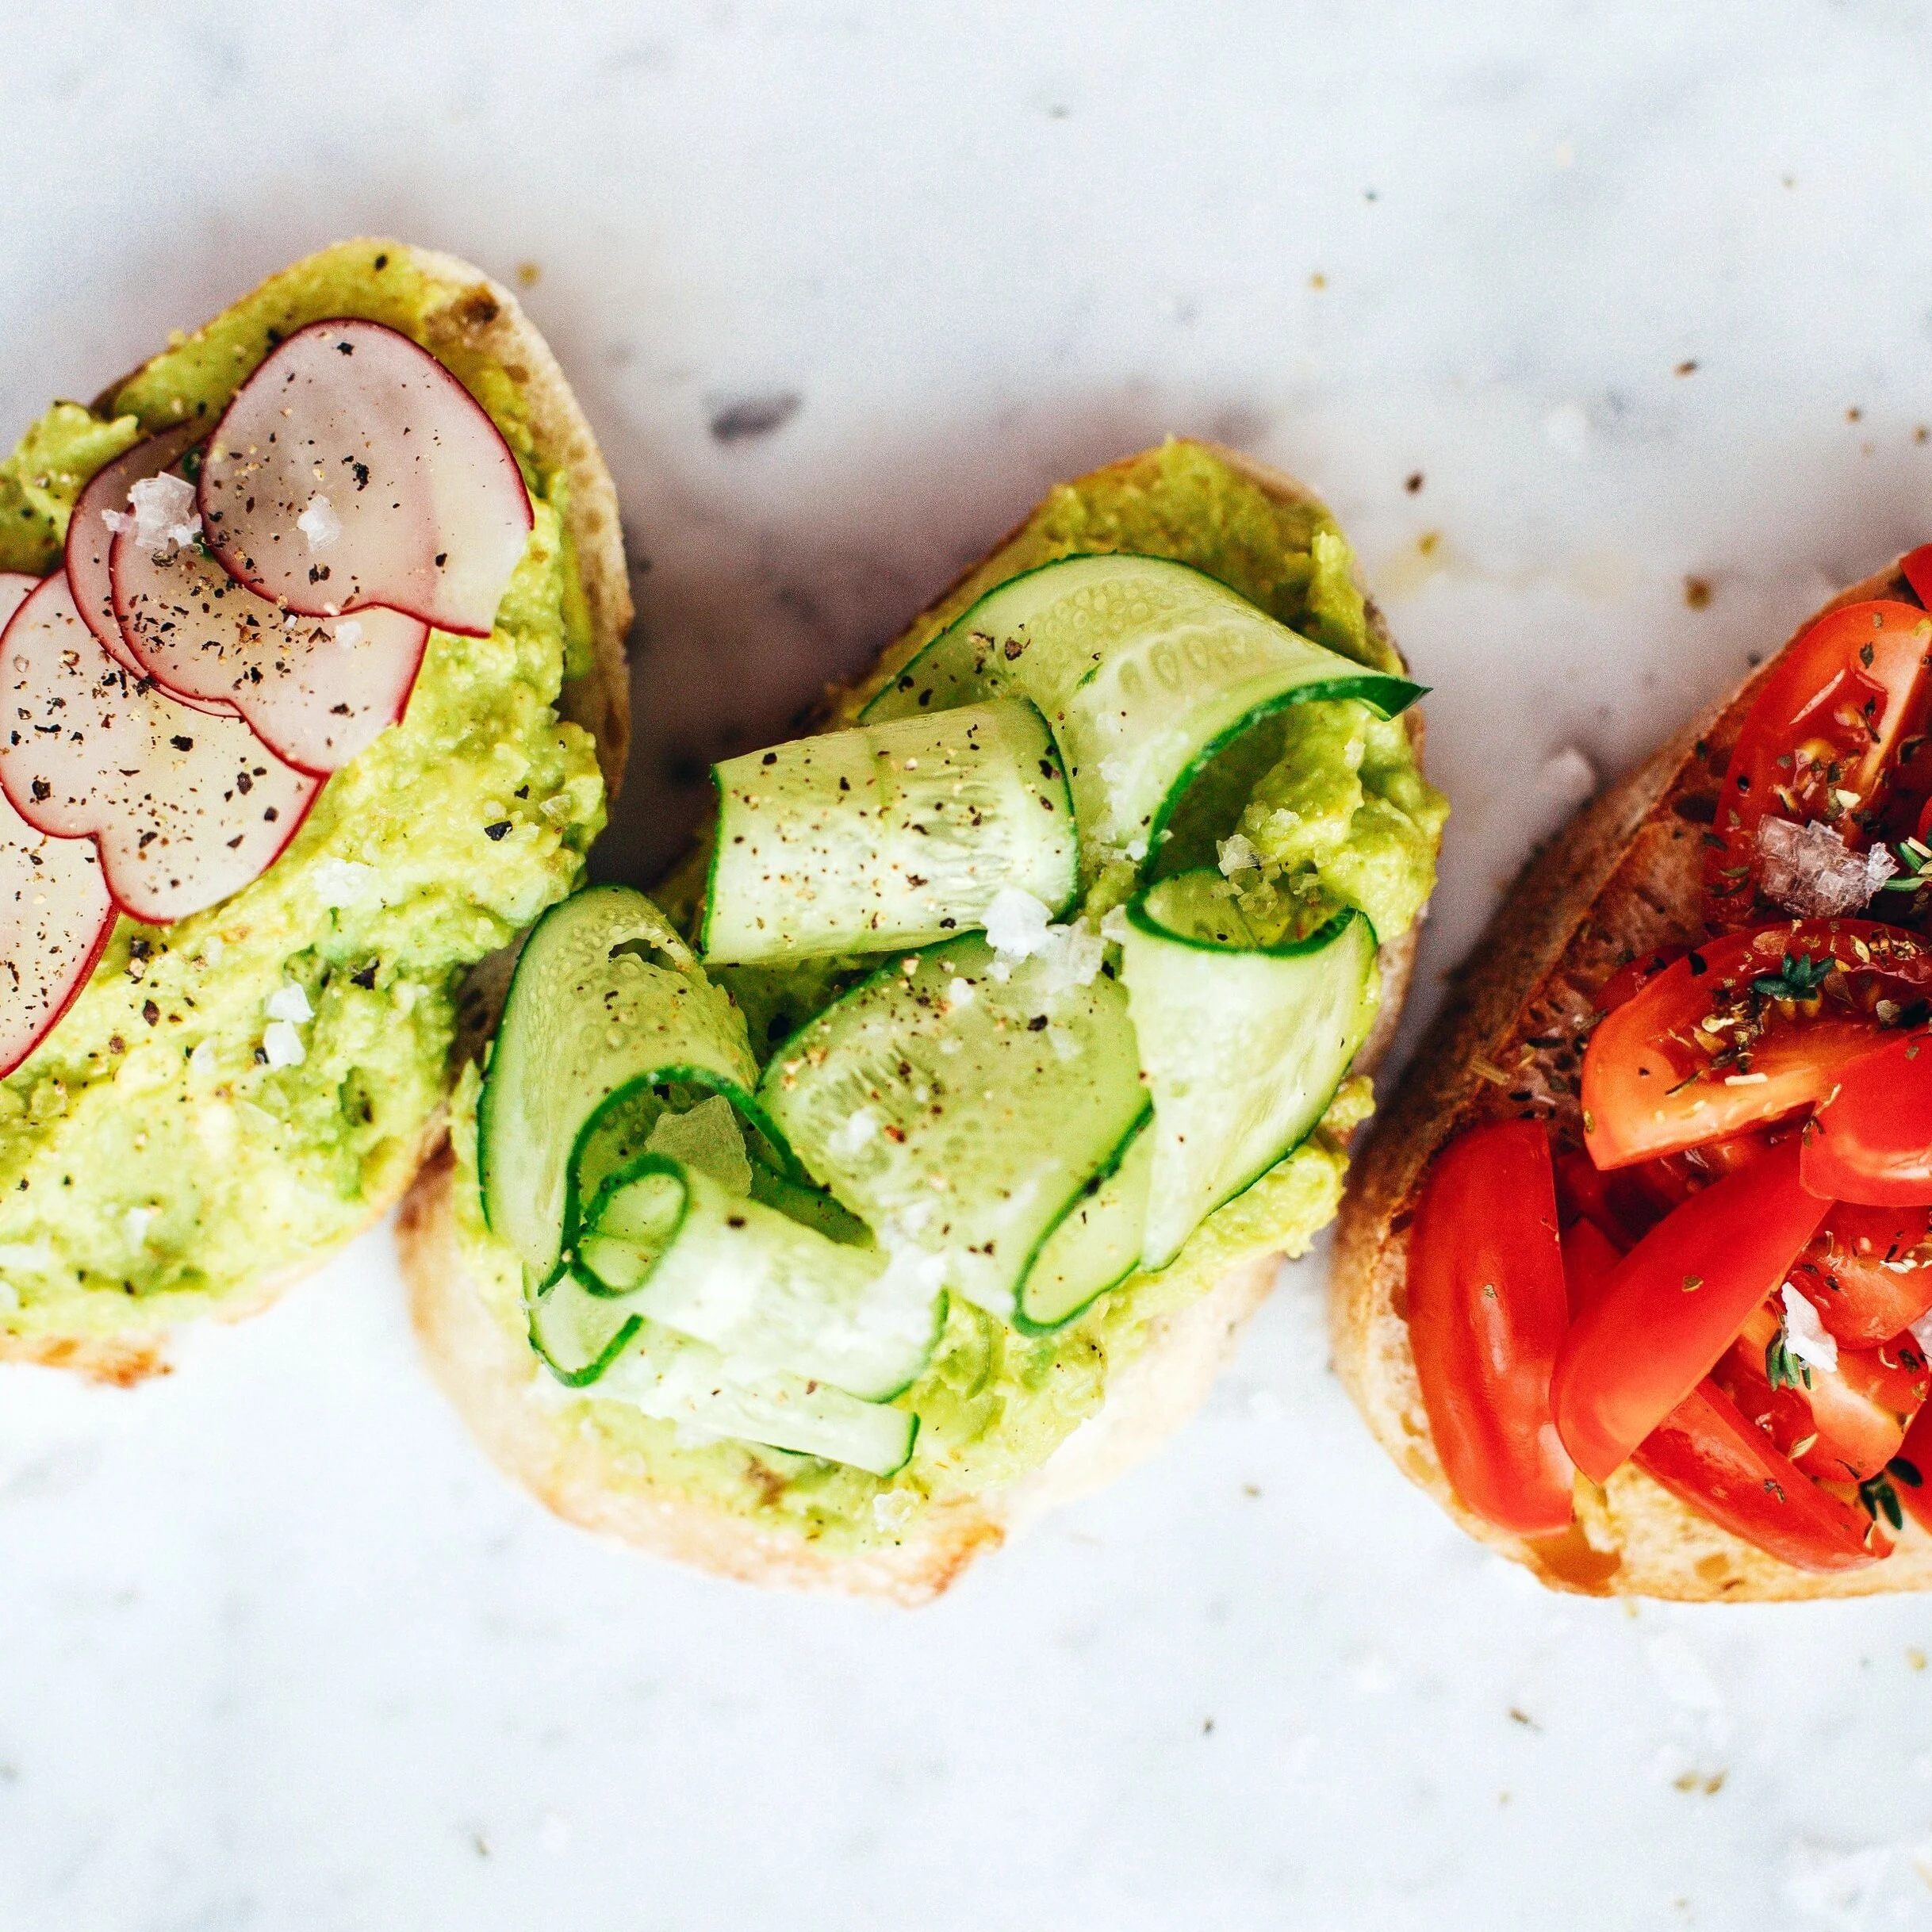
INGREDIENTS (note, I have not included many quantities in this recipe as they are mostly “to-taste” and will vary depending on how many pieces of toast you’re making. I encourage you to be creative!)
Sourdough bread - sliced (for a no-bread alternative use Rice cake “thins”)
Triple cream brie cheese
Avocado (keep in mind 1/8 of an avocado is a low FODMAP serving)
Mini Persian cucumbers sliced very thinly (use a Mandoline if you have one)
Cherry tomatoes - quartered
Radishes - sliced thinly
Fresh thyme or basil - chopped
Lime juice
Freshly ground black pepper
Cumin (optional but very good!)
Feta cheese crumbled
Optional extras: Pepitas, chives, green onions, bacon, egg (poached, soft boiled, scrambled, over easy…) use your imagination!
DIRECTIONS:
Toast your sourdough bread (or layout your rice cake thins) and spread a thin layer of brie cheese on the toast while it’s hot so it melts down into the toast a bit.
For each whole avocado, mash the avocado with the juice of 1/2 lime, 1/2 teaspoon cumin (optional), salt, and pepper to taste, and spread the mashed avocado on the toasted sourdough or rice cake and brie.
Variation 1: Toss the cherry tomatoes with olive oil and balsamic vinegar. Pile them on your avocado toast. Sprinkle with fresh thyme or basil, feta cheese, flaky salt, and freshly ground black pepper.
Variation 2: Pile the thinly sliced cucumbers on your avocado toast. Sprinkle with feta cheese, flaky salt, and freshly ground black pepper.
Variation 3: Thinly slice your radishes and lay them on your avocado toast. Sprinkle with feta cheese, flaky salt, and freshly ground black pepper.
Variation 4: Top with eggs (prepared to your choice) and a sprinkling of homemade bacon bits (cook your own bacon and crumble it up!)
The possibilities for low FODMAP avocado toast are endless! Use your imagination. Try things out.
This recipe contains affiliate links so you can easily purchase items listed on the page. This is for your information and convenience. If you purchase through this link, I may earn a commission but there is no additional cost to you. Please read my disclosure for more information.
Crunchy taco wrap
45 minutes • Gluten-free • Low FODMAP • Serves 4 - 6
45 minutes • Gluten-free • Low FODMAP • Serves 4 - 6 • Craving crunchy tacos? This is a delicious, crunchy, combination taco/tostada that will surely become a family favorite. Even more delicious with our fresh low FODMAP salsa.
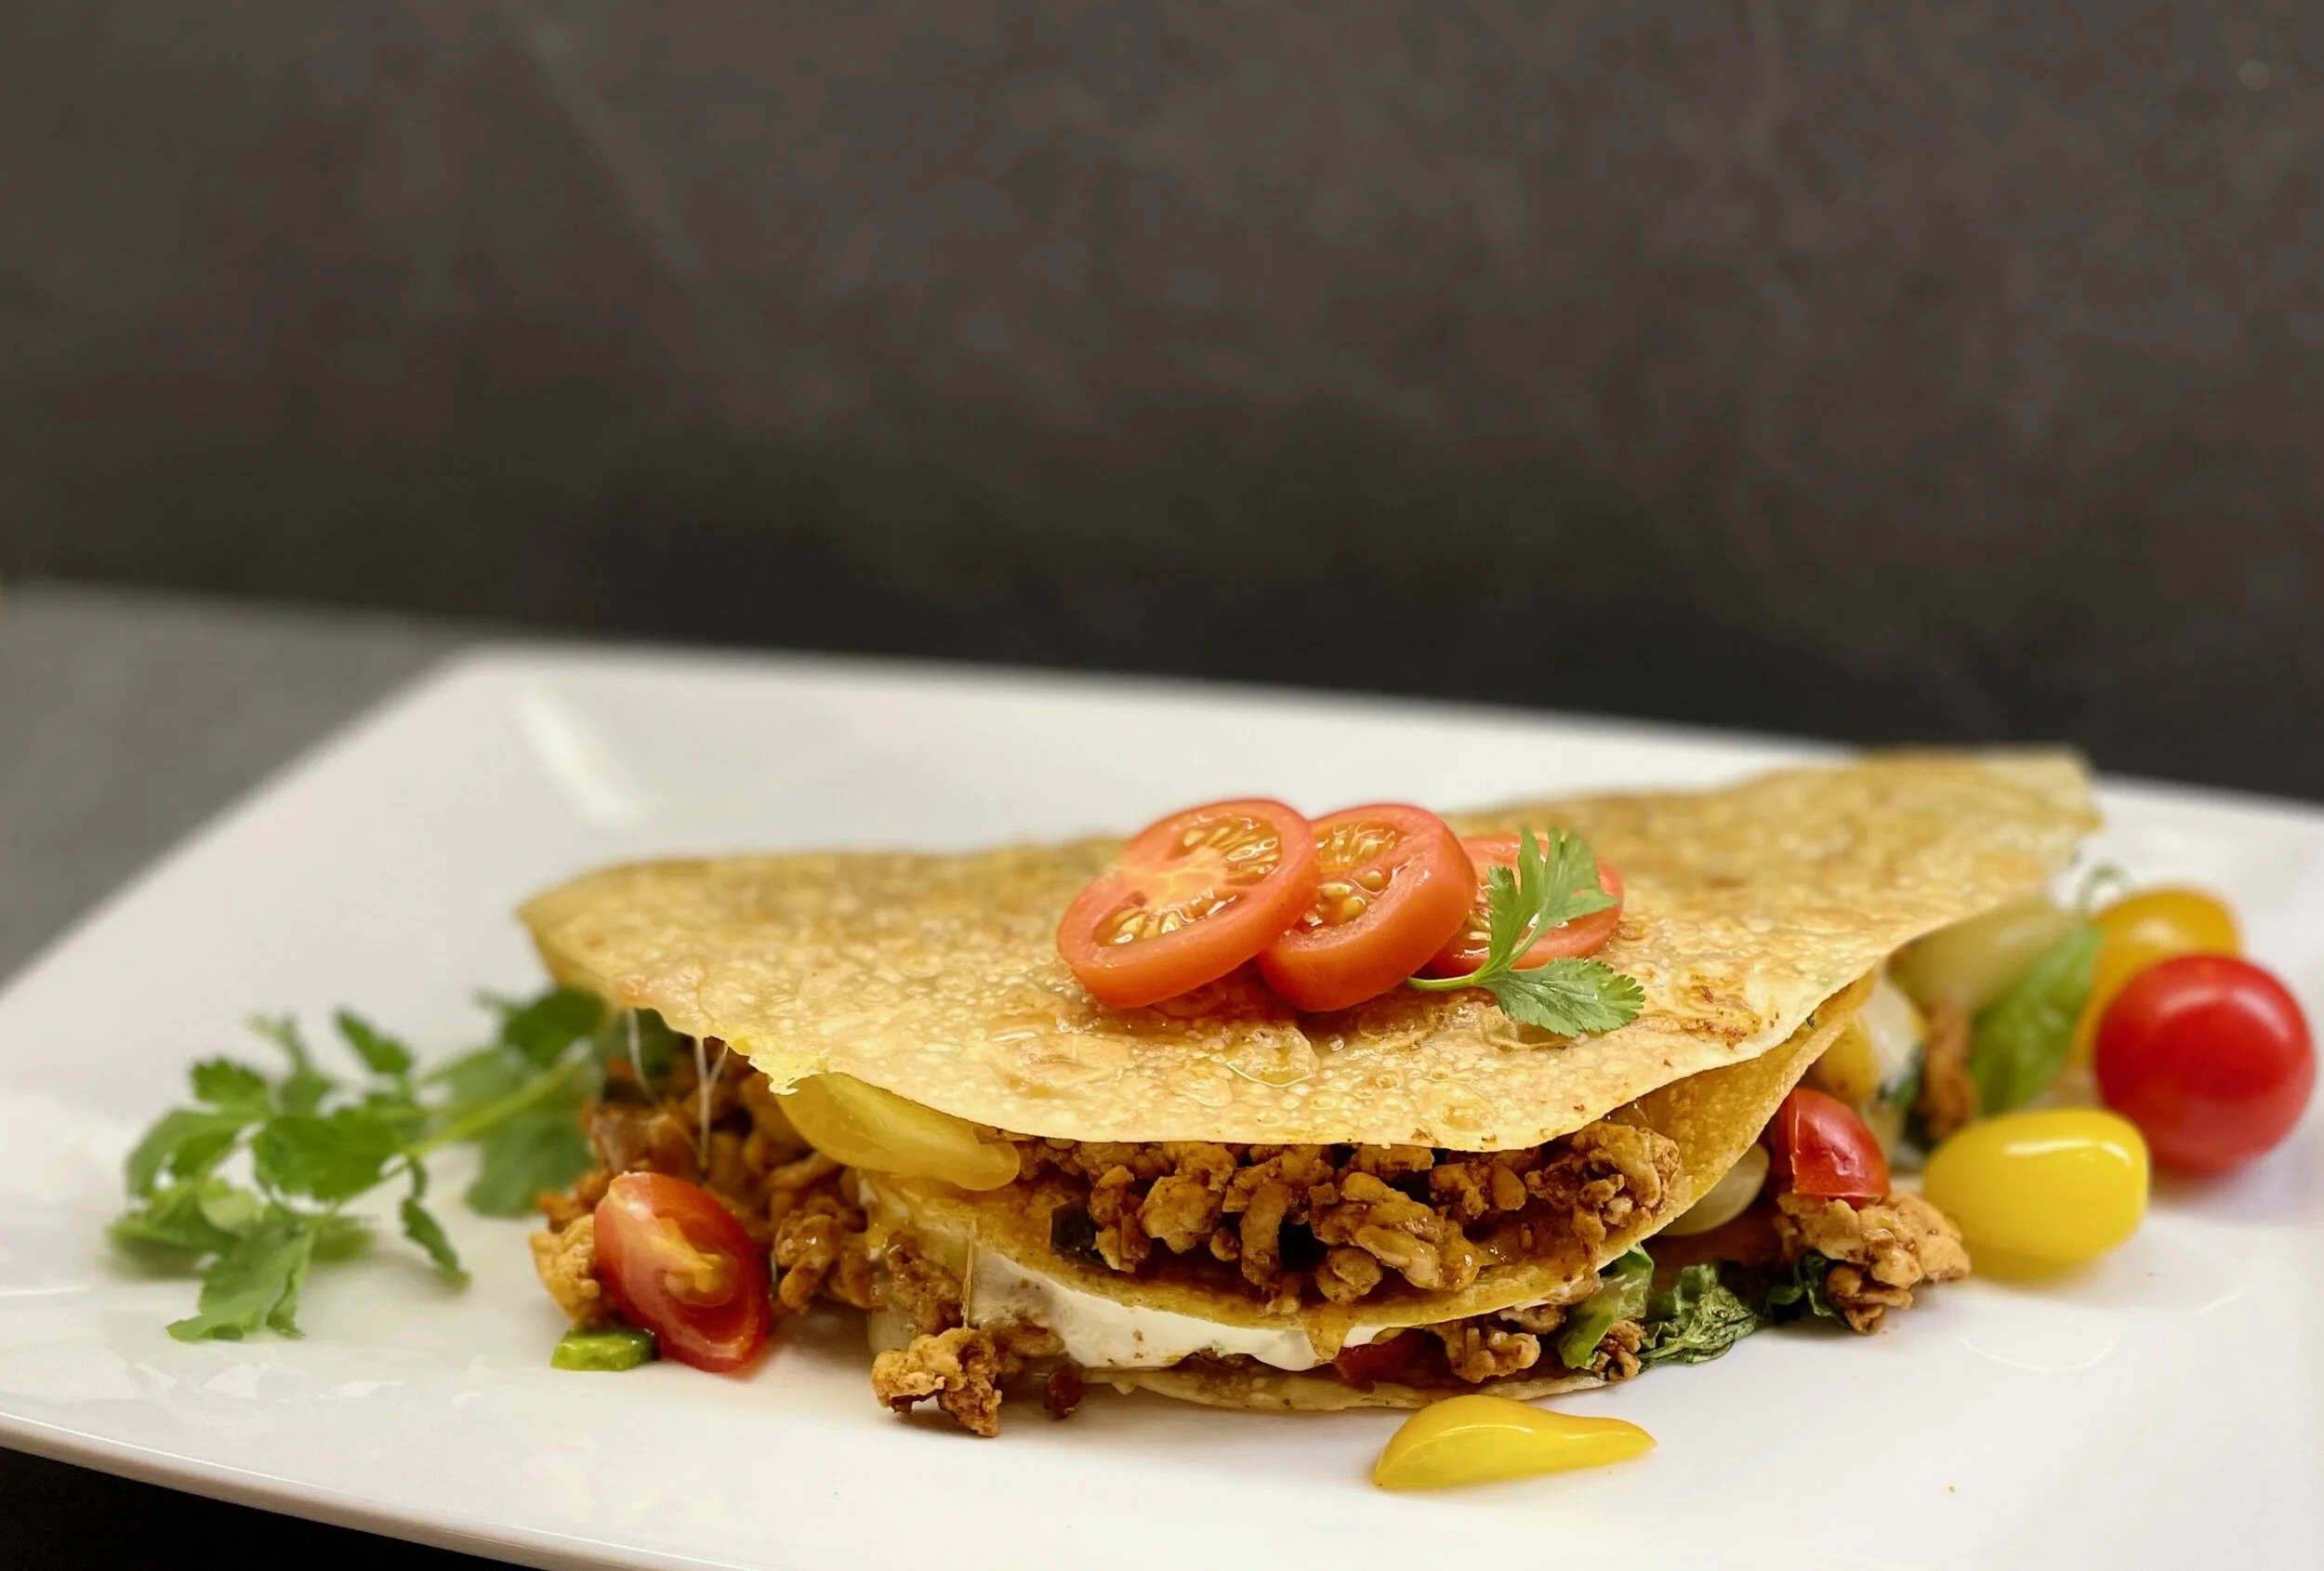
INGREDIENTS:
FOR THE TACO MEAT
2 tablespoons garlic-infused olive oil
4 green onions (green part only) chopped
1 pound ground chicken, turkey, beef, or bison
2 teaspoons chili powder
2 teaspoons smoked paprika
1 1/2 teaspoons ground cumin
1/4-1/2 teaspoon crushed red pepper flakes (to your taste)
1/2 teaspoon dried oregano
1 teaspoon kosher salt (or 1 teaspoon Smoke n Sanity Essence of Garlic Salt)
FOR THE ASSEMBLY
4 corn tortillas
1 cup shredded sharp cheddar cheese
1/2 cup cubed Monterey Jack cheese
1 poblano or jalapeño pepper, seeded and finely chopped
4 large (burrito size) gluten-free and low FODMAP tortillas (I like brown rice tortillas)
1/4 cup lactose-free sour cream
1 - 2 cups shredded romaine lettuce
1 cup cherry tomatoes, chopped
Serve with any/all of the following: fresh cilantro or chives, avocado mashed with lime, and our fresh salsa.
INSTRUCTIONS:
Preheat the oven to 400° F.
In a large skillet, heat the olive oil over high heat. When the oil shimmers, add the ground meat and green onions. Cook, breaking up the meat as it cooks until the chicken is browned, about 5 minutes. Add the chili powder, paprika, cumin, red pepper flakes, oregano, and salt or garlic salt. Add 3/4 cup water. Reduce the heat to medium and simmer until the sauce has thickened slightly around the chicken, about 10 minutes. Remove from the heat.
Meanwhile, make the tostadas. Line the corn tortillas up on a cookie sheet pan and rub lightly on one side with olive oil. Transfer to the oven and bake for 6 minutes. Flip, and bake another 4-5 minutes, until crisp. While warm, sprinkle with sea salt and lime zest for extra flavor.
To assemble, warm a large tortilla for 20 seconds in the microwave, then brush with water to dampen. Lay flat on a surface. On one side, layer the meat, a sprinkle of cheddar, a few cubes of Monterey Jack, and a sprinkle of chopped peppers. Add 1 corn tortilla on top, spread with sour cream, lettuce, tomatoes, and cilantro or chives. Fold the large tortilla in half (folding or breaking the corn tortilla in half too). Repeat with the remaining wraps.
Heat a drizzle of olive oil in a skillet, add 1 crunchy taco wrap and cook 2-3 minutes per side until crisp and golden brown.
Cut each “taco” in half for serving. Serve warm with any amount of desired toppings, fresh cilantro or chives, avocado mashed with lime, and our fresh salsa.
This recipe contains affiliate links so you can easily purchase items listed on the page. This is for your information and convenience. If you purchase through this link, I may earn a commission but there is no additional cost to you. Please read my disclosure for more information.
Best fresh salsa (IBS-friendly too)
20 Minutes • Gluten-free • Dairy-free • Low FODMAP • Makes about 1.5 cups
20 Minutes • Gluten-free • Dairy-free • Low FODMAP • Makes about 1.5 cups. This salsa is our family favorite — even over more traditional salsa that includes onion and garlic. We use it on all things Tex-Mex and even over eggs for breakfast!

INGREDIENTS:
1-2 Jalapeno peppers – seeded and finely chopped (wear gloves while you seed and chop or wash hands well before you touch anything else)
5 ripe tomatoes chopped – heirloom are nice for flavor and color or choose fresh “on the vine” for good flavor
1 cup chopped fresh cilantro (or chives if you hate cilantro)
2 green onions (green part only) chopped
½ teaspoon ground cumin
¼ teaspoon cayenne pepper (less if you want a less spicy version)
1 teaspoon chili powder
2 tablespoons lime juice
FOR THE PINEAPPLE VERSION:
1/2 cup fresh pineapple chopped
FOR THE “CON QUESO” VERSION (don’t use pineapple in this version):
1 pound sharp cheddar cheese (grated)
¼ cup lactose-free milk
DIRECTIONS:
In a food processor, place seeded jalapeno, roughly chopped tomatoes, green onions, chopped cilantro, cumin, chili powder, and lime juice. Process using pulse setting just until an evenly chunky texture is obtained. Stir in the pineapple if using.
For the Con Queso version: grate cheese and combine with milk. Cook over medium heat, stirring occasionally, 7-10 minutes, or until cheese is melted. Add salsa and mix until well combined. Serve with tortilla chips, low FODMAP veggies, or over your favorite low FODMAP dish.
This recipe contains affiliate links so you can easily purchase items listed on the page. This is for your information and convenience. If you purchase through this link, I may earn a commission but there is no additional cost to you. Please read my disclosure for more information.
Creamy Thai chicken and rice noodle soup
30 Minutes • Gluten-free • Dairy-free • Low FODMAP • Serves 4
30 Minutes • Gluten-free • Dairy-free • Low FODMAP • Serves 4 • This creamy Thai chicken and rice noodle soup is easy to make in 30 minutes so it’s a perfect weeknight dinner. It’s also so good you’ll want it for lunch the next day—so make sure there’s enough!

INGREDIENTS:
1 1/2 pounds boneless skinless chicken thighs or breasts, cubed
1 tablespoon ground turmeric
2 teaspoons ground ginger
Black pepper
5 tablespoons gluten-free, low sodium soy sauce
1 teaspoon maple syrup
3 tablespoons garlic-infused olive oil
Greens such as 4 baby bok choy, 3 cups spinach or 1 bunch kale, chopped
4 green onions (green part only), chopped
1-inch fresh ginger, peeled and grated
1/4 cup fresh Thai basil, chopped (ok to substitute cilantro)
Low FODMAP Thai Curry Paste:
1/4 teaspoon crushed red pepper flakes
1/2 teaspoon salt (or Smoke n Sanity Essence of Onion Salt)
Zest of one lime
1 teaspoon coriander
3 tablespoons garlic-infused olive oil
2 (13.5 ounce) cans full-fat coconut milk
8 ounces rice noodles, thick or thin, or steamed white rice if you prefer
Lime juice, sliced limes, and additional herbs for serving
DIRECTIONS:
Toss the chicken with turmeric, ground ginger, a pinch of pepper, 2 tablespoons of the soy sauce, maple syrup, and 1 tablespoon garlic-infused olive oil. Let sit in the refrigerator for 5 minutes.
Heat 2 tablespoons oil in a large Dutch oven or braiser over medium-high heat. Add the chicken and sear until browned, about 3 minutes, stirring 2-3 times. Toss in the chopped greens and cook 2 minutes more, until just charred on the edges. Transfer everything to a plate.
To the same Dutch oven, add 2 tablespoons oil, the green onions, fresh ginger, and cilantro/basil, cook 2 minutes, then stir in the low FODMAP Thai curry paste. Cook until fragrant, about 2 minutes. Stir in the coconut milk and 3 tablespoons of soy sauce. Slide the chicken and greens back into the sauce. Simmer over medium heat until the sauce thickens slightly, about 5 minutes.
Meanwhile, cook noodles or rice according to package directions.
Divide the noodles or rice between bowls and ladle the chicken and sauce over the top. Add to each bowl as desired the herbs and lime juice.
Original recipe inspired by Tieghan Gerard of Half Baked Harvest
This recipe contains affiliate links so you can easily purchase items listed on the page. This is for your information and convenience. If you purchase through this link, I may earn a commission but there is no additional cost to you. Please read my disclosure for more information.
Low FODMAP Chef’s salad
20 Minutes • Gluten-free • Low FODMAP • Serves 4
20 Minutes • Gluten-free • Low FODMAP • Serves 4 • This is one of my favorite lunchtime salads because it’s hearty, filling, and energizing so you won’t get the afternoon sleepies. It also makes an excellent light dinner choice. Of course, you can omit the turkey to make it vegetarian and add other low FODMAP veggies you might have on hand. Watch your serving size as too many raw vegetables may be hard to digest when you have IBS.

SALAD INGREDIENTS:
4 cups romaine lettuce, washed and torn into bite-size pieces
4 mini Persian cucumbers – peeled and sliced thickly
4 carrots – peeled and sliced diagonally
Handful of cherry tomatoes
1 cup cooked turkey or chicken cut into bite-size chunks
1/3 cup fresh basil – chiffonade (sliced thinly)
1/2 cup pumpkin seeds (pepitas) – roasted and salted - see our recipe here
1/2 cup walnuts – raw halved
1/2 avocado - cut into chunks
Hard-boiled eggs – peeled and quartered - optional
Blue cheese or gorgonzola crumbles - optional
DRESSING INGREDIENTS:
1/3 cup extra virgin olive oil
1 tablespoon red wine vinegar
1/2 teaspoon Coleman’s dry mustard
Salt and Pepper to taste
DRESSING DIRECTIONS:
Mix all ingredients together in a small jar and shake to combine. Adjust the salt and pepper to taste.
SALAD DIRECTIONS:
Wash and spin the lettuce as dry as possible. If you’re not putting the salad together right away, put the clean lettuce in a plastic bag with a paper towel in it. Squeeze as much air out as you can and seal the bag and put it in the refrigerator. Your lettuce will be crisp, clean, and dry when you’re ready for it.
Add the cucumbers, carrots, cherry tomatoes, fresh basil, walnuts, pepitas, and turkey and toss to combine.
Prepare the dressing and add just enough to lightly coat the lettuce and toss again.
Add the avocado, and cheese crumbles and turn the salad gently to combine.
Put the salad on plates and set quartered eggs alongside. You may add some salt and pepper to the eggs and serve.
This recipe contains affiliate links so you can easily purchase items listed on the page. This is for your information and convenience. If you purchase through this link, I may earn a commission but there is no additional cost to you. Please read my disclosure for more information.
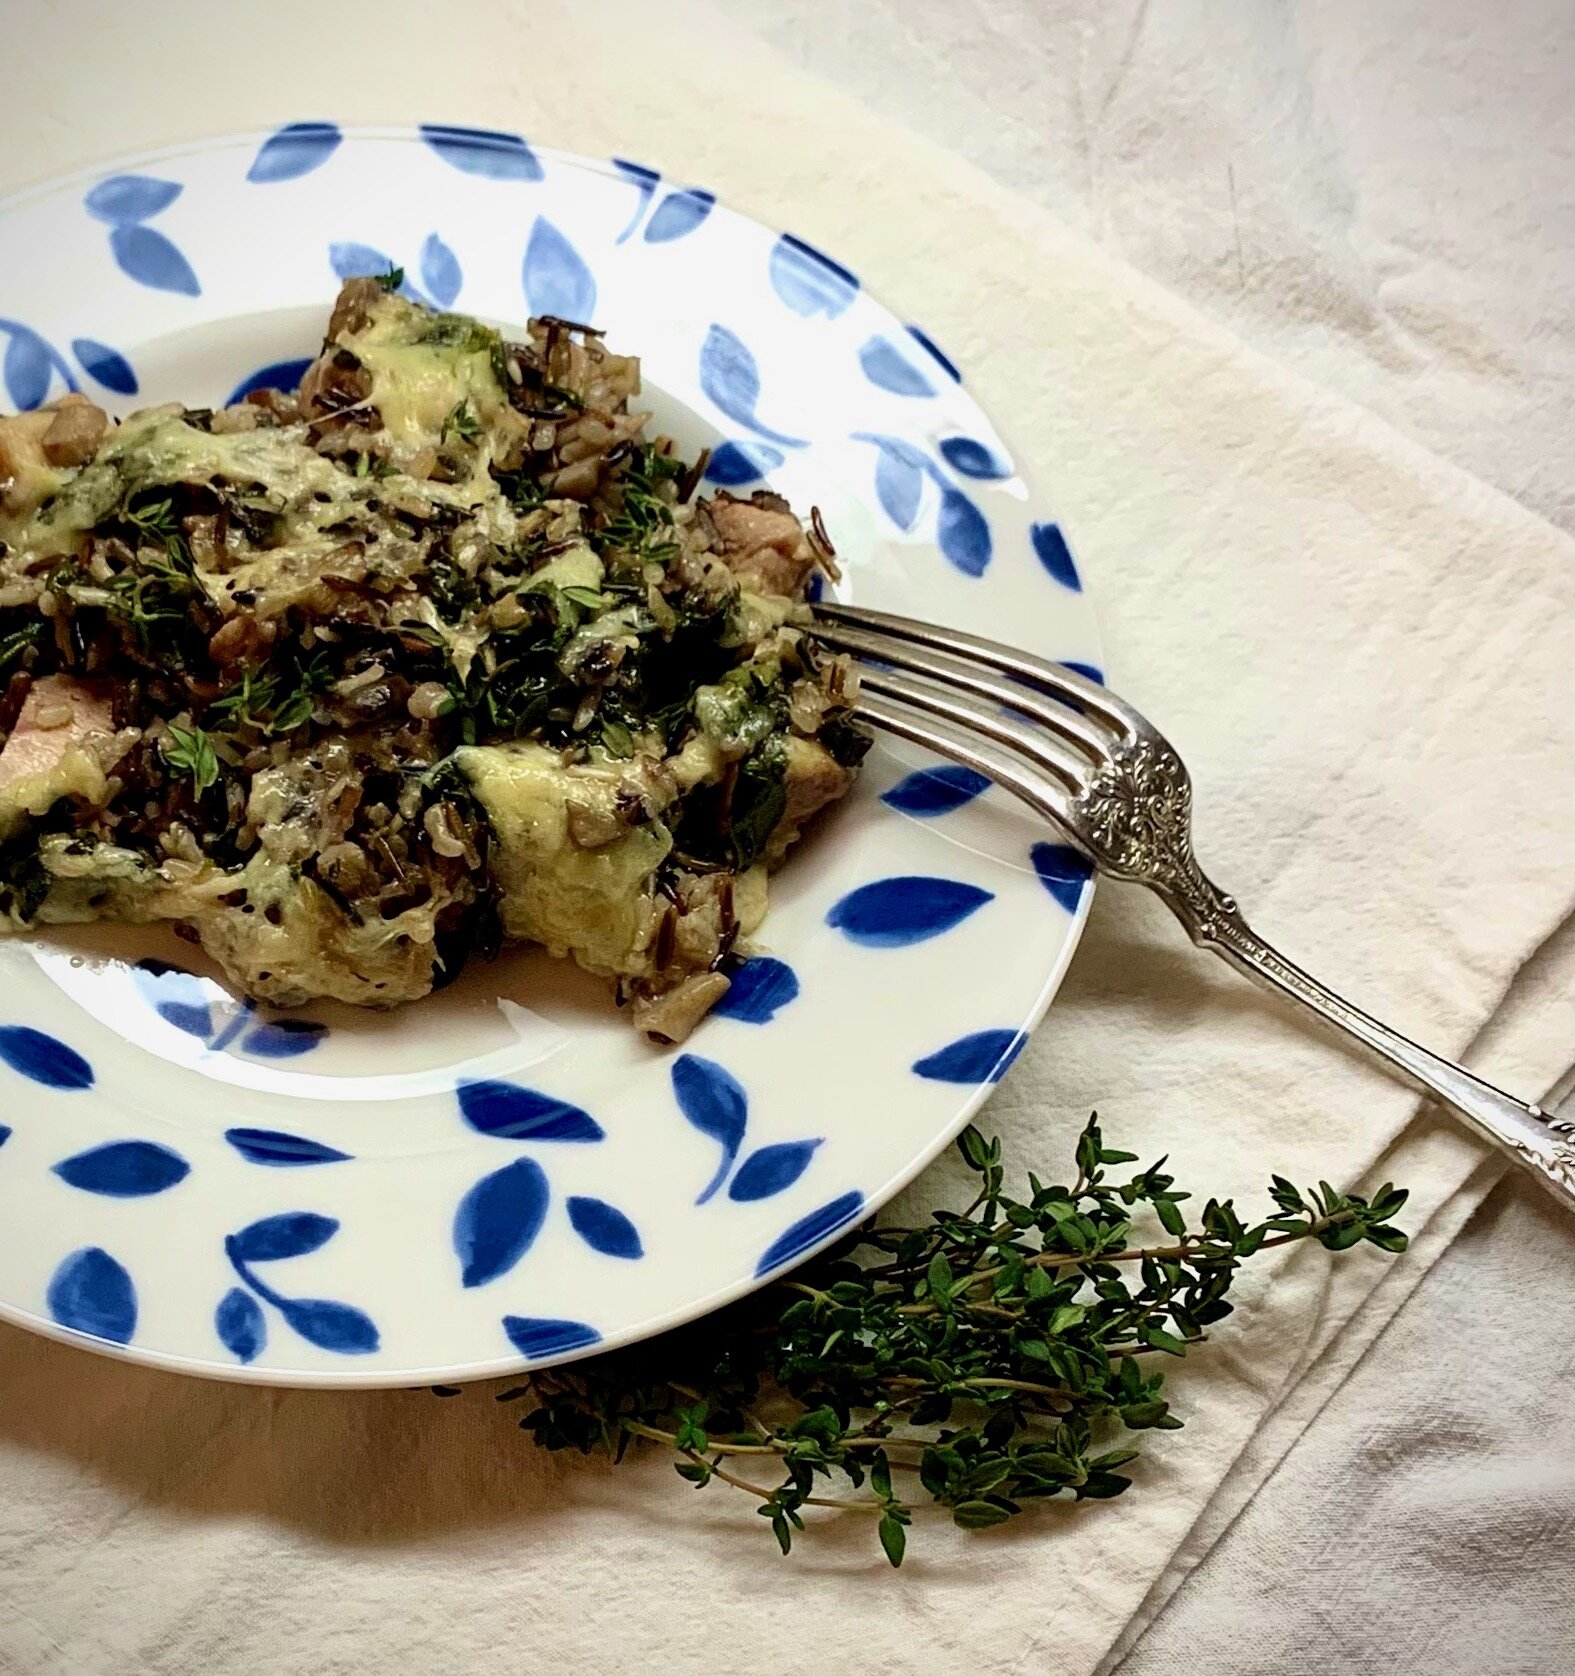
Wild rice, mushrooms, spinach, and chicken - the perfect one pan meal
90 Minutes (mostly cooking time) • Gluten-free • Low FODMAP • Serves 4
90 Minutes (mostly cooking time) • Gluten-free • Low FODMAP • Serves 4 • This wild rice, mushroom, spinach, and chicken one-pan meal is healthy, filling, and delicious.

INGREDIENTS:
2 tablespoons butter
1 tablespoon garlic-infused olive oil
2 leeks (green part only) chopped
Kosher salt and pepper
6 ounces oyster mushrooms
2 tablespoons fresh chopped thyme, plus more for serving
2 1/2 cups low FODMAP chicken broth
1/2 cup white wine or more low FODMAP chicken broth
2 cups wild rice*
1 - 1 1/2 pounds boneless skinless chicken breasts, cut into bite-size pieces
2 cups baby spinach
1 1/2 cups shredded Gruyère cheese
DIRECTIONS:
Melt the butter and olive oil in a large, oven-safe skillet over medium heat. Add the leek greens and cook for about 3 minutes to soften. Season with salt and pepper. Add the mushrooms, cook another 3 minutes or until the mushrooms start to brown/caramelize. Stir in the thyme and cook another minute longer.
Pour in the 2 cups chicken broth and the wine and bring to a boil over high heat. Stir in the rice and chicken, bring back to a boil, then cover, and reduce the heat to low. Simmer for 45-55 minutes or until the rice is fully cooked, if needed, add the remaining 1/2-1 cup broth during cooking if the rice gets a bit dry before it’s fully cooked. Remove from the heat and stir in the spinach.
Preheat the oven to 400 degrees F.
Sprinkle the cheese over top of the rice and transfer it to the oven. Bake for 10-15 minutes or until the cheese has melted. Remove from the oven and serve with additional fresh thyme.
* Rice is a great staple food on the low FODMAP diet. To date, Monash University has tested white, brown, basmati, and red rice, and each is low FODMAP in 1 cup servings of cooked rice. Based on the other rice results, my guess is that jasmine, wild or black rice would also test low FODMAP. If you are on a low FODMAP elimination diet and you want to be extra “safe”, I would recommend waiting to test your individual tolerance for wild rice until after the elimination phase. In this case, you can substitute one of the other tested types of rice for wild rice in this recipe.
This recipe contains affiliate links so you can easily purchase items listed on the page. This is for your information and convenience. If you purchase through this link, I may earn a commission but there is no additional cost to you. Please read my disclosure for more information.
10 simple happy belly yoga poses
Ten simple yoga poses that could work wonders for your digestion and your mind.
“Yoga can aid digestion, elimination (constipation), and bloating by increasing the circulation and energy to these areas.”
I’m sharing this article on the benefits of yoga for your belly because yoga and stretching are a big part of the IBS Game Changer toolbox. Certain yoga poses can stimulate your internal organs and help decrease stress and calm your nerves which, in turn, can help you rest and digest. Ten simple yoga poses that could work wonders for your digestion and your mind are outlined with instructions and pictures in this Huffington Post article.

“Yoga also works on a deeper energetic level, stimulating the energy systems or meridians of the body. By choosing asanas that stimulate the stomach, small intestine, large intestine, and liver meridians we can create harmony and balance within the body by aiding digestion and bloating.”
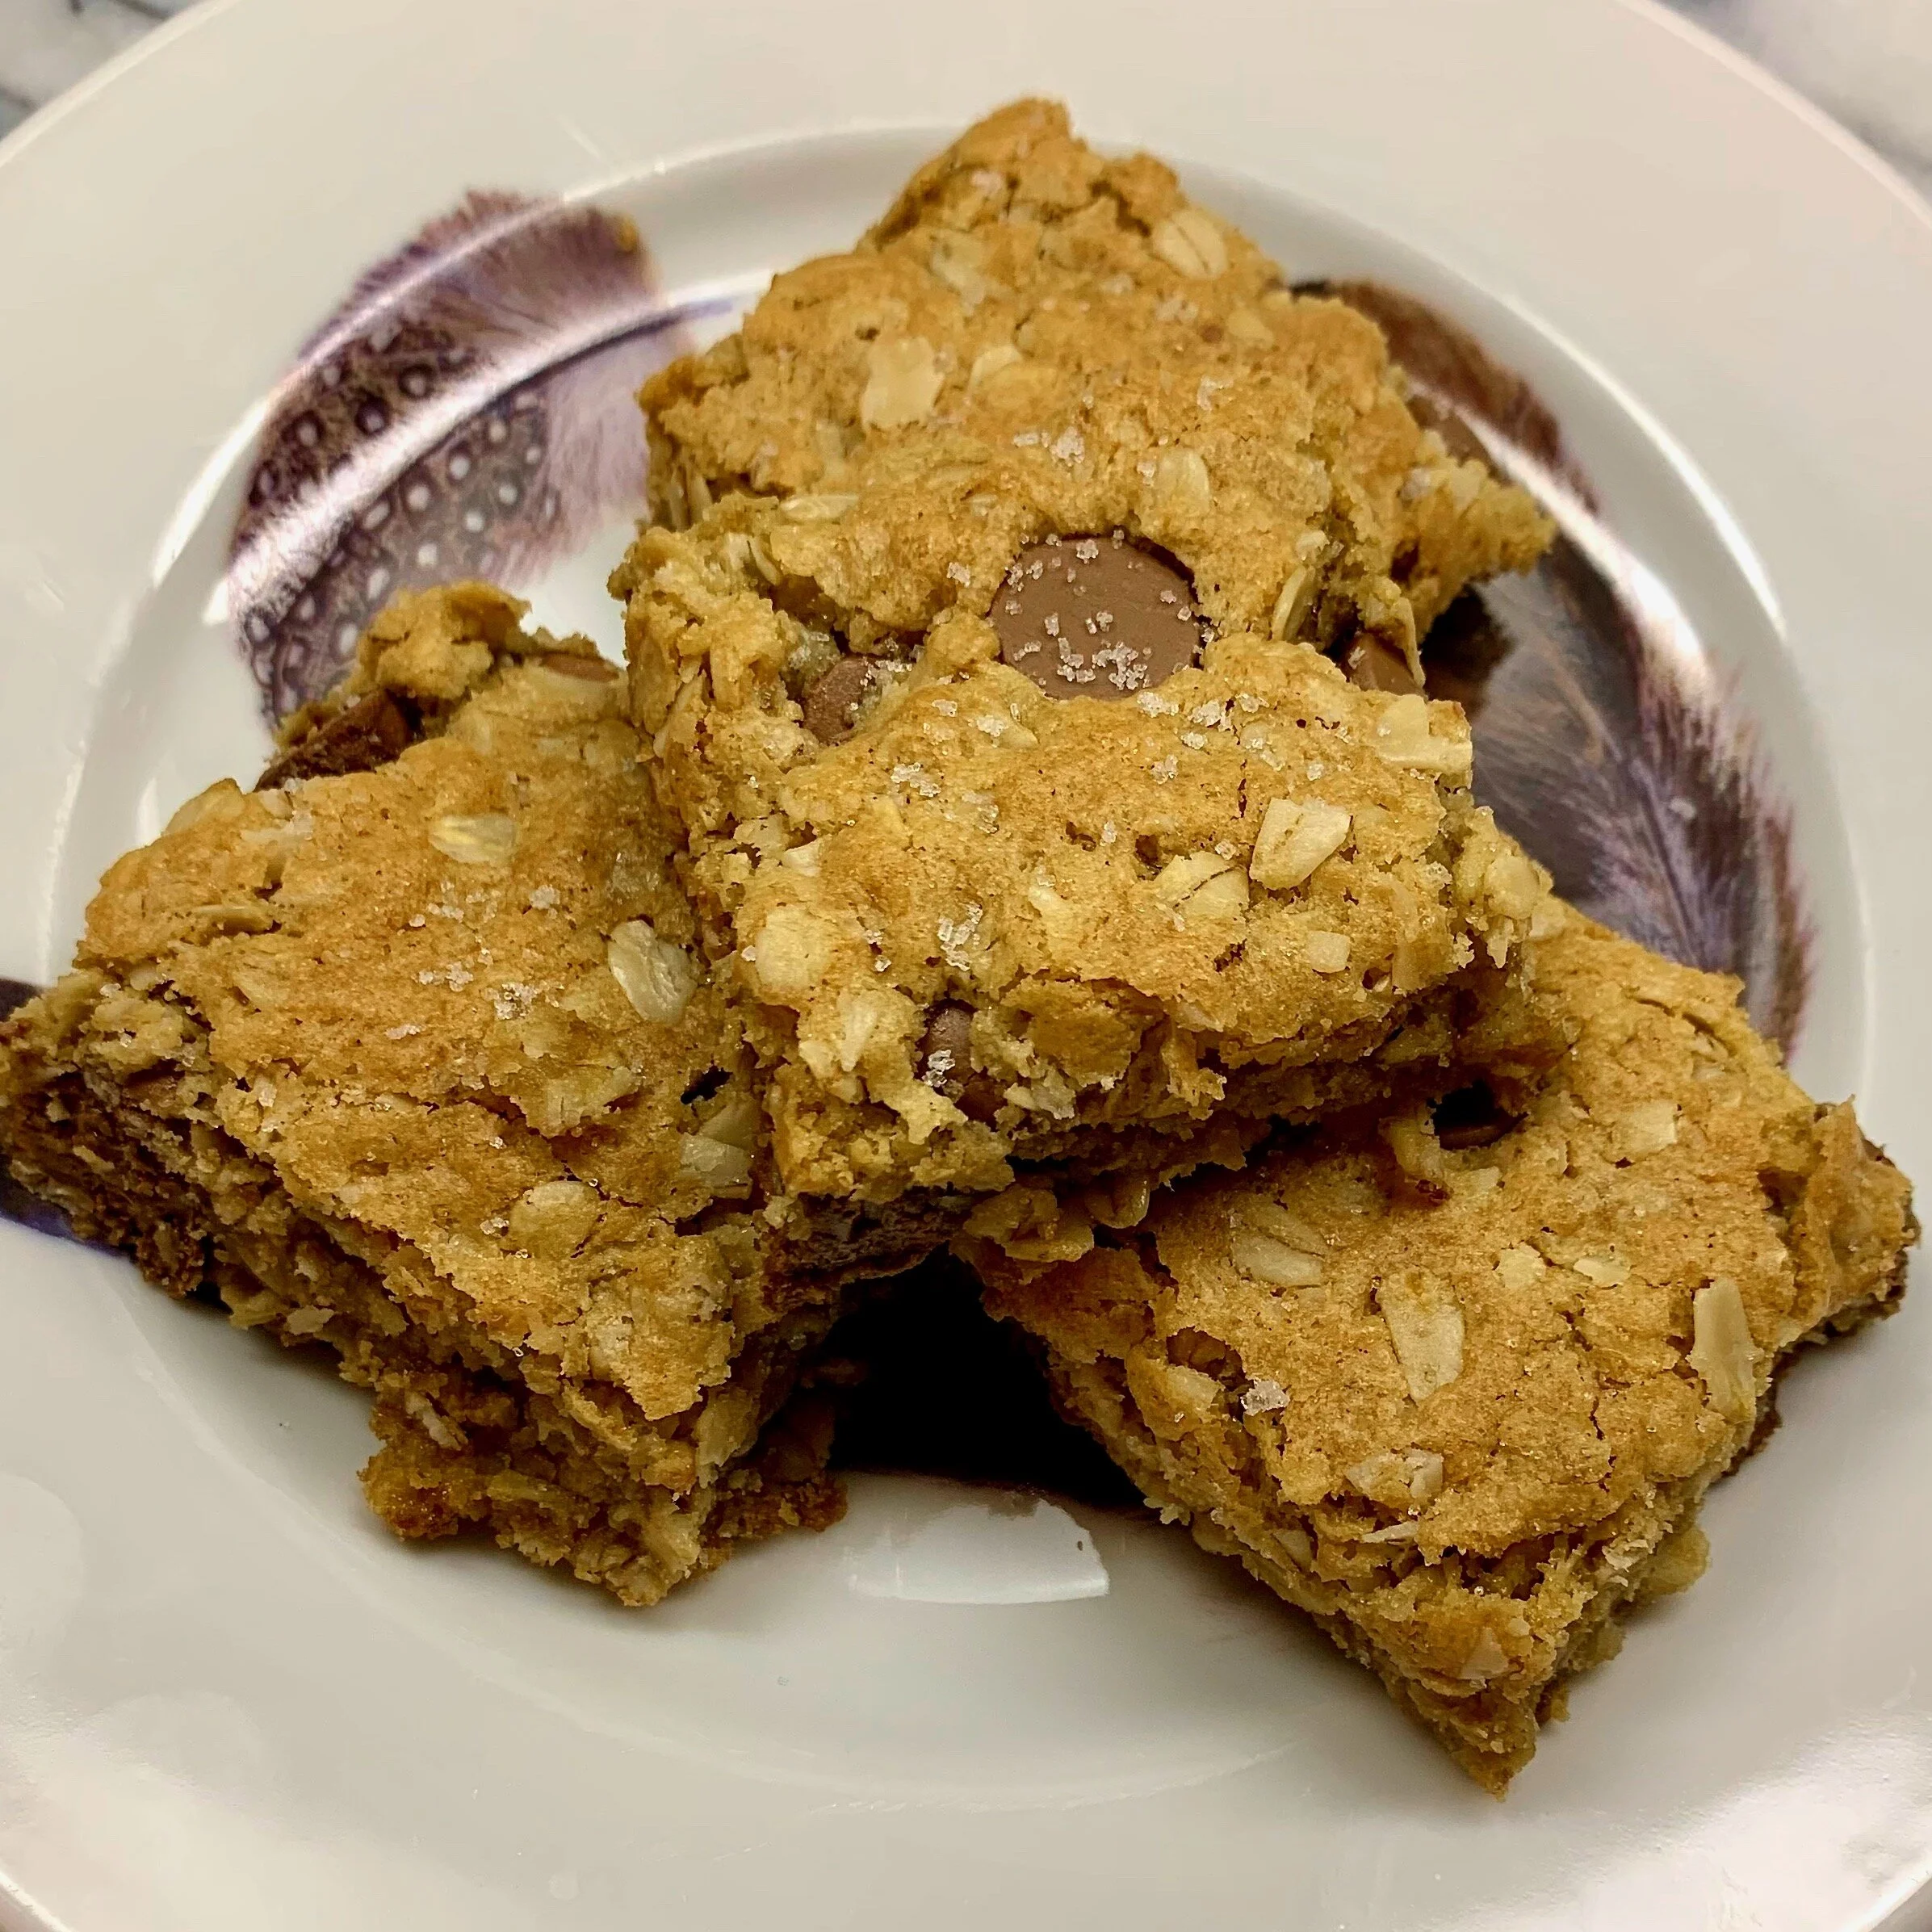
Coconut chocolate chip cookie bars
30 Minutes • Gluten-free • Lactose-free • Low FODMAP • Makes 12 bars
30 Minutes • Gluten-free • Lactose-free • Low FODMAP • Makes 12 bars • These delicious low FODMAP coconut chocolate chip cookie bars are so good they won’t last long! The milk chocolate and coconut blend together to make your sweet tooth happy and the oatmeal gives it heartiness, so they make a satisfying snack.
INGREDIENTS
2 1/2 cups gluten-free oatmeal
1 1/2 cups all-purpose gluten-free flour such as Bob’s Red Mill or Cup4Cup
1/2 cup light brown sugar
1/2 cup granulated sugar
½ cup unsweetened shredded coconut
1 teaspoon baking soda
1/2 teaspoon kosher salt
1 cup melted coconut oil
2 large eggs
1 tablespoon vanilla extract
1 1/2 cups milk chocolate chips (I like Guittard)
1/2 teaspoon fleur de sel or other flaky salt
DIRECTIONS:
Preheat the oven to 350 degrees F. Line a 9x13 inch baking dish with parchment paper.
In a large mixing bowl or the bowl of a stand mixer, mix the oatmeal, flour, brown sugar, granulated sugar, coconut, baking soda, salt, coconut oil, eggs, and vanilla. Beat until the dough is moist and all the ingredients are combined. The dough may be oily. Mix in the chocolate chips.
Press the dough into the prepared baking dish. If the chips are bunched up, spread them out as you spread the dough in the pan. Transfer to the oven and bake 18-20 minutes or until the edges are set and the bars are golden. Sprinkle with fleur de sel or another flaky salt.
Let cool and then cut into bars. Store at room temperature in an air-tight container.
Bars are best slightly warm so pop each bar in the microwave for 20 seconds before eating for the best flavor and texture.
This recipe contains affiliate links so you can easily purchase items listed on the page. This is for your information and convenience. If you purchase through this link, I may earn a commission but there is no additional cost to you. Please read my disclosure for more information.
Steak tacos with Mexican “frites” and cilantro lime cream
45 Minutes (after marinating the meat) • Gluten-free • Low FODMAP • Serves 4
45 Minutes (after marinating the meat) • Gluten-free • Low FODMAP • Serves 4 • For this recipe, you can grill the steak, cook it in your crockpot or instant pot, or even cook it on the stovetop. Just season it first and make sure you end up with thin flavorful slices. These tacos are easy and delicious!

INGREDIENTS:
2 pounds flank steak
1 tablespoon chili powder
1 teaspoon salt (or 1 teaspoon Smoke n Sanity lof FODMAP onion salt)
1 teaspoon smoked paprika
2 tablespoons garlic-infused olive oil
Zest and juice of 1 lime
1/2 cup gluten-free beer, such as Stone Delicious IPA (or water)
8 gluten-free corn tortillas
1/4 cup canola or vegetable oil to cook the tortillas
Serve with any/all of these additional items: sliced avocado, feta cheese, jalapeños, and shredded lettuce.
MEXICAN “FRITES”
4 potatoes, washed and cut into ¼-inch-thick matchsticks (leave the skin on)
3 tablespoon garlic-infused olive oil
1 teaspoon chili powder
1 teaspoon smoked paprika
1 teaspoon salt (or to taste)
CILANTRO LIME CREAM
Zest and juice of 1 lime
1/2 cup lactose-free sour cream
1/2 cup fresh cilantro, finely chopped (or fresh chopped chives)
2 green onions (green part only), finely chopped
1/2 teaspoon garlic scape powder and 1/2 teaspoon salt (or 1/2 teaspoon Smoke n Sanity low FODMAP garlic salt)
Avocado, feta cheese, jalapeños, cilantro or chives, and shredded lettuce to serve.
DIRECTIONS:
Place the steak in a 9x13 inch pan or Ziploc bag. Combine the chili powder, paprika, pinch of salt, garlic-infused olive oil, lime juice, and zest. Rub the seasonings into the steak. Add the beer. Marinate 30 minutes or in the fridge as long as overnight.
Preheat your grill or grill pan to high. (Or place in hot pot or crockpot and cook per appliance directions for flank steak.)
Remove the steak from its marinade and sear the steak for 5-8 minutes on one side and then flip and sear another 5 minutes or until your desired doneness is reached. Remove the steak from the grill and allow to rest 10 minutes. Slice steak thinly against the grain.
Meanwhile, make the Cilantro Lime Cream sauce. Combine all ingredients in a bowl and mix until combined. Season with salt. Set aside in the fridge.
Make the fries to be done when you are ready to eat (so they are hot).
Preheat the oven to 425 degrees F.
Toss the potatoes in a large bowl or Ziploc bag with the olive oil, chili powder, paprika, and a large pinch of salt
Line one or two rimmed baking sheets with parchment. Place the potatoes on the parchment-lined baking sheets. Spread the fries in one even layer. Do not overcrowd the pan, if needed, divide the fries between 2 baking sheets. Transfer to the oven and bake for 15-20 minutes, then flip the fries and bake for 10 minutes more until cooked through.
While the fries are cooking, prepare your tortillas. You may just heat them in a damp towel in the microwave. Or, heat 1 tablespoon of oil in a non-stick frying pan. When hot, cook one tortilla for about 30-45 seconds on each side so it starts to brown but remains a bit pliable. Remove from the pan and fold the tortilla over the handle of a wooden spoon (to create a rounded fold) then set on paper towels and proceed with the next tortilla until all are cooked and ready.
Stuff the steak into the prepared tortillas with fries, avocado, cilantro lime cream, lettuce, feta, and more cilantro. Enjoy every bite.
Pro tip: If you don’t like cilantro you may substitute chopped chives for the cilantro in this recipe. If you don’t like steak, you can substitute chicken. They will still be delicious!
This recipe contains affiliate links so you can easily purchase items listed on the page. This is for your information and convenience. If you purchase through this link, I may earn a commission but there is no additional cost to you. Please read my disclosure for more information.
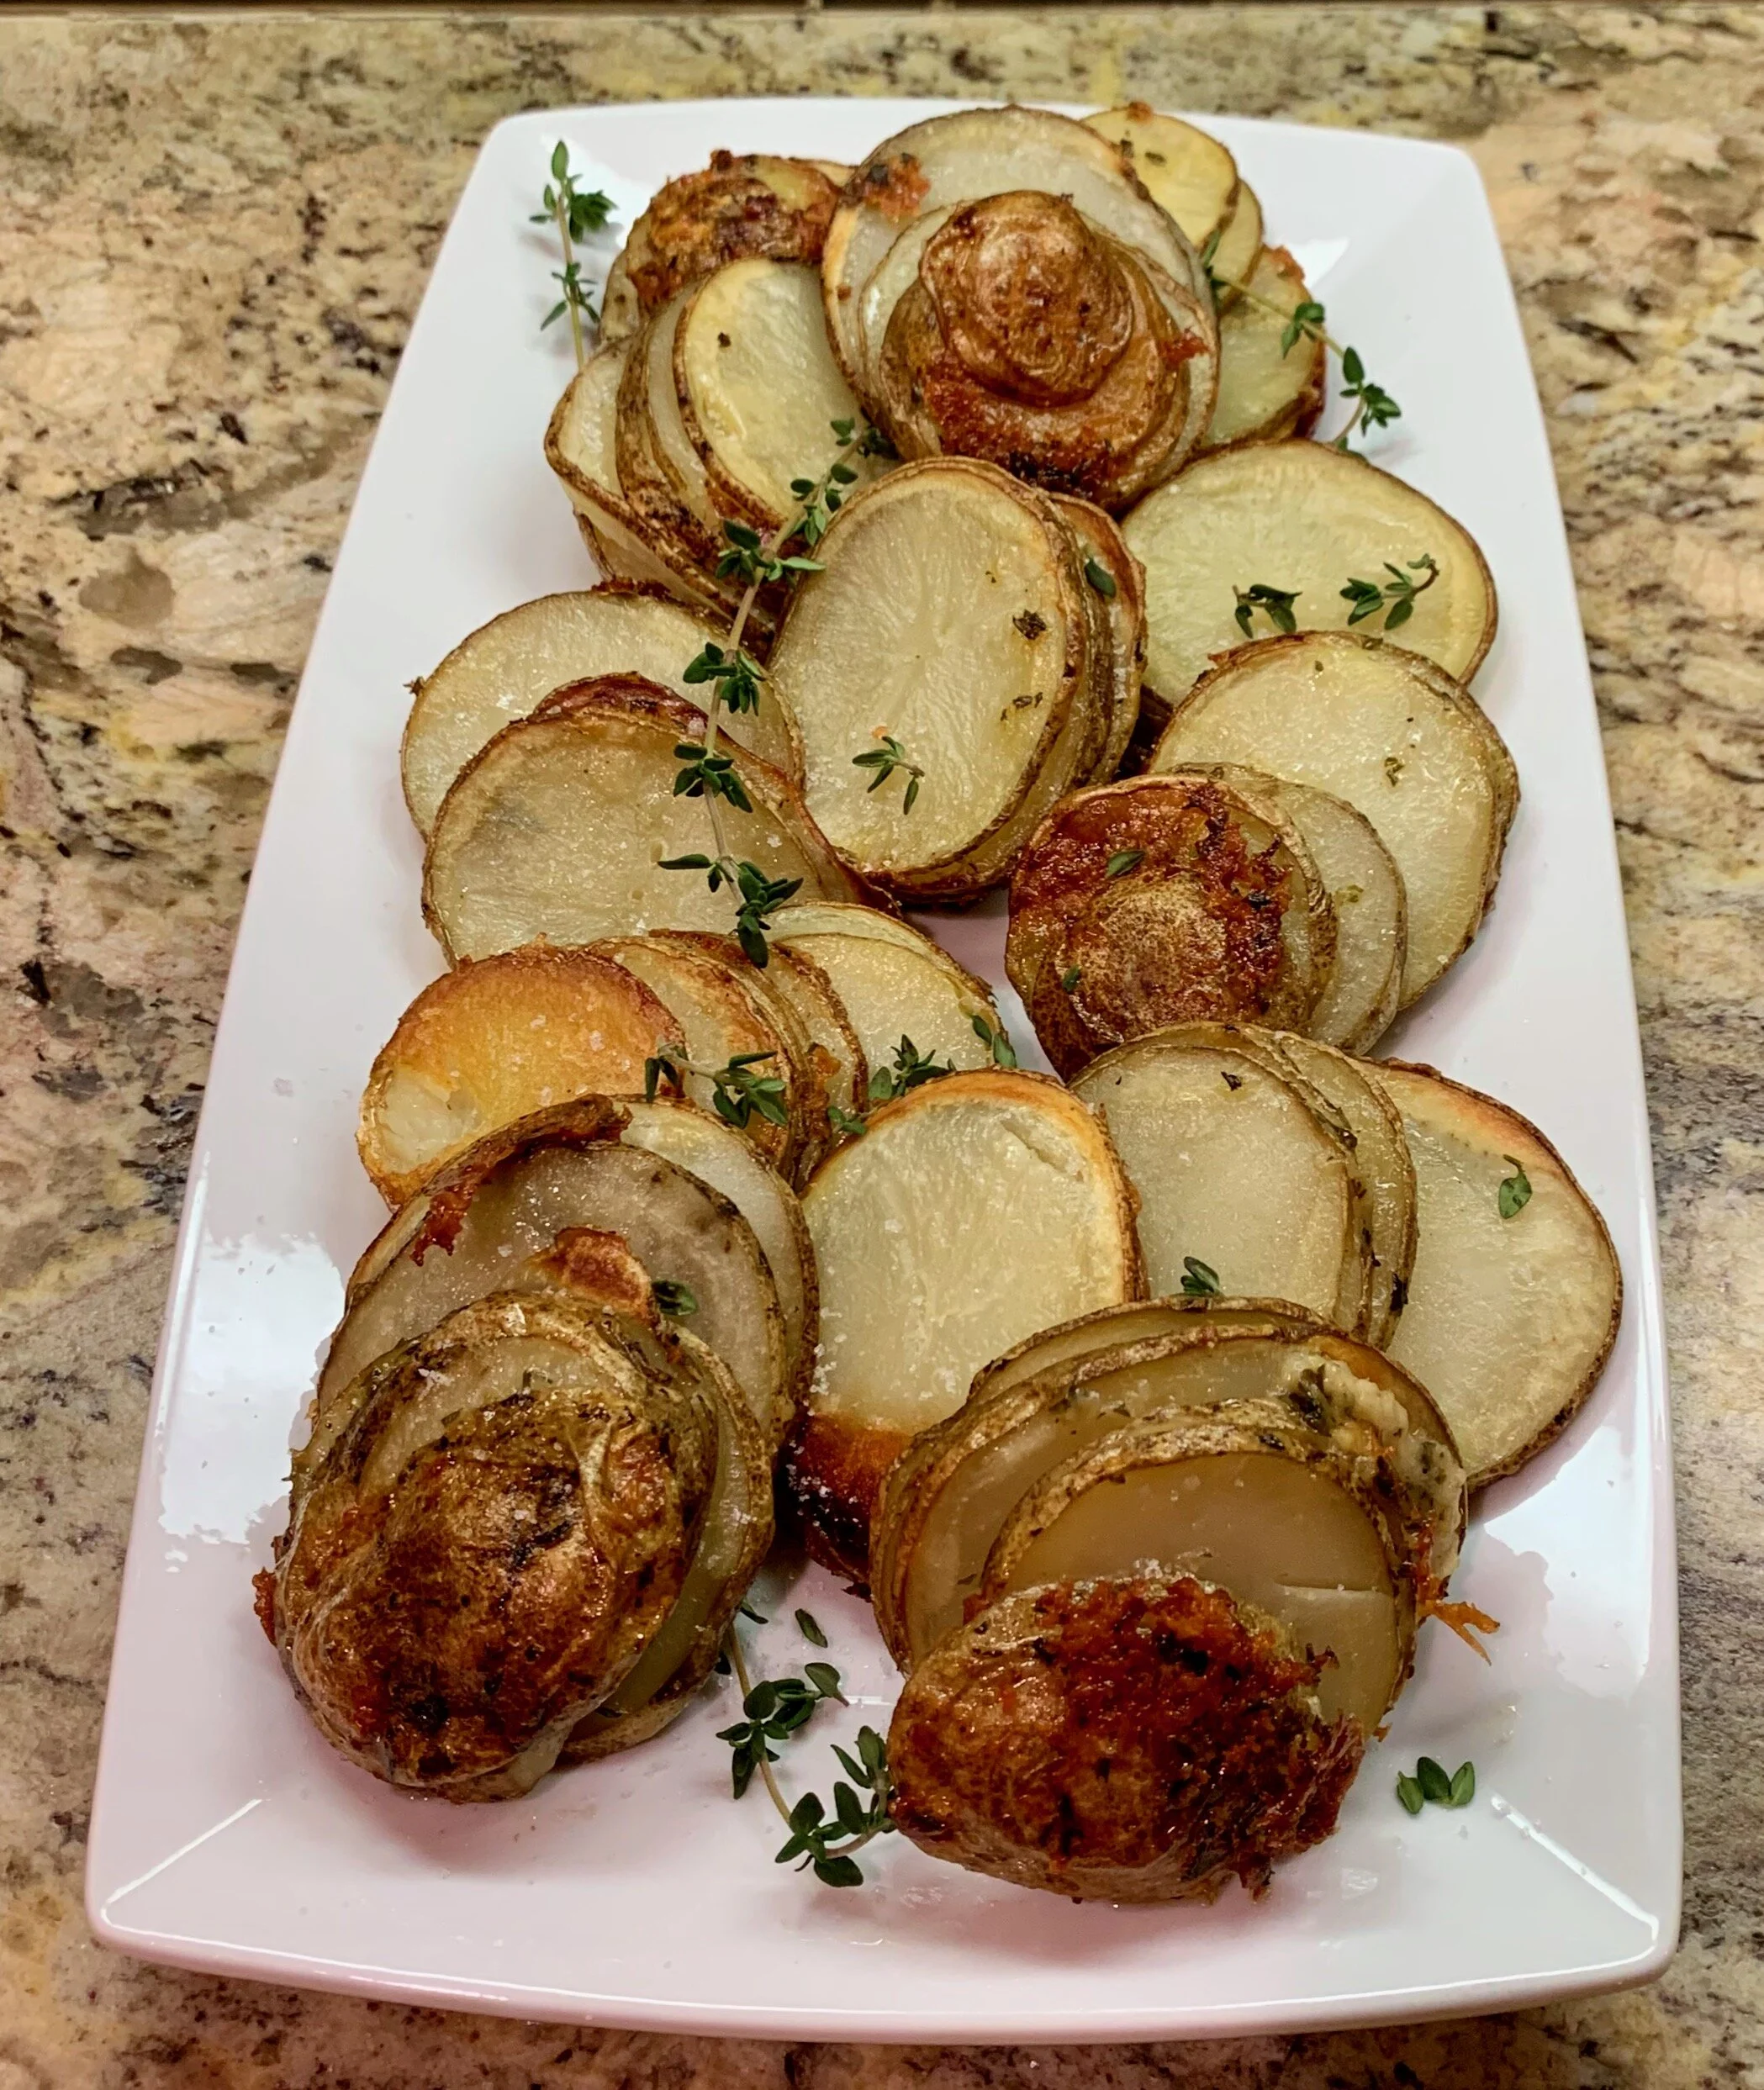
Thyme and gruyere potato stacks
90 Minutes (mostly cook time) • Gluten-free • Low FODMAP • Serves 8
90 Minutes (mostly cook time) • Gluten-free • Low FODMAP • Serves 8 • This delicious, crispy potato dish will quickly replace any other “scalloped” potato side dish you've been making. It takes a little handwork to make, but the result is worth the effort.
INGREDIENTS:
6 medium Russet or Idaho potatoes, cut into 1/8-inch-thick slices
¼ cup salted butter, melted
¼ cup garlic-infused olive oil
¼ cup chopped fresh oregano
2 tablespoons chopped fresh thyme
1/2 cup grated parmesan cheese
1/2 cup shredded gruyere cheese or extra sharp cheddar
Kosher salt and black pepper to taste
DIRECTIONS:
Preheat the oven to 400° F. Lightly grease a 12-cup muffin tin.
Wash and cut the potatoes using a mandoline or very sharp knife into 1/8-inch slices.
In a large bowl, stir together the butter, olive oil, oregano, thyme, both cheeses, and a large pinch of both salt and pepper. Add the potatoes and toss well to coat. Stack the potatoes and make sure some of the butter/cheese mixture is between each slice. Layer the potatoes evenly among the prepared muffin tin, stacking the layers all the way to the top. The potatoes will shrink down as they cook.
Cover with foil and place on a baking sheet. Transfer to the oven and bake for 30 minutes. Remove the foil and continue cooking another 20-25 minutes or until the potatoes are tender and golden. Run a butter knife around the edges of each stack to release them. Serve immediately, sprinkled with a little sea salt.
Print recipe here.
Original recipe inspired by Tieghan Gerard of Half Baked Harvest
This recipe contains affiliate links so you can easily purchase items listed on the page. This is for your information and convenience. If you purchase through this link, I may earn a commission but there is no additional cost to you. Please read my disclosure for more information.