Deliciously Low FODMAP

Inspire yourself with hundreds of delicious low FODMAP recipes, tips, and tools, and enjoy the abundance that is yours even when you have IBS.
Use the buttons and filters to find something specific or browse the complete collection for inspiration.
Discover a treasure trove of recipes with my FREE recipe club! Get new ideas delivered straight to your inbox every week.
Deliciously Low FODMAP is a trademark of IBS Game Changer, LLC
Filter to find Recipes and Tools
More Filtering Options
- All 738
- Appetizer 50
- BBQ 46
- Bowl 32
- Breakfast 58
- Cocktails 13
- Collection 1 58
- Collection 10 27
- Collection 11 30
- Collection 12 27
- Collection 13 31
- Collection 14 29
- Collection 15 31
- Collection 16 34
- Collection 17 31
- Collection 18 33
- Collection 19 36
- Collection 2 32
- Collection 20 33
- Collection 21 33
- Collection 22 40
- Collection 23 20
- Collection 24 1
- Collection 3 28
- Collection 4 29
- Collection 5 30
- Collection 6 32
- Collection 7 31
- Collection 8 31
- Collection 9 32
- Condiments 6
- Crock Pot 4
- Dessert 109
- Diabetes Game Changer Exception Protocol Contains Alcohol 11
- Diabetes Game Changer Exception Protocol Contains Flour 109
- Diabetes Game Changer Exception Protocol Contains Flour AND Sugar 78
- Diabetes Game Changer Exception Protocol Contains Sugar 49
- Diabetes Game Changer First Four Weeks 370
- Dinner 337
- Drink 8
- Easter 1
- Free Guide 17
- Gluten-free 599
- Gut Microbiome 2
- Guthealth 3
- Holidays 69
- IBS Triggers 4
- Keto Friendly 128
- Lactose-Free 175
- Low FODMAP Diet 724
Low FODMAP quick Florentine chicken with brie
10 Minutes Prep • 15 Minutes Cook • Gluten-free • Low FODMAP • Serves 4
10 Minutes Prep • 15 Minutes Cook • Gluten-free • Low FODMAP • Serves 4 • I love serving this for dinner guests because it’s so quick to make and finishes in the oven so you can be ready to plate it all at once. It’s colorful, flavorful, and delicious. Serve over steamed rice, gluten-free pasta, or keep it light and serve it with a crisp green salad.

INGREDIENTS:
1 large egg, beaten
1/4 cup gluten-free flour
4 boneless skinless chicken breast cutlets (about 3/4 inch thick)
Kosher salt and pepper
6 tablespoons cold salted butter*, cubed
2 - 4 tablespoons garlic-infused olive oil
2 cups cherry tomatoes
2 tablespoons fresh thyme (stripped from the stems)
1 pinch crushed red pepper flakes (optional)
4 ounces brie (double or triple cream is best), rind removed**
3 tablespoons fresh-squeezed lemon juice
1/2 cup (or more to taste) fresh basil, chiffonade (sliced in thin strips)
DIRECTIONS:
Place the egg and flour in separate shallow bowls.
Season the chicken with salt and pepper. Dredge both sides of the chicken through the egg, and then through the flour, tossing to coat. Place the chicken on a plate.
In an oven-safe skillet set over medium heat, add 1 - 2 tablespoons olive oil. When the oil shimmers, add the tomatoes, 1 tablespoon thyme, and a pinch each of salt, pepper, and red pepper flakes. Cook until the tomatoes begin to pop, about 4-5 minutes. Turn off the heat and transfer the tomatoes to a plate.
In the same skillet, melt together 4 tablespoons butter and 1 - 2 tablespoons olive oil. When the oil shimmers, add the chicken and cook until the bottom side is golden brown, about 3-4 minutes. Flip the chicken and add 2 more tablespoons butter and 1 tablespoon thyme, swirling the butter around the chicken. Cook, basting the chicken with the butter until the chicken is cooked and golden brown, about 4 to 5 minutes.
Meanwhile, preheat the broiler.
Remove your skillet from the heat, add the brie slices on top of each chicken cutlet. Spoon the tomatoes and lemon juice over the top. Transfer to the oven, broil for 2 minutes until the cheese is melted. Top the chicken with lots of fresh basil. Serve with plenty of fresh basil over rice or gluten-free pasta, or alongside a crisp green salad or steamed broccoli florets tossed in a bit of the chicken sauce.
Enjoy!
Pro tips:
*Use cultured butter if you can find it. It's fermented for 20 hours then churned to 82% butterfat which makes the taste incredibly rich and it raises the smoke point, making it ideal for browning.
** Put the brie in the freezer for about 20 minutes and then cut the rind off once it’s firmed up.
This post may contain affiliate links so you can easily purchase items listed on the page. There is no increased cost to you for purchasing items through these links so feel free to use them!
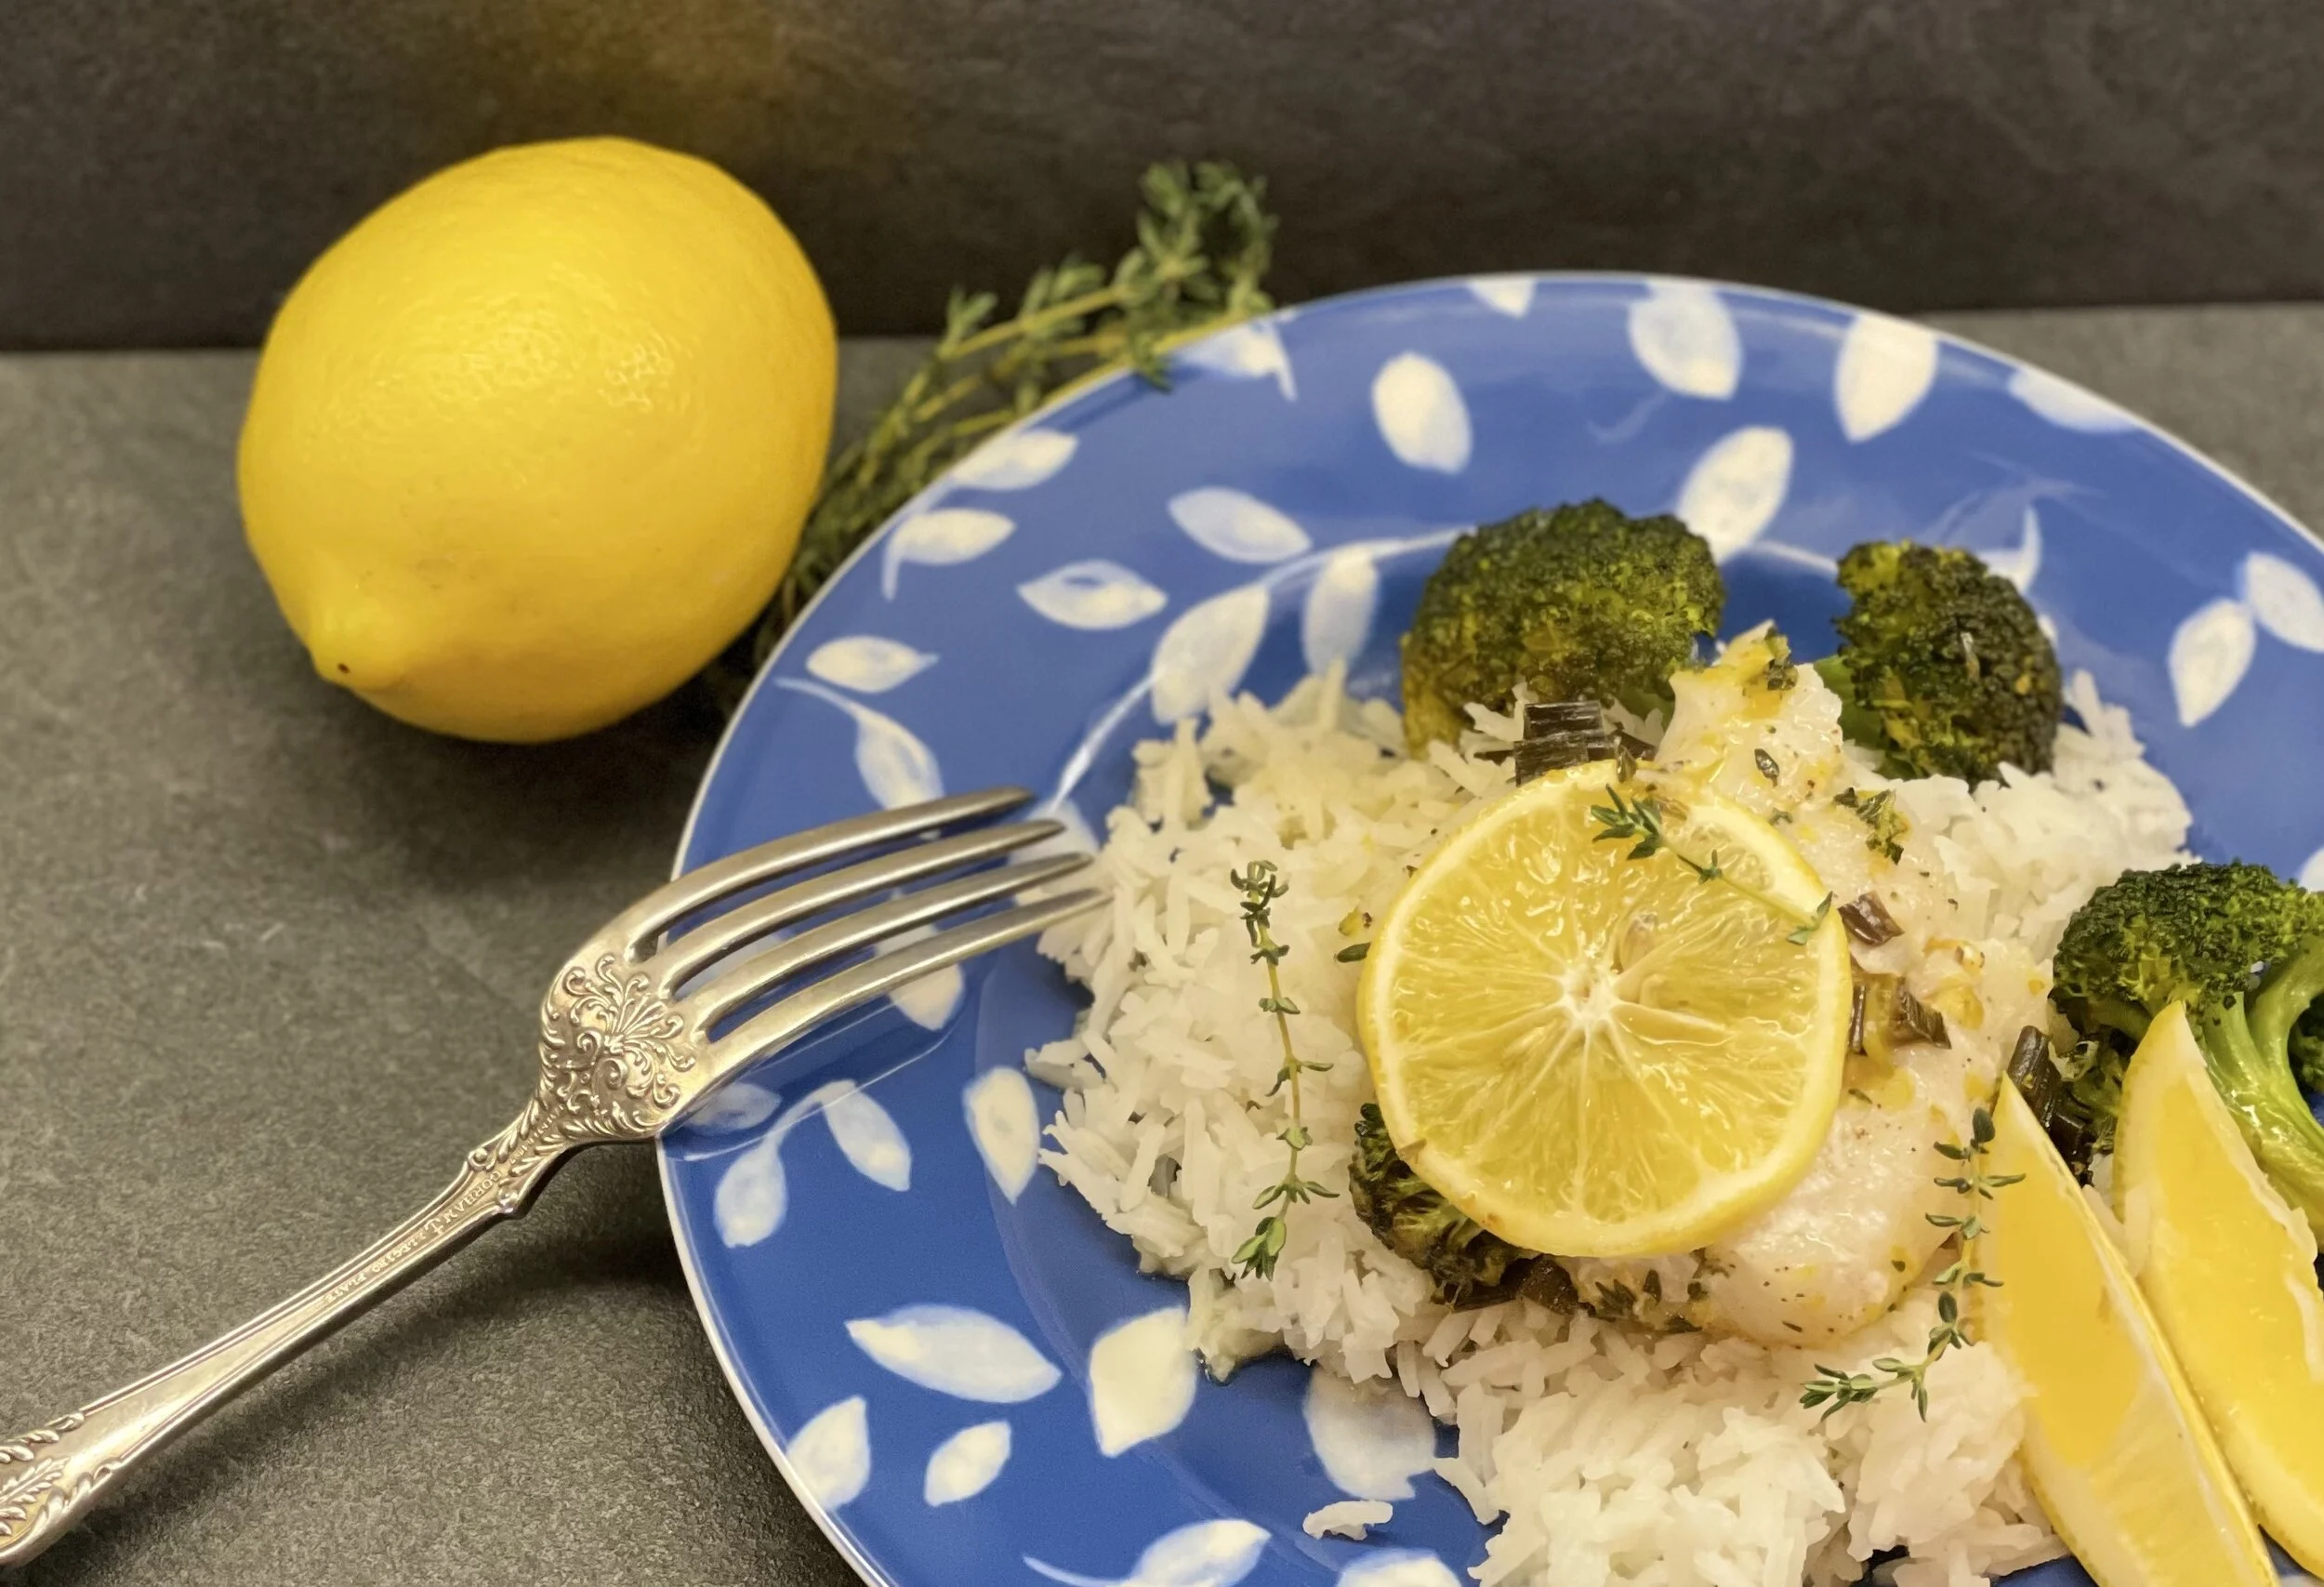
Low FODMAP baked lemon thyme cod
30 Minutes • Gluten-free • Low FODMAP • Serves 4
30 Minutes • Gluten-free • Low FODMAP • Serves 4 • This recipe delivers a wonderful delicate flavor that is sure to please the whole family. It’s light and flavorful and you cook the vegetables with the fish so it's an easy one-pan meal. Get the freshest fish you can for the best flavor and texture.
MARINADE INGREDIENTS:
1 – 1 1/2 pounds cod – or sub black cod, halibut, sea bass, or other firm white fish
2 tablespoons garlic-infused olive oil
1 teaspoon kosher salt
½ teaspoon pepper
2 teaspoons fresh thyme
Zest from one lemon
INGREDIENTS:
2 tablespoons garlic-infused olive oil
1 leek, green part only, thinly sliced
2 cups broccoli florets only (discard the stems)
Zest of one lemon
1 tablespoons fresh thyme
1/2 cup low FODMAP chicken broth, more as needed
1/2 cup dry white wine
Generous pinch salt and pepper
DIRECTIONS:
Preheat oven to 400 degrees F.
Cut cod into 4 pieces and pat dry. Place in a bowl, drizzle with olive oil and sprinkle with salt and pepper, thyme, and zest of one lemon and toss to coat well. Set aside.
Heat 2 tablespoons olive oil over medium heat in an oven-proof skillet, cast iron skillet, or dutch oven. Add leek greens and cook, stirring until leek greens and tender. Add the broccoli, zest of one lemon, fresh thyme, broth, and white wine. Stir in salt and pepper, simmer on medium-low heat until liquid has reduced by half, about 5 minutes.
If the broccoli needs a bit longer, add another splash of broth or wine and cover the pan for a few minutes, letting it steam and get tender. Once broccoli is tender. If the mixture seems dry, add another splash of broth—you want this slightly wet ( ¼- ½ inch liquid in the bottom of the pan).
Nestle in the fish in the pan, scraping out any excess marinade over the fish. Bake in the oven until fish is cooked through—about 10-15 minutes, depending on thickness.
Serve on a bed of steamed rice with extra lemon slices.
Enjoy!
This post may contain affiliate links so you can easily purchase items listed on the page. There is no increased cost to you for purchasing items through these links so feel free to use them!
Low FODMAP veggie stir fry
10 Minutes Prep • 15 Minutes Cook • Gluten-free • Low FODMAP • Vegetarian • Serves 4
10 Minutes Prep • 15 Minutes Cook • Gluten-free • Low FODMAP • Vegetarian • Serves 4 • This stir fry is quick to make, full of flavor, texture, and color. It’s also easy to modify with veggies you have on hand. I hope you enjoy this dish as much as we do.
INGREDIENTS:
7 ounces broccoli florets only
10 radishes (sliced or quartered)
1 red bell pepper (thinly sliced)
1 sweet potato (thinly sliced in half moons)
2 cups brown or white rice
2 tablespoons roasted and salted peanuts (chopped)
2 tablespoons garlic-infused olive oil
4-6 green onions (green part only - sliced)
Optional: Sliced avocado (1/8 per serving is low FODMAP), fresh sprouts (such as broccoli sprouts) or cilantro, to garnish
SAUCE
4 tablespoons gluten-free low sodium soy sauce
4 tsp toasted sesame oil (for flavor)
3 tablespoons rice vinegar or lime juice
1 tablespoon mirin or maple syrup
1 tablespoon finely grated ginger, adjust to taste
2 teaspoons cornstarch or arrowroot
DIRECTIONS:
Chop your veggies into small, equal size pieces. Cut the broccoli into florets and discard the stems. Slice or quarter the radishes, slice the bell pepper into thin slices and slice the sweet potato into thin slices or half-moons.
Prepare rice according to package instructions. If using brown rice, allow extra cooking time before you start cooking your veggies.
Mix all the sauce ingredients together in a bowl or mason jar. Adjust the amount of ginger to taste and set aside.
Heat a large frying pan over medium-high heat, add in a tablespoon of oil to the hot pan and swirl it around so that it coats the bottom of the pan.
Throw in the broccoli and sweet potato and stir-fry for about 1 minute.
After 1 minute, add the bell pepper and stir-fry for another minute.
Next add in the radishes, and green onions. Stir fry for another minute or so.
Push the contents of the pan to the side with your spatula and give the prepared sauce a good stir or shake (so it’s well combined before you add) and pour the sauce into the hot pan.
Turn the heat off immediately after adding the sauce, it should thicken in the residual heat of the pan. Mix it into the veggies.
Divide the cooked rice between four bowls, top with stir-fried veggies, and chopped peanuts cashews. Garnish with sliced avocado, fresh sprouts, or cilantro if you wish.
This post may contain affiliate links so you can easily purchase items listed on the page. There is no increased cost to you for purchasing items through these links so feel free to use them!
Are probiotics the answer for your IBS symptoms?
Another free guide to help you get your IBS symptoms under control.
The answer to this question is maybe yes and maybe no. And, you won’t know if it’s a yes until you test it in a very systematic way. How do you do that? Let me tell you…

If you want to try a probiotic, you have to be systematic or you will never know if it is helping, hurting, or doing nothing at all.
Here’s how you do that:
Choose a 15-30-day period when you can easily eat a purely low FODMAP diet so you have a clean environment in which to test your body’s response to probiotic therapy. Introduce the daily probiotic and take it daily for 15-30 days. If you notice a positive change in your gut behavior then a probiotic may be the answer for you. If you’ve been scrupulous about eating a low FODMAP diet during your probiotic introduction and you notice a negative change (increased diarrhea, constipation, gas, or another discomfort) then a probiotic is likely not the answer for you. If you don’t notice any change at all, then continuing to take a probiotic is up to you. If it makes you FEEL like you’re doing something helpful and there’s no negative consequence, go for it.
There are many options of probiotics out there. One example that contains all three strains that are beneficial for those of us with IBS is Garden of Life Raw Probiotics Ultimate Care. I recommend you browse the probiotics that are available to you locally and read the ingredients to see what strains are included. Probiotics from the Bifidobacterium, Lactobacillus, and Saccharomyces families have shown particular promise for those of us with IBS. (See this article or this article for more on that).
A word of caution: Watch out for the prebiotic soluble fibers inulin and fructooligosaccharides (FOS), which are highly fermentable fibers that should be avoided because they often trigger IBS symptoms. These sneaky little ingredients are frequently added to protein shakes and bars, yogurts, probiotic supplements, fiber supplements, and more.
Wait…what are probiotics and why would they be helpful for my IBS?
Probiotics are an interesting topic for people with irritable bowel syndrome (IBS). Many IBS sufferers take probiotics in the hope that balancing out their gut bacteria will improve their symptoms. A number of studies have shown that specific probiotics may have the potential to do just that.
As you know, if you’ve been following me, I’m not a huge proponent of taking medications or supplements if you can manage your symptoms and maintain your good health through diet. Antibiotics and other medications that may be used to treat symptoms of IBS can damage healthy bacteria living in the gut and actually lead to worsening symptoms of IBS. The more medications you take, the more unknowns you throw into your system, and identifying and solving the real problems can get even harder.
That being said, in some cases a supplement may actually be needed. As noted, probiotics from the Bifidobacterium, Lactobacillus, and Saccharomyces families have shown particular promise for those of us with IBS and may be worth a try, especially if you are not able to tolerate even small amounts of certain high FODMAP food categories or you’re having trouble getting your symptoms under control even with a careful low FODMAP diet approach.
Why is that? Your digestive system is filled with a collection of beneficial bacteria known as “gut flora,” and these bacteria play an important role in your overall health. Sometimes, and for various reasons, your gut flora can get thrown out of balance, allowing harmful bacteria to multiply and take over. Your gut flora, if out of balance, may contribute to the symptoms of IBS. Probiotics may help restore balance in a number of ways, including by inhibiting the growth of harmful bacteria, reducing inflammation, and slowing down the digestive system.
What Are Probiotics?
Probiotics are strains of live bacteria or yeast that are found in foods and supplements. They’re safe, similar to your natural gut flora, and may provide some benefits to your health such as supporting weight loss, improving heart health, improving digestion, and boosting the immune system.
Common foods that naturally contain probiotics tend to be fermented such as yogurt, sauerkraut, tempeh, or kimchi. While we can eat some of these foods (lactose-free yogurt and plain tempeh), others are high in FODMAPs and should be avoided (sauerkraut and kimchi).
How Do Probiotics Work with IBS?
IBS symptoms have been linked to certain changes in the gut flora. For example, people with IBS have been shown to have lower amounts of Lactobacillus and Bifidobacterium in their guts, and higher levels of harmful Streptococcus, E. coli, and Clostridium.
Whether this change is a cause or the result of IBS is uncertain but we do know changes in the gut flora can influence IBS symptoms by increasing inflammation, increasing sensitivity to gas in the intestine, reducing immune function, and changing digestive motility.
Probiotics may improve symptoms in the following ways:
Inhibiting the growth of disease-causing bacteria
Enhancing the immune system’s barrier functions
Helping fight inflammation
Slowing down bowel movements
Reducing gas production by balancing the gut flora
Reducing the gut’s sensitivity to gas buildup
So, are probiotics the answer for you? Only you can answer that question. I hope I have given you the information you need to do that in a systematic way.
This post may contain affiliate links so you can easily purchase items listed on the page. There is no increased cost to you for purchasing items through these links so feel free to use them!
Nana Sears flourless peanut butter cookies (low FODMAP)
20 Minutes • Gluten-free • Low FODMAP • Makes 24 cookies
20 Minutes • Gluten-free • Low FODMAP • Makes 24 cookies • If you like peanut butter cookies, you will LOVE these. So simple to make (we love simple ingredients) and delightful to eat. Nana Sears didn’t make these to be low FODMAP she just made them to be delicious!

INGREDIENTS:
1 cup creamy peanut butter
1 cup granulated sugar + more for rolling
1 egg
1 teaspoon baking soda
1/2 cup semi-sweet chocolate chips
1 teaspoon coconut oil
1/2 cup roasted salted peanuts chopped
DIRECTIONS:
Preheat oven to 350 degrees F and line a cookie sheet with parchment paper.
Combine peanut butter and sugar and mix well. You can do this by hand or in your stand mixer.
Add egg and baking soda and continue to mix until fully combined.
Roll 1 tablespoon of dough at a time in a small ball, then roll in sugar and put it on your tray. Don’t put them too close as they spread when they cook.
Press each dough ball down with a fork (dip the fork in sugar if it sticks).
Bake for 10 minutes then remove from oven and allow to cool on sheet.
Melt the semisweet chocolate with the coconut oil in the microwave. Use a fork to drizzle it across the cookies.
Sprinkle with chopped peanuts and salt. Let cool fully.
Enjoy!
Original recipe from Helen Sears Chaknova. Thank you Helen! I love these!
This post may contain affiliate links so you can easily purchase items listed on the page. There is no increased cost to you for purchasing items through these links so feel free to use them!
Low FODMAP broccoli parmesan risotto
10 Minutes Prep • 30 Minutes Cook • Gluten-free • Low FODMAP • Serves 4
10 Minutes Prep • 30 Minutes Cook • Gluten-free • Low FODMAP • Serves 4 • Broccoli is one of the most perfect low FODMAP veggies as long as you stick to the tops only. This risotto is a quick go-to that blends the creaminess of the rice, the tang of the parmesan, and packs it with good greens for your health!

INGREDIENTS:
1 pound broccoli florets
2 cups flat-leaf parsley, plus whole leaves for garnish
1 cup lactose-free half and half or whole milk
8 - 9 cups low FODMAP chicken stock
2 cups Arborio rice
4 tablespoons unsalted butter
4 green onions (green part only), finely minced
1 cup white wine
2 cups grated Parmesan cheese, plus shavings for garnish
DIRECTIONS:
Bring a large pot of water to a boil, salt generously, then toss in the broccoli florets for a brief 2 minutes. Remove immediately and run under cold water. Wrap in a towel and wring out as much of the water as possible. Place in a food processor along with the parsley and half and half or milk. Pulse until very smooth.
Pour the chicken broth into a small pot. This next step is optional: For a creamier risotto, place the rice in a sieve and rinse in the stock (you may have to tilt the pot to submerge rice in stock). Bring the now cloudier, starchier stock to a gentle simmer and keep warm over low heat.
In a medium braiser or any wide-bottomed, high-sided pan (I just use the large pot from cooking the broccoli earlier), melt butter and sauté green onions for a minute or two until tender. Stir in the drained rice, coating each grain until butter-slicked. Add the wine and cook to reduce, stirring constantly.
Once the alcohol has evaporated, lower the heat and slowly ladle in the hot stock (one or two ladlefuls at a time), stirring until fully absorbed by the rice between each addition. Keep stirring until the rice is al dente, about 18 to 20 minutes.
When cooked to your liking, stir in the broccoli floret puree and grated Parmesan, which should loosen the risotto up a bit. Season to taste with salt and pepper. If desired, garnish with whole parsley leaves and Parmesan shavings.
Enjoy!
This post may contain affiliate links so you can easily purchase items listed on the page. There is no increased cost to you for purchasing items through these links so feel free to use them!
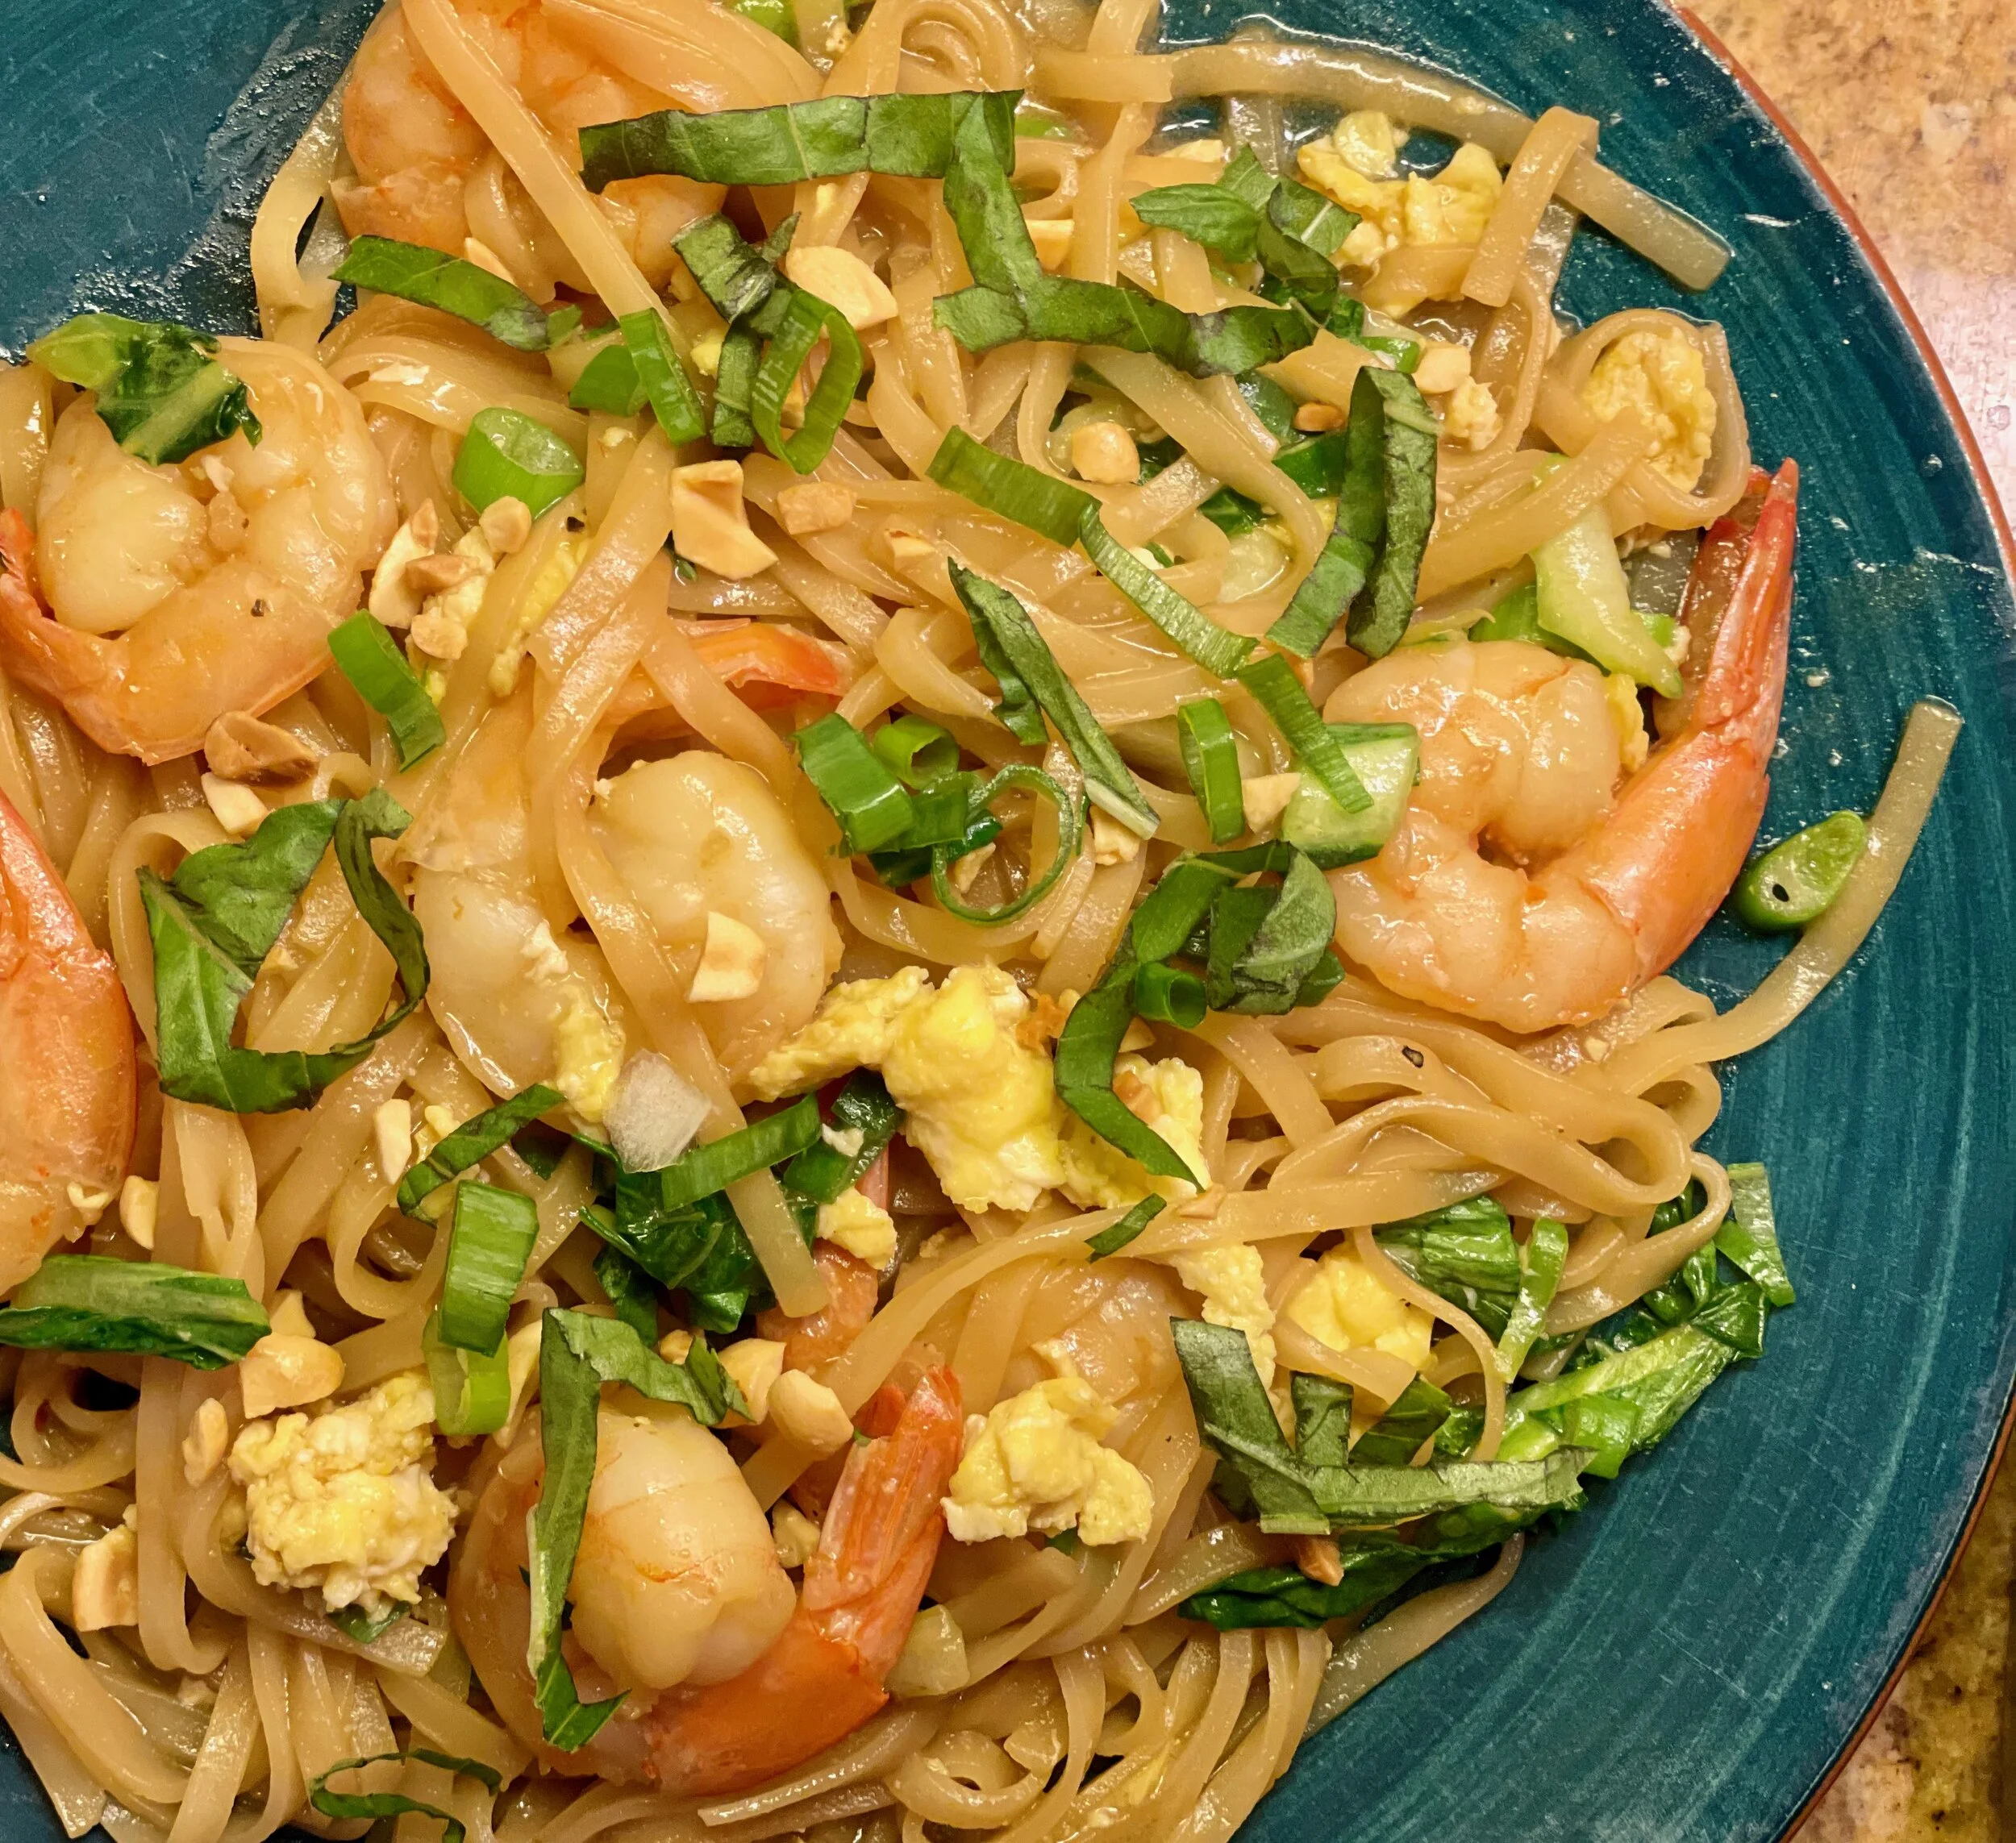
Low FODMAP garlic butter shrimp pad Thai
30 Minutes • Gluten-free • Low FODMAP • Serves 4
30 Minutes • Gluten-free • Low FODMAP • Serves 4 • Craving a good garlic butter shrimp pad Thai that won’t give you a stomachache? Then you’ll LOVE this recipe! This pad Thai is wonderfully flavorful, fresh, and quick to make. And best of all? It's low FODMAP so your tummy will be happy too.
INGREDIENTS
8 ounces wide rice noodles
4 tablespoons gluten-free low sodium soy sauce, using more or less to taste
2 tablespoon rice vinegar
3 tablespoons maple syrup
1/4 teaspoon chili flakes, plus more for serving
1 pound cooked jumbo shrimp, peeled and deveined
3 tablespoons garlic-infused olive oil
3 tablespoons salted butter
2-3 eggs, beaten
2 cups bean sprouts or chopped baby bok choy (or half and half)
4 green onions (green part only) chopped, plus more for serving
1/4 cup roasted peanuts, chopped
Thai or regular basil and limes, for serving
DIRECTIONS:
Thaw your shrimp in a colander for three minutes under running cool water or overnight in the fridge.
Prepare the rice noodles according to package instructions and set them aside.
To make the sauce. In a small bowl, combine the soy sauce, rice vinegar, maple syrup, and chili flakes.
Heat the olive oil and butter in a large skillet over medium heat. When melted and hot, add the shrimp and saute for 2-3 minutes. Add a pinch of both chili flakes and black pepper. Continue to cook the shrimp in the butter for another 1-2 minutes until they are well heated.
Add the noodles and sauce, tossing to combine. Cook until the noodles are warmed through and begin soaking up the sauce, about 1 minute. In a separate skillet, scramble the eggs then add to the noodle mixture with the bok choy and toss to combine. Remove from the heat. Add the bean sprouts and green onions, toss once more to combine.
Divide the noodles and shrimp between plates. Top with basil, green onions, peanuts, and chili flakes, and a squeeze of lime juice.
Enjoy!
This post may contain affiliate links so you can easily purchase items listed on the page. There is no increased cost to you for purchasing items through these links so feel free to use them!
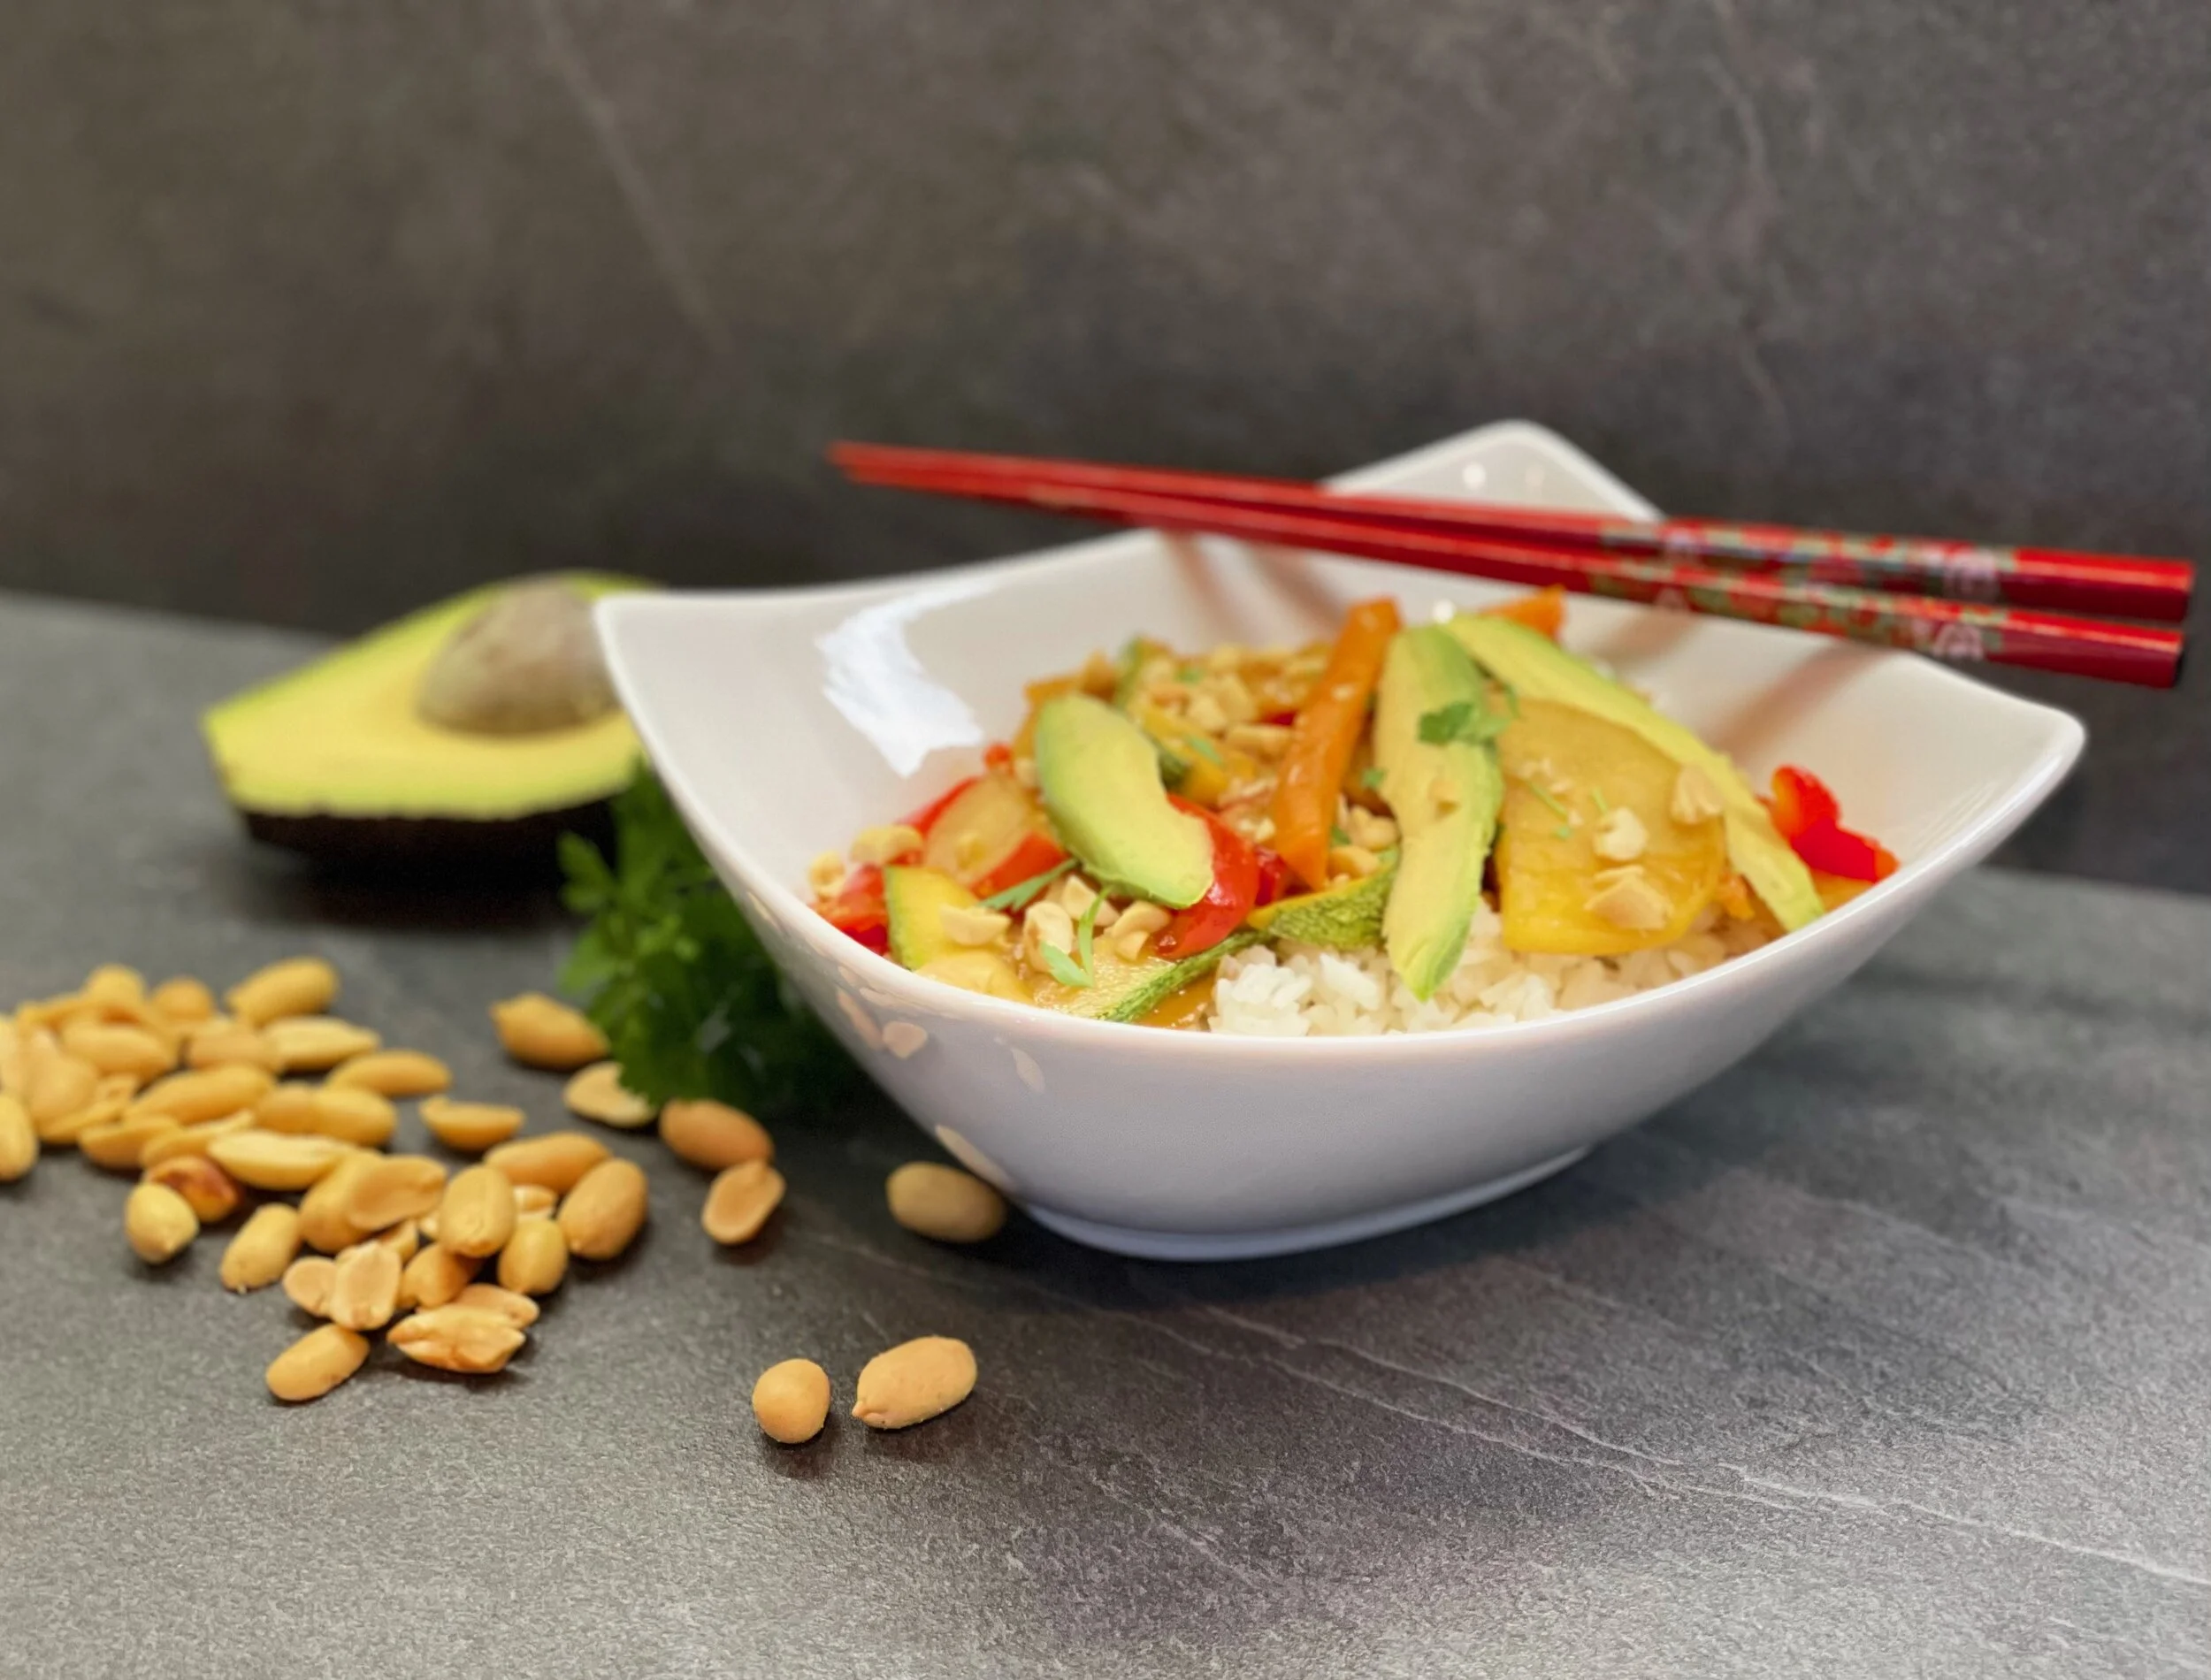
Low FODMAP Budha bowl
Prep 20 Minutes • Cook 30 Minutes • Gluten-free • Low FODMAP • Serves 4
Prep 20 Minutes • Cook 30 Minutes • Gluten-free • Low FODMAP • Serves 4 • This simple vegetarian dish is simply wonderful! The colors and flavors are crisp and fresh and the sweet potatoes bring a delightful creaminess to the whole thing. The ginger vinaigrette is FULL of flavor, and you’ll love it on any veggie bowl or salad.

INGREDIENTS:
2 heads of broccoli tops (no stems) cut into bite-sized pieces
1 large sweet potato (orange or white), cut into wedges (low FODMAP serving size is 1/2 cup)
2 tablespoons extra virgin olive oil
Kosher salt and pepper
2 tablespoons raw sesame seeds
2 cups shredded purple cabbage (low FODMAP serving size is 3/4 cup)
Juice from 1 lemon
1 cup cooked white rice, brown rice, or quinoa
2 carrots shredded
1/2 avocado sliced (low FODMAP serving is 1/8 of an avocado)
1 Cara Cara orange, blood orange, or navel orange, sliced
TURMERIC GINGER VINAIGRETTE:
1 tablespoon garlic-infused olive oil
1-inch piece fresh ginger, peeled
1 tablespoon apple cider vinegar
1 tablespoon maple syrup
Juice from 1 lemon
½ teaspoon ground turmeric
Kosher salt and pepper
1 pinch cayenne pepper
DIRECTIONS:
Preheat the oven to 425 degrees F and line a rimmed baking sheet with parchment (for easier cleanup).
Place the sweet potato wedges in a bowl and toss with 1 tablespoon olive oil, and a pinch each of salt and pepper. Transfer to the on the prepared baking sheet and put them in the oven to cook for 15-20 minutes, then remove from the oven.
Toss the broccoli with the remaining tablespoon of olive oil, and add to the baking sheet with the sesame seeds sprinkled over the top. Return to the oven and roast for another 15 minutes or until the sweet potatoes and broccoli are done to your likeness.
Meanwhile, combine the shredded cabbage, lemon juice, and a pinch of salt in a medium bowl and massage with your hands for 30 seconds to 1 minute to tenderize the cabbage.
To assemble, divide the rice among bowls. Add the roasted veggies, cabbage, carrots, avocado, and oranges. Top with sprouts and hemp seeds and drizzle with the dressing (recipe follows).
DIRECTIONS TURMERIC GINGER VINAIGRETTE
Combine all ingredients in a blender and blend until mostly smooth. Taste and adjust seasonings as needed.
Enjoy!
Original recipe inspired by Tieghan Gerard, Half Baked Harvest
This post may contain affiliate links so you can easily purchase items listed on the page. There is no increased cost to you for purchasing items through these links so feel free to use them!
Facts about FODMAPs
In this guide, you’ll find some of the most common myths about FODMAPs alongside the facts to keep you informed and help you on your journey to get your IBS under control!
There is a lot of information out there about FODMAPs and it can be tricky to filter out the facts from the fiction. In this guide, you’ll find some of the most common myths about FODMAPs alongside the facts to keep you informed and help you on your journey to get your IBS under control!

Here are a couple of examples of the fictions we address:
Fiction: If I’m intolerant to foods that are high in FODMAPs, it means I’ll never be able to eat them again.
Fiction: If you are experiencing gut symptoms such as diarrhea, bloating, or abdominal pain you should get on a low FODMAP diet right away.
Get the facts and get your IBS under control!
Low FODMAP roasted turmeric chicken and golden rice
Prep 20 Minutes • Cook 30 Minutes • Gluten-free • Low FODMAP • Serves 4
Prep 20 Minutes • Cook 30 Minutes • Gluten-free • Low FODMAP • Serves 4 • This low FODMAP roasted turmeric chicken and rice are full of flavor, color, and texture. It’s a great meal to switch up your average weeknight dinner. And the leftovers are really delicious the next day.

INGREDIENTS:
1 pound boneless skinless, chicken breasts (or thighs) cut into bite-size pieces
3 tablespoons garlic-infused olive oil
2 teaspoons smoked paprika or sweet paprika
2 teaspoons ground cumin
1/2 teaspoon ground cardamom
1/2 teaspoon ground turmeric
1/8 teaspoon ground cinnamon
1/4-1/2 teaspoon cayenne pepper (depending on taste)
Juice from one half of a lemon
Kosher salt and black pepper to taste
Fresh-squeezed lemon
For serving any/all of the following: Lemon wedges, cucumber slices, chopped red or orange bell pepper, chopped chives, or thinly sliced green onions (green part only).
GOLDEN RICE INGREDIENTS:
4 tablespoons salted butter (or olive oil, if the lactose in butter bothers you)
1 teaspoon ground turmeric
1 pinch crushed red pepper flakes
1 1/2 cups long-grain rice, such as jasmine or basmati
1 (14 ounce) can of full-fat coconut milk
1 1/2 cups low FODMAP chicken broth, plus more as needed
1 teaspoon kosher salt, plus more as needed
2 cups roughly chopped greens such, as kale, chard, or spinach
DIRECTIONS:
In a bowl, combine the olive oil, chicken, paprika, cumin, cardamom, turmeric, cinnamon, cayenne, lemon, and a large pinch each of salt and pepper. Let marinate for 15 minutes at room temperature or up to overnight in the refrigerator.
Preheat the oven to 425° F. Arrange the chicken on a baking sheet. Bake 10 minutes, toss and bake another 5 minutes, or until cooked through. Switch the oven to broil. Broil 1-2 minutes, until the chicken chars on the edge. *Watch closely so it doesn’t burn!
Meanwhile, make the rice.
Melt the butter, turmeric, and crushed red pepper flakes in a medium pot over high heat. Add the rice and toss to coat. Stir in 1 1/2 cups of broth, coconut milk, and a pinch of salt and bring to a boil. Add the greens on top of the rice, but do not stir. Place the lid on the pot and turn the heat down to the lowest setting possible. Allow the rice to cook ten minutes on low and then turn the heat off completely and leave the cover on. Let the rice sit, covered, for another 10 minutes.
When the rice is cooked, switch the heat onto low, and if needed, add additional broth 1/2 cup at a time until the consistency of the rice is to your liking. Taste, adding salt as needed.
Serve the chicken on the rice with a good squeeze of fresh lemon juice over the top and garnished with any/all of these: cucumber slices, avocado slices (less than 1/8 for low FODMAP serving), chopped chives, or thinly sliced green onions (green part only).
Enjoy!
This post may contain affiliate links so you can easily purchase items listed on the page. There is no increased cost to you for purchasing items through these links so feel free to use them!
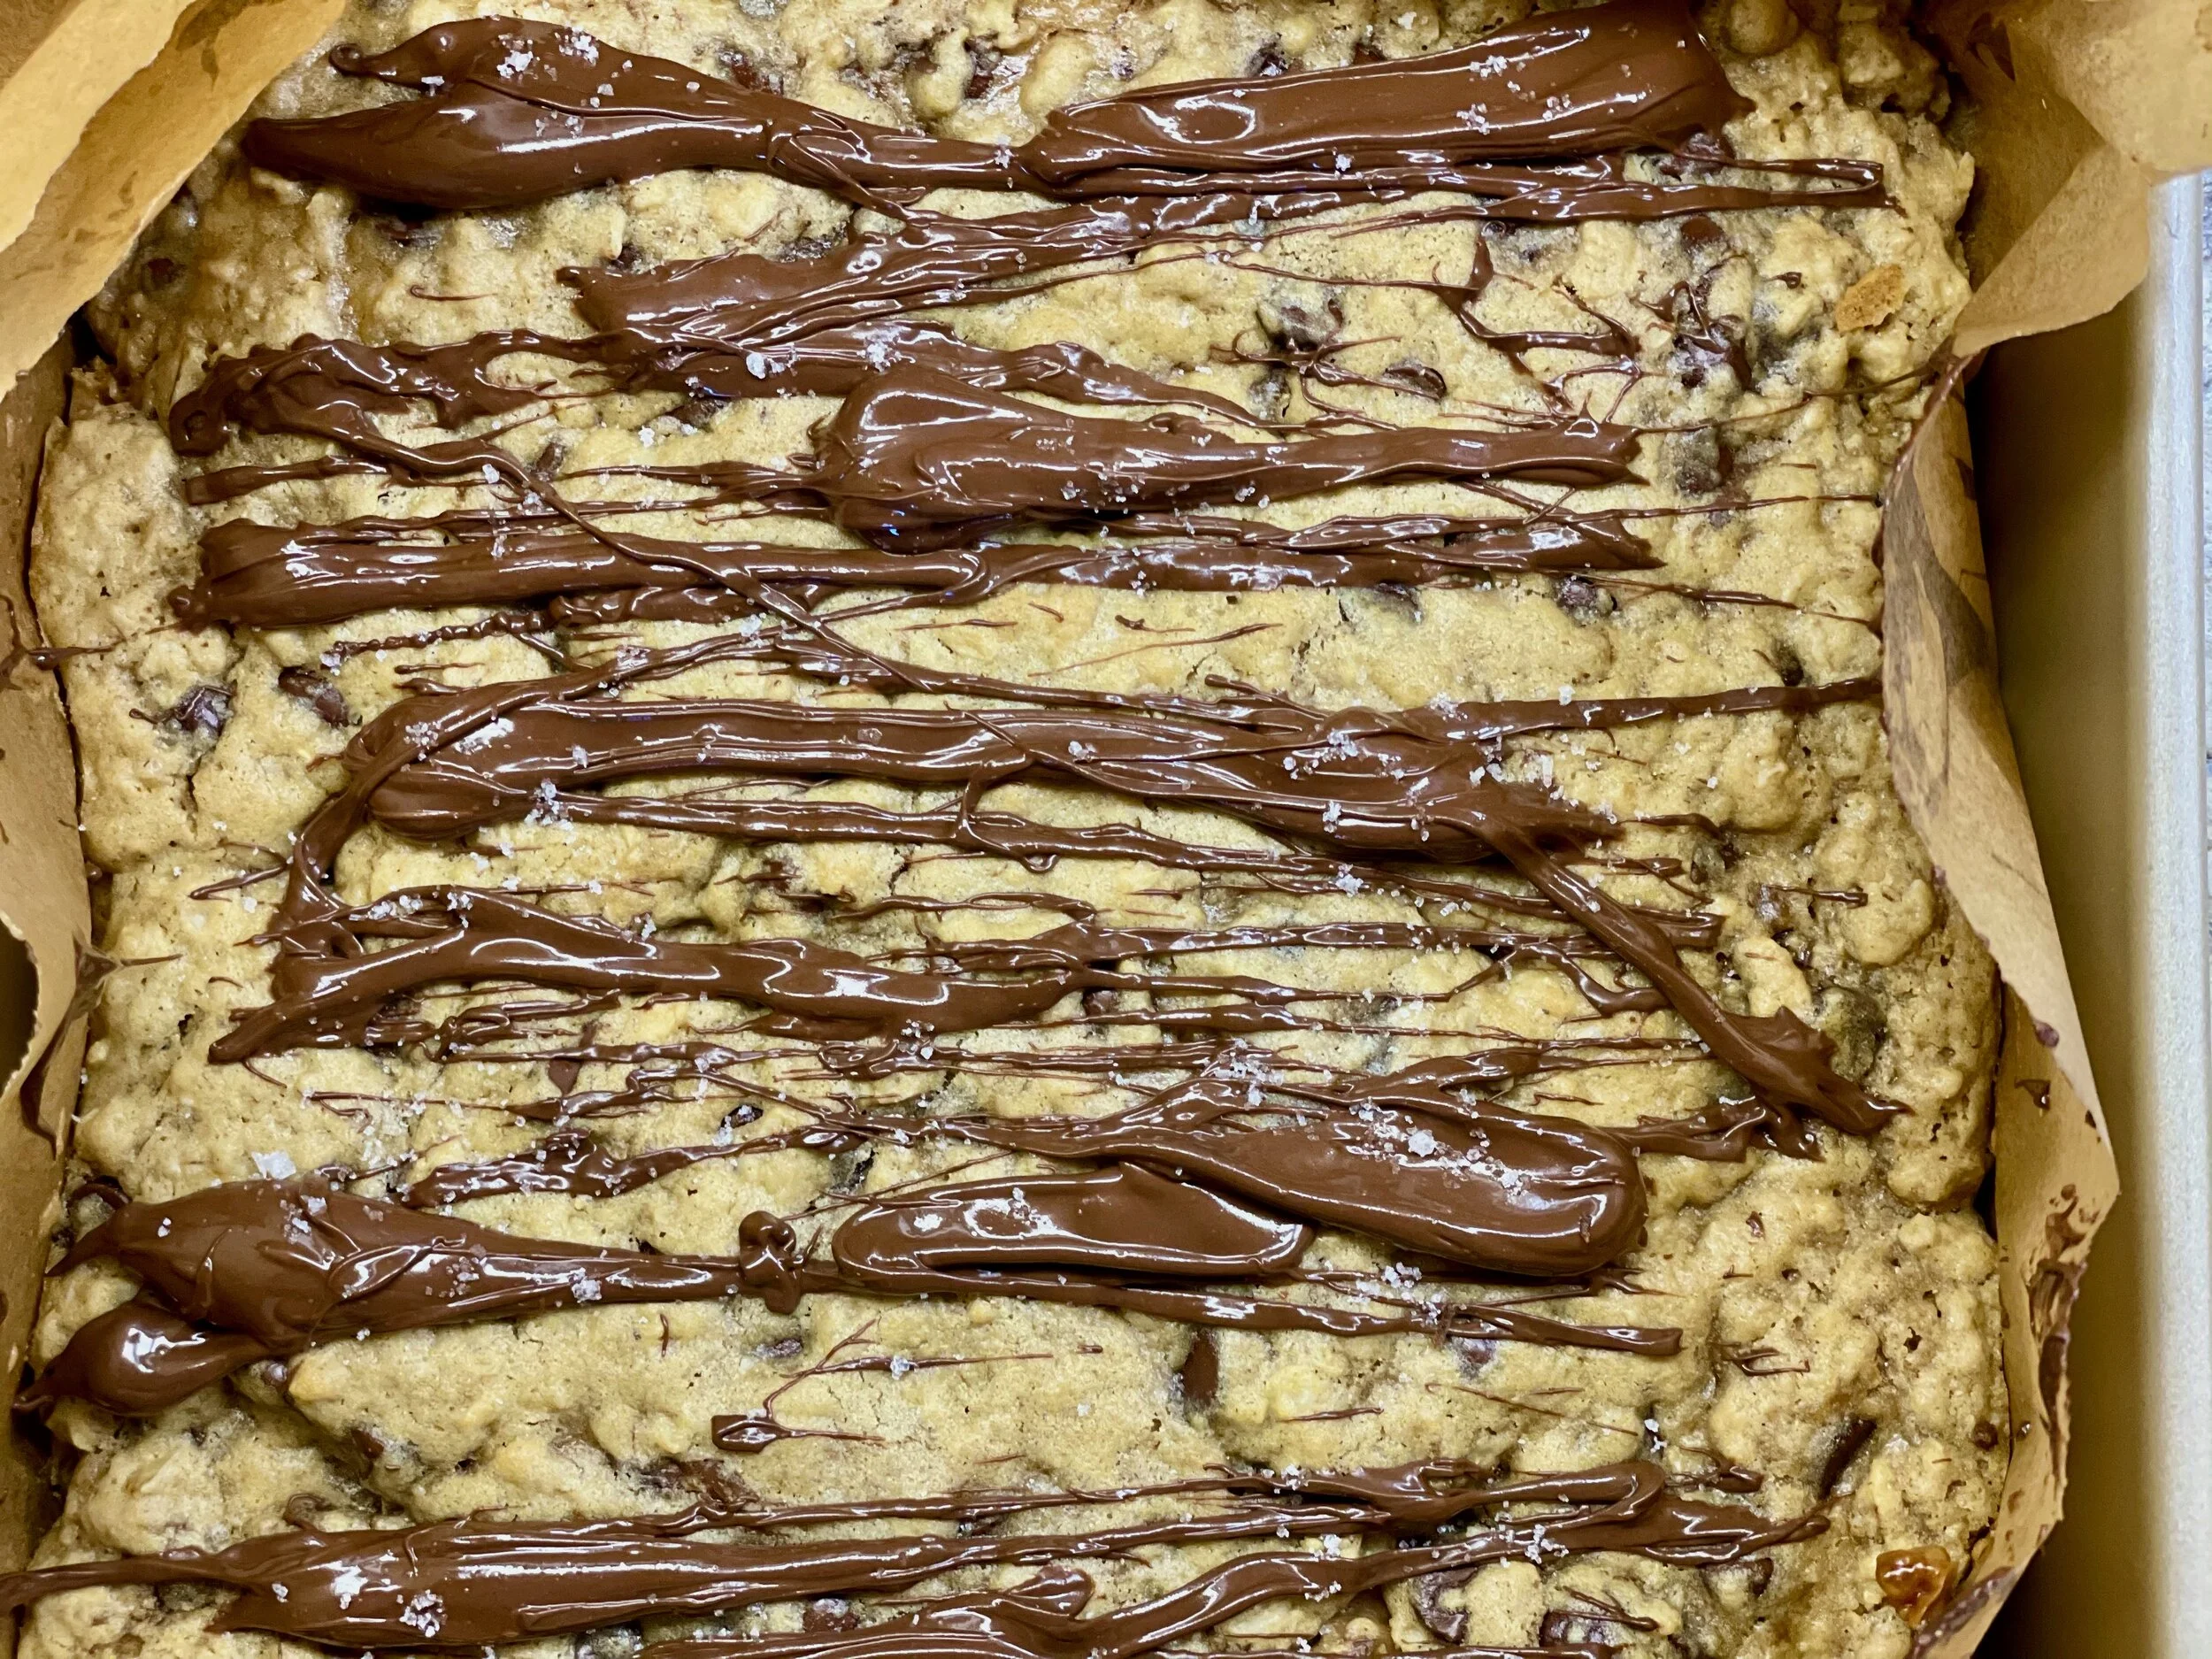
Low FODMAP toffee chocolate cookie bars
30 Minutes • Gluten-free • Low FODMAP • Makes 16 bars
30 Minutes • Gluten-free • Low FODMAP • Makes 16 bars • A thin layer of toffee in the middle makes these bars extra special but don’t worry—they are also super easy to make! Toss everything in one bowl and mix it up for the bars. Make the toffee in a small saucepan. Layer it up and dive in!
INGREDIENTS:
1 cup gluten-free old fashioned oats
1 cup gluten-free all-purpose flour
1/2 cup light brown sugar
1 teaspoon baking soda
1/2 teaspoon kosher salt
1/2 cup melted butter or coconut oil
1 large egg or 2 medium eggs
2 teaspoons vanilla extract
1 cup semi-sweet chocolate chips
TOFFEE LAYER INGREDIENTS:
1/2 stick (1/4 cup) salted butter
3/8 cup light brown sugar
1/8 cup real maple syrup
1/2 teaspoon baking powder
Pinch of salt
DIRECTIONS:
Preheat the oven to 350° F. Line an 8x8 inch square baking pan with parchment paper.
In a medium-size mixing bowl or the bowl of a stand mixer, mix the oatmeal, flour, brown sugar, baking soda, salt, butter, eggs, and vanilla. Beat until all the ingredients are combined. Mix in the chocolate chips. Spread half of the dough evenly into the bottom of the prepared baking pan. Bake 8 minutes.
Meanwhile, make the toffee layer. In a small saucepan, melt together the butter, brown sugar, and maple syrup over medium heat. Gently boil, stirring constantly until thickened, about 5-8 minutes. Remove from the heat and stir the baking powder and a pinch of salt.
Remove the bars from the oven and spread the toffee over the top. Add the remaining oatmeal dough and spread evenly. Bake another 10 minutes or until the top is golden brown. Add a sprinkling of flaky salt. Let cool completely, then cut into bars or eat them warm (if a bit gooey!) Enjoy!
This post contains affiliate links so you can easily purchase items listed on the page. This is for your information and convenience. If you purchase through this link, I may earn a commission but there is no additional cost to you. Please read my disclosure for more information.
Crunchy low FODMAP oven-baked tacos-supreme
40 Minutes • Gluten-free • Low FODMAP • Serves 4
40 Minutes • Gluten-free • Low FODMAP • Serves 4 • These crunchy oven-baked tacos are delicious and so easy to make you’ll want to add them to your weekly regulars! Served with a mix of your favorite taco toppings and a squeeze of lime, they’re a meal the whole family will love. And, they are great leftover too - just pop them in a hot oven for ten minutes and you’ve got a fresh crunchy taco for lunch!

INGREDIENTS:
2 tablespoons garlic-infused olive oil
1 pound ground chicken, beef, or turkey
4 green onions (green part only) chopped
2-3 teaspoons chili powder, use to your taste
2 teaspoons smoked paprika
1 1/2 teaspoons ground cumin
1/4-1/2 teaspoon crushed red pepper, use to your taste
1/2 teaspoon dried oregano
1 teaspoon Smoke n Sanity Essence of Garlic salt* (and leave the teaspoon of salt out)
OR 1 teaspoon Gourmend Garlic Scape powder* and add the salt below
1 teaspoon kosher salt
1/4 cup fresh cilantro or chives (if you hate cilantro), chopped
1/4 cup canola oil (for frying the tortilla shells)
8 gluten-free corn tortillas
2 cups shredded extra-sharp cheddar cheese
2 limes, quartered
Your favorite taco toppings: Chopped tomatoes, shredded lettuce, sour cream, hot sauce, you name it!
DIRECTIONS:
Preheat the oven to 425 degrees F.
In a large skillet, heat the olive oil over high heat. When the oil shimmers, add the ground chicken and green onions. Cook, breaking up the meat as it cooks until the chicken is browned, about 5 minutes. Add the chili powder, paprika, cumin, essence of garlic salt or garlic scape powder, red pepper flakes, oregano, and salt. Add 3/4 cup water. Reduce the heat to medium and simmer until the sauce has thickened slightly around the chicken, about 10 minutes. Remove from the heat and stir in the cilantro or chives (we love cilantro but we know some of you really don’t like it!).
Meanwhile, in a medium skillet add about 1 tablespoon of canola oil. Heat over medium-high until the oil shimmers and a drop of water make the oil spatter. Cook each tortilla for about 30 seconds on each side until it starts to brown and bubble up a bit. Remove from the pan and bend over the handle of a wooden spoon to shape in half, then set aside on paper towels.
Line the taco shells up on a parchment-lined (for easy clean up) rimmed baking sheet or 9x13 inch baking pan. Evenly divide the meat among each taco shell and top with cheese. Bake 10 minutes, until the cheese has melted and the shells have crisped.
Meanwhile, prepare your toppings.
Serve the tacos with a generous squeeze of lime and topped with your favorite taco toppings.
Roll up your sleeves and dive in!
*If you don’t have either of these in your pantry, leave them out. It will be fine. Just add a bit more scallions or chives to balance the flavor.
This post may contain affiliate links so you can easily purchase items listed on the page. There is no increased cost to you for purchasing items through these links so feel free to use them!
Low FODMAP bok choy chicken fried rice
25 Minutes • Gluten-free • Low FODMAP • Serves 4
25 Minutes • Gluten-free • Low FODMAP • Serves 4 • Simple, delicious, healthy and it won’t upset your stomach. Need I say more? Make extra so you can have it for lunch the next day! Omit the eggs and chicken breast to make this a vegan-friendly recipe. You can also consider adding firm tofu in place of the chicken for a vegetarian option.

INGREDIENTS
2 cups brown or white rice, cooked
1 pound chicken breast, cubed
1 tablespoon + 1 teaspoon garlic-infused olive oil
2 eggs, beaten
2 teaspoons coconut oil
4 green onions, green part only - chopped
1 pound bok choy, washed and chopped
1/2 cup carrots, diced
1 head broccoli florets cut into bite-size pieces
1 tablespoon ginger, minced
1 tablespoon gluten-free low-sodium soy sauce
1 teaspoon toasted sesame oil
1/2 teaspoon pepper
1/4 teaspoon red pepper flakes
Additional salt and black pepper to taste
Toasted sesame seeds for serving
DIRECTIONS:
Cook brown or white rice according to package instructions.
Heat a large skillet over medium-high heat and add 1 tablespoon garlic-infused olive oil. Add cubed chicken and cook just until cooked through. Remove the chicken and set it aside.
In the same skillet, add a bit more garlic-infused olive oil, the beaten eggs, and a dash of black pepper. Cook and scramble the eggs for about 1 minute. Remove cooked eggs and set them aside. Wipe skillet if necessary.
Add coconut oil to the skillet. When the oil is hot, add ginger, green onions, broccoli, and carrots. Cook for about 3 minutes; stir frequently.
Add bok choy and cook for about 3-4 minutes; stir frequently.
Add remaining ingredients: cooked rice, soy sauce, sesame oil, cooked chicken, pepper flakes, salt, and pepper to taste. Toss mixture for about 3 minutes until ingredients are evenly distributed and heated through.
Enjoy!
Pro-tip, scramble in an egg or two when you’re heating it up for lunch the next day!
This post contains affiliate links so you can easily purchase items listed on the page. This is for your information and convenience. If you purchase through this link, I may earn a commission but there is no additional cost to you. Please read my disclosure for more information.
Low FODMAP bacon cherry tomato pizza
30 Minutes • Gluten-free • Low FODMAP • Serves 4
30 Minutes • Gluten-free • Low FODMAP • Serves 4
Have you been craving a good pizza that won’t give you a stomachache? This is it! The delicious, yeasted crust is just the right combination of chewy and crisp. It’s quick to make because it doesn’t require any kneading and it rises while it cooks, so don’t be afraid to try this tonight. Your whole family will love it!

Ingredients
2 cups gluten-free flour (Bob’s Red Mill 1 to 1 works well)
1 packet active dry yeast (2 1/4 tsp)
1 Tablespoon sugar
1 tsp salt
1 large egg
1 tsp dried basil
2 tablespoon garlic-infused olive oil (or regular)
Additional olive oil for spreading the dough
1 tsp apple cider vinegar (or white vinegar works too)
¾ cup warm water (105 – 110 degrees F)
1 cup extra sharp cheddar cheese, grated
6 slices bacon - cooked and chopped
10 cherry tomatoes - halved
6 fresh basil leaves - cut into strips
1/2 cup freshly grated parmesan cheese
Salt and pepper
DIRECTIONS
Set pizza stone or cookie sheet on the lower rack of the oven and preheat oven to 425 degrees F.
Combine water, sugar, and yeast in a small bowl and let sit for 5 minutes until it begins to froth.
Combine flour, salt, and dried basil in a large bowl. Add in the egg, olive oil, vinegar, and yeast mixture.
Stir until the flour is combined and the dough comes away from the sides of the bowl. Don’t add more flour – the dough is supposed to be a bit sticky.
Transfer the dough to a piece of parchment on a cookie sheet.
Using your fingers dipped in olive oil, press and push the dough out into a round or rectangle.
Keep pressing out across the parchment. It’s a bit sticky so keep dipping your fingers in olive oil and keep pressing it out until it’s all about the same thickness and in the shape you want. The surface of your crust doesn’t have to be smooth, your toppings will be covering it anyway. I like to spread it out fairly thin so I have more room to add toppings! You can roll the edges under if you like a thicker edge.
Before adding any toppings: Transfer the crust on the parchment to the hot pizza stone or cookie sheet in the oven and cook for 8-10 minutes.
Remove from the oven and brush the entire crust with garlic-infused or regular olive oil. Then, layer on the cherry tomatoes, bacon, cheddar cheese, parmesan cheese, and basil. Season with salt and pepper.
Put the pizza back in the oven and cook for another 8-10 minutes until the edges of the crust are browning and the cheese is nicely melted.
Enjoy it while it’s hot. It’s best that way.
This post contains affiliate links so you can easily purchase items listed on the page. This is for your information and convenience. If you purchase through this link, I may earn a commission but there is no additional cost to you. Please read my disclosure for more information.
Best French toast (low FODMAP and all!)
30 minutes • Low FODMAP • Serves 6 • Great for Sunday brunch or anytime you want to indulge in some serious breakfast extravagance.
30 minutes • Low FODMAP • Serves 6 • Great for Sunday brunch or anytime you want to indulge in some serious breakfast extravagance. Take your French toast to a whole new level with this recipe. When the sourdough is soaked in the bourbon/egg mixture and combined with the butter and cinnamon sugar, it’s more like dessert than breakfast! When you top it off with our whipped coconut cream and a drizzle of maple syrup, and chopped pecans, well, that’s it!

INGREDIENTS
6 large eggs
1 1/2 cups lactose-free whole milk or lactose-free half and half
2 tablespoons bourbon (optional)
1 tablespoon vanilla extract
1/4 teaspoon fresh ground nutmeg
6 slices traditional sourdough bread*
1/4 cup granulated sugar
2 teaspoons ground cinnamon
1 tablespoon butter or coconut oil for the pan
FOR SERVING (all optional):
Pecans, finely chopped
DIRECTIONS:
In a large 9x13 inch baking dish, whisk together the eggs, milk, bourbon, vanilla, nutmeg, and a pinch of salt. Add the bread slices, and turn to coat. Let the bread sit 10 minutes, then flip and let sit another 10 minutes.
In a small bowl, combine the sugar and cinnamon.
When ready to cook, melt the butter in a large skillet over medium heat. Cook the toast until lightly golden 2-3 minutes, then flip and cook 3-5 minutes, until deeply golden. Sprinkle the cinnamon sugar on top of each piece of toast. Flip the toast, cinnamon-sugar side facing down, and cook 2-3 minutes more until the sugar is golden brown and caramelized.
Plate the french toast cinnamon sugar side facing up. Sprinkle each piece lightly with cinnamon sugar. Serve with our whipped coconut cream, a dusting of chopped pecans, and a drizzle of maple syrup.
Enjoy!
*Traditional sourdough bread will never list “yeast” or “vinegar” in the ingredients. If the ingredients are free of these two things then you can be confident it’s made in the traditional way (that includes wild yeast and fermentation to create the sour taste) and should be well-tolerated if you have IBS.
This post contains affiliate links so you can easily purchase items listed on the page. This is for your information and convenience. If you purchase through this link, I may earn a commission but there is no additional cost to you. Please read my disclosure for more information.
Four things you can do right now to get your IBS under control
Do you feel like your gut is completely out of control and you don’t know how you’re going to feel one day to the next, not to mention one HOUR to the next? Do you have a constant level of anxiety that impacts everything you do? Do you have diarrhea one day and constipation the next? Are you taking medication to combat these symptoms on a daily basis? These are all classic signs of IBS. And, if you let them, they will run your life.

You’ve got to start sometime. How about now?
Luckily there’s a much better way to live! And you can get started on that better life today with four things you can start doing RIGHT NOW that will help minimize or even eliminate your constant gut roller coaster.
Ready to give it a go?
And, if you find you need some help, motivation, inspiration, we’ve got your back there too!
Our IBS Game Changer program is proven time and time again. You can get some inspiration from our clients as they talk about their newfound freedom from IBS symptoms, ability to eat out, entertain friends, and enjoy the abundance of deliciously low FODMAP foods available to them.
Our promise to you is:
You will feel better in less than eight weeks.
You will have the knowledge you need to feel better for the rest of your life.
If you do not see results in eight weeks, we will give you your money back.*
There’s no downside. There’s only the opportunity to live a full, abundant, comfortable life.
Grab a free 15 minutes with us to see how this program could change your life.
*As explained in the program agreement
Low FODMAP bacon cheeseburger and oven fries
60 Minutes • Low FODMAP • Serves 4
60 Minutes • Low FODMAP • Serves 4 • Craving a bacon cheeseburger and fries that won’t give you a stomachache? This is it! Lean ground beef or bison burgers with extra sharp cheddar cheese and thick-sliced natural bacon are the secret to excellent flavor with a low FODMAP profile. Serve with our easy oven fries and you’ve got an excellent meal!

BURGER INGREDIENTS:
1 slice real sourdough bread
1 slightly beaten egg
1/4 cup freshly grated parmesan cheese
1/2 teaspoon dry thyme
1/2 teaspoon dry rosemary
3/4 - 1 teaspoon salt (or use Smoke n Sanity Essence of Garlic or Onion salt)
1/4 teaspoon black pepper
1 pound grass-fed organic* ground beef or ground bison (bison is delicious, leaner, and lower in saturated fat and calories than ground beef)
1/4 cup water
1 pound low FODMAP bacon
2 tablespoons garlic-infused olive oil for brushing on burgers before you grill
OPTIONAL EXTRAS:
Gluten-free (low FODMAP) hamburger buns
Romaine lettuce leaves (for the bunless among us)
Sliced extra sharp cheddar cheese
Sliced tomato
Avocado
Sauteed oyster mushrooms
Dijon mustard
OVEN FRIES INGREDIENTS:
3 pounds unpeeled russet potatoes cut into wedges or strips
3 tablespoons olive oil
1 teaspoon Kosher salt or Smoke n Sanity Essence of Garlic or Onion salt
1/2 teaspoon black pepper
OVEN FRIES DIRECTIONS:
Preheat oven to 425 degrees F.
Place cut potatoes in a large bowl and drizzle with oil, salt, or seasoned salt and pepper. Gently toss to evenly coat. Spread on a parchment-lined baking sheet in one layer. Roast for 25-30 minutes, then flip and roast for 25-30 minutes more. This may take longer depending on how thick you cut your potatoes. You want the potatoes to be deeply golden and crispy on the outside.
BACON DIRECTIONS:
Line a rimmed baking sheet with foil and lay the bacon strips on the baking sheet. Bake in your 425-degree oven for about 15 minutes until desired crispness is reached.
BURGER DIRECTIONS:
If you’re going to use your grill, preheat to medium-high (400 degrees F).
Combine all ingredients except olive oil in a bowl and mix well. I use my hands as it’s the best way to get everything really well mixed.
Shape into patties and lay on a parchment-lined platter or rimmed baking sheet. If you’re not cooking them right away, keep them in the fridge so they stay nice and cold.
Before grilling (or cooking in your oven) brush the burgers with the garlic-infused olive oil then lay them, oil side down, on the grill, or oil side up in the oven. Cook to your desired doneness (about 5 minutes) then brush the top with oil and flip them. Cook for another 5 minutes or until they are to your liking. If you’re doing them in the oven, follow the same instructions. If you’re adding cheddar cheese slices, do so in the last minute or so of cooking so the cheese melts nicely into the burger.
Who needs a bun when you have these delicious oven fries? Serve fries, bacon, and cheeseburgers with any/all of the optional extras listed. Enjoy!
*Read this post to see why I recommend grass-fed and organic for all meat where possible. It’s not just humans who eat greens that have been sprayed with roundup!
This post contains affiliate links so you can easily purchase items listed on the page. This is for your information and convenience. If you purchase through this link, I may earn a commission but there is no additional cost to you. Please read my disclosure for more information.
Low FODMAP yum yum chicken and sweet potatoes
Prep 20 Minutes • Cook 40 Minutes • Gluten-free • Low FODMAP • Serves 4 - 6
Prep 20 Minutes • Cook 40 Minutes • Gluten-free • Low FODMAP • Serves 4 - 6 • This easy sheet pan dinner is perfect for company or a family weeknight meal. It’s colorful, healthy, and totally delicious!

INGREDIENTS
2 small sweet potatoes, cut into wedges or cubes (low FODMAP serving is 1/2 cup)
3 tablespoon garlic-infused olive oil
1/4 cup low sodium gluten-free soy sauce
2 tablespoons maple syrup
1-inch fresh ginger, grated
2 tablespoons toasted sesame seeds
2 pounds boneless chicken breasts, cut into 2-inch cubes
1/4 cup lactose-free sour cream
Juice from 1 lime
3 cups steamed white or brown rice
For serving: Shredded carrots, shredded red cabbage, green onions, sliced cucumbers, sliced radishes, and avocado (all optional but delicious!)
DIRECTIONS:
Preheat the oven to 425 degrees F. On a rimmed baking sheet, toss the sweet potatoes with 1 tablespoon oil, salt, and pepper. Transfer to the oven and roast for 20 minutes.
To make the savory sauce. In a glass jar, combine the soy sauce, maple syrup, ginger, 1 tablespoon garlic-infused olive oil, and the sesame seeds.
Add the chicken to a bowl and toss with half of the savory sauce. Remove the potatoes from the oven and slide them to 1 side of the pan. Add the chicken and any sauce left in the tossing bowl to the other side. Return to the oven and continue roasting another 15 minutes, until the chicken is cooked through. During the last 2-3 minutes of cooking, switch the oven to broil and broil until the chicken chars on the edges and the sauce sticks to the chicken. Watch closely, the broiler can burn food fast.
Meanwhile, combine 2-3 tablespoons of the remaining savory sauce with the sour cream. Season with salt. This is the "yum yum" sauce. Reserve any remaining savory sauce for serving.
To serve, divide the rice between bowls. Top with chicken and sweet potatoes. Add additional toppings as desired. Serve drizzled with the two sauces.
Original recipe inspired by Tieghan Gerard, Half Baked Harvest
This post contains affiliate links so you can easily purchase items listed on the page. This is for your information and convenience. If you purchase through this link, I may earn a commission but there is no additional cost to you. Please read my disclosure for more information.
Four simple habits to make you and your tummy happier (based on neuroscience)
Check out our guide to four simple happiness habits that might just take you from ho-hum to oh-happy.
Who doesn’t want to be happier? I don’t know anyone who would say no when asked if they want to feel happier than they do right now—even if they are blissfully happy! Happiness is an emotion we seek and promote and revel in. And for those of us with IBS, these practices will not only make your heart and brain happy, but they just might improve your relationship with your gut too. We’ve got you! Check out our guide to four simple happiness habits that will help take you from ho-hum to oh-happy.

Here’s one thing to keep in mind human life is 50/50. If we never feel sadness we can’t really know happiness. If we never feel pain, we can’t really feel pleasure. We don’t want to expect to be happy all the time because that’s not how life works. We can, however, stack the deck in favor of inviting happiness into our lives on a regular basis by adopting certain practices that have been scientifically proven to facilitate the experience of happiness.
Practice being thankful. Simply ask yourself this question “What am I grateful for?” Then, write down all the things you can think of. Keep in mind many of these things can be very basic. I’m grateful to be alive. I’m grateful to have a functioning body. I’m grateful to have a roof over my head. I’m grateful to have enough food to eat. I’m grateful to have a loving spouse, partner, child, dog, cat, iguana. Once you’ve covered the basics, you can look for the more nuanced things you are grateful for. How about a clean house, a mowed lawn, an oiled hinge, a beautiful sunrise, the sound of the ocean…I’m sure you can think of a very long list. And you can add to it every day because every new day is something in and of itself to be thankful for.
Make time for exercise. We cover this a lot in our program. Daily gentle exercise is really good for those of us with IBS because it keeps things moving, raises our spirits, in many cases gets us outside with a buddy or two (which compounds the benefits of the exercise), and keeps our joints and muscles working well.
The key to adding exercise to your life is not to make it too difficult! You can set yourself up for failure if you decide “exercise” means at least an hour with sweating and pain involved. That doesn’t sound very appealing. I think I would pass on that.
Too much exercise can take our body’s resources away from digesting our food and can cause us more stress than it does good. There’s a big range of what is “right” for each of us so listen to your body and monitor your own response to exercise. Then adjust the intensity and amount for optimum results.
I recommend people who don’t exercise at all start by walking around the block just once. Then increase it to twice. Then go from there. I myself walk about 3 miles a day. Some days I do less and some days I do more but I always get out for at least a short walk. It has become a habit. Like brushing my teeth. Once it’s a habit you don’t even have to think about it. It just happens. And guess what? YOU are the beneficiary!
Adopt a healthy diet. This is a big one for people, like you and me, who have IBS. About 80% of people can see a marked improvement in their IBS symptoms by switching to a low FODMAP diet followed by a specific protocol to challenge FODMAPs back into the diet. A healthy diet when you have IBS should be as broad and varied as possible — without triggering your IBS symptoms.
That’s why we constantly publish new Deliciously Low FODMAP™ recipes to inspire you to try new things, expand your palate, and delight your whole family. We emphasize eating less processed, more organic, and non-GMO foods when you have IBS because they are likely to have fewer hidden triggers that come from our industrialized food production system. Don’t forget, eating a healthy diet includes drinking plenty of water too.
Give someone else a helping hand. This is a wonderful practice that is scientifically proven to help you feel happy and connected. It benefits the person (or people) you’re helping too! Win. Win. It can be something easy and quick or long and committed but either way, it can help you feel connected and happy. For me, developing delicious simple low FODMAP recipes, IBS-friendly tips and tools, and sharing them with all of you makes me very happy and I thank you for your interest and your gratitude. It inspires me every day! I also volunteer my time and bring treats to my family, friends, and neighbors. Not every day but once in a while. It’s so easy and fun.
What is it for you?
How about volunteering your time, donating your talent and/or your treasure, to the local library, food pantry, charity of your choice? These are wonderful ways to help others. You can also help in small ways if you tune your attention to find and address small needs all around you. How about offering to walk your neighbor’s dog, mow their lawn, rake their leaves, bring them dinner? How about dropping off flowers or some treats when it’s not the holidays. Just for fun! How about sending a letter and making a connection with someone who might be lonely.
There’s so much we can all do to help ourselves and those around us feel happy. You don’t have to make major changes in your life to reap the benefits. Start small and let it blossom. And remember to appreciate the times you are not feeling happy too. That 50/50 balance will make you appreciate happiness so much more.
Deliciously Low FODMAP is a trademark of IBS Game Changer, LLC. All rights reserved.
Low FODMAP risotto a la carbonara
Prep 5 Minutes • Cook 25 Minutes • Gluten-free • Low FODMAP • Serves 4
Prep 5 Minutes • Cook 25 Minutes • Gluten-free • Low FODMAP • Serves 4 • This risotto “a la carbonara” (what better combo than bacon, eggs, and parmesan cheese?) is right up there with my favorite comfort foods. It’s quick to make and the result is creamy, flavorful, and oh so comforting. I love scrambling the leftovers with a couple of eggs for breakfast or lunch the next day!

INGREDIENTS:
8 ounces bacon or pancetta, diced
4 teaspoons garlic-infused olive oil
1 1/3 cups Arborio rice (Japanese sushi rice also works)
1 cup dry vermouth or white wine
6 to 7 cups low FODMAP chicken broth, kept hot in a separate saucepan over low heat
4 egg yolks
1/4 cup lactose-free whole milk
Freshly ground black pepper, to taste
1/2 - 1 cup finely grated Parmesan cheese, plus more for garnish
DIRECTIONS:
Starting from a cold pan, heat the bacon or pancetta in the olive oil until it has crisped up significantly and rendered down much of its fat, about 5 minutes. Transfer to a paper towel-lined plate and set aside for later. Pour out the fat, reserving 1 tablespoon in the pan. Sauté the rice in the pan for about a minute. Add the wine and continue to cook until all the liquid is absorbed.
Slowly stir in the hot chicken broth, one ladleful at a time, only adding more once the last addition has been fully absorbed by the rice. This should take about 16 minutes. When you're nearing the end of your broth, taste your rice: Is it al dente? That is, soft on the outside with a tiny bite left in the center of the grain? When it's at this stage, remove from heat, cover, and let sit to finish cooking while you prepare the egg mixture.
In a small bowl, whisk together the egg yolks, whole milk, black pepper, and as much parmesan cheese as you want (you can add more later).
Fold the egg mixture into the still-warm risotto, loosening it up a bit.
Serve your risotto topped with the reserved crispy bacon or pancetta, a more grated (or shaved) parmesan, and a few grinds of freshly ground black pepper.
Enjoy!
Original recipe inspired by Food52
This post contains affiliate links so you can easily purchase items listed on the page. This is for your information and convenience. If you purchase through this link, I may earn a commission but there is no additional cost to you. Please read my disclosure for more information.